Agile Integration Best Practices Using an IBM GitOps Automation Framework
- Lab Overview
- Prerequisites
- Business Context
- Automation Framework Introduction
- Lab Environment
- 0 - Preparation
- 1 - Clone Repositories
- 2 - Explore the Environment
- 3 - Prepare the Subscription
- 4 - Deploy ACE and ES instances
- 5 - Activate MQ Queue Manager
- 6 - Customize Event Streams
- 7 - Configure ACE
- 8 - Customize APIC
- 9 - Check the Demo Assets
- Summary
Lab Overview
Have you received requests to deliver a Multi-style Integration demo or PoC, and you don’t know how to quickly prepare this environment? You are on the right place. In this session, you will learn how to prepare a demo/PoC environment using GitOps automation framework. This environment will include different assets, capabilities, services and applications of IBM Cloud Pak for Integration.
The first main goal of this session is to provide you a complete CP4I environment with multiple demo assets to be ready to progress your sales opportunity. This first goal is achieved by reusing a multi-style integration demo assets.
The second goal is to provide this environment quickly and easily, by using the GitOps automation framework, more details here about Cloud Pak Production Deployment Guides.
This document was created for Senior Technical Specialists, and we know you are one of them. Because of that, instead to have very detailled steps, we have high level directions about what you need to do. There are some challenges that we don’t explain how to do them, but we are pretty sure that you can do it! But let the proctors know if you have any issue to complete the challenges.
As part of the evalution process of this session, at the end, you will need to capture and upload screenshots of your final progress. In this document, you will see some references about the necessary screenshots.
In this session you will learn:
- the IBM opinionated point of view regarding a GitOps centric method to manage RHOCP infrastructure, IBM integration software and application workload code (three tier GitOps architecture).
- how to develop, review, and extend an IBM GitOps automation repository that incapsulate key software components within the IBM Integration portfolio.
- how to position a GitOps automation framework as a key boot-strapping and operational mechanism supporting a Client PoC activity and Client adoption.
Prerequisites
- You need to have an OpenShift environment with GitOps operators. For this session, your proctor will provide you a pre-installed environment, with admin access (more details below). If you want to create your personal environment, check this video or follow the preparation section from this documentation.
- You need to have installed in your machine:
- You need to have a SalesForce account. This should have been completed as part of the Tech Academy pre-requisite work.
- You need to have a mailtrap account. This too should have been completed as part of the Tech Academy pre-requisite work.
- You have access to GitHub Organization with all repositories. Your proctor will provide that for you.
Business Context
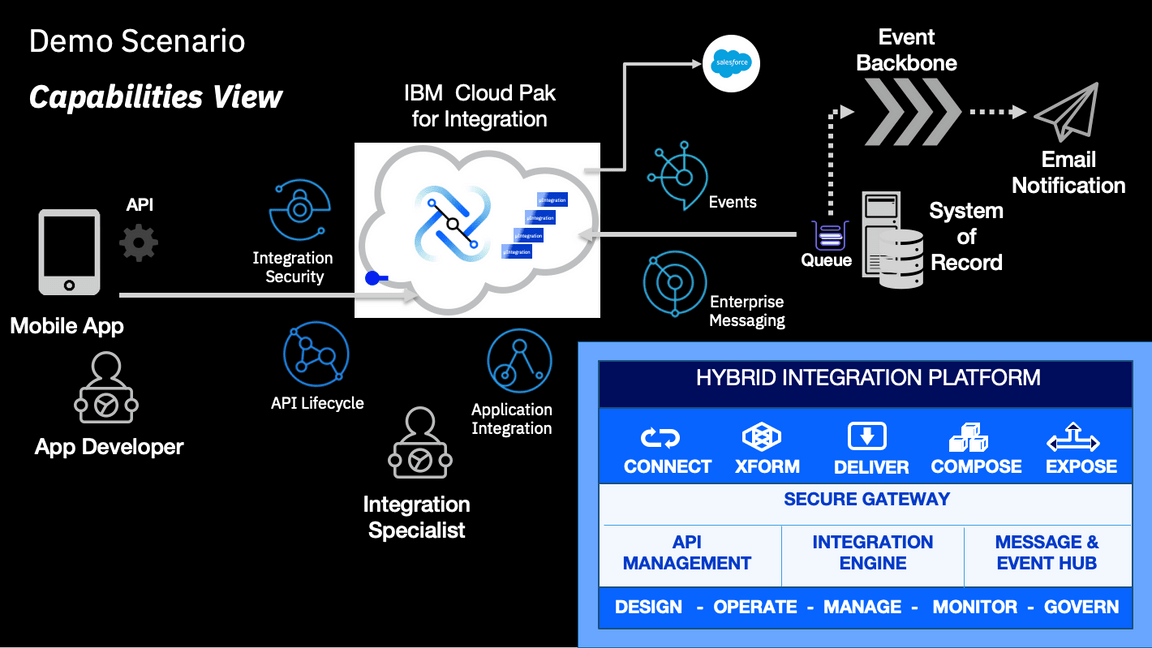
This document describes multiple use cases that highlight the multi-style integration patterns needed by an Integration Specialist to implement a digital transformation initiative that showcase the value Cloud Pak for Integration can provide.
In this case a customer has a system of record that has used for many years which ws designed to work with MQ to process requirements, and now they want to extend the application to expose an API in a asecure way as part of their mobile app.
But the requirement doesn’t end there, they are also implementing a new CRM system as a Service and they want to keep both systems in sync without having to modify the original system of record.
Additionally as part of their digital transformation initiative they want to stay closer to their clients and they want to send email notifications when the client is taking certain actions in their mobile app. To support this strategy, the enterprise architecture team wants to implement an event backbone, as part of their event driven architecture.
The following diagram provides a high level view of the scenario:
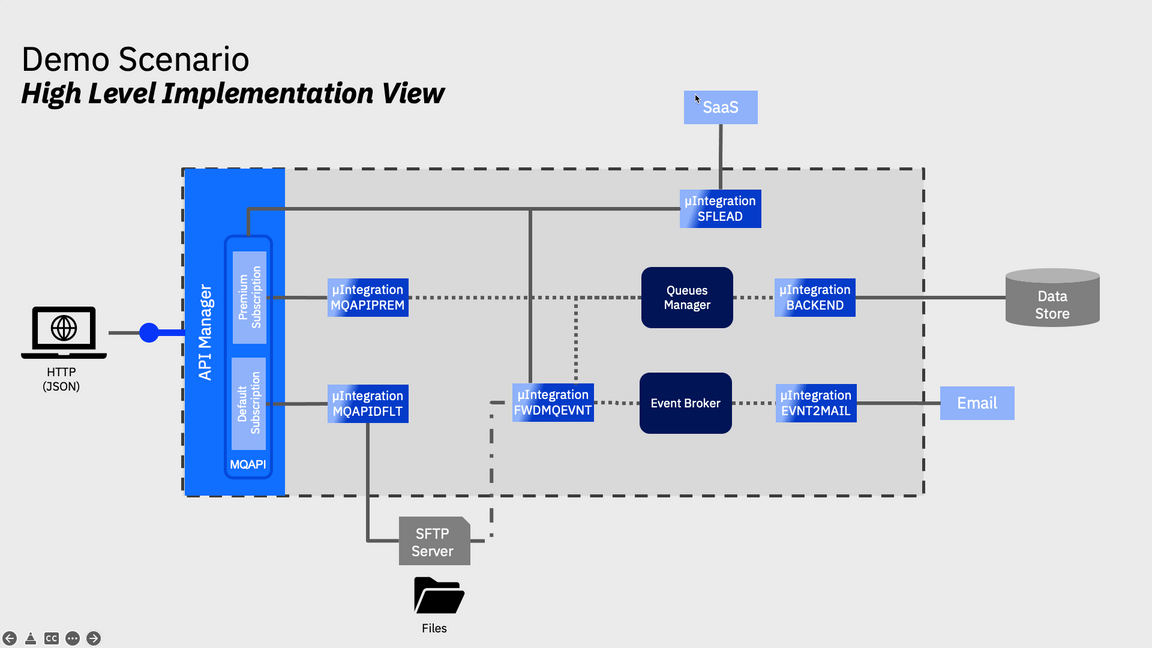
In order to implement this demo you will need to deploy an instance of each one of the following components in your OCP Cluster:
- API Connect Cluster
- Event Streams Cluster
- Queue Manager
- App Connect Enterprise Integration Servers
The following diagram provides a high level implementation view of the scenario with the core capabilities:
To demonstrate the added value capabilities provided by CP4I you will deploy an instance of the following components in your OCP Cluster:
- Platform UI (formerly known as Platform Navigator)
- Automation Foundation Assets (formerly known as Asset Repository)
- Operations Dashboard
Automation Framework Introduction
What are the Production Deployment Guides?
The Cloud Pak Production Deployment Guides document and demonstrate how to design, deploy and operate cloud-native solutions leveraging IBM Cloud Pak capabilities in Red Hat OpenShift environments. The guides focus on Production level qualities of services such as High Availability, Security and Performance including how to design, install and manage your Cluster in the popular managed and unmanaged Cloud environments as well as tackling disconnected or air-gapped environments.
Production Deployment Guide objectives
There are a number of objectives behind providing the Production Deployment Guides. The three main goals of the Guides are provided below:
- Provide opinionated, validated Production topologies
- Provide a GitOps driven automation framework
- Enable IBMers to setup Production topologies
What is GitOps?
GitOps requires us to describe the entire system declaratively in Git where the desired system state is versioned, managed and applied by software agents.
Automation is key for scale in the Cloud world and OpenShift and Cloud Paks are no different. The implementation code and artifacts provided along with these guides are based on a GitOps approach where infrastructure and everything deployed in to an OpenShift Cluster (including Cloud Paks) is described as code and is managed in the same way that application code would be.
More information on the gitops structure can be read in this page.
Lab Environment
For this session you will use a ROKS 4.8 environment with 5 nodes (b3c.16x64). Following this video, you can have a personal environment for you, including GitOps operator and configuration. But for this section, your lab proctors pre-installed this cluster for you. They already installed GitOps, created an empty GitHub Organization and forked the automation repositories that you will use, for this empty organization (check the video to see the steps already completed).
Because of time restrictions, the proctors already installed some core services of Cloud Pak for Integration, avoiding you to wait almost 90 minutes to complete this installation. In the previous sections, you will check what are installed in this environment.
0 - Preparation
In this section you will do some initial steps to prepare your environment for the lab, including accept the Account Invitation in IBM Cloud, access your cluster web console and by command line interface. Let’s start it!
Log in IBM Cloud.
Open the Notifications page (click on top right ring bell icon).
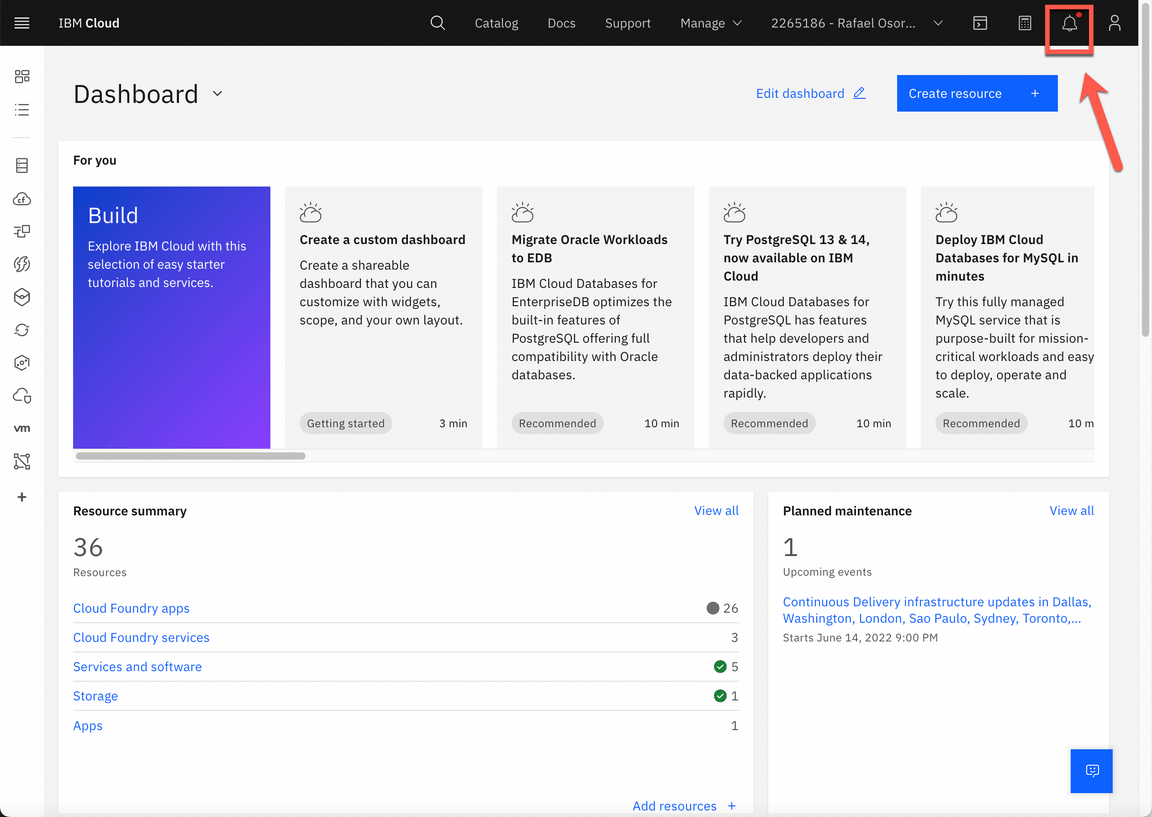
On the Notifications page, you should have an Account notification informing you that “You are invited to join an account in IBM Cloud”. Select this notification and click the Join now link.
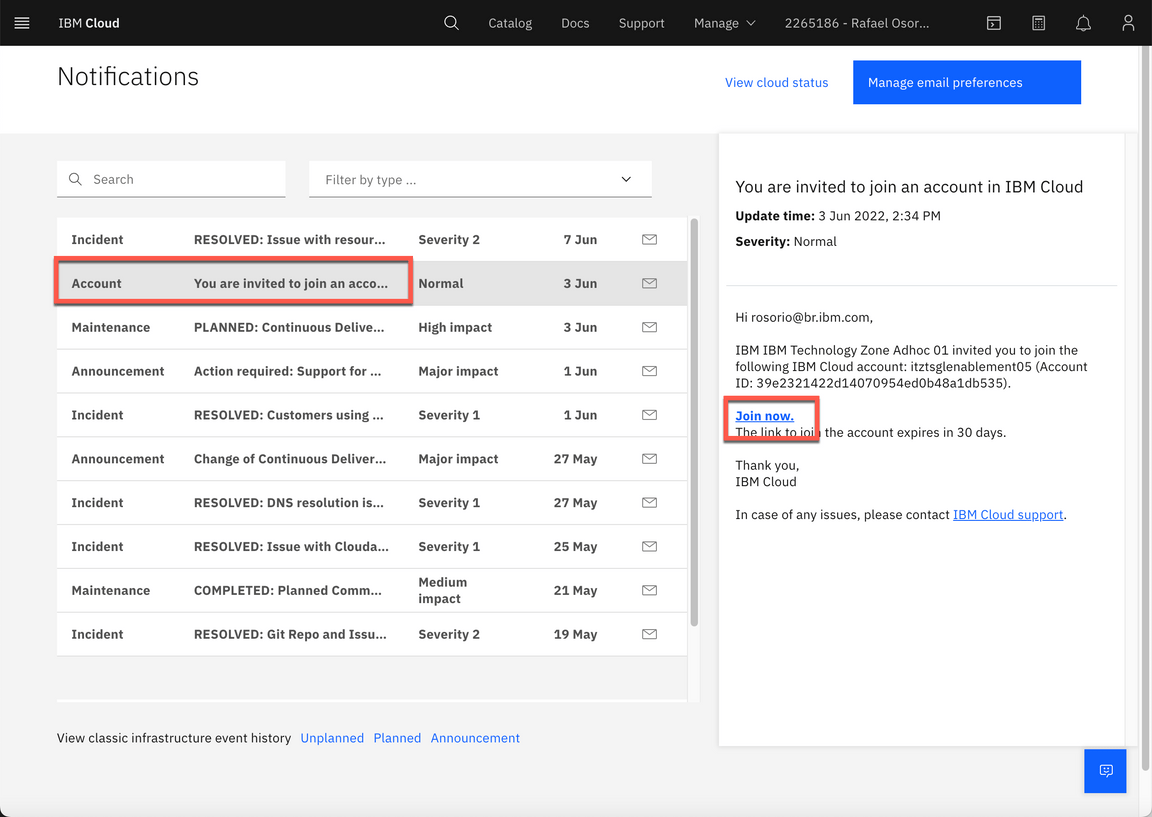
Follow the steps to accept the invitation.
Now back to the IBM Cloud dashboard, change your IBM Cloud account to 2543884 - itztsglenablement05.
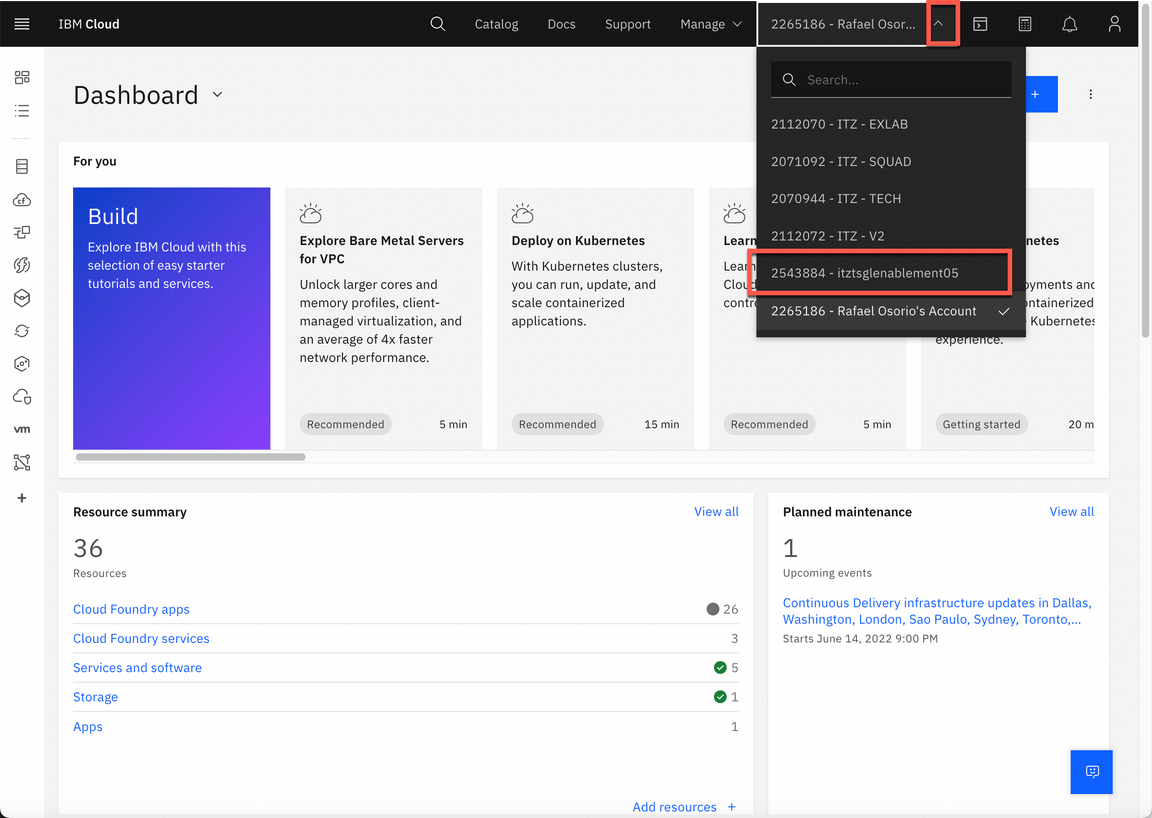
Now you have two possibilities, you can open the Team Environment page on the left of this menu and click to open your Cluster page (it is easy, isn’t?) or you can open the Openshift page on the IBM Cloud menu and look for your cluster in the Clusters’ list.
On your cluster’s page, click OpenShift web console.
Great, you are almost ready for the lab. Last but not least important, let’s copy login command to access the cluster by CLI. On the top right, click your username and select Copy login command.
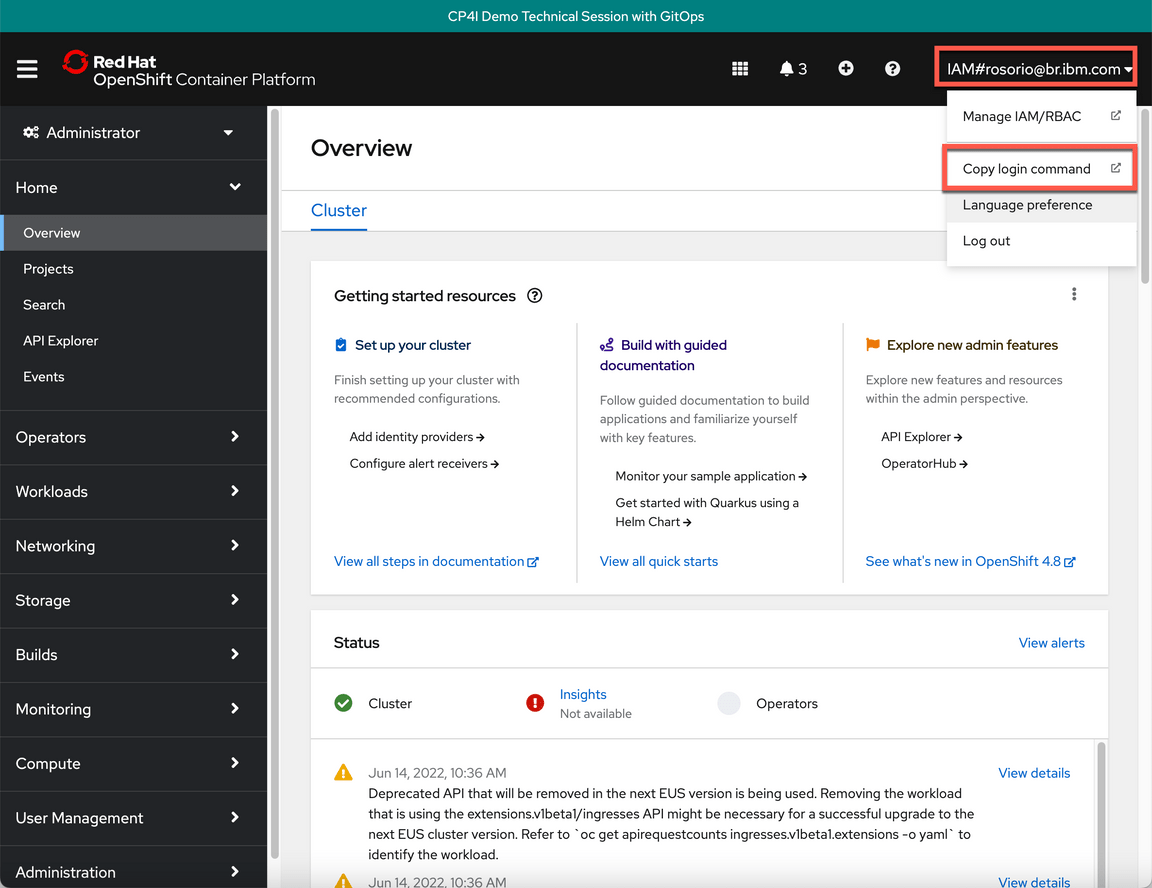
Click Display Token.
Copy the Login with this token command and paste on a terminal window.
You should have received an invitation for the GitHub Organization of your team. Don’t forget to accept it in your Github account email.
That is it! Now you are ready for the lab. Take a breath and enjoy your lab!
1 - Clone Repositories
- As explained before, you already have Github repositories for your team. On the left navigator menu, check the name of your cluster and GitHub organization. As soon as you have the name, let’s clone the repositories in your local machine. Use the command below to define your GIT_ORG variable.
export GIT_ORG={REPLACE_WITH_YOUR_GIT_ORG}
- Now let’s clone the repositories to your local machine.
mkdir ${GIT_ORG}cd ${GIT_ORG}git clone https://github.com/${GIT_ORG}/multi-tenancy-gitopsgit clone https://github.com/${GIT_ORG}/multi-tenancy-gitops-infragit clone https://github.com/${GIT_ORG}/multi-tenancy-gitops-servicesgit clone https://github.com/${GIT_ORG}/multi-tenancy-gitops-apps
- You are welcome to explore all the four repositories of the GitOps Automation framework.
2 - Explore the Environment
Now that you have all the repositories locally, let’s check what have been deployed.
Let’s start by exploring the GitOps Automation Framework YAML files. First, let’s check the kustomization.yaml in infra layer (/multi-tenancy-gitops/0-bootstrap/single-cluster/1-infra/).
Challenge 2.1:what namespaces are enabled? openshift console - check namespaces (tools ibm-common-services)Let’s explore the kustomization.yaml in services layer (/multi-tenancy-gitops/0-bootstrap/single-cluster/2-services/)
Challenge 2.2:what are the instances enabled? How can you check Platform navigator and API Connect?Let’s check the installed operators in your Cluster Web Console (there is a URL available in the Team Environments page).
Challenge 2.3:how do I see the Installed Operators in OpenShift web console?Now, let’s open the ArgoCD UI. Don’t forget to find the ArgoCD URL and admin’s password. Tip: ArgoCD is installed in the openshift-gitops namespace, just look for an opaque (type) openshift-gitops-cntk in Secrets and an openshift-gitops-cntk Routes.
Challenge 2.4:Where do I see the ArgoCD URL? Where do I get the ArgoCD admin password?In ArgoCD UI check all applications available. Check the application’s healthy status.
Let’s open the Platform navigator. Tip: All CP4I services are installed in the tools namespace. And secret name is ibm-iam-bindinfo-platform-auth-idp-credentials.
Challenge 2.5:Where do I see the Platform navigator URL? How do I get the CP4i admin’s password?Check what the Integration’s Instances are available.
Challenge 2.6:What are the instances available?
3 - Prepare the Subscription
Now it’s your time to do some actions using the GitOps Automation Framework. Let’s start by preparing some subscriptions.
Edit multi-tenancy-gitops/0-bootstrap/single-cluster/2-services/kustomization.yaml.
Uncomment the lines below.
- argocd/operators/ibm-ace-operator.yaml- argocd/operators/ibm-eventstreams-operator.yaml- argocd/operators/ibm-mq-operator.yaml
- In the multi-tenancy-gitops folder: Add, Commit and Push the changes to multi-tenancy-gitops repository.
git add .git commit -m "adding new operators"git push origin
Back to the argoCD console, refresh the 02-Services application. Maybe you need to wait few minutes to make sure that all the status are Sync and Healthy, before progressing.
Challenge 3.1:What are the new applications available in ArgoCD?Back to the OpenShift Web console, check if there are new operators available.
Challenge 3.2:What are the new operators? How to check them?
4 - Deploy ACE and ES instances
Now, let’s create App Connect Enterprise and Event Streams instances using the GitOps Automation Framework.
Edit multi-tenancy-gitops/0-bootstrap/single-cluster/2-services/kustomization.yaml.
Uncomment the lines below.
- argocd/instances/es-demo.yaml- argocd/instances/ace-infra.yaml
- In the multi-tenancy-gitops folder: Add, Commit and Push the changes to multi-tenancy-gitops repository.
git add .git commit -m "deploying ace and es"git push origin
Back to the argoCD console, refresh the 02-Services application. Maybe you need to wait few minutes to make sure that all the status are Sync and Healthy, before progressing.
Challenge 4.1:What are the new applications available in ArgoCD?Back to the OpenShift Web console, check if there are new operators available.
Challenge 4.2:What are the new operators?Back to CP4i Platform Navigator, check if the new instances are available and ready.
Challenge 4.3:How to check if the instances are available in Platform Navigator?
5 - Activate MQ Queue Manager
Now, let’s start the application layer. First we need to create the MQ Queue Manager.
Edit multi-tenancy-gitops/0-bootstrap/single-cluster/3-apps/kustomization.yaml.
Uncomment the line below.
- argocd/sko-sample/mqmgr.yaml
- In the multi-tenancy-gitops folder: Add, Commit and Push the changes to multi-tenancy-gitops repository.
git add .git commit -m "mq queue manager"git push origin
Back to the argoCD console, refresh the 03-Application application. Maybe you need to wait few minutes to make sure that all the status are Sync and Healthy, before progressing.
Challenge 5.1:What are the new applications available in ArgoCD?On the OpenShift Web Console page, check the qmgr-demo are running.
On the CP4i Platform Navigator page, check the Queue Managers.
Challenge 5.2:How many Queue Managers are available? How do you check them?
6 - Customize Event Streams
Now, let’s create the Event Streams resources for our Multi-Style demo.
Edit multi-tenancy-gitops/0-bootstrap/single-cluster/3-apps/kustomization.yaml.
Uncomment the line below.
- argocd/sko-sample/eventstream.yaml
- In the multi-tenancy-gitops folder: Add, Commit and Push the changes to multi-tenancy-gitops repository.
git add .git commit -m "customize ES"git push origin
Back to the argoCD console, refresh the 03-Application application. Maybe you need to wait few minutes to make sure that all the status are Sync and Healthy, before progressing.
Open the eventstream application and check the log of es-demo-setup-job-??? pod.
You should see a failure that statefulsets.apps is forbidden. Let’s fix it! Edit multi-tenancy-gitops-apps/sko-sample/eventstream/es-demo-setup-job-sa-role.yaml.
In the Rules section, create a new rule with the content below and save the new YAML file.
- apiGroups: ["apps"]resources: ["statefulsets"]verbs: ["get", "watch", "list"]
- In the multi-tenancy-gitops-apps folder: Add, Commit and Push the changes to multi-tenancy-gitops-apps repository.
git add .git commit -m "apps statefulsets permission"git push origin
Back to the argoCD console, refresh the eventstream application. Maybe you need to wait few minutes to make sure that all the status are Sync and Healthy.
Now you need to delete es-demo-setup-job to re-run the pod.
Now let’s check the log of es-demo-setup-job-??? pod again.
Wow, another failure!! Now with route. Follow the same approach of the previous error, but now include a rule to resources routes in the apiGroups route.openshift.io and repeat the same verbs of the previous rule.
Repeat steps 8 to 11, to deploy the changes.
7 - Configure ACE
Now, let’s work with Application Connect Enterprise. In this part, you are configuring artifacts, secrets and certificates.
Open the multi-tenancy-gitops-apps/sko-sample/ace-00-configs folder.
Execute the commands below to generate the configuration YAML files.
- SF_USER is [Email addess used to log into Salesforce]
- SF_PWD is [Password used to log in][token received in email]
- SF_CLIENT_ID is [Consumer Key]
- SF_CLIENT_SECRET is [Consumer Secret]
- MAILTRAP_USER is [Mailtrap SMTP User]
- MAILTRAP_PWD is [Mailtrap SMTP Password]
./06-ace-config-barauth-github.sh./07-ace-config-policy-mq.shSF_USER=<my-sf-user> SF_PWD=<my-sf-pwd> SF_CLIENT_ID=<my-sf-client-id> SF_CLIENT_SECRET=<my-sf-client-secret> SF_LOGIN_URL="https://login.salesforce.com" ./08-ace-config-accounts-sf.sh./10-ace-config-policy-es-scram.sh./11-ace-config-setdbparms-es-scram.sh./12-ace-config-truststore-es.sh./13-ace-config-policy-udp.sh./14-ace-config-policy-email.shMAILTRAP_USER=<user> MAILTRAP_PWD=<pwd> ./15-ace-config-setdbparms-email.sh
Verify that there are 9 YAML files generated in the ace-00-configs folder.
Edit multi-tenancy-gitops-apps/sko-sample/ace-00-configs/kustomization.yaml file.
Uncomment the lines below (all the content).
- ace-config-accounts-designer.yaml- ace-config-policy-es-scram.yaml- ace-config-setdbparms-es-scram.yaml- ace-config-truststore.yaml- ace-config-policy-udp.yaml- ace-config-policy-email.yaml- ace-config-setdbparms-email.yaml
- In the multi-tenancy-gitops-apps folder: Add, Commit and Push the changes to multi-tenancy-gitops-apps repository.
git add .git commit -m "ace config"git push origin
Edit multi-tenancy-gitops/0-bootstrap/single-cluster/3-apps/kustomization.yaml file.
Uncomment the lines below (all the content).
- argocd/sko-sample/ace-00-configs.yaml- argocd/sko-sample/ace-backend.yaml- argocd/sko-sample/ace-evnt2mail.yaml- argocd/sko-sample/ace-fwdmqevnt.yaml- argocd/sko-sample/ace-mqapidflt.yaml- argocd/sko-sample/ace-mqapiprem.yaml- argocd/sko-sample/ace-sflead.yaml
- In the multi-tenancy-gitops folder: Add, Commit and Push the changes to multi-tenancy-gitops-apps repository.
git add .git commit -m "ace config"git push origin
Back to the argoCD console, refresh the 03-Application application. Maybe you need to wait few minutes to make sure that all the status are Sync and Healthy, before progressing.
Back to Platform Navigator, open App Connect Dashboard (Run > Integration) and check the Integration servers.
8 - Customize APIC
Now, let’s create the Provider Organization and Publish the API in APIC.
Go to the folder multi-tenancy-gitops-apps/sko-sample/apic-cust.
Now let’s configure APIC to submit emails when necessary (e.g.: Portal Users registration). Run the script to generate the APIC mail secret using Mailtrap.
- MAILTRAP_USER is [Mailtrap SMTP User]
- MAILTRAP_PWD is [Mailtrap SMTP Password]
MAILTRAP_USER=<user> MAILTRAP_PWD=<pwd> ./apic-user-mail-secret.sh
Check that you have a Secret YAML file in your folder.
In the multi-tenancy-gitops-apps folder: Add, Commit and Push the changes to multi-tenancy-gitops repository.
git add .git commit -m "apic user mail secret"git push origin
Edit multi-tenancy-gitops/0-bootstrap/single-cluster/3-apps/kustomization.yaml.
Uncomment the line below.
- argocd/sko-sample/apic-cust.yaml
- In the multi-tenancy-gitops folder: Add, Commit and Push the changes to multi-tenancy-gitops repository.
git add .git commit -m "apic customization"git push origin
Back to the argoCD console, refresh the 03-Application application. Maybe you need to wait few minutes to make sure that all the status are Sync and Healthy, before progressing.
Open the apic-cust application. Check if the apic-setup job is successful (look at the pod’s logs).
Great, now you are ready to publish your API. Back to the OpenShift Console, open the Pods page (Workloads > Pods), on the tools namespace, filter by the word publish.
Open the pod, and go to the Terminal tab.
In the Terminal session, run ./apic-publish-api.sh.
Feel free to accept or not the limited usage tracking.
You need to authenticate in APIC to publish the API. Let’s do it! Open the URL provided in a different browser session.
If necessary log in APIC with your admin and password.
Copy the code to the Terminal tab to continue the publish process.
Great, your API is published successfully.
9 - Check the Demo Assets
Great, in this part of the lab, you will check the Demo environment and assets. On the other hand, you will collect all the evidences to prove that you were able to complete the lab (check the 3 screenshots notes).
Back to ArgoCD page, go to the main page, and check all the 35 applications are healthy.
SCREENSHOT 1- Take a screenshot of the main ArgoCD page showing 35 applications healthy. Please include your browser adddres bar showing your cluster URL.Now, let’s test your demo. Open the Platform Navigator page and go to the Integration Instances view.
Here you should see all the integrations as Ready.
SCREENSHOT 2- Take a screenshot of the Integration Instances page with all instances as ready. Please include your browser adddres bar showing your cluster URL.Then, open the API Manager (Run > API).
Click Develop APIs and products. And select JGRMQAPI.
Put your API online.
Now, let’s try it! Open the Explorer tab.
Click on POST /contacts.
Open Try it.
On the Body section, click Generate to create a request body sample.
Click Send.
If you received 200 response, your request has been processed (success). Note: if you receive a CORS issue. Open the URL, accept the risks and try again.
Now, let’s check the Integration Trace page (Operate > Integration Trace).
Close the What’s New dialog and accept the license.
Open the Traces view.
Select the entry that has all APIC ACE and MQ components in the services column.
Great, here you should have the integrated trace graph with 10 nodes, including all the demo components.
SCREENSHOT 3- Take a screenshot of the Integrated Tracepage showing all the demo components (10 nodes). Please include your browser adddres bar showing your cluster URL.
Summary
You have successfully completed this lab. In this lab you learned:
- the IBM opinionated point of view regarding a GitOps centric method to manage RHOCP infrastructure, IBM integration software and application workload code (three tier GitOps architecture).
- how to develop, review, and extend an IBM GitOps automation repository that incapsulate key software components within the IBM Integration portfolio.
- how to position a GitOps automation framework as a key boot-strapping and operational mechanism supporting a Client PoC activity and Client adoption.
Check this video later, if you want to learn how to deliver a demo using this demo environment.
So far we have focused on the “runtime” aspect of the deployment, but to provide a full demo experience, in some cases you will need to walk a customer through the assets that make up the demo scenario. If you want to have the developer experience in your demo/POC, check here how to do it.
