CP4I for Technical Sales - API Demo
- 1 - Review Demo Scenario
- 2 - Provision a Red Hat OpenShift cluster
- 3 - Access your OpenShift cluster and install the command line
- 4 - Cloning Repositories
- 5 - Setting Context
- 6 - Installing Foundational Services
- 7 – Deploying the Platform UI
- 8 - Deploying Automation Assets
- 9 - Deploying API Connect
- 10 - Deploying App Connect
- 11 - Set up Salesforce
- 12 - Connect Cloud Pak for Integration instance to your endpoints
- 13 - Configure the asset repository
- 14 - Creating Dev User for Developer Portal
1 - Review Demo Scenario
| DEMO OVERVIEW | |
|---|---|
| Scenario overview | Access applications through APIs and integrations. Use SaaS connectivity to Salesforce to create a self-service car repair API giving customers real-time estimates and integrating directly with record systems. The demo shows easy API creation with no-code App Connect Designer, rate limiting plans, security policies and self-service API consumption using the API Connect portal. |
| Demo products | Cloud Pak for Integration |
| Demo capabilities | API management; Application integration; Connectors |
| Demo intro slides | Download the Introduction and Overview slides here. |
| Demo script | A complete demo script is on the second tab above. The demo script has multiple tasks that each have multiple steps. In each step, you have the details about what you need to do (Actions), what you can say while delivering this demo step (Narration), and what diagrams and screenshots you will see. This demo script is a suggestion, and you are welcome to customize based on your sales opportunity. Most importantly, practice this demo in advance. If the demo seems easy for you to execute, the customer will focus on the content. If it seems difficult for you to execute, the customer will focus on your delivery. |
| Prerequisites | You need to have installed in your machine: - oc CLI v4.6+. - github CLI - Bash Shell - JAVA v8+ - APIC CLI And you also need an account in the folllowing email service to configure your CP4I environment: - mailtrap |
| Demo authors | Rafael Osorio, Alan Glickenhouse and Callum Jackson based on Car Repair Demo created by CP4I Dev team |
| How to get support | Contact rosorio@br.ibm.com regarding issues with setting up and running this demo use case. |
2 - OpenShift Installation
IBM Cloud Pak for Integration brings together IBM’s market-leading middleware capabilities to support a broad range of integration styles and use cases. With powerful deployment, lifecycle management, and production services running on Red Hat OpenShift, it enables clients to leverage the latest agile integration practices, simplify the management of their integration architecture, and reduce cost. Cloud Pak for Integration demands an OpenShift cluster.
Follow the steps below to provision a Red Hat OpenShift Container Platform cluster on VMware on IBM Cloud.
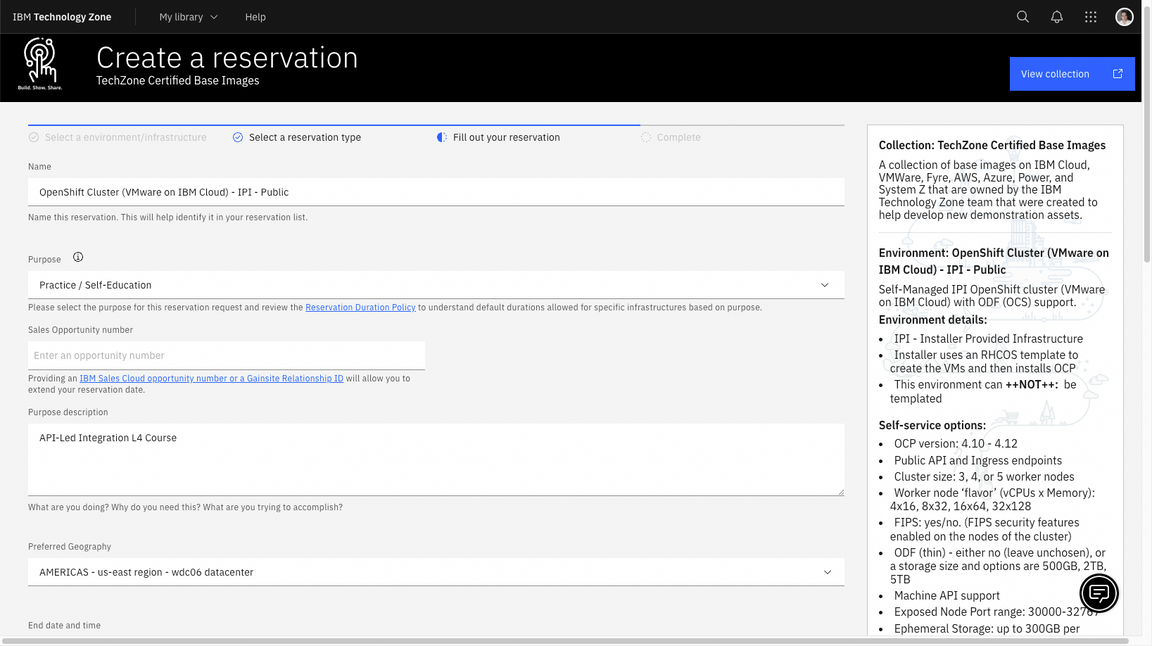
2.1 To request an OpenShift Cluster on VMware on IBM Cloud, go here and complete the form with the follow details.
| Field | Value |
|---|---|
| Purpose | If you are doing the L3 course, select Education. If you are a demo, select:Demo and inform the Sales opportunity. |
| Purpose Description | If you are doing the L3 course, enter: CP4I L3 Course. If you are delivering a Demo, enter the Demo details. |
| Preferred Geography | You are welcome to select the preferred Geography |
| Field | Value |
|---|---|
| OpenShift Version | 4.16 |
| Storage | ODF - 2 TB |
| Worker Node Count | 5 |
| Worker Node Flavor | 16 vCPU x 64 GB - 100 GB ephemeral storage |
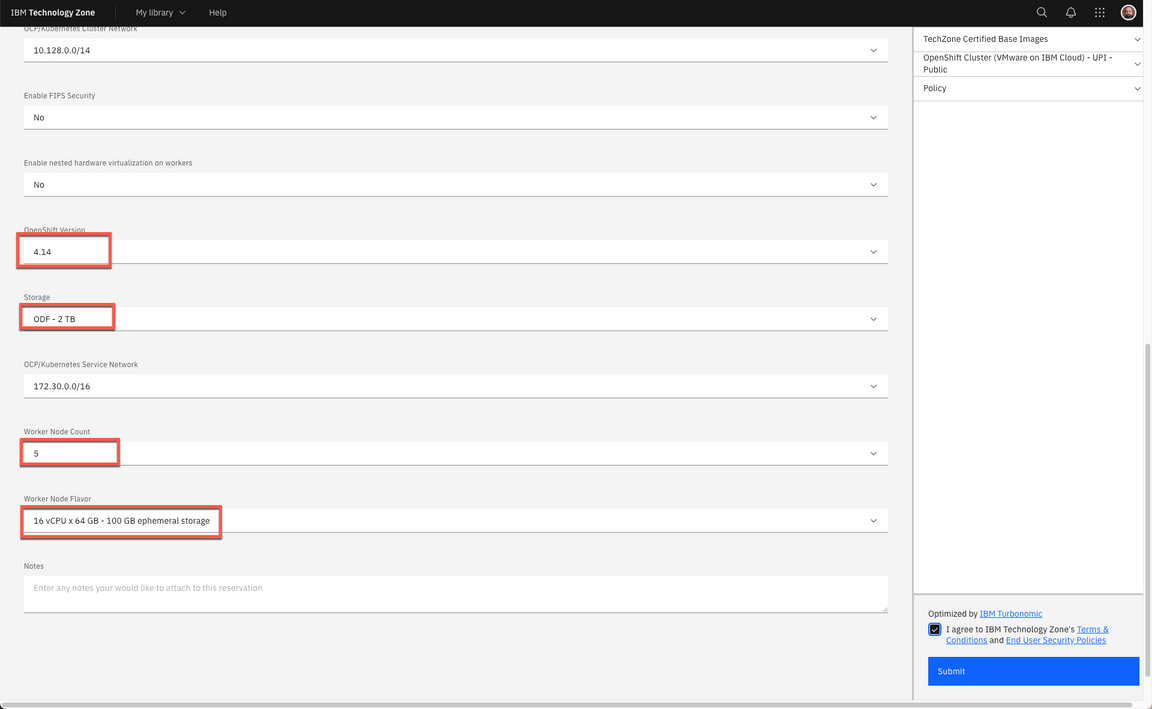
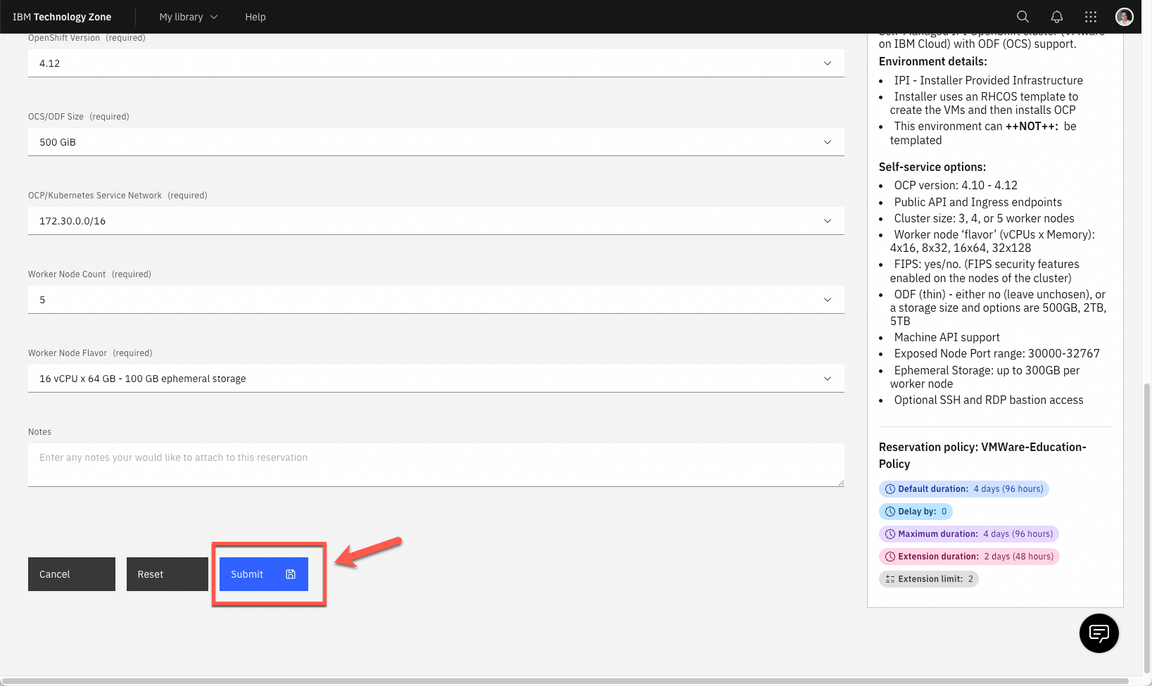
2.2 Agree with the TechZone Terms and Conditions (A) and click Submit (B).
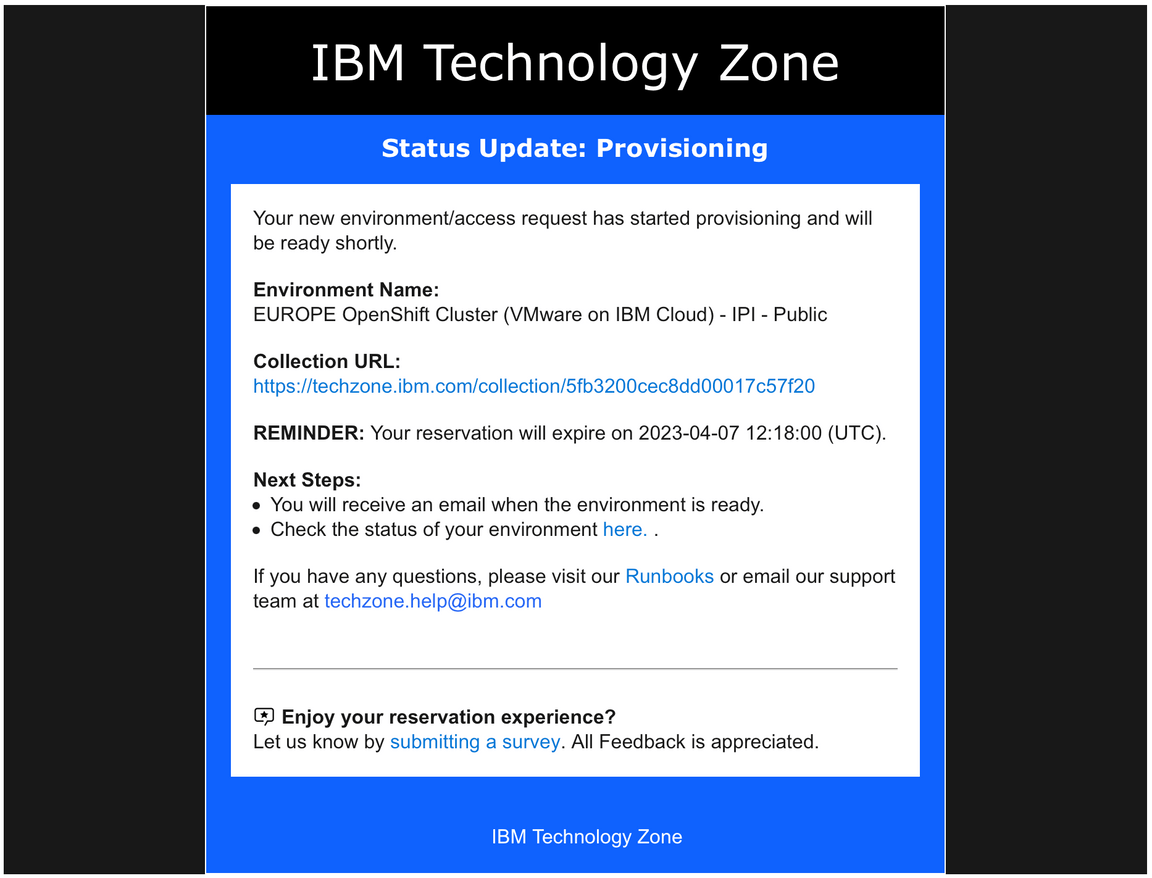
2.3 You will receive an email confirming the instance is provisioning.
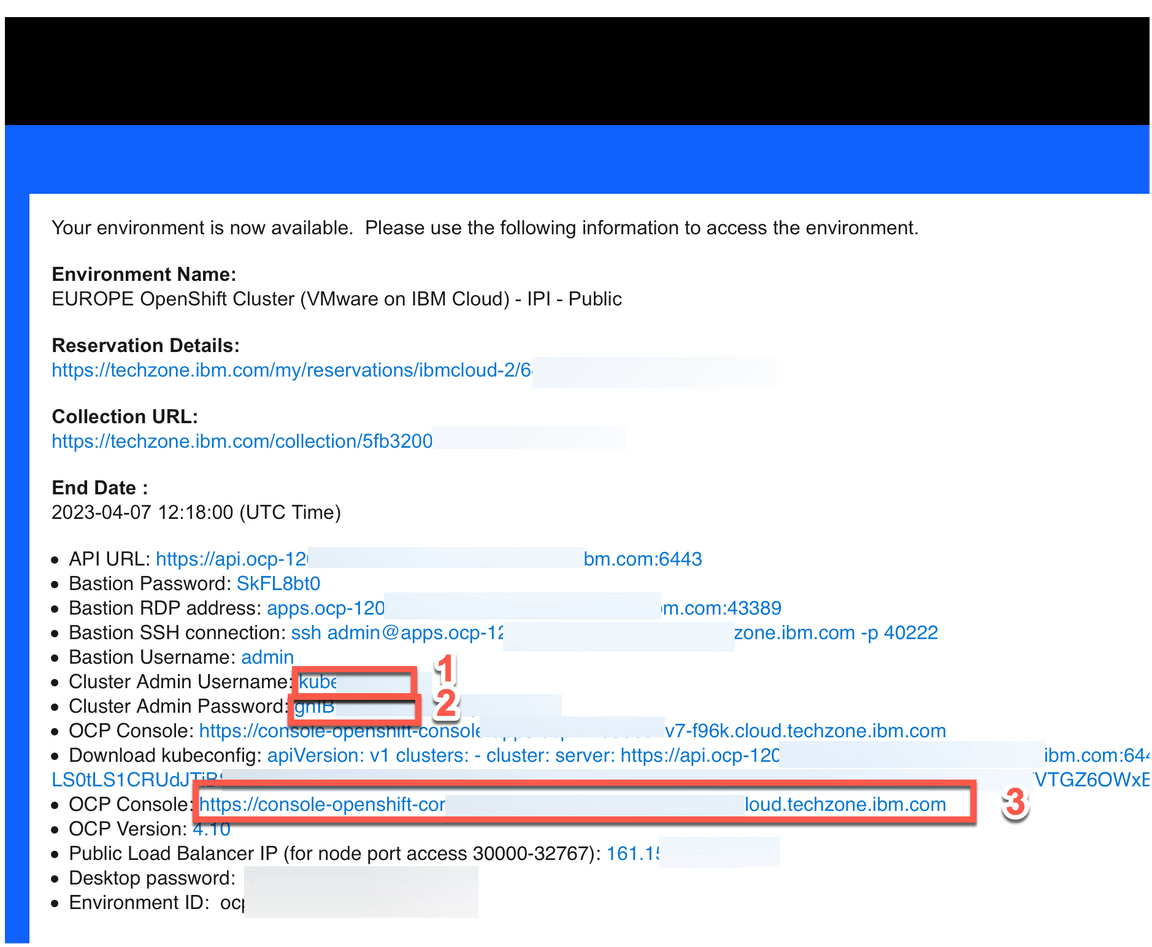
2.4 You will receive a second email once the environment is provisioned. You should expect this to take between 30 and 120 minutes. Now the status update changed to Ready. Click on Reservation ID to open the details page of your new reservation environment. Copy your Cluster Admin Username (A) and Cluster Admin Password (B). Copy the OCP Console link (C).
3 - Access your OpenShift cluster and install the command line
In this section, you access your OpenShift cluster and install the OpenShift command line tool.
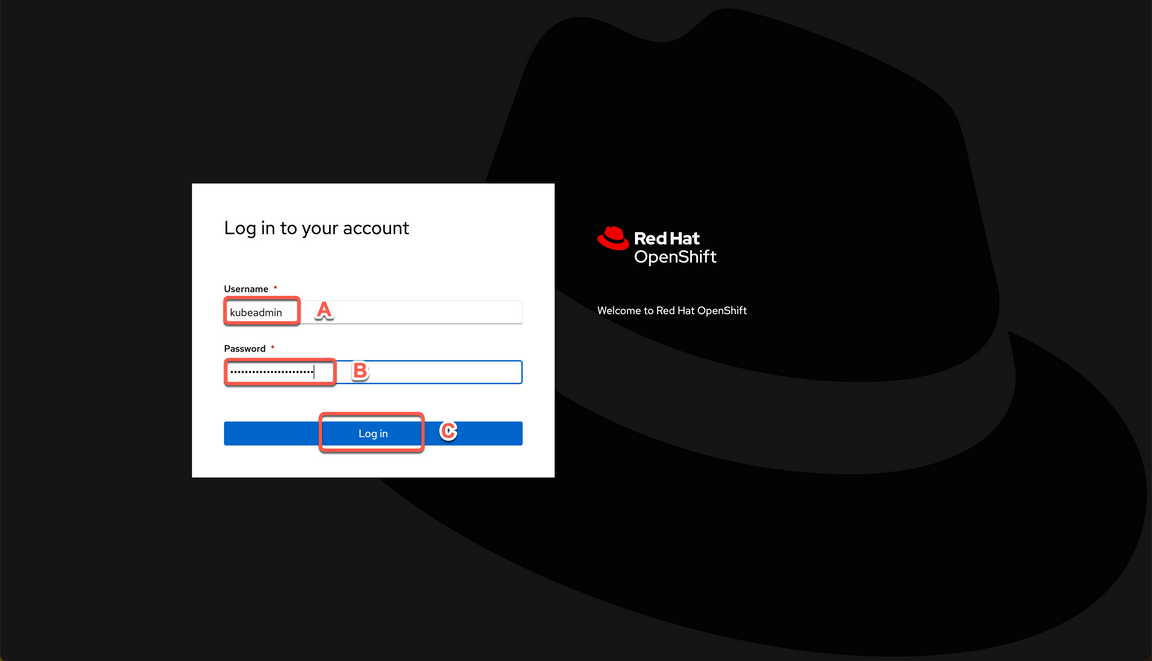
3.1 In a Browser, open the OCP Console link and paste the Cluster Admin Username (A) and Password (B) copied in the previous step and click Log in (C).
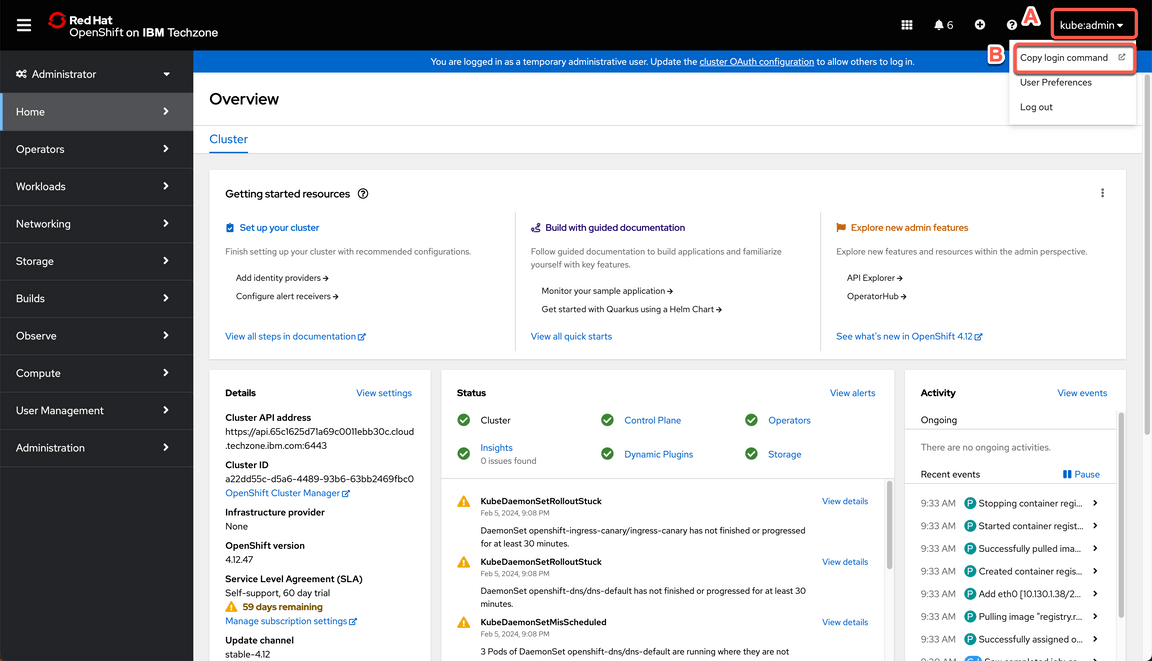
3.2 Great, you are almost ready for the demo. Last but not least important, let’s copy login command to access the cluster by CLI. On the top right, click your username (A) and select Copy login command (B).
3.3 Click Display Token.

3.4 Copy the Log in with this token command and paste on a terminal window.


That is it! Now you are ready for the Cloud Pak for Integration installation. Take a breath and let’s start to install the Pak.
4 - Cloning Repositories
To use this guide you will need to clone the CP4I end to end demo repo to your workstation. Let’s do it now!
4.1. Open a terminal window and run the command below. It is recommended you do so in a directory like /Desktop so that you can easily locate the files afterwards.
- First, authenticate your Terminal with the IBM GitHub repository with the following command:
gh auth login --hostname github.ibm.com
- Within the Terminal window, navigate through the following prompts:
- a. What is your preferred protocol for Git operations on this host? :
HTTPS - b. Authenticate Git with your GitHub credentials? :
Yes - c. How would you like to authenticate GitHub CLI? :
Login with a web browser - d. Terminal will generate a one-time code :
copy this to a notepad - e. Within your web browser, log in using your GitHub credentials
- f. Supply the one-time code and approve access to GitHub
- g. Wait until the Terminal window reports back a successful
Logged in as...
- a. What is your preferred protocol for Git operations on this host? :
4.2 Execute the following within Terminal to clone the demo repository.
gh repo clone github.ibm.com/joel-gomez/cp4i-demo
4.3 Open the cp4i-demo folder.
cd cp4i-demo
5 - Setting Context
Based on where you have deployed your OCP cluster you will need to set up some environment variables to inform the installation script about your environment. Let’s do it here!
5.1 Define an environment variable to set the CP4I version.
export CP4I_VER=16.1.0
5.2 Set the OCP type based on the storage classes in the cluster. If using a ROKS cluster, use export OCP_TYPE=ROKS instead.
export OCP_TYPE=ODF
5.3 Set mailtrap credentials, substituting <my-mailtrap-user> and <my-mailtrap-pwd>.
export MAILTRAP_USER=<my-mailtrap-user>export MAILTRAP_PWD=<my-mailtrap-pwd>
5.4 If you have provisioned the OCP cluster in Tech Zone you can use the following script to set the proper default storage class.
scripts/99-odf-tkz-set-scs.sh
5.5 Your cluster will also need access to pull the container software required to deploy the Cloud Pak. Your Entitlement Key is used to grant access. You can download you entitlement key from My IBM. Click Copy.
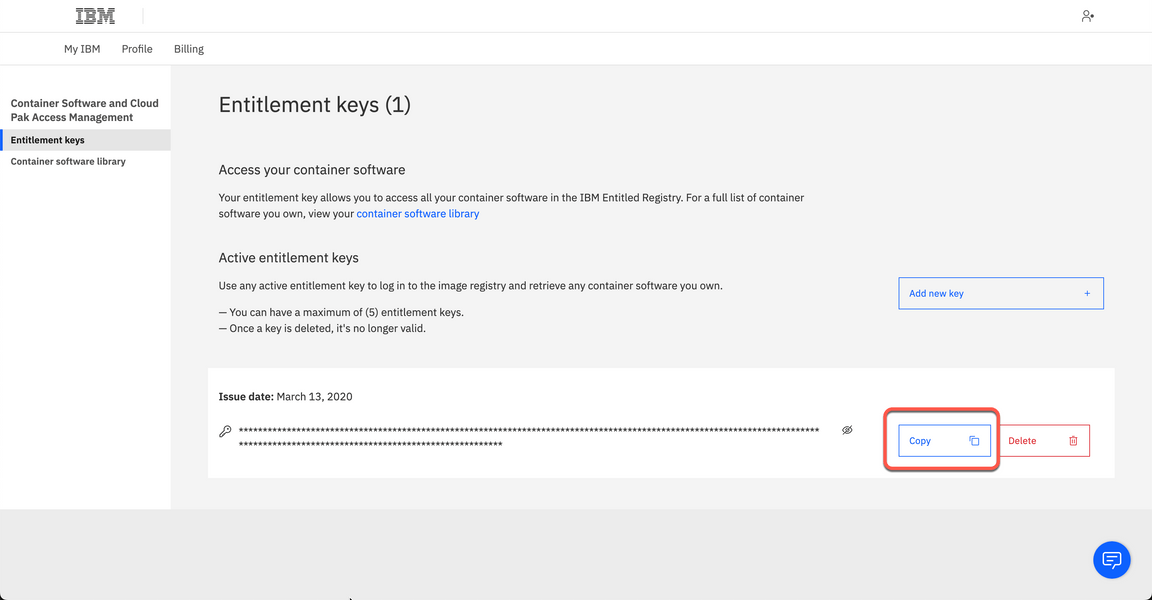
5.6 The IBM Entitled Registry contains software images for the capabilities in IBM Cloud Pak® for Integration. To allow the Cloud Pak for Integration operators to automatically pull those software images, you must first obtain your entitlement key, then add your entitlement key in a pull secret. Replace the my-key with your IBM entitlement key.
export ENT_KEY=<my-key>
5.7 Now, you need a namespace where you will deploy the different capabilities.
scripts/02a-cp4i-ns-key-config.sh
6 - Installing Foundational Services
The IBM Cloud Pak foundational services operator is no longer installed automatically. Install this operator manually if you need to create an instance that uses identity and access management (IAM). The following steps will walk you through this process.
6.1 First we need to have a certificate manager, otherwise, the IBM Cloud Pak foundational services operator installation will not complete. Let’s do it!
oc apply -f resources/00-cert-manager-namespace.yamloc apply -f resources/00-cert-manager-operatorgroup.yamloc apply -f resources/00-cert-manager-subscription.yaml
Confirm the subscription has been completed successfully before moving to the next step running the following command.
SUB_NAME=$(oc get deployment cert-manager-operator-controller-manager -n cert-manager-operator --ignore-not-found -o jsonpath='{.metadata.labels.olm\.owner}');if [ ! -z "$SUB_NAME" ]; then oc get csv/$SUB_NAME -n cert-manager-operator --ignore-not-found -o jsonpath='{.status.phase}';fi;echo
Wait for a response of Succeeded.
6.2 Install the Postgress SQL Catalog Source.
oc apply -f catalog-sources/${CP4I_VER}/01-postgress-sql-catalog-source.yaml
Confirm the catalog source has been deployed successfully before moving to the next step running the following command.
oc get pods -n openshift-marketplace | grep postgresql
Wait for a response of READY.
6.3 Install the Common Services Catalog source.
oc apply -f catalog-sources/${CP4I_VER}/02-common-services-catalog-source.yaml
Confirm the catalog source has been deployed successfully before moving to the next step running the following command.
oc get catalogsources opencloud-operators -n openshift-marketplace -o jsonpath='{.status.connectionState.lastObservedState}';echo
Wait for a response of READY.
6.4 Create the Common Services namespace.
oc new-project ibm-common-services
6.5 Install the Foundational Services operator (former Common Services).
oc apply -f subscriptions/${CP4I_VER}/00-common-service-subscription.yaml
Confirm the operator has been deployed successfully before moving to the next step running the following command.
SUB_NAME=$(oc get deployment/ibm-common-service-operator -n openshift-operators --ignore-not-found -o jsonpath='{.metadata.labels.olm\.owner}');if [ ! -z "$SUB_NAME" ]; then oc get csv/$SUB_NAME --ignore-not-found -o jsonpath='{.status.phase}';fi;echo
Wait for a response of Succeeded.
7 – Deploying the Platform UI
In this section, you will install the Platform Navigator UI. The Platform UI is a user interface for the IBM Cloud Pak for Integration that allows the user to deploy and manage instances of the integration capabilities from a central location.
Deploying the Platform UI allows you to deploy and manage instances from a central location.
7.1 First, let’s install Platform UI Catalog source.
oc apply -f catalog-sources/${CP4I_VER}/03-platform-navigator-catalog-source.yaml
Confirm the catalog source has been deployed successfully before moving to the next step running the following command.
oc get catalogsources ibm-integration-platform-navigator-catalog -n openshift-marketplace -o jsonpath='{.status.connectionState.lastObservedState}';echo
Wait for a response of READY.
7.2 Install the Platform UI Operator.
oc apply -f subscriptions/${CP4I_VER}/01-platform-navigator-subscription.yaml
Confirm the operator has been deployed successfully before moving to the next step running the following command.
SUB_NAME=$(oc get deployment ibm-integration-platform-navigator-operator -n openshift-operators --ignore-not-found -o jsonpath='{.metadata.labels.olm\.owner}');if [ ! -z "$SUB_NAME" ]; then oc get csv/$SUB_NAME --ignore-not-found -o jsonpath='{.status.phase}';fi;echo
Wait for a response of Succeeded.
7.3 Deploy a Platform UI instance.
oc apply -f instances/${CP4I_VER}/common/01-platform-navigator-instance.yaml
Confirm the instance has been deployed successfully before moving to the next step running the following command.
oc get platformnavigator cp4i-navigator -n tools -o jsonpath='{.status.conditions[0].type}';echo
Wait for a response of READY.
7.4 Once the Platform UI instance is up and running get the access info.
scripts/03b-cp4i-access-info.sh
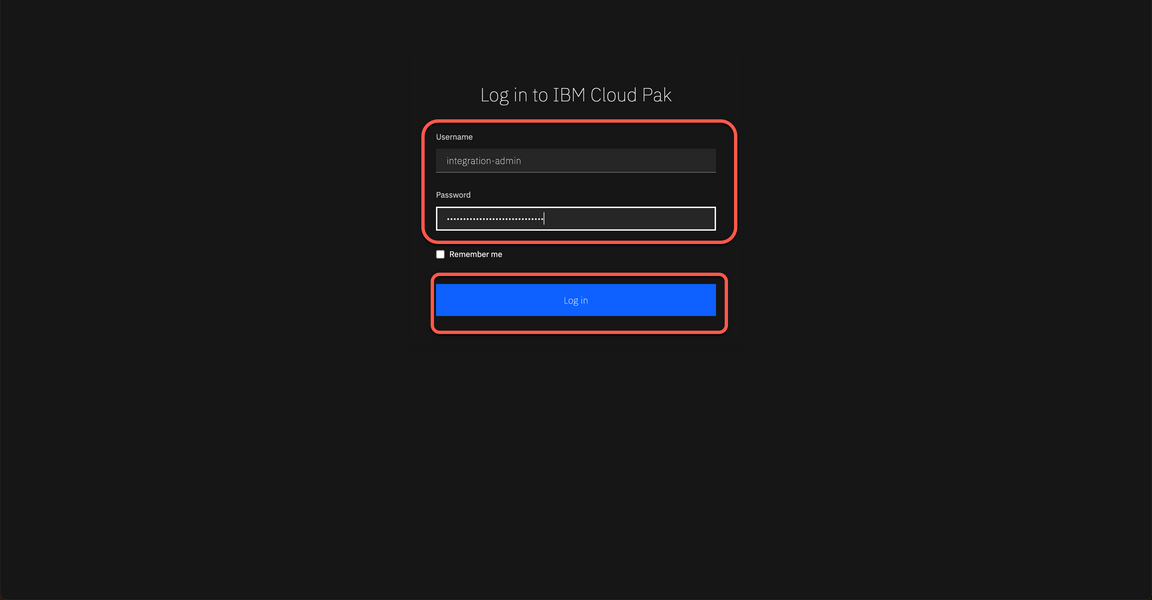
7.5 Open the Platform UI URL and log in. Note the password is temporary and you will be required to change it. Take note of your new password, you will use it multiple times.
8 - Deploying Automation Assets
In this section, you will install the Automation foundation assets(Automation Assets). It is a capability that lets you store, manage, and share integration assets.
Automation assets enables teams to share and reuse integration assets across capability instances. For example, you can import an OpenAPI specification asset within the IBM API Connect user interface.
Assets can be located in remote repositories, such as Git. This feature allows users to take advantage of the versioning capability offered by the remote repository. Assets that are stored in a remote repository are read-only.
8.1 Let’s deploy an instance of the Automation Assets using the following script:
oc apply -f catalog-sources/${CP4I_VER}/04-asset-repo-catalog-source.yaml
Confirm the catalog source has been deployed successfully before moving to the next step running the following command.
oc get catalogsources ibm-integration-asset-repository-catalog -n openshift-marketplace -o jsonpath='{.status.connectionState.lastObservedState}';echo
Wait for a response of READY.
8.2 Install Asset Repo Operator.
oc apply -f subscriptions/${CP4I_VER}/02-asset-repo-subscription.yaml
Confirm the operator has been deployed successfully before moving to the next step running the following command.
SUB_NAME=$(oc get deployment ibm-integration-asset-repository-operator -n openshift-operators --ignore-not-found -o jsonpath='{.metadata.labels.olm\.owner}');if [ ! -z "$SUB_NAME" ]; then oc get csv/$SUB_NAME --ignore-not-found -o jsonpath='{.status.phase}';fi;echo
Wait for a response of Succeeded.
8.3 Deploy an Asset Repo instance
oc apply -f instances/${CP4I_VER}/${OCP_TYPE}/02-asset-repo-ai-instance.yaml
Confirm the instance has been deployed successfully before moving to the next step running the following command.
oc get assetrepository asset-repo-ai -n tools -o jsonpath='{.status.phase}';echo
Wait for a response of Ready.
9 - Deploying API Connect
9.1 Install DataPower Catalog Source
oc apply -f catalog-sources/${CP4I_VER}/05-datapower-catalog-source.yaml
Confirm the catalog source has been deployed successfully before moving to the next step running the following command.
oc get catalogsources ibm-datapower-operator-catalog -n openshift-marketplace -o jsonpath='{.status.connectionState.lastObservedState}';echo
Wait for a response of READY.
9.2 Install DataPower Operator.
oc apply -f subscriptions/${CP4I_VER}/03-datapower-subscription.yaml
Confirm the operator has been deployed successfully before moving to the next step running the following command.
SUB_NAME=$(oc get deployment datapower-operator -n openshift-operators --ignore-not-found -o jsonpath='{.metadata.labels.olm\.owner}');if [ ! -z "$SUB_NAME" ]; then oc get csv/$SUB_NAME --ignore-not-found -o jsonpath='{.status.phase}';fi;echo
Wait for a response of Succeeded.
9.3 Install APIC Catalog Source.
oc apply -f catalog-sources/${CP4I_VER}/07-api-connect-catalog-source.yaml
Confirm the catalog source has been deployed successfully before moving to the next step running the following command.
oc get catalogsources ibm-apiconnect-catalog -n openshift-marketplace -o jsonpath='{.status.connectionState.lastObservedState}';echo
Wait for a response of READY.
9.4 Install APIC Operator
oc apply -f subscriptions/${CP4I_VER}/04-api-connect-subscription.yaml
Confirm the operator has been deployed successfully before moving to the next step running the following command.
SUB_NAME=$(oc get deployment ibm-apiconnect -n openshift-operators --ignore-not-found -o jsonpath='{.metadata.labels.olm\.owner}');if [ ! -z "$SUB_NAME" ]; then oc get csv/$SUB_NAME --ignore-not-found -o jsonpath='{.status.phase}';fi;echo
You should get responses of Succeeded for both of them.
9.5 Deploy APIC instance with some extra features enabled.
scripts/07d-apic-inst-deploy-instana.sh
Confirm the installation completed successfully before moving to the next step running the following commands.
oc get APIConnectCluster apim-demo -n tools -o jsonpath='{.status.phase}';echo
Note this will take almost 30 minutes, so be patient, and at the end you should get a Ready response.
9.6 Configure the email server in APIC.
scripts/07f-apic-initial-config.sh
9.7 Create a Provider Organization for admin user.
scripts/07g-apic-new-porg-cs.sh
10 - Deploying App Connect
10.1 Install the App Connect Catalog source.
oc apply -f catalog-sources/${CP4I_VER}/10-app-connect-catalog-source.yaml
Confirm the catalog source has been deployed successfully before moving to the next step running the following command.
oc get catalogsources appconnect-operator-catalogsource -n openshift-marketplace -o jsonpath='{.status.connectionState.lastObservedState}';echo
Wait for a response of READY.
10.2 Install the App Connect operator.
oc apply -f subscriptions/${CP4I_VER}/07-app-connect-subscription.yaml
Confirm the operator has been deployed successfully before moving to the next step running the following command.
SUB_NAME=$(oc get deployment ibm-appconnect-operator -n openshift-operators --ignore-not-found -o jsonpath='{.metadata.labels.olm\.owner}');if [ ! -z "$SUB_NAME" ]; then oc get csv/$SUB_NAME --ignore-not-found -o jsonpath='{.status.phase}';fi;echo
Wait for a response of Succeeded.
10.3 It is time to Deploy the Dashboard instance.
oc apply -f instances/${CP4I_VER}/${OCP_TYPE}/06-ace-dashboard-instance.yaml
Confirm the instance has been deployed successfully before moving to the next step running the following command.
oc get dashboard ace-dashboard -n tools -o jsonpath='{.status.phase}';echo
Note this will take few minutes, but at the end you should get a response of Ready.
10.4 Deploy Designer Authoring instance with support for Callable Flow. First let’s deploy the Switch Server instance.
oc apply -f instances/${CP4I_VER}/common/07-ace-switch-server-instance.yaml
Confirm the instance has been deployed successfully before moving to the next step running the following command.
oc get switchserver ace-switch-server -n tools -o jsonpath='{.status.phase}';echo
Wait for a response of Ready.
10.5 Deploy Designer Authoring instance.
oc apply -f instances/${CP4I_VER}/${OCP_TYPE}/08-ace-designer-local-ai-instance.yaml
Confirm the instance has been deployed successfully before moving to the next step running the following command.
oc get designerauthoring ace-designer-ai -n tools -o jsonpath='{.status.phase}';echo
Wait for a response of Ready
10.6 Now, let’s create Bar Auth Configuration.
scripts/11-ace-config-barauth-github.sh
11 - Set up Salesforce
You need a Salesforce developer account to run this demo. If you already have a Salesforce developer account, you can use that (start at step 2 below). If not, you can sign up for a free developer account by following step 1 below.
11.1 Go to Salesforce Developers. Follow the prompts on the Saleforce pages to get your free developer account.
11.2 As soon as you have your account, go back to the Salesforce log in page and log in to your developer account.
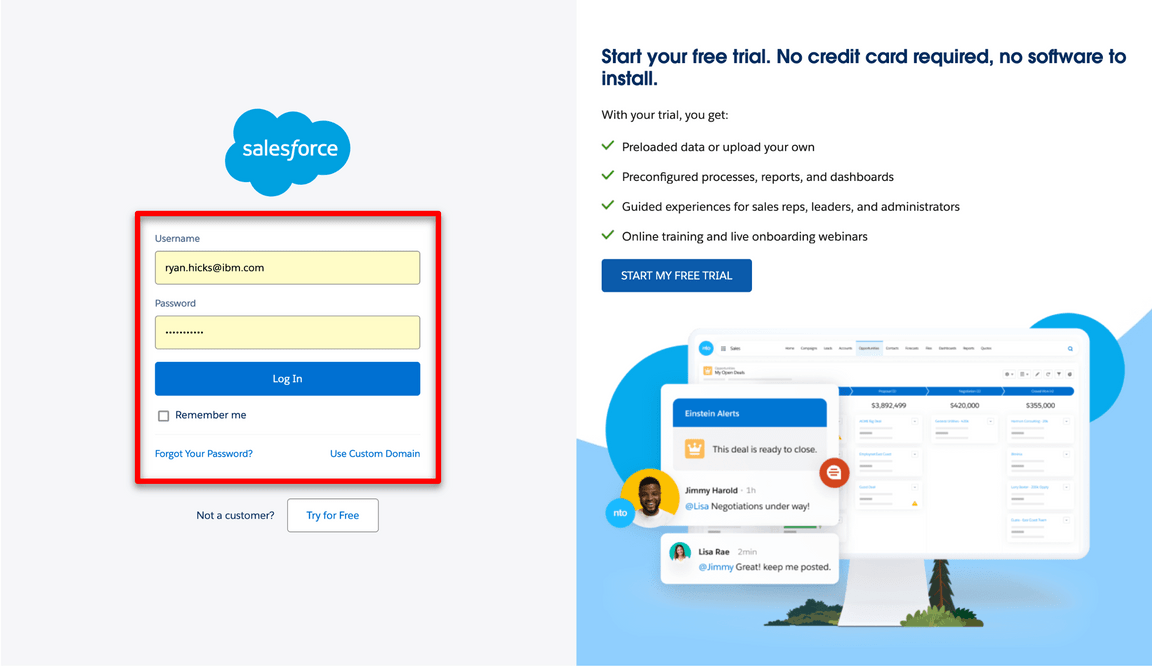
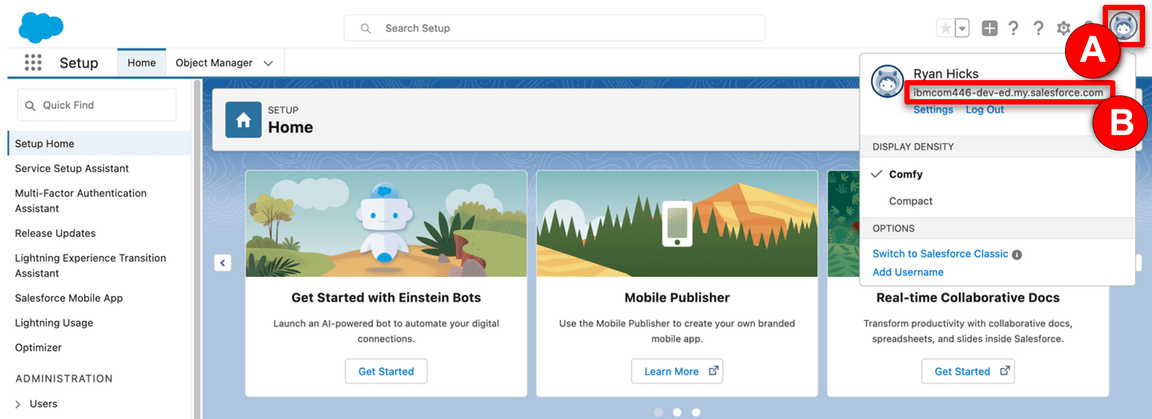
11.3 Click the profile icon (1) and save your Salesforce Login URL (2).
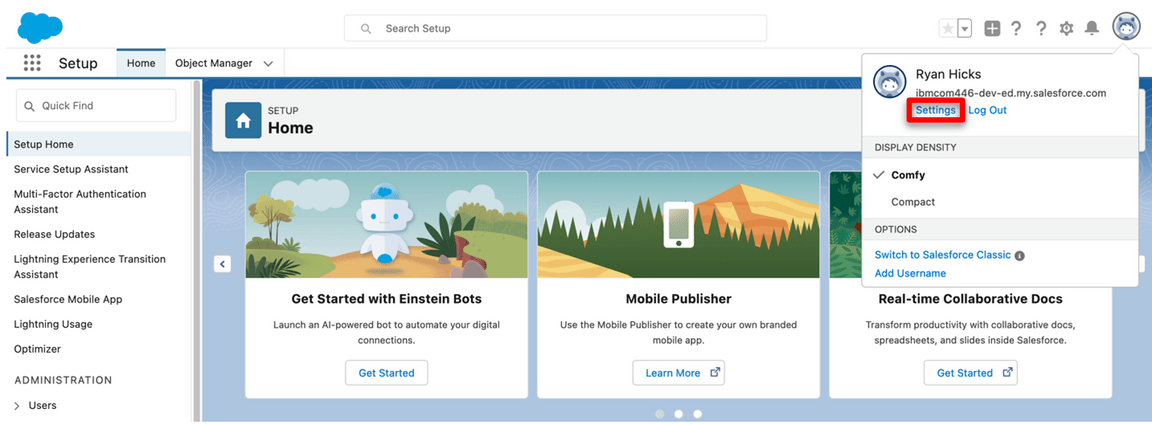
11.4 In the same user profile menu select Settings.
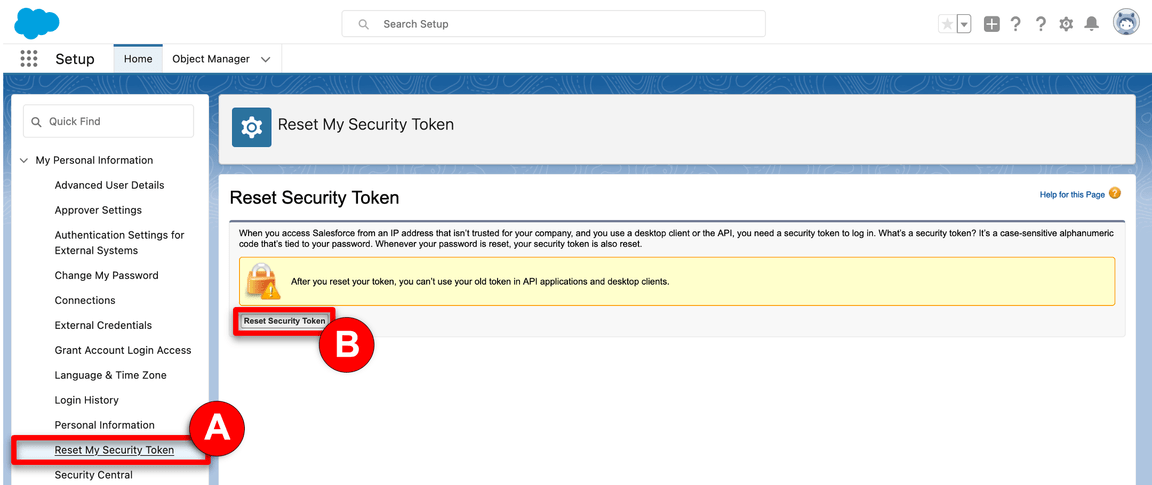
11.5 Click Reset My Security Token in the My Personal Information (1) menu. Then, click Reset Security Token (2). A newly-generated security token will be emailed to you.
11.6 Next, you will create an application representing App Connect Enterprise, and then retrieve the Consumer Key and Consumer Secret. Click the cogwheel icon (1) and select Setup (2).

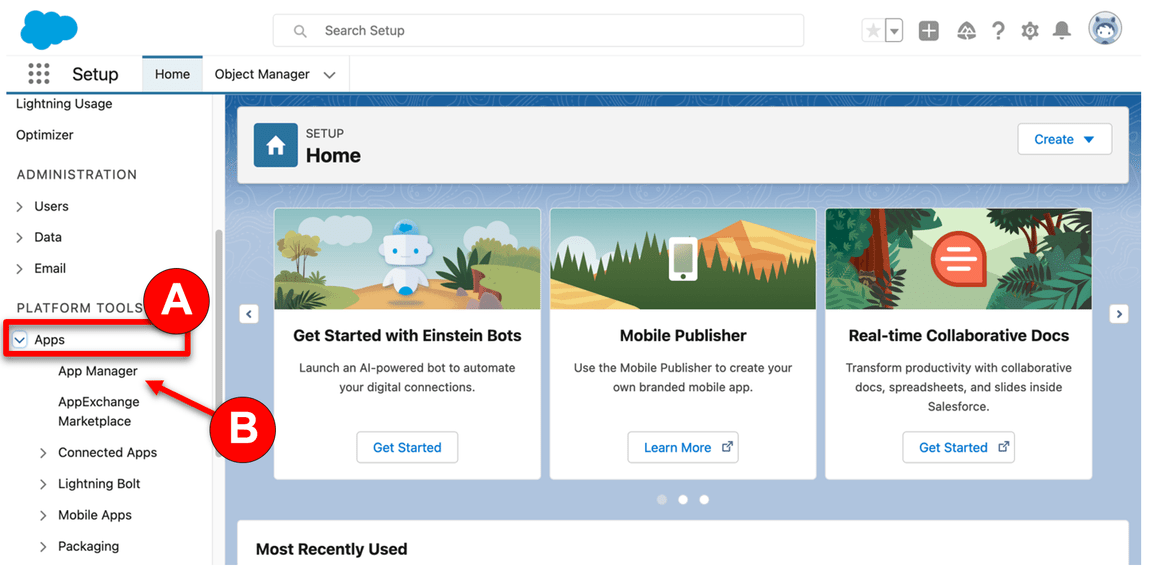
11.7 In the navigator on the left-hand side, scroll to PLATFORM TOOLS, expand Apps (1), and click App Manager (2).
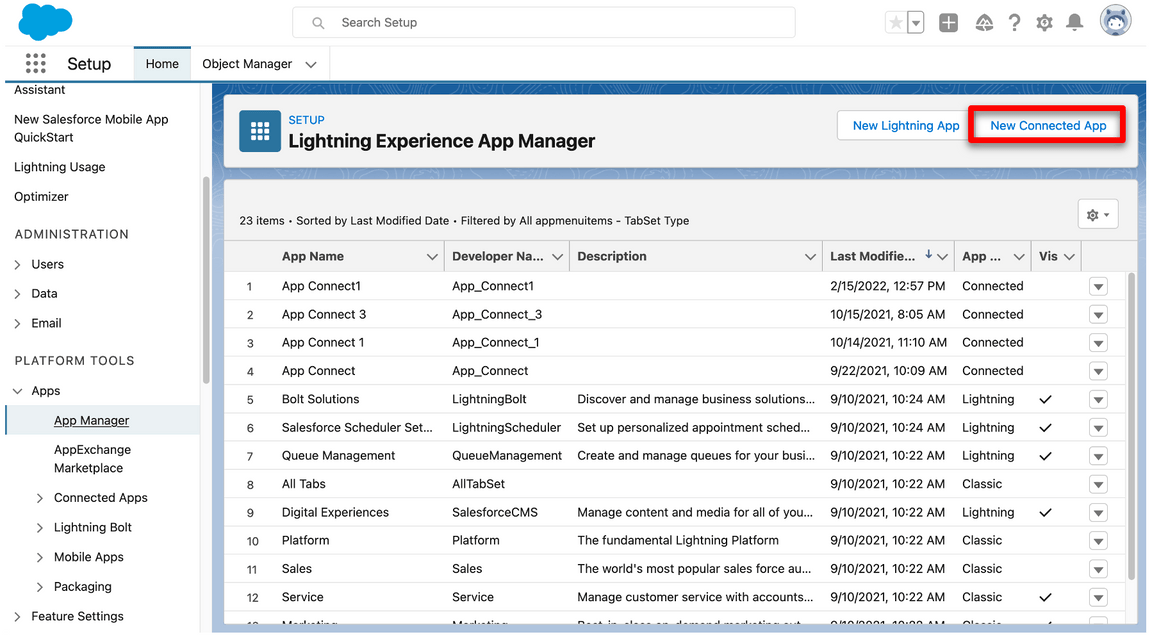
11.8 Click New Connected App.
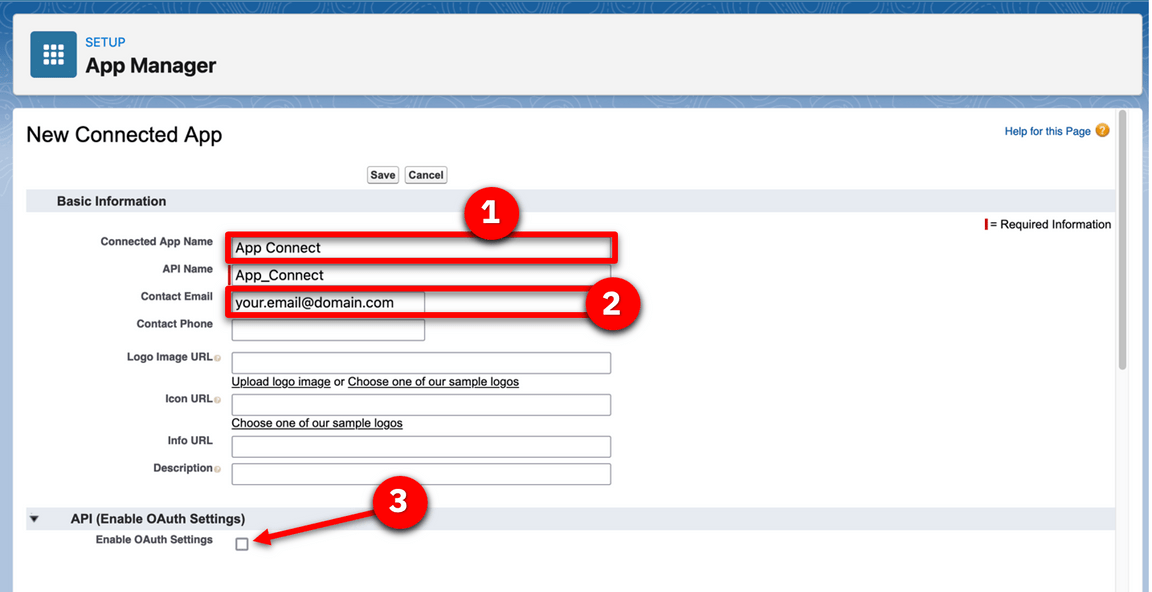
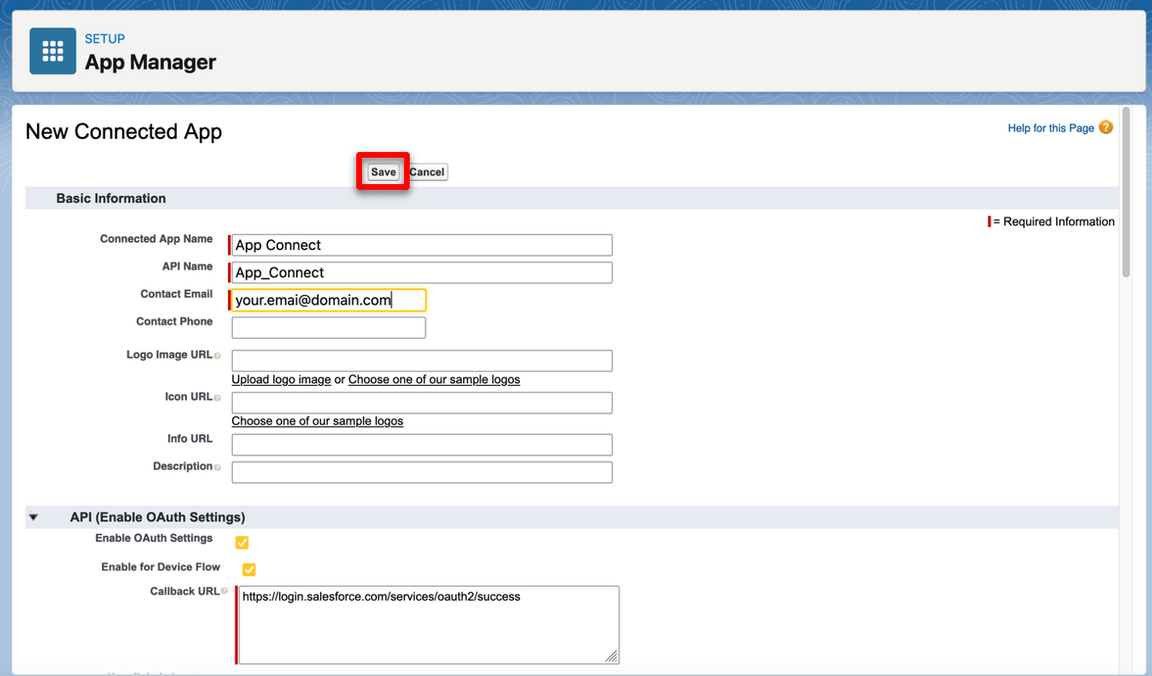
11.9 Enter App Connect (1) as the Connect App Name and your email as the Contact Email (2). Select Enable OAuth Settings (3).
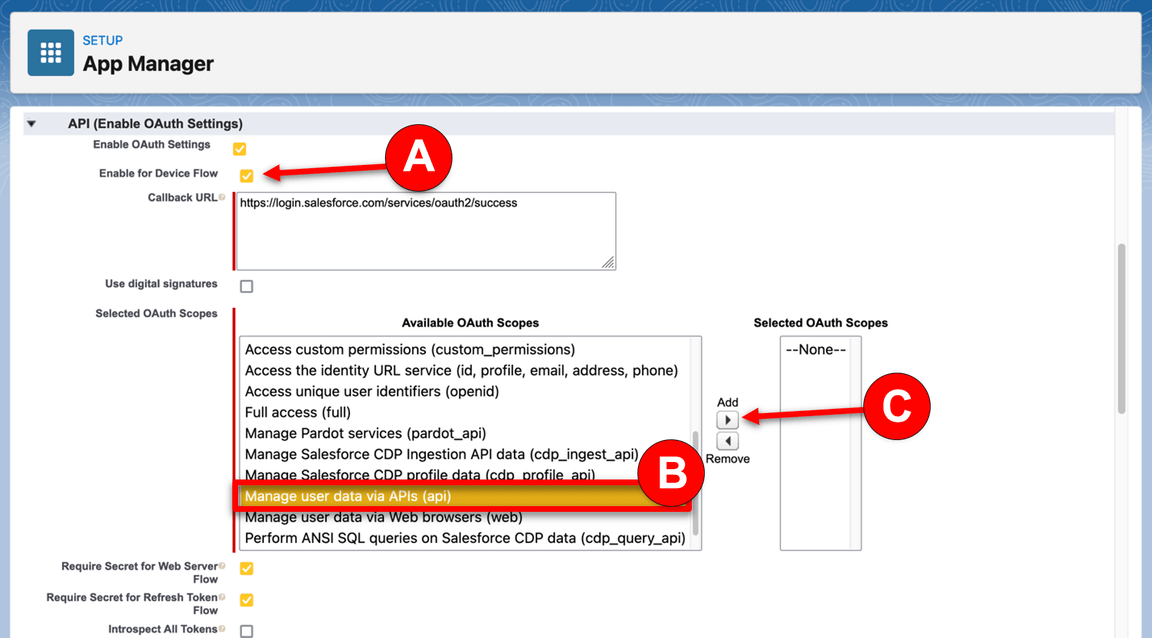
11.10 Select Enable for Device Flow (1). Now select Manage user data via APIs (api) (2) as the Selected OAuth Scopes. Click Add (3)
11.11 Click Save.
11.12 It will take approximately 10 minutes for the new connected app to register in Salesforce. Once it does, you should see Manage Consumer Details displayed. Click Manage Consumer Details, following any authentication directions.
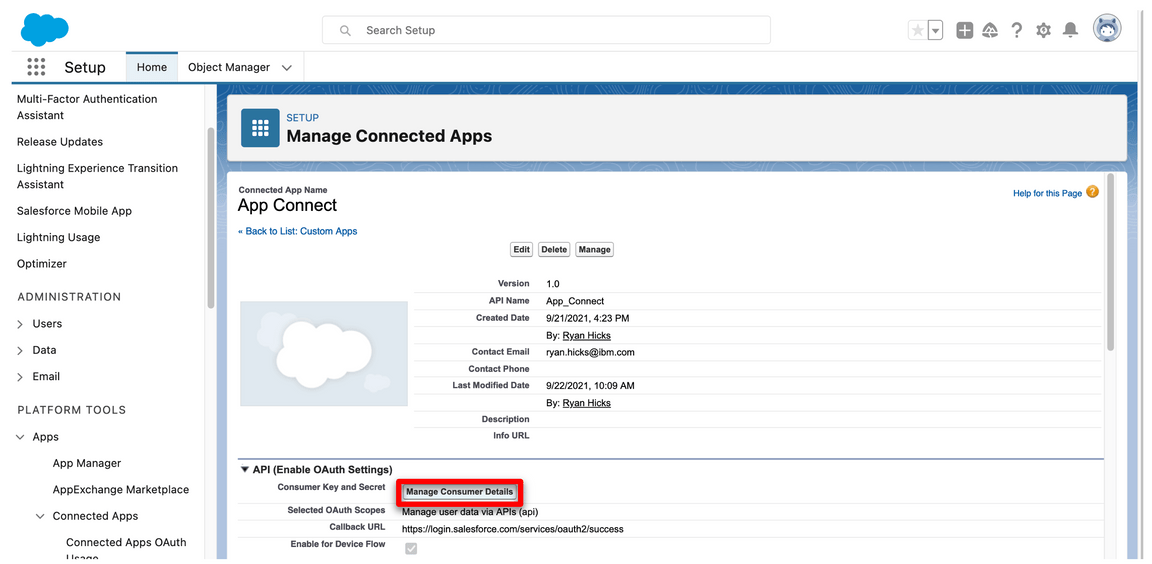
11.13 Save the Consumer Key and Consumer Secret.

11.14 In the search box at the top of the screen, enter OAuth (1), and then select OAuth and OpenID Connect Settings (2).
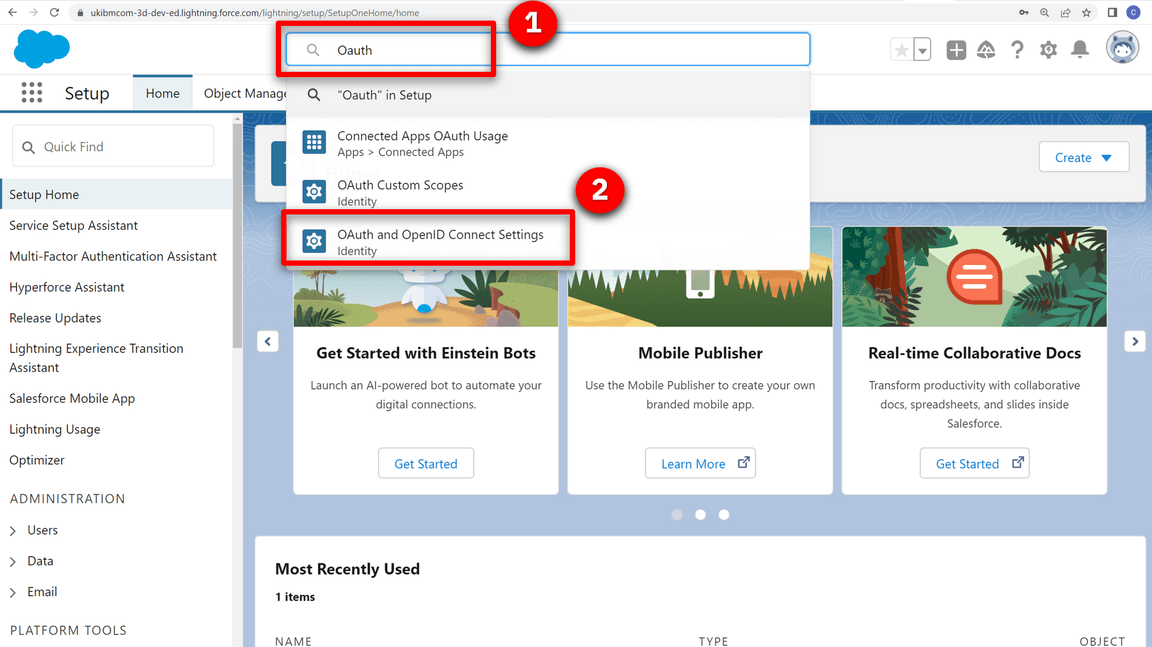
11.15 Ensure that OAuth User-Agent Flows and OAuth Username-Password Flows are enabled.
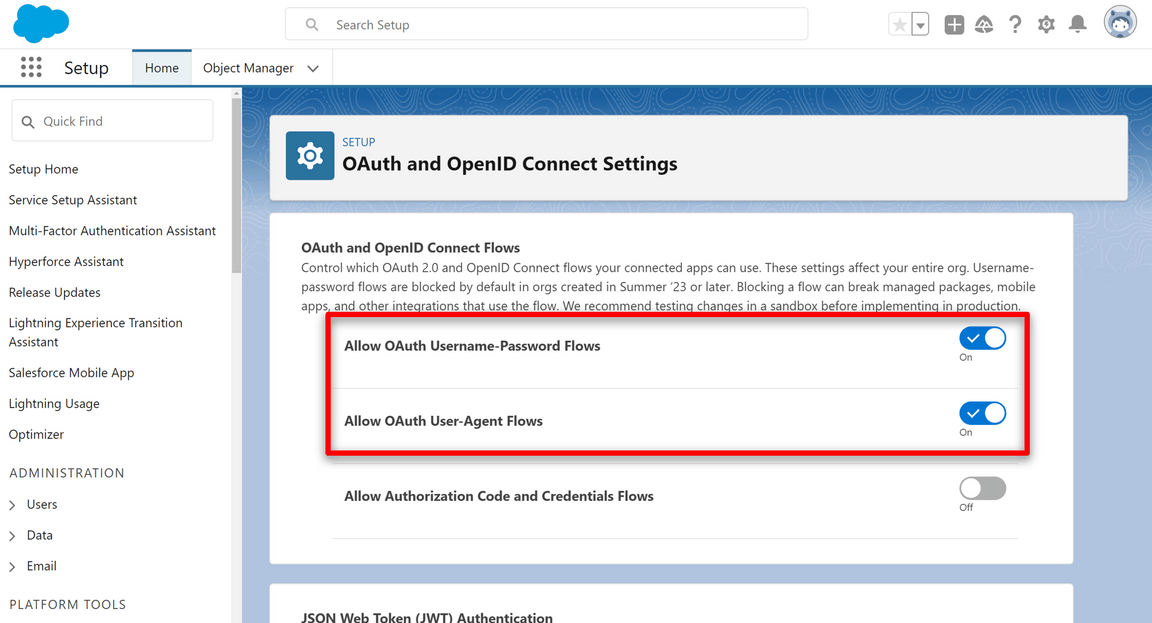
Your Salesforce developer account is ready.
12 - Connect Cloud Pak for Integration instance to your endpoints
Let’s configure our services endpoints in Cloud Pak for Integration.
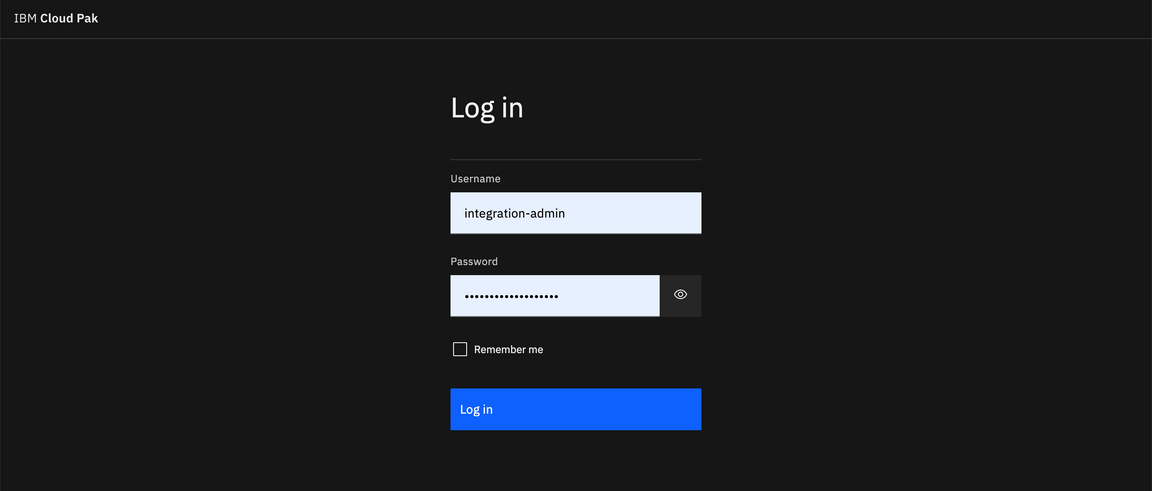
12.1 Back to the Platform Navigator page (If necessary log in with your admin Username and Password).
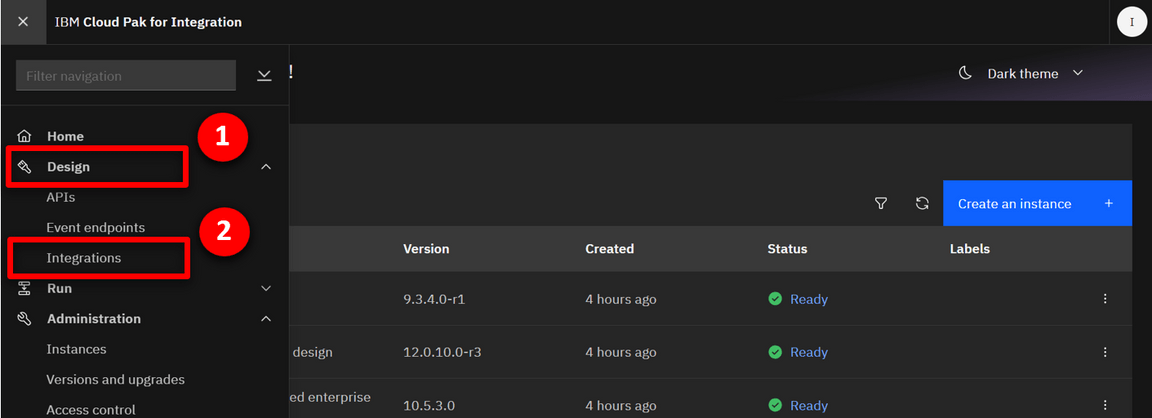
12.2 In the menu on the top left, open the Design folder (1) and select Integrations (2).
12.3 Click on the ace-designer-ai entry.

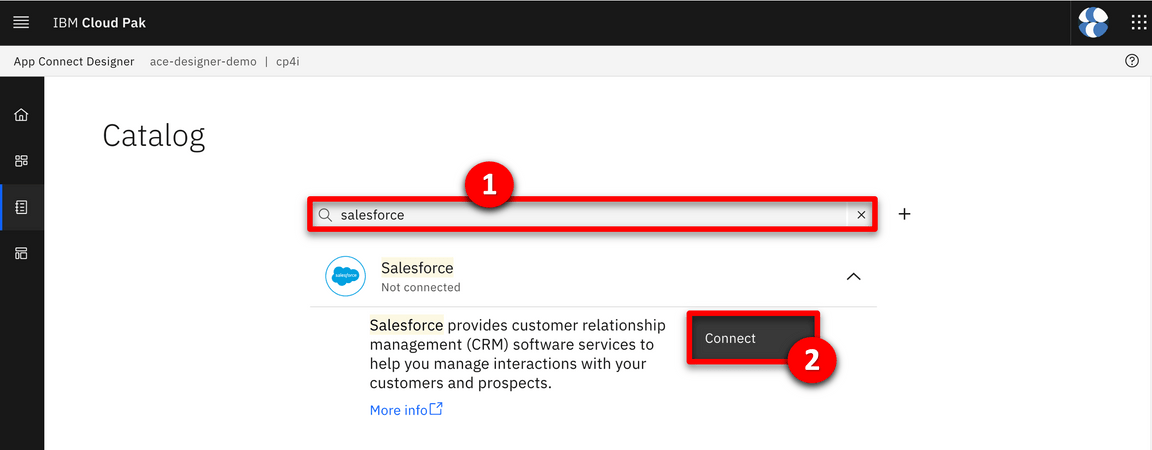
12.4 Click the Catalog icon to see a list of the available connectors.

12.5 Search for salesforce (1) and click Connect (2).
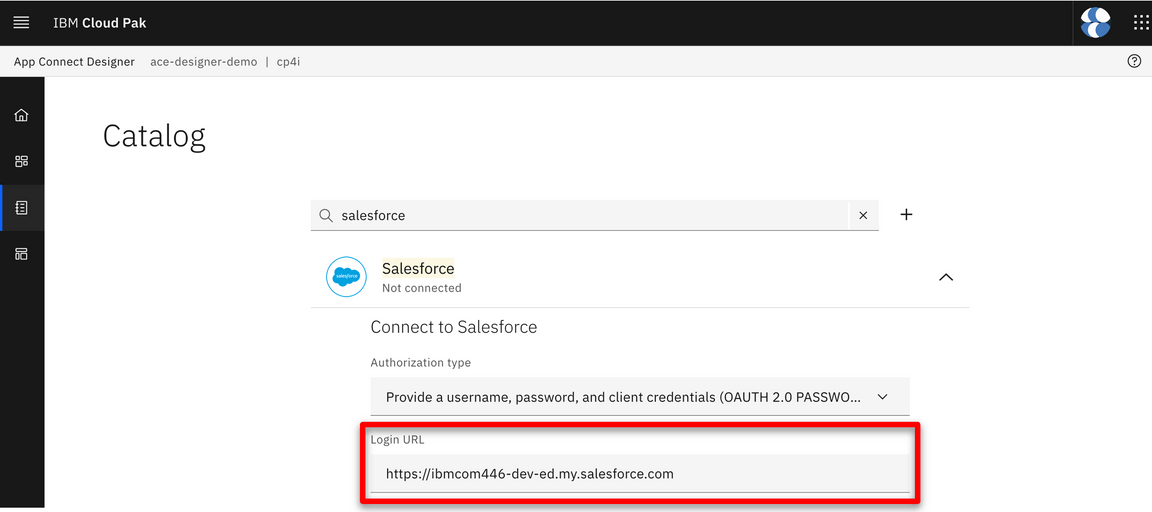
12.6 Enter your Salesforce Login URL.
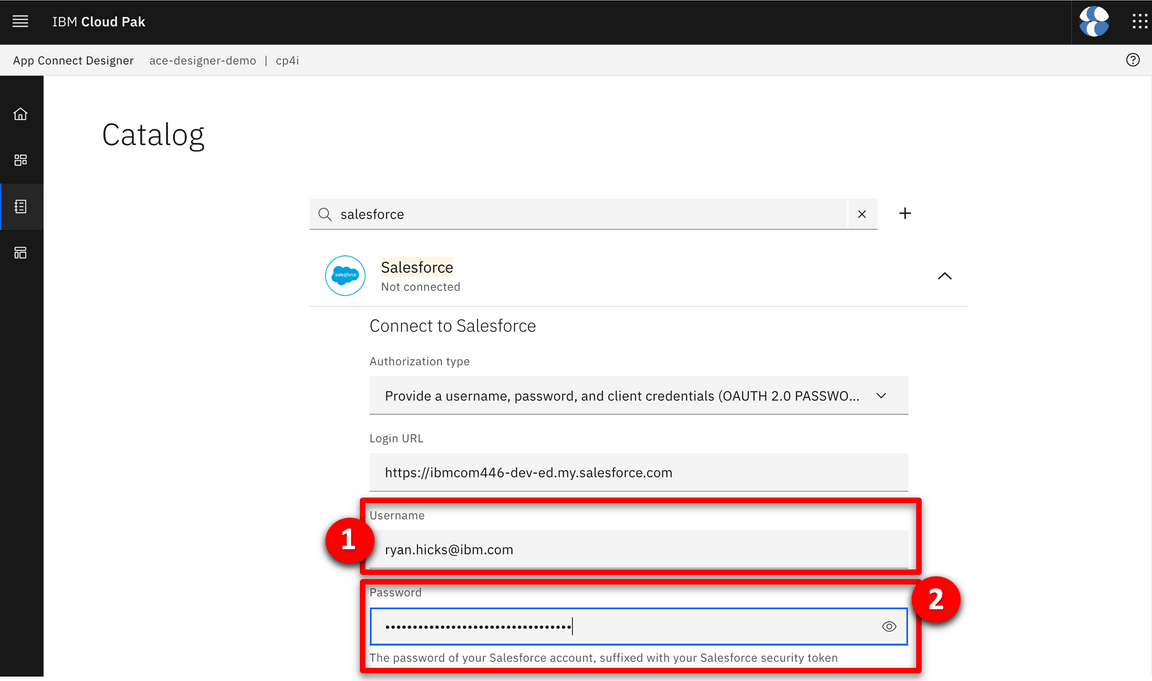
12.7 Input your Salesforce Username (1). Fill in the connector’s Password field (2) by concatenating your Salesforce Password and the Security token received via email.
For example, if your Salesforce password is ‘myGreatPassword’ and your Salesforce security token is ‘2325jsdhew4312hs534dh’ then enter ‘myGreatPassword2325jsdhew4312hs534dh’ in the Password field.
12.8 Input Salesforce’s Consumer Key as Client ID (1) and Secret as Client Secret (2), in the connector account UI. Click Connect (3).

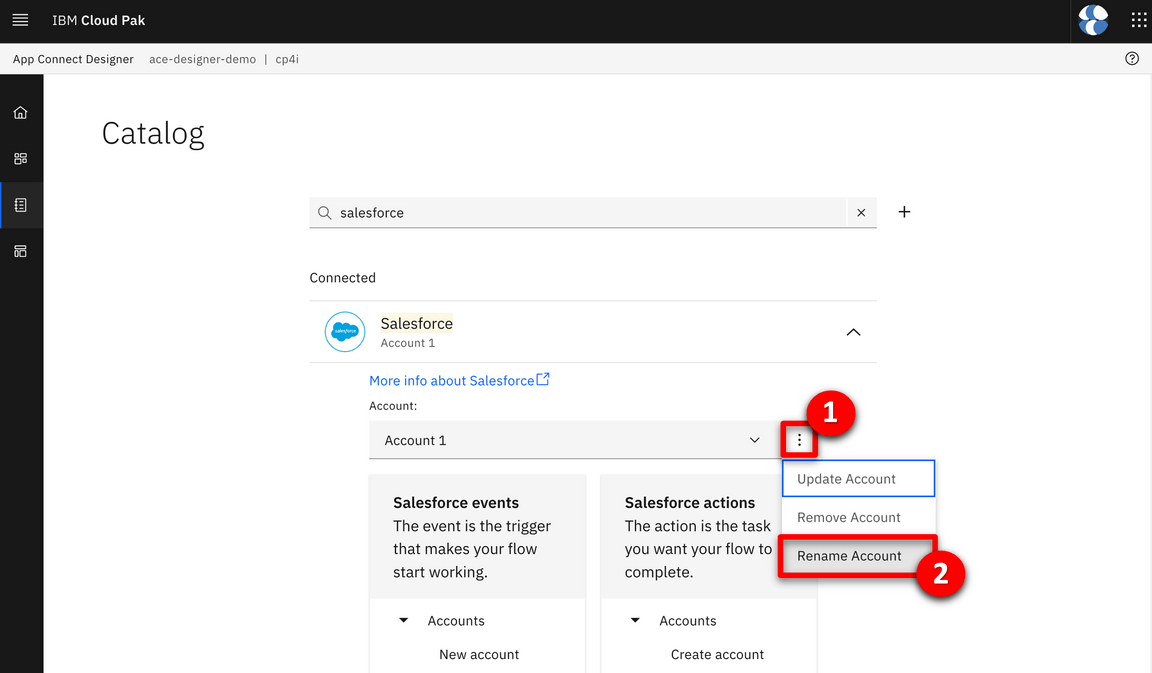
12.9 Click on the menu icon (1) and select Rename Account (2).
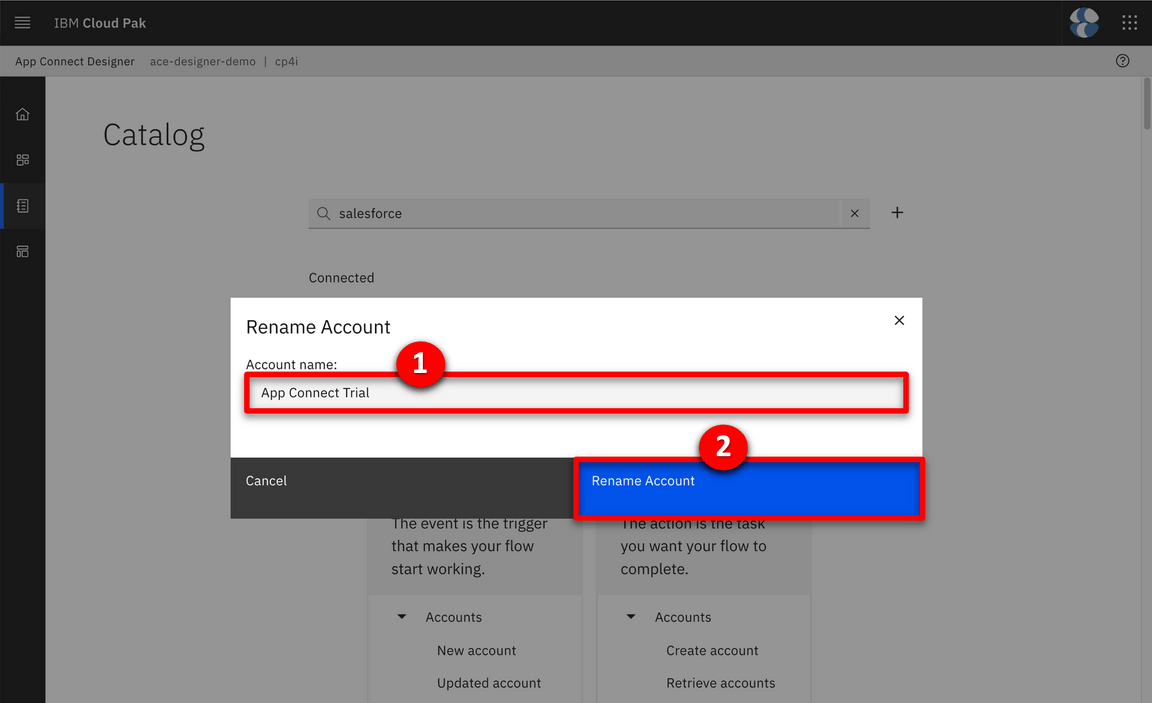
12.10 Enter App Connect Trial (1) as Account name and click Rename Account (2).
Your environment is ready to demo.
13 - Configure the asset repository
During the demo we will import an existing flow from the assest repository. An GitHub repository will be configured to import the flow.
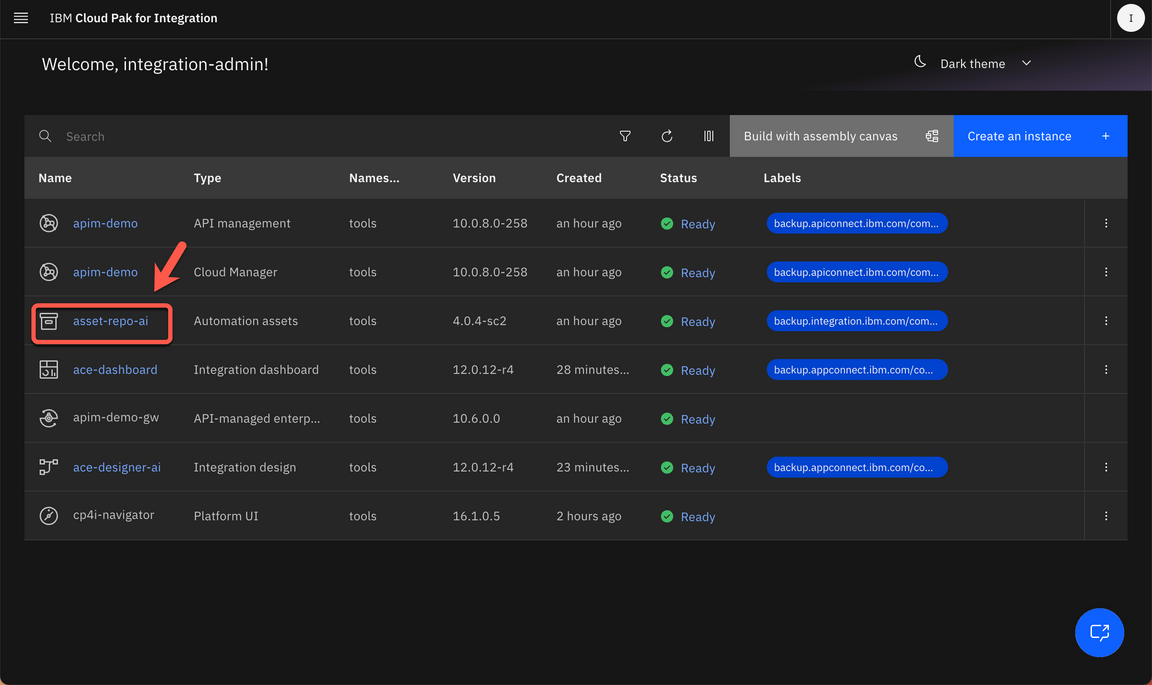
13.1 Open the CP4I homepage (if necessary, click on Home icon on the top of the page). On the homepage, you should see the all instances available on your Pak. Select asset-repo-ai.
13.2 Click Remotes (1) and select Add remote (2).

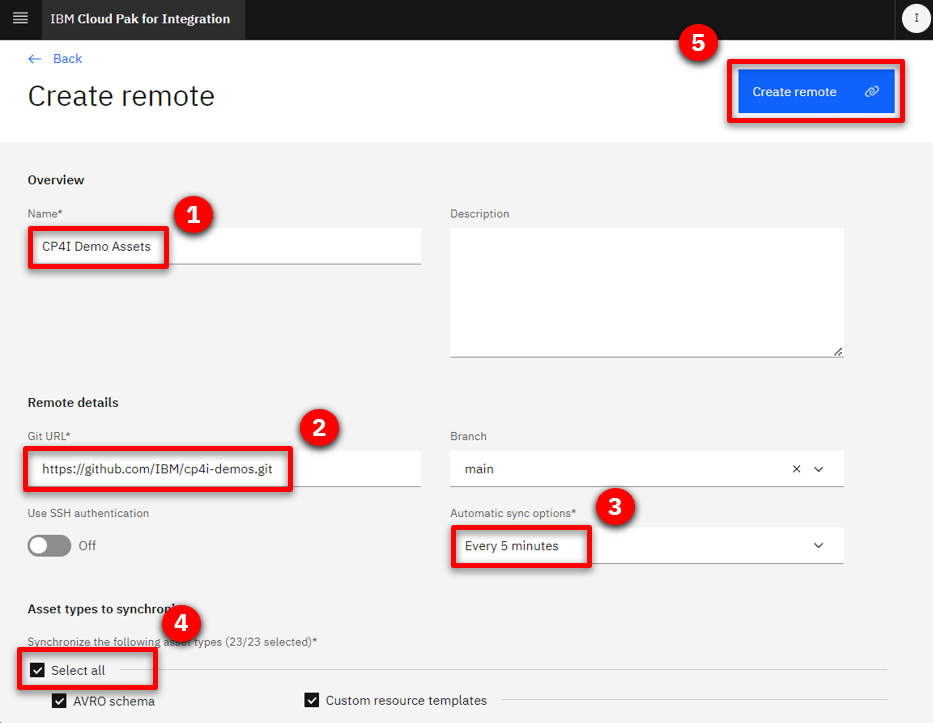
13.3 Fill in the following values.
Name (1): CP4I Demo Assets
Git URL (2): https://github.com/IBM/cp4i-demos.git
Automatic sync options (3): 5 minutes
Asset types to synchronize (4): Select all
Click Create remote (5) to complete the form.
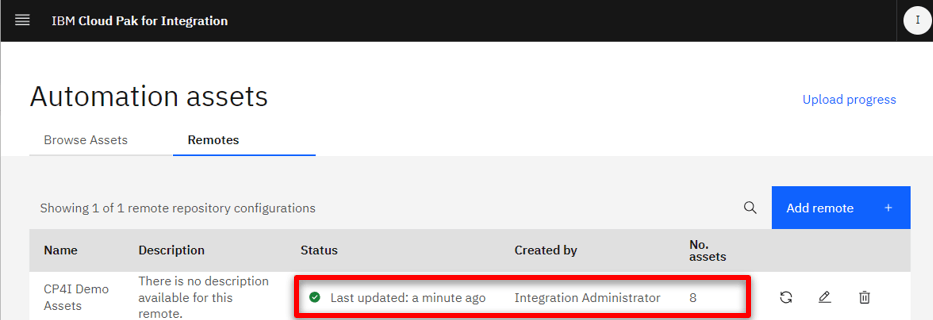
13.4 In a couple of minutes the resources from the GitHub repository will be synchronized.
14 - Creating Dev User for Developer Portal
Now, let’s create a user in the Developer Portal.
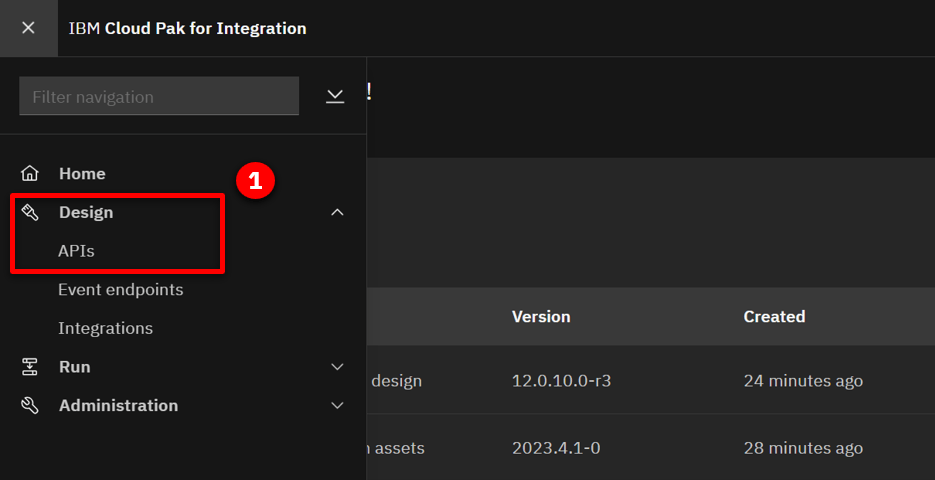
14.1 Expand Design and select APIs (1).
14.2 Click apim-demo API management.

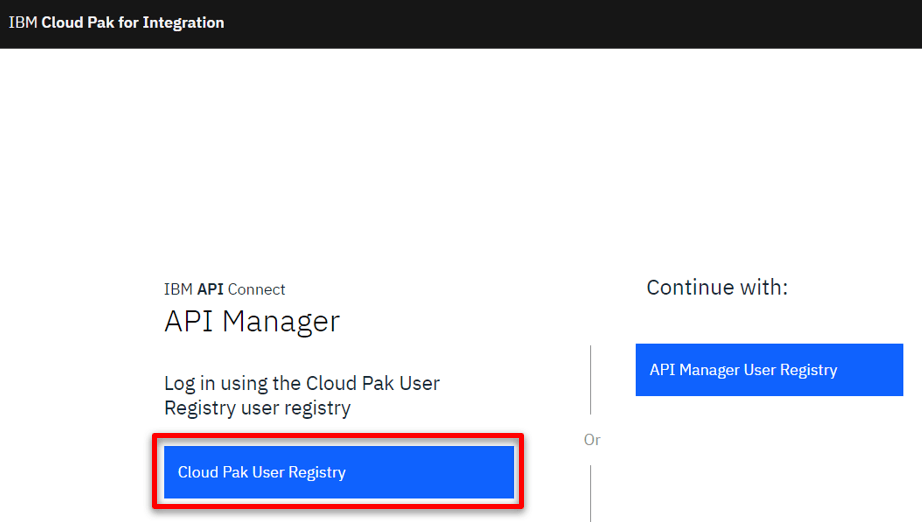
14.3 If a login screen is presented, select Cloud Pak User Registry
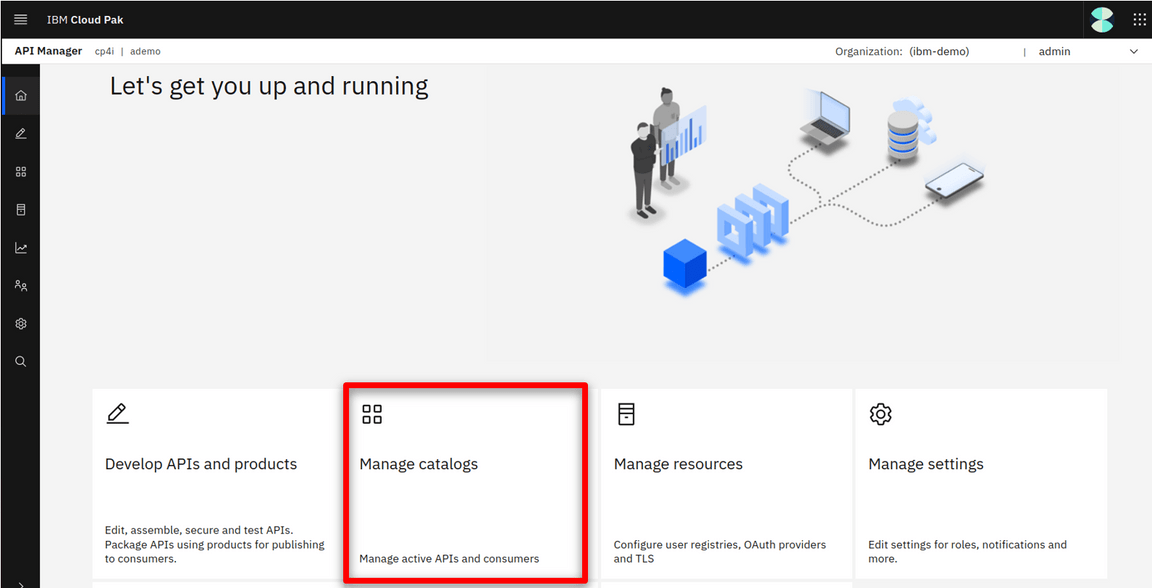
14.4 Click Manage catalogs (2).
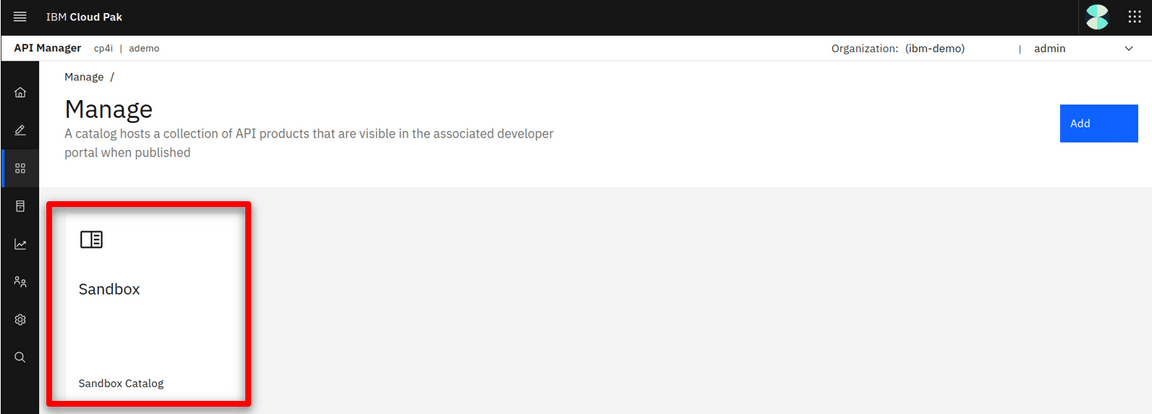
14.5 Open Sandbox.
14.6 Select the Consumers (1) tab, click Add (2) and select Create organization (3).

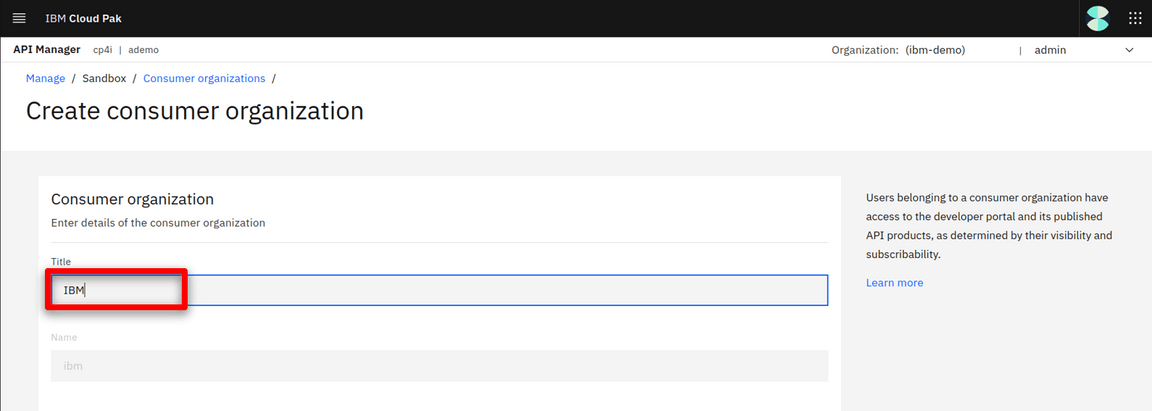
14.7 Fill in IBM as the title.
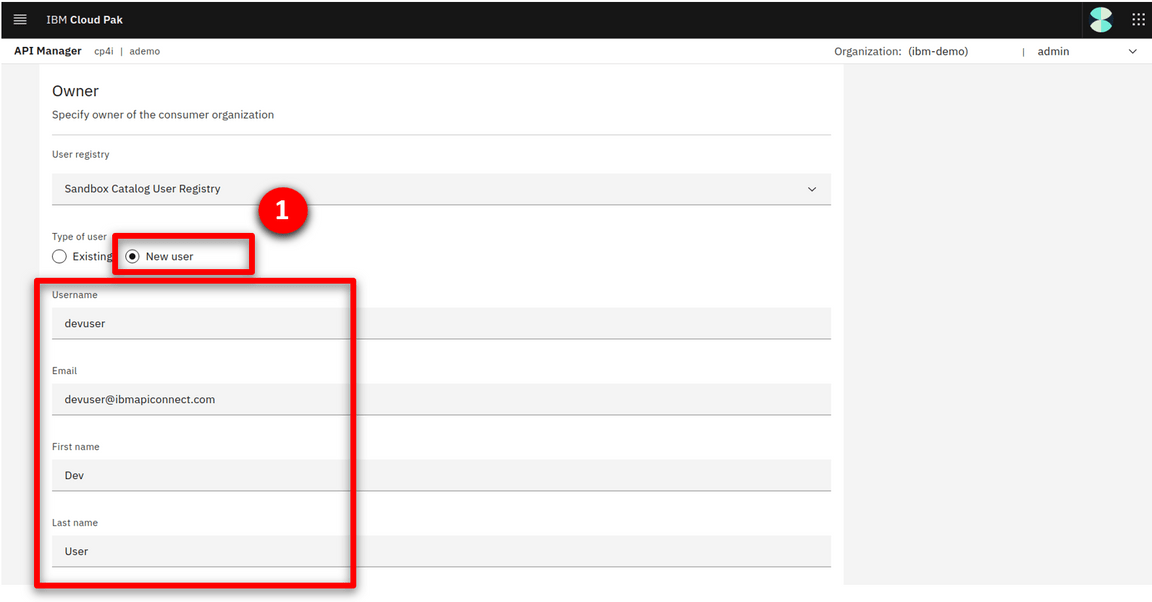
14.8 Scroll down to the Owner section, set the type of user to New user (1), fill in the following details and click Create.
| FIELD | VALUE |
|---|---|
| Username: | devuser |
| Email: | devuser@ibmapiconnect.com |
| First name: | Dev |
| Last name: | User |
| Password: | AP1Connect! |
14.9 A new consumer organization is created.
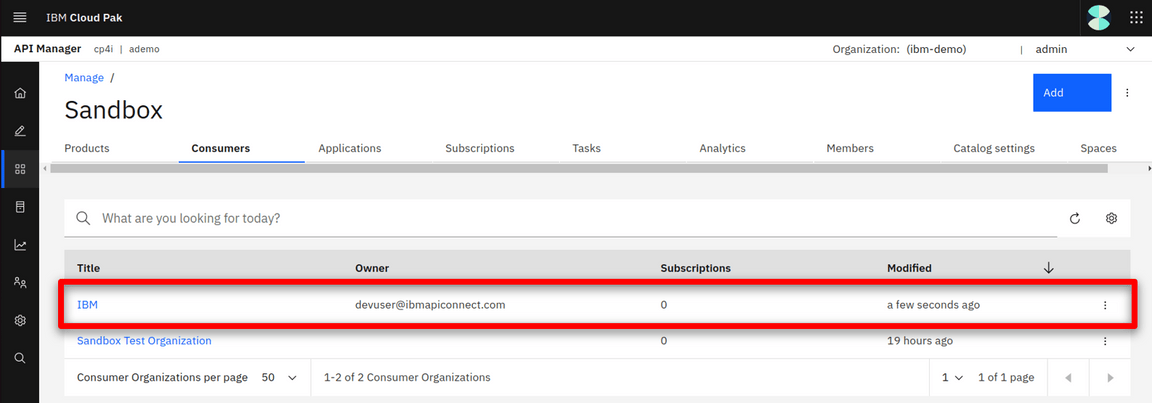
Congratulations! Your portal developer user has been created and you are ready for the demo.
