Mastering Enterprise-Level GraphQL
- Introduction
- Prerequisites
- Business Context
- Lab Overview
- 1 - Install Node.JS
- 2 - Install IDE
- 3 - Setup StepZen
- 4 - Build your GraphQL API from a REST API
- 5 - Adding a new REST API in your GraphQL API
- 6 - Autogenerate GraphQL Schemas from MySQL Database
- 7 - Creating a composition of building blocks using @materializer
- 8 - Create a GraphQL Proxy API in APIC
- 9 - Editing and Testing the GraphQL Proxy API
- 10 - Create a Product and apply GraphQL RateLimits
- 11 - Explore the API from Developer Portal
- Summary
Lab Overview
The rising adoption of hybrid cloud has resulted in data stored everywhere – in different types of data stores likes data warehouses, lakes, and lakehouses as well as across different clouds and on-premises environments. APIs serve as the essential connector between different data sources and applications, which means that businesses are relying on and creating more APIs than ever before to get the data they need to power their applications and experiences.
GraphQL has rapidly become a go-to query language for companies to interact with their data and is emerging as a new standard for APIs, layering upon the investments in REST APIs and data systems. While GraphQL APIs are significantly easier for the application teams to consume, they can represent a challenge to the API Provider teams tasked with building them. We believe that APIs built declaratively are simply better - leading to first implementation with fewer lines of clean code, faster time to deploy, and APIs with built-in performance, cost, and reliability optimizations.
When you program declaratively you are configuring a system - you are also providing the system with universal rules that can be applied across all queries, and in different situations. The resulting code is more fault-tolerant, reduces repetition of software patterns (following DRY principles), and is easier to understand and maintain. Importantly, it allows the platform to do things for you that you would otherwise have to code yourself.
StepZen enables developers to easily build and deploy a single GraphQL API that gets the data they need from multiple backends. The API delivers the right data reliably, irrespective of backend protocols, schemas and authentications. We manage the API so that developers manage zero infrastructure.
With StepZen’s declarative approach developers can build GraphQL APIs (and federated graphs) by composing GraphQL building blocks to create the GraphQL schema. Strong introspection capabilities mean that a GraphQL model for enterprise data can be constructed and composed with only a few lines of code.
Because you build your APIs declaratively, StepZen understands the API and can make optimization decisions at runtime, delivering low latency and high throughput and imposing a minimum burden on the backends.
API Connect enables developers to easily manage, secure, socialize, and monitor their APIs. With API Connect in front of StepZen, it’s easy to build API Products that include GraphQL, REST, SOAP, and other forms of APIs all in a single product. You can then offer your API Product for sale under various API Plans which each have their own terms of usage. With your Products and Plans set, you can advertise them and socialize them to your end users with a self-service Developer Portal, which allows your customers to find, try out, and pay you for your API Products, without your active involvement. Finally, you can monitor your API usage to notice trends as well as issues.
While API Connect management unifies your new GraphQL APIs with your existing REST APIs, it also provides first-class security for your new StepZen GraphQL API. Threat protection, rate limiting, and monetization can all be based on a highly-customized analysis of every transaction’s input GraphQL query, with only a few declarative assertions from you. You tell API Connect which parts of your schema are more expensive, and it customizes that to every query from your customers.
By the end of this lab, with the combination of StepZen and API Connect, you will have deployed a world-class system for combining disparate backends including linkages between them, into a single API, secured your API, socialized it to your customers, and monitored its invocations.
Let’s get started!
Prerequisites
You need to have your IBM API Connect environment. As part of this lab, you will use IBM API Connect as a Service on AWS. If you don’t have an account, follow the steps from this documentation to create a 30 days trial account.
You need to have a StepZen account. StepZen provides an easier way for developers to build GraphQL APIs. StepZen takes a declarative programming approach (describing WHAT the program does, without explicitly specifying HOW), which results in smaller and more intuitive code, better runtime performance, and faster time to value. StepZen was also designed to be highly flexible. It is compatible with other API approaches and is available as-a-Service (SaaS) while also supporting deployments in private clouds and on-premises data centers. If you don’t have an account, you are able to get started with a free StepZen account here (no credit card required).
Business Context
Your company decided to invest in GraphQL as a new standard for APIs. GraphQL is a query language for APIs that gives an application client greater control over what data it retrieves in an API request when compared with a REST API request.
You would like to explore an easier way for developers to build GraphQL APIs, consuming data stored everywhere. Take an e-commerce application for example. With a single call, GraphQL can merge data that is found in different subsystems, like customer information, order numbers, and delivery status, and return it in an expected format. While GraphQL APIs are significantly easier for the application teams to consume, they can represent a challenge to the API teams tasked with building them, securing them, socializing them, and managing them. To ease the process of building these APIs, you would like to explore a way to create GraphQL APIs using a declarative approach for federated access to data.
On the other hand, as a developer, you are having problems managing the use of GraphQL APIs in your company.
GraphQL provides the following particular advantages over REST APIs:
The application client can request only the data that it needs. For example, when retrieving bank account records, request only the account number and current balance for each account, but not the customer name and address details. With a REST API request, either the backend REST service must provide separate endpoints or parameters for different data subsets, or the application client must retrieve the complete records and then discard the unwanted data.
The application client can retrieve multiple related resources in a single request. For example, a customer’s bank account record might include an array that references other finance products that the customer holds. If an application client wants to retrieve the bank account details for a specific customer, and details of the other finance products for that customer, then with a REST API the client would first retrieve the bank account details, and then make separate requests for each of the other products. A GraphQL API can be designed to allow the client to retrieve all this information in a single request.
However, this flexibility presents security challenges with rate limiting, because two seemingly very similar requests might return vastly different amounts of data, and what might have required multiple REST API requests, each counting towards the rate limit, might require only a single GraphQL API request. It is important therefore that rate limiting controls are imposed that reflect the amount of data that is retrieved.
Lab Overview
In this lab you will learn how to move from Zero to Enterprise in the GraphQL domain. Initially you will learn how to use StepZen to create a a federated GraphQL API by pulling data from disparate sources (REST API and MySQL). After that you will use IBM API Connect to create a GraphQL API proxy definition that proxies a backend GraphQL server from StepZen, and to define rate limiting controls that reflect the amount of data that is returned from the server by a request to the GraphQL API.
In this lab, you will complete the following sections:
- 1 - Install Node.JS
- 2 - Install IDE
- 3 - Setup StepZen
- 4 - Build your GraphQL API from a REST API
- 5 - Adding a new REST API in your GraphQL API
- 6 - Autogenerate GraphQL Schemas from MySQL Database
- 7 - Creating a composition of building blocks using @materializer
- 8 - Create a GraphQL Proxy API in APIC
- 9 - Editing and Testing the GraphQL Proxy API
- 10 - Create a Product and apply GraphQL RateLimits
- 11 - Explore the API from Developer Portal
1 - Install Node.JS
In this section you will install Node.JS in your machine. Let’s start it!
- Start your lab environment and open a browser.
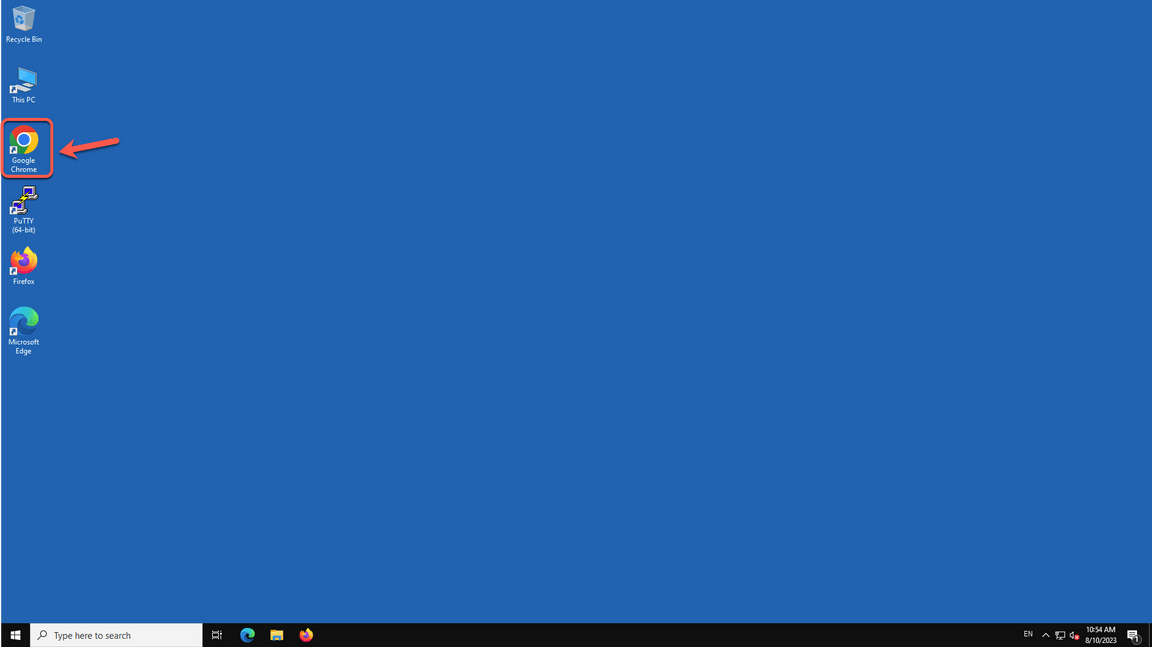
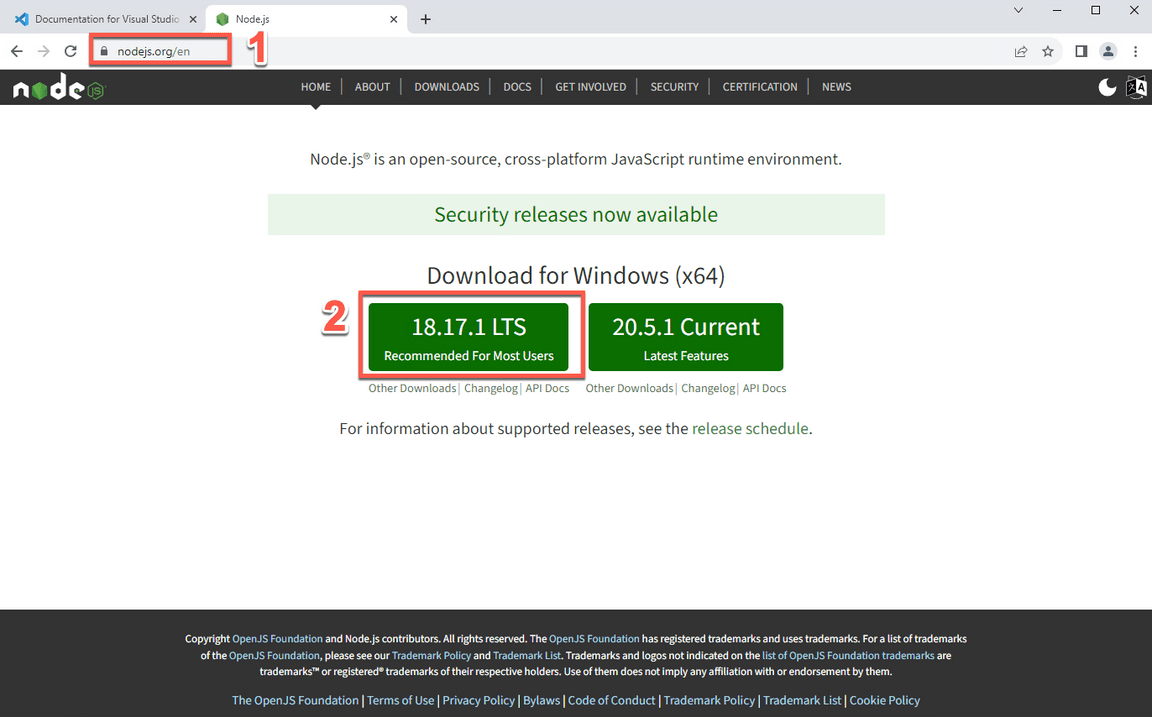
- Open the URL below (1). And download the recommended node.js version.
https://nodejs.org
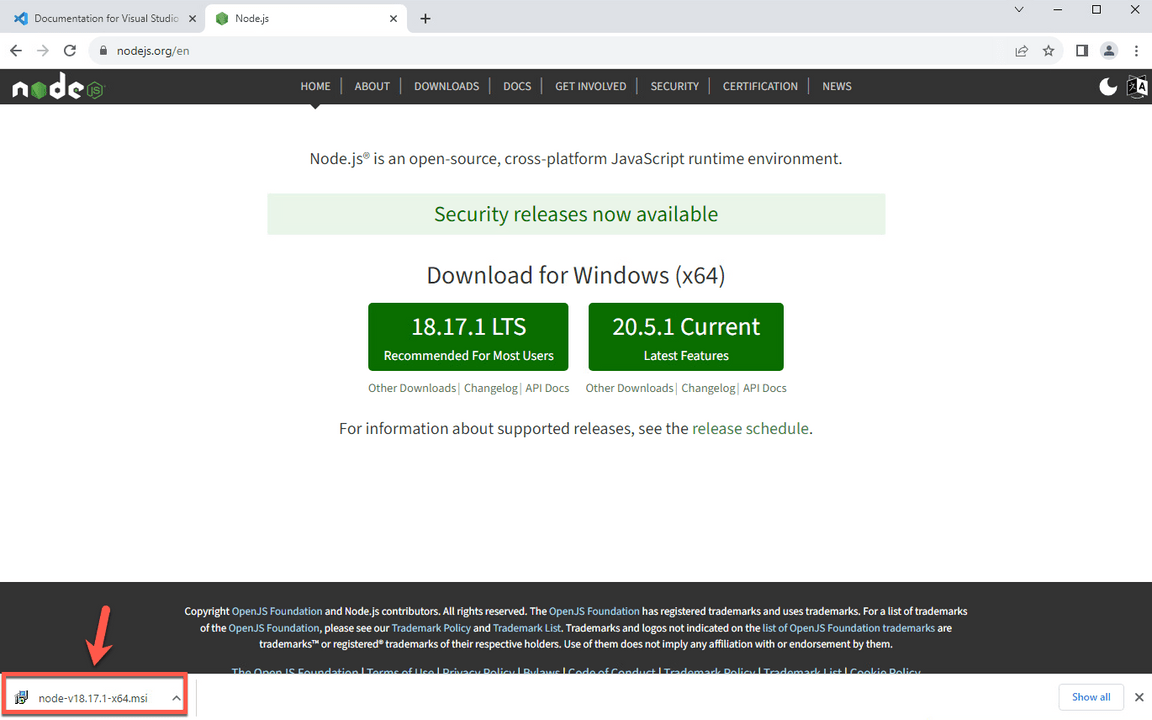
- Save the Node installation in your machine and execute it.
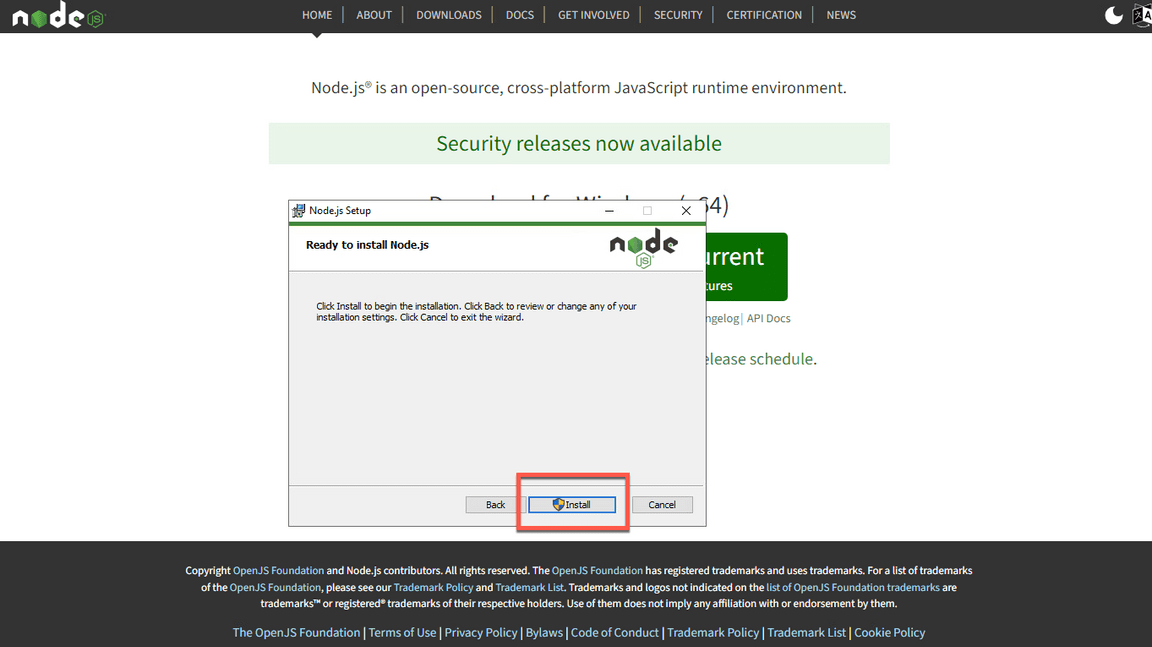
- Accept the default values and click Install to complete the installation. If necessary enter the Windows administrator password (Passw0rd).
- When completed, just click Finish.
2 - Install IDE
An Integrated Development Environment (IDE) is a piece of software that contains all of the things you need to develop, compile, link, and debug your programs. Furthermore, IDEs typically bundle a number of other helpful editing features, such as integrated help, name completion, auto-formatting, and sometimes a version control system. So while you could do all of these things separately, it’s much easier to install an IDE and have them all accessible from a single interface.
In this lab, you will use the IDE to explore your GraphQL schema. You are welcome to use any IDE that you prefer. If you don’t have any preference, you can follow the steps below to install Visual Studio Code.
- On your browser, open the URL below (1). And download the VSCode User Installer specific of your OS (2).
https://code.visualstudio.com/Download
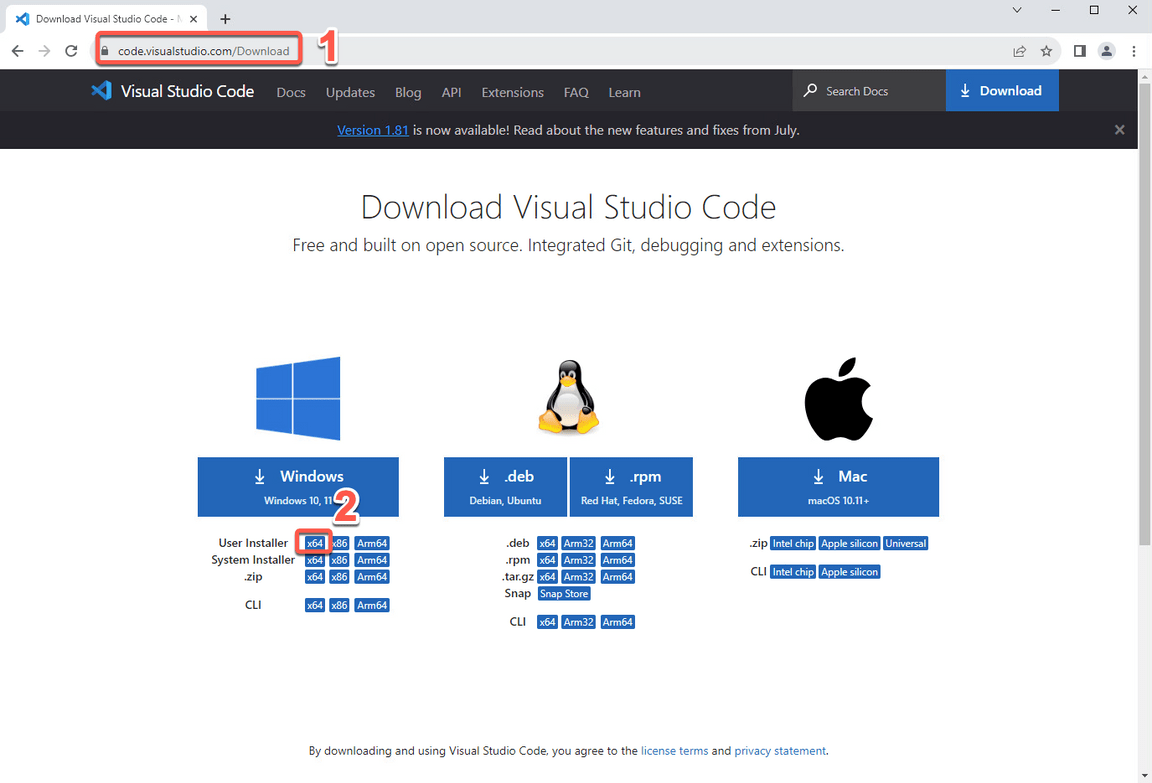
2.Save the VSCode installation in your machine and execute it.
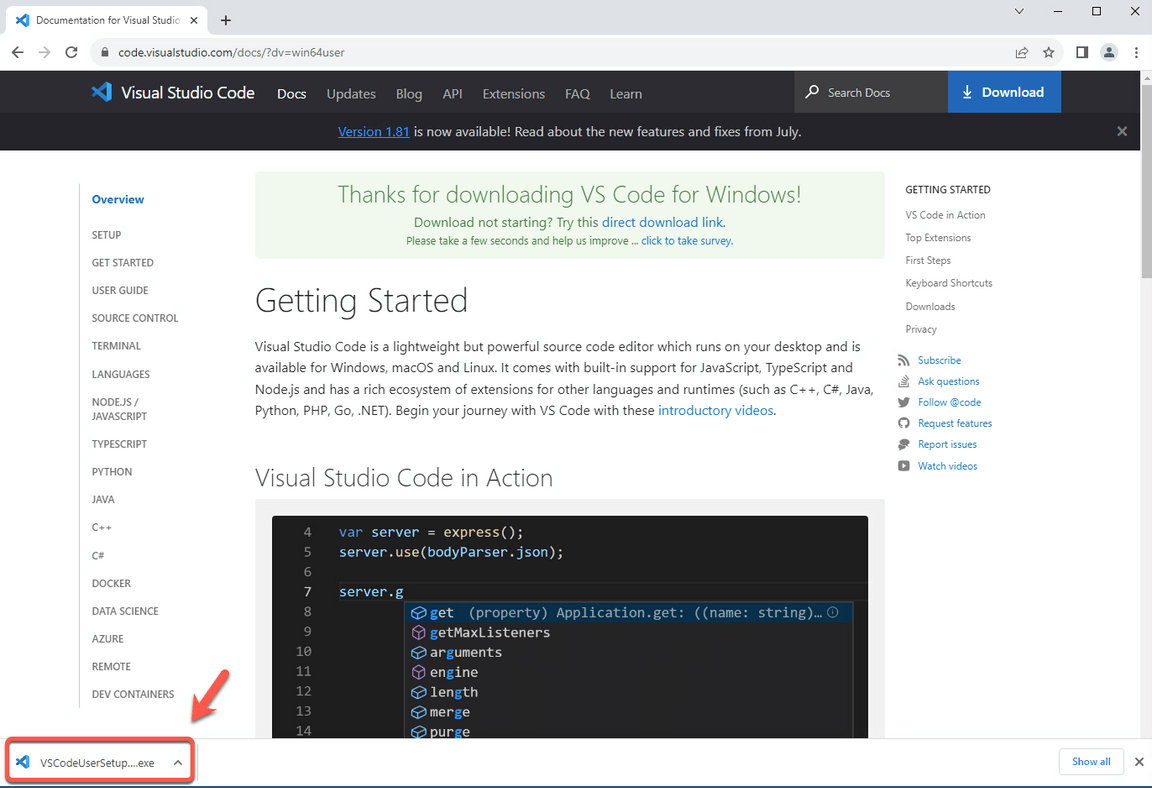
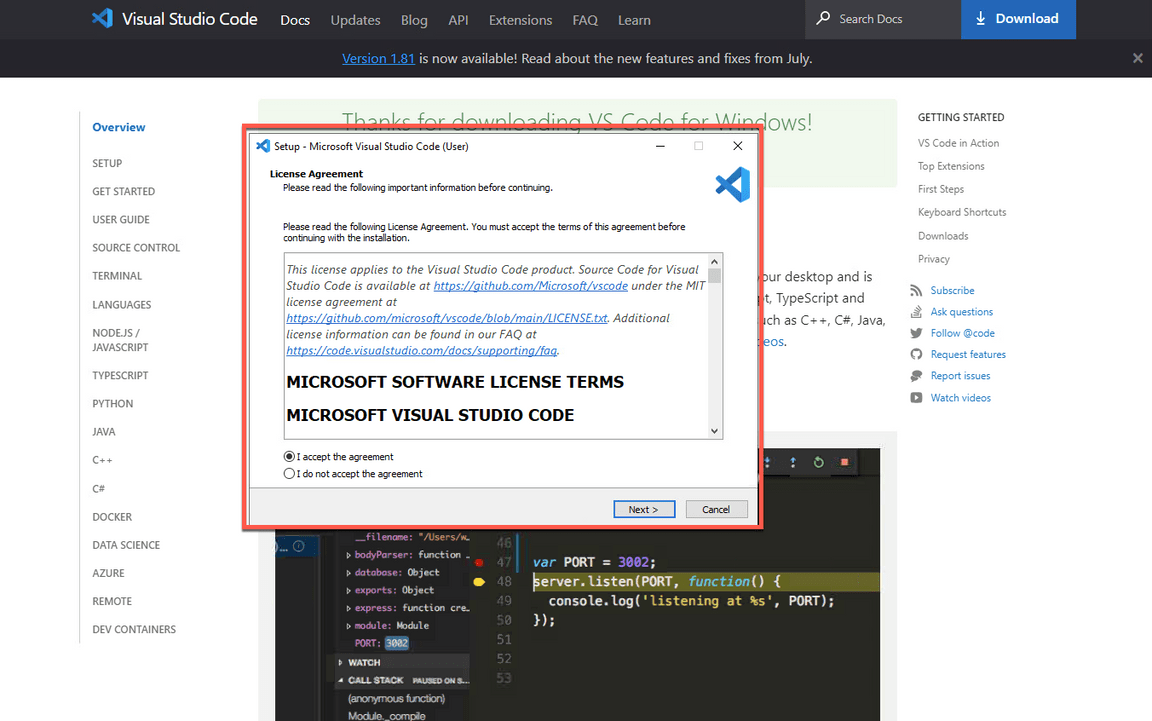
- Follow the installation steps to complete it.
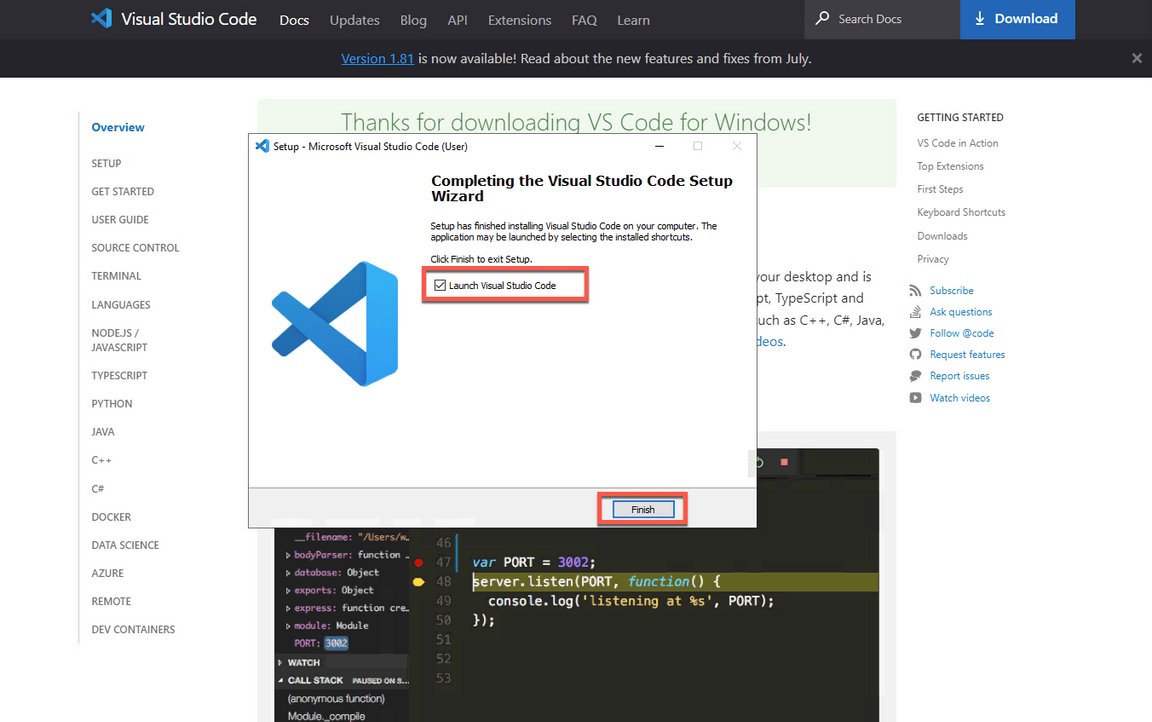
- At the end, check the option to Launch Visual Studio Code and click Finish.
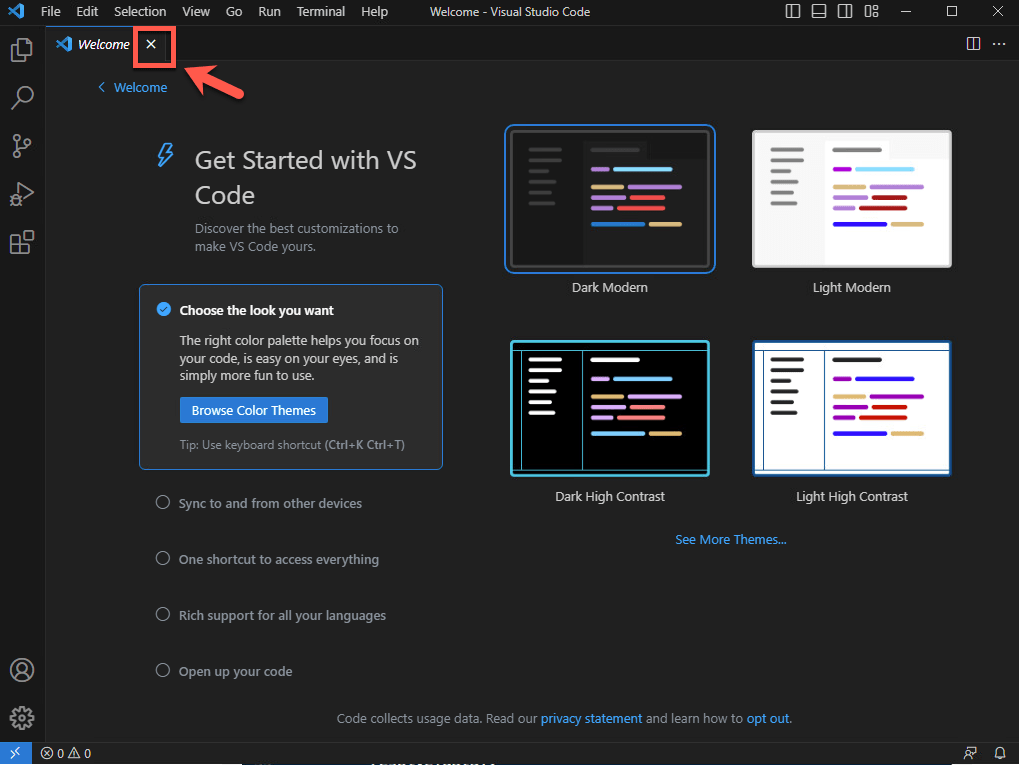
- You can close the Welcome tab.
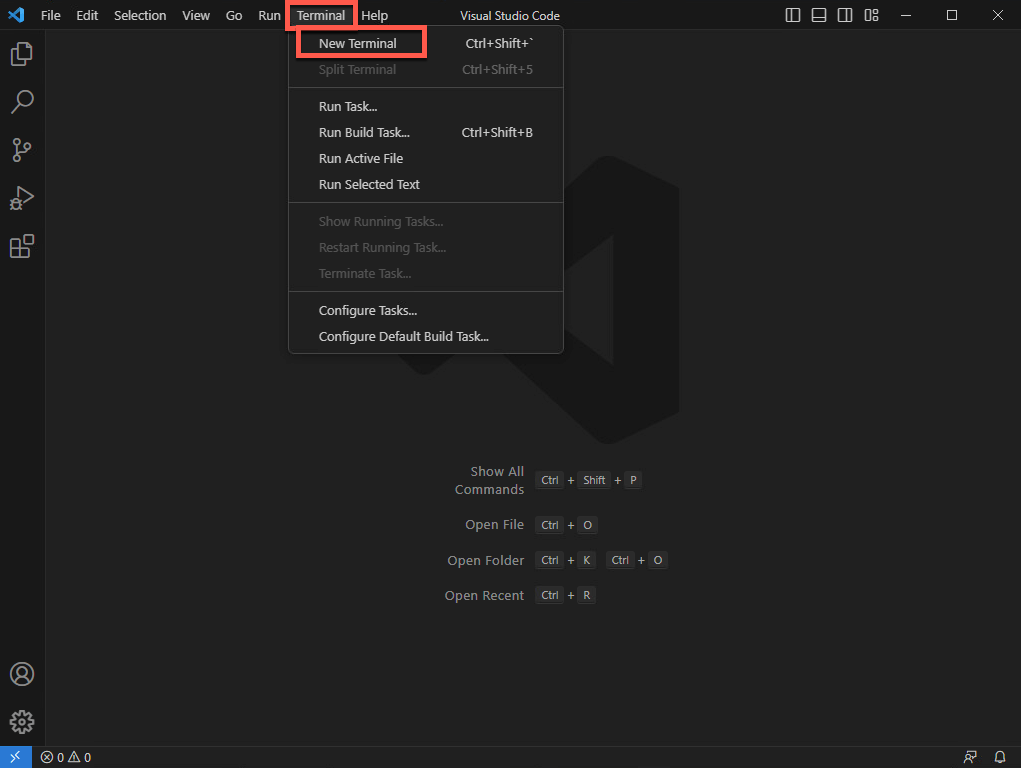
- Open the Terminal menu and click on New Terminal.
- Great! Now you should see a terminal window on bottom of your Visual Studio Code. Enter the command below to check if the node installation is ok (as result of the command you should see the node version).
node -v
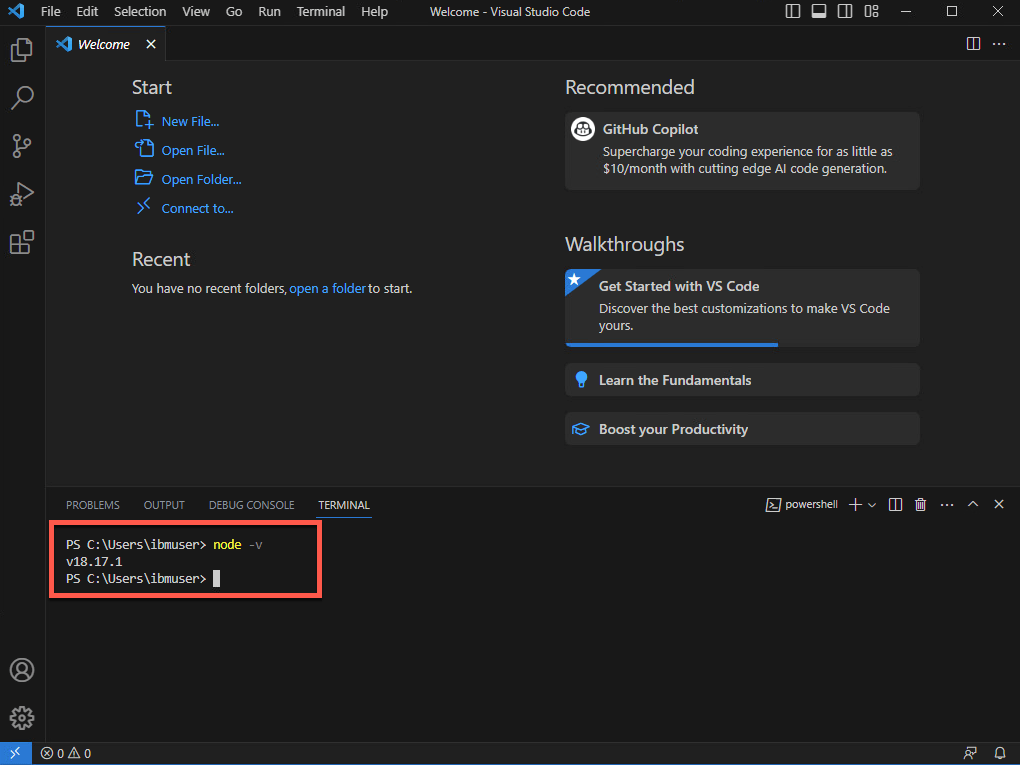
TROUBLESHOOTING: If you are not able to recognize your node command in Visual Studio console, you need to close and start your Visual Studio Code again. Enter the node command again, and now it should work.
- If you are using Windows machine, now you need to change the PowerShell execution policies to be able to execute scripts in VS Code terminal. An execution policy is part of the PowerShell security strategy. Execution policies determine whether you can load configuration files, such as your PowerShell profile, or run scripts. Let’s do it! On your Visual Studio Code Terminal window run the command below.
Set-ExecutionPolicy -Scope CurrentUser -ExecutionPolicy Bypass
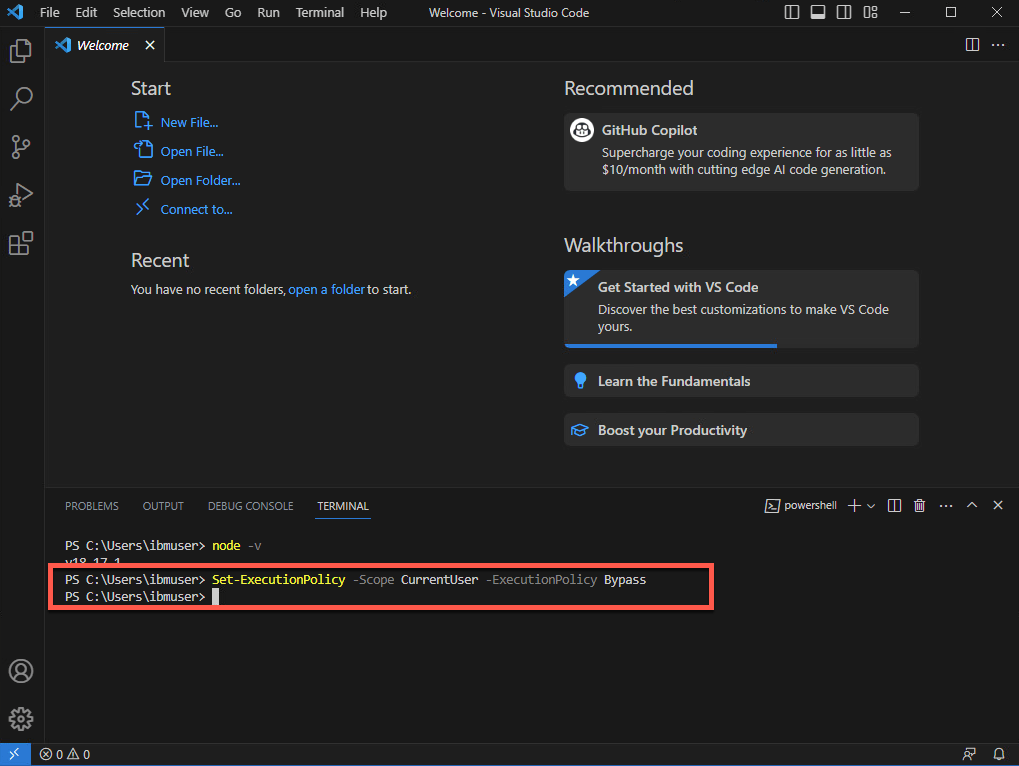
That is it! Now you are ready for the lab. Take a breath and enjoy your lab!
3 - Setup StepZen
In this section, you will start to use StepZen. You will install StepZen CLI and log in with your StepZen account. If you don’t have a StepZen account check the prerequisites section how to create it.
StepZen enables developers to easily build and deploy a single GraphQL API that gets the data they need from multiple backends. The StepZen CLI is the primary tool for creating, uploading, deploying and testing your StepZen API. The StepZen CLI enables you use to manage your StepZen schemas, configurations, and endpoints. The CLI also comes with a built-in Schema Explorer that enables you to explore and test the API you’ve deployed locally from your browser. The StepZen CLI is available via npm, let’s install it.
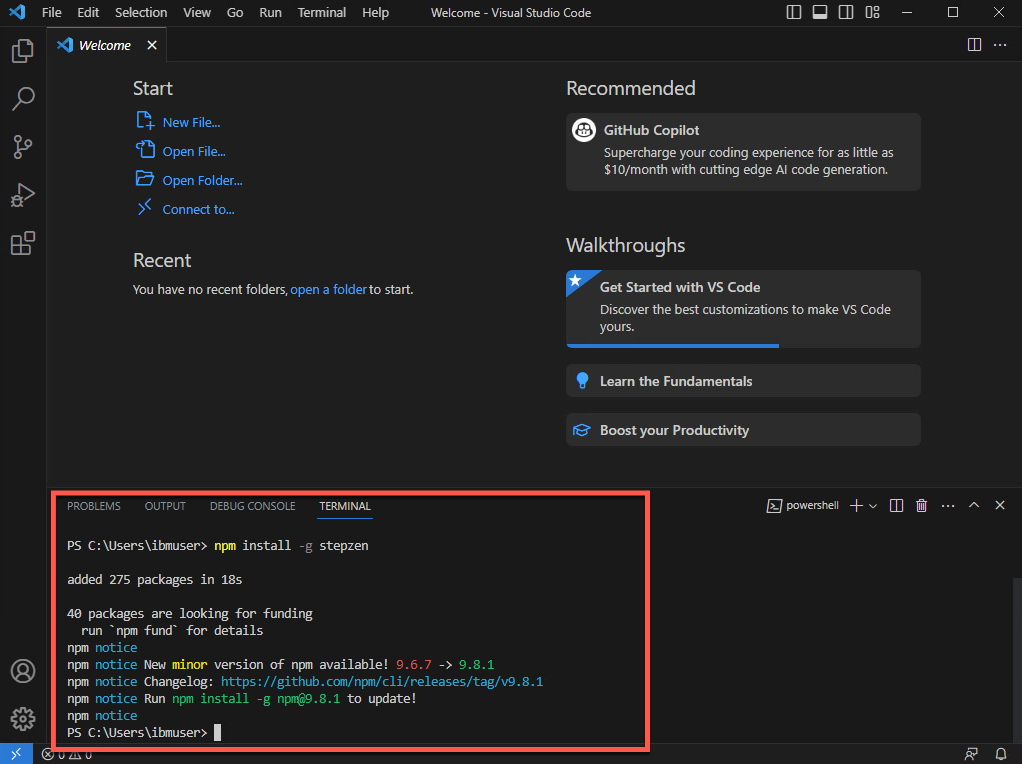
- On your terminal, run the command below to install the StepZen CLI.
npm install -g stepzen
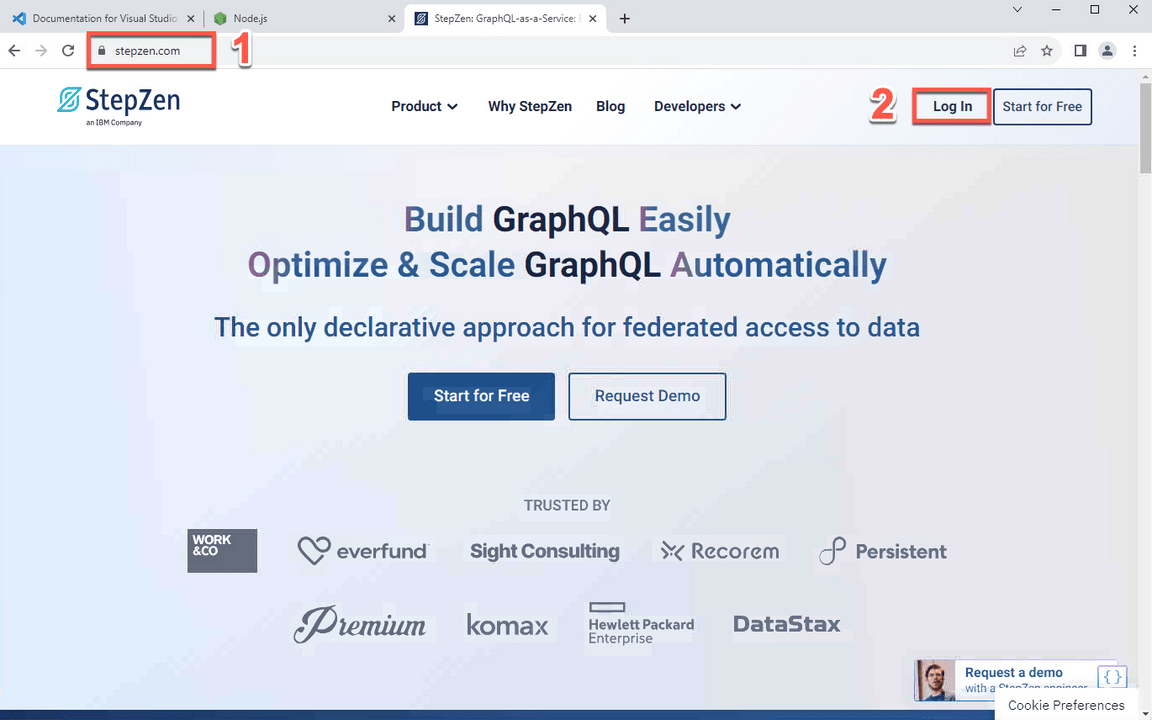
- Now, let’s log in with StepZenAccount. Back to the browser window, open the URL below (1) and click on Log In link (2).
http://www.stepzen.com
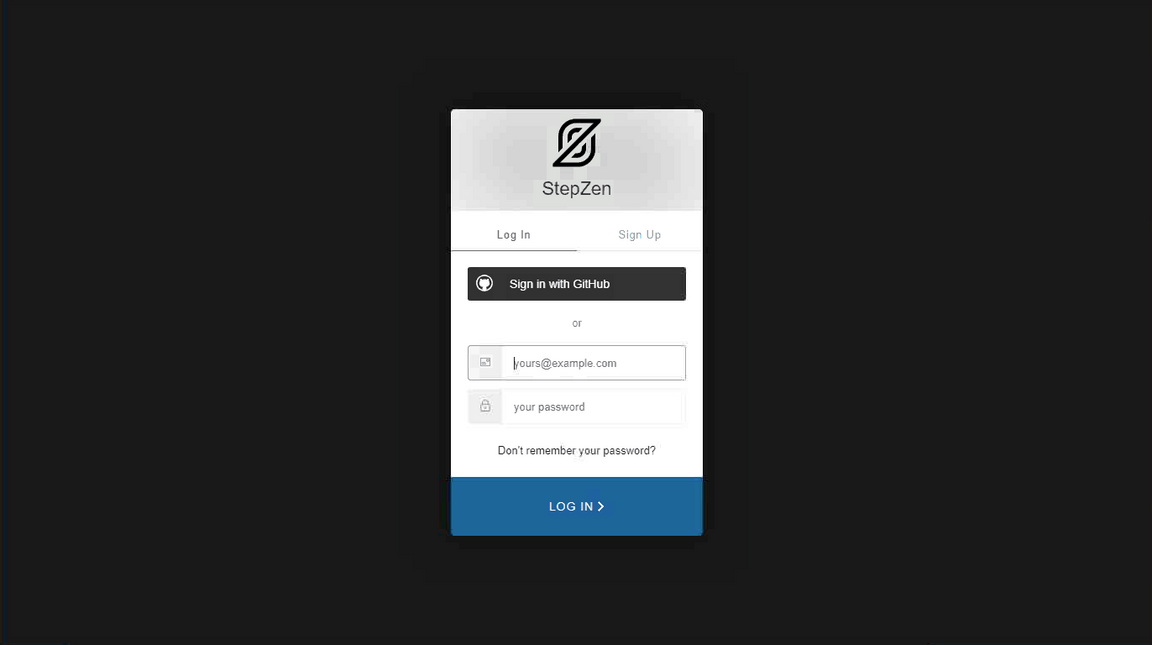
- If you have a personal account, go ahead and log in. If you are using an account provided by your lab owner, log in with the username and password that you received.
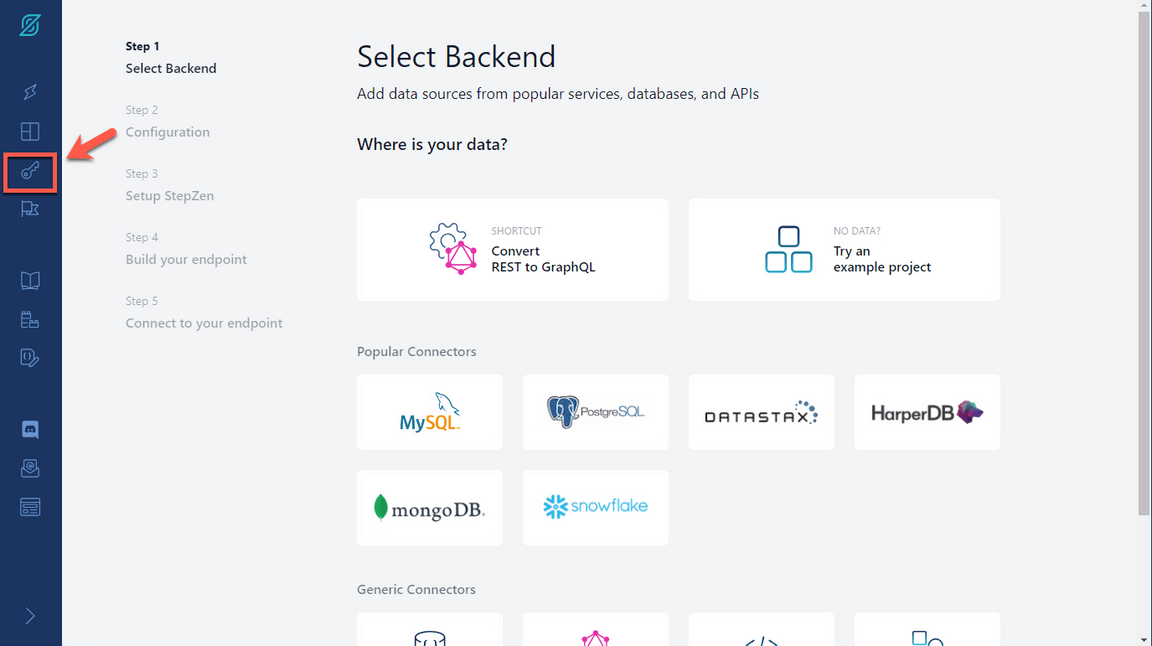
- On StepZen Dashboard page, on the left menu, open the Account page (key icon).
- Here you have all the information that you need to log in using the CLI. Your Account name (1) and Admin Key (2). You will use them in the next step.
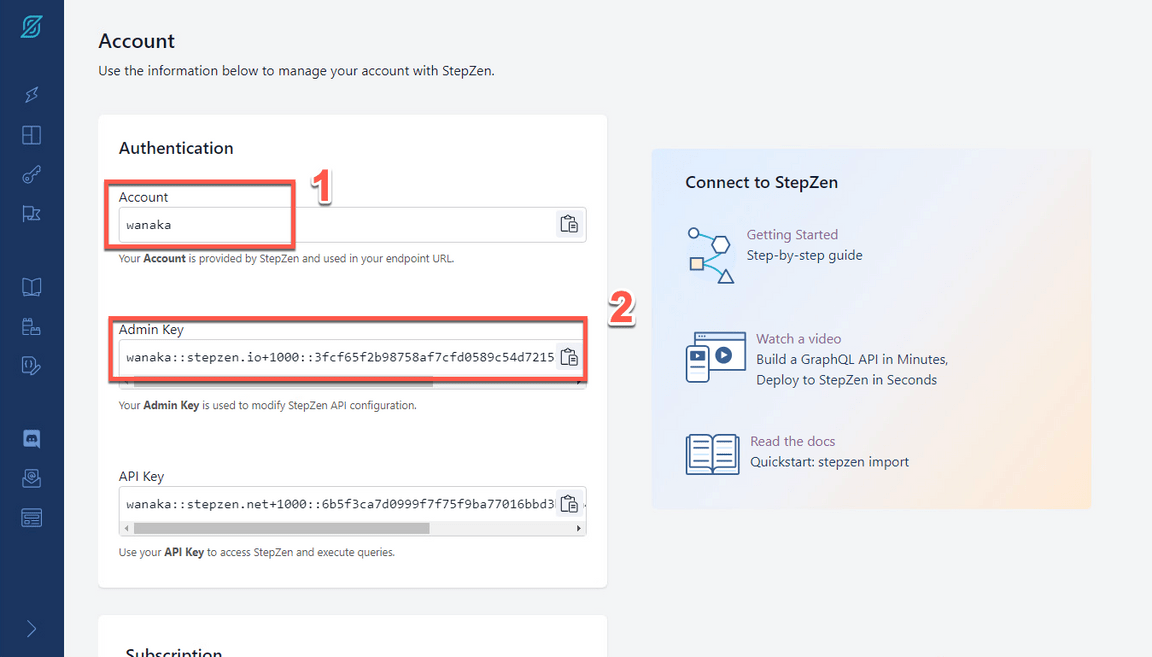
- On your Visual Studio Code terminal window, execute the command below to log in with StepZen CLI, replace [your_account] with the account value (1) from the Account page.
stepzen login -a [your_account]
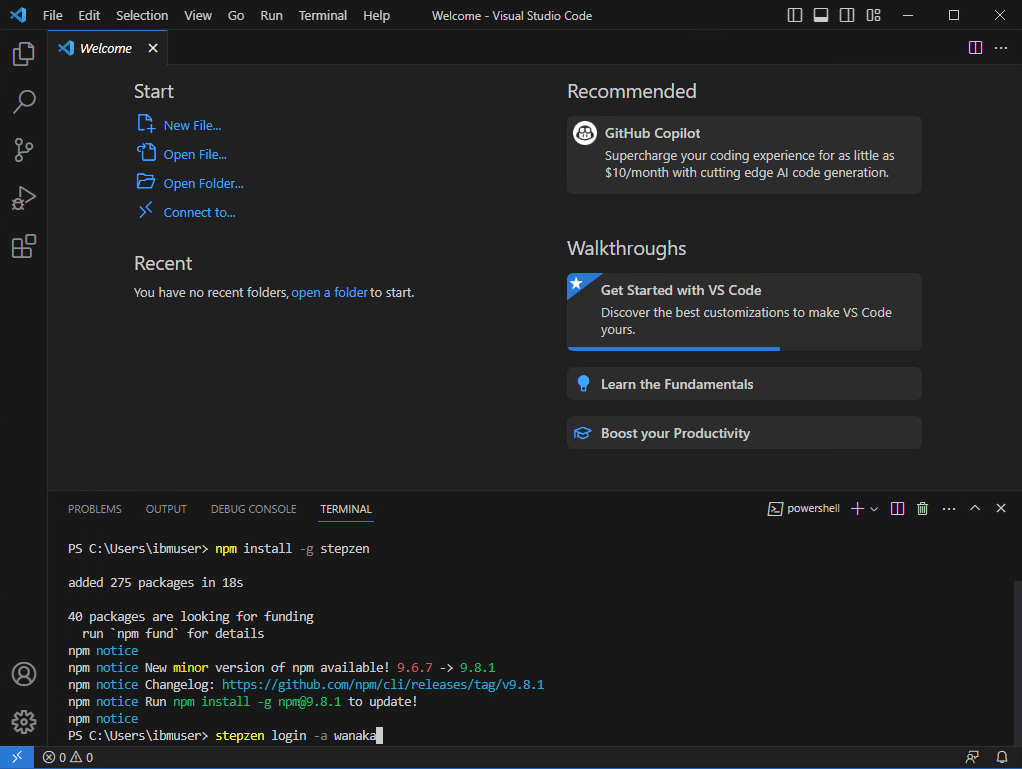
- Now, you need to enter your Admin Key. Copy and paste the Admin Key value (2) from the Account page.
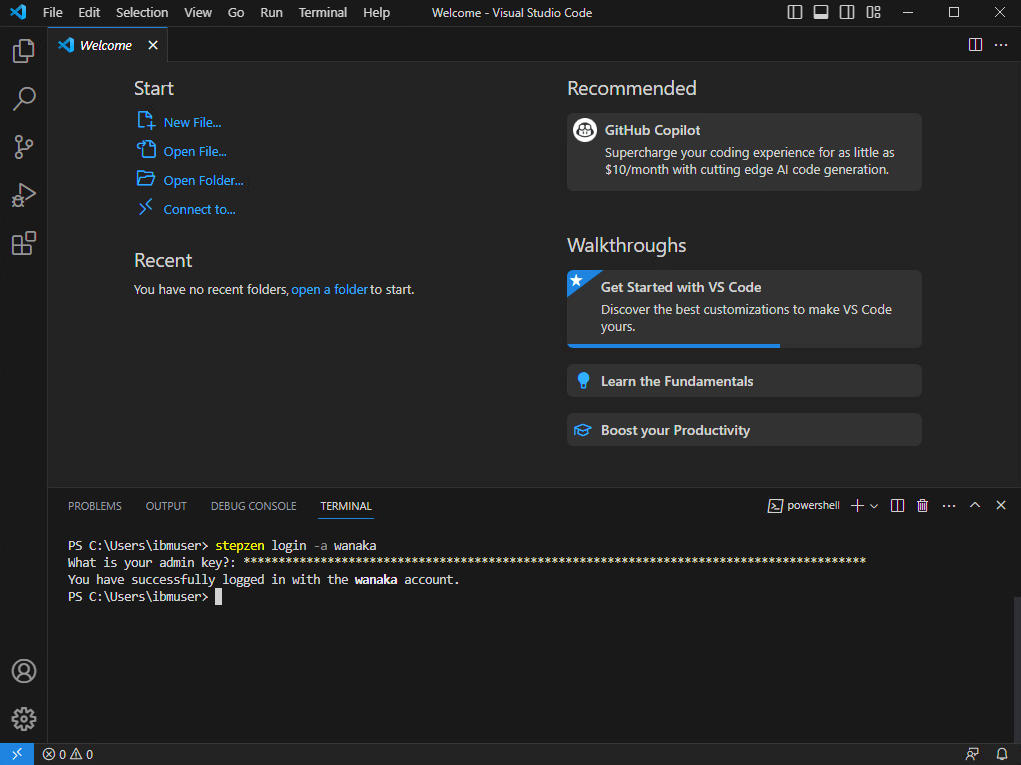
Great, now you are ready to build your graphQL API!
4 - Build your GraphQL API from a REST API
Use the StepZen CLI to create a GraphQL API for backends with REST interfaces in minutes.
There are two ways to create your GraphQL API with StepZen when you have a REST backend.
- Use the command-line interface (CLI) command stepzen import curl to specify an existing REST endpoint - StepZen introspects the endpoint and auto-generates a GraphQL schema for you.
- Write your schema code in a .graphql GraphQL Schema Definition Language (SDL) file. Use the powerful GraphQL directive @rest to connect the REST endpoint, and with just a few lines of code, you have a working schema.)
In this section you will learn how to use stepzen import curl on an existing REST API. This command sends a curl request to StepZen and parses the GraphQL types from the JSON response.
Before we build your GraphQL API, let’s create a new directory and initialize a StepZen workspace in this directory.
- On Visual Studio Code Terminal, execute the command below to create a new directory.
mkdir product-demo
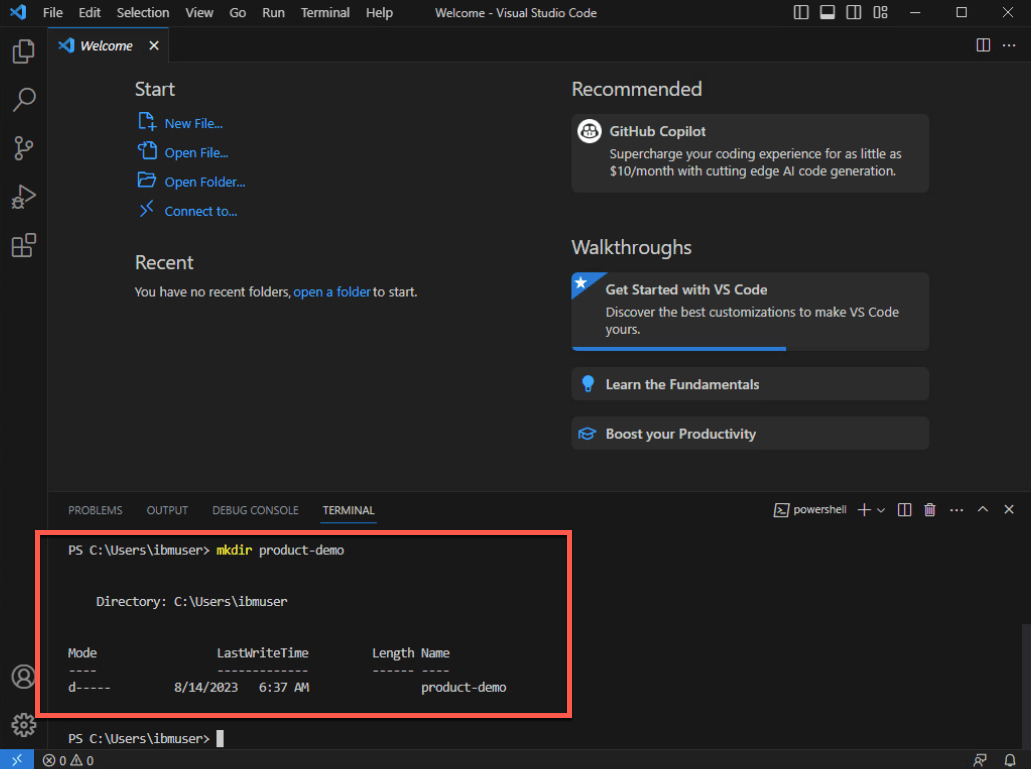
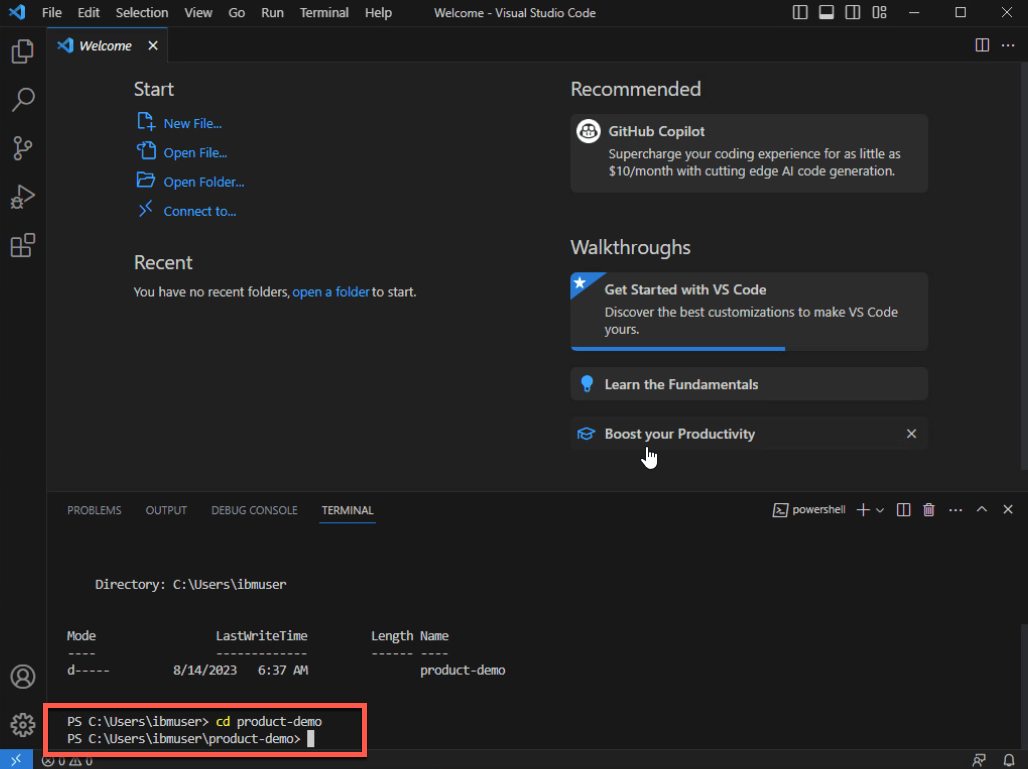
- Change to the new directory.
cd product-demo
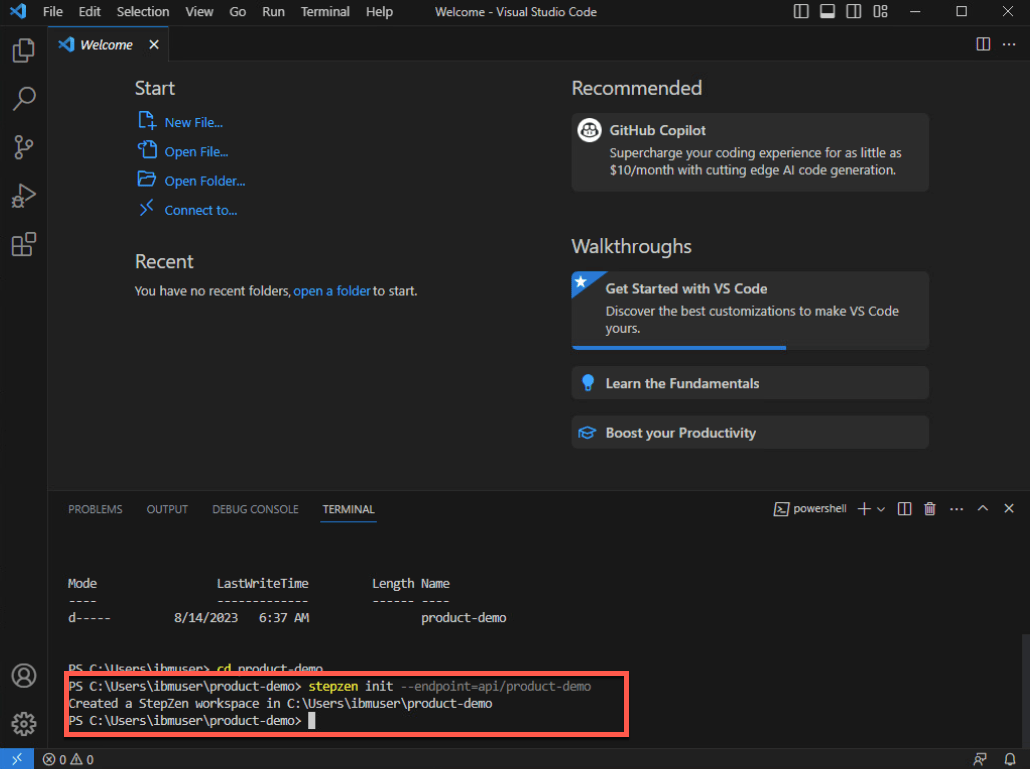
- You need to initialize a StepZen workspace in the current directory. Execute the command below.
stepzen init --endpoint=api/product-demo
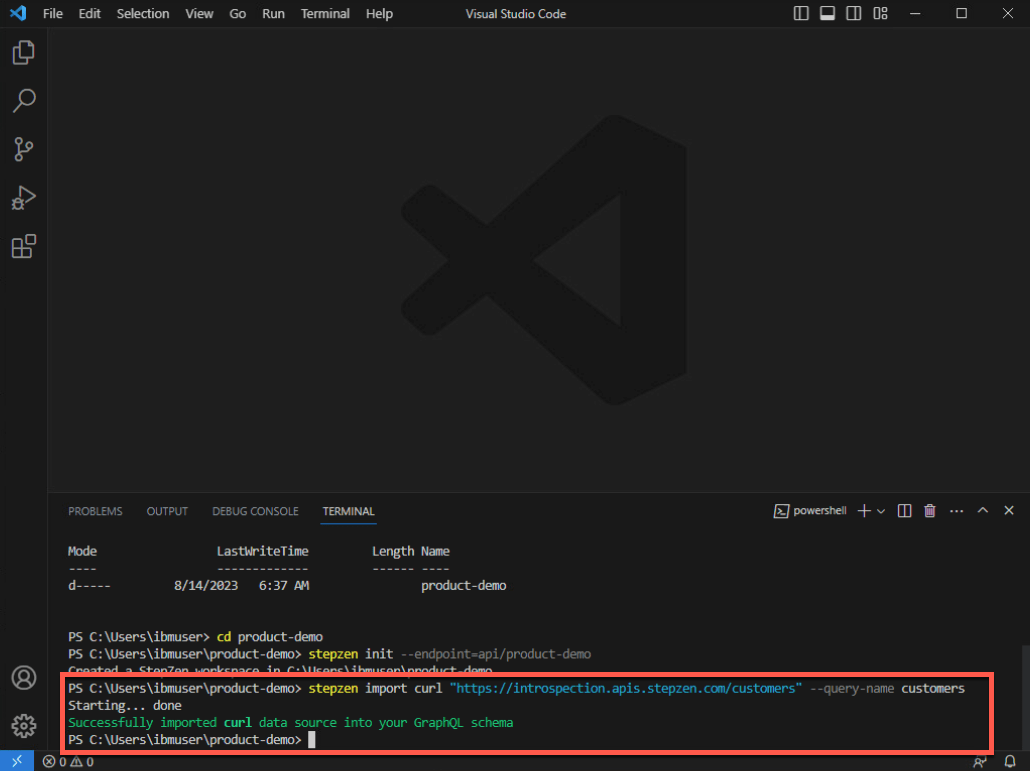
- Now, let’s take advantage of StepZen to introspects the REST endpoint and auto-generates a GraphQL schema for you. Here you will use a pre-created REST API.
stepzen import curl "https://introspection.apis.stepzen.com/customers" --query-name "customers"
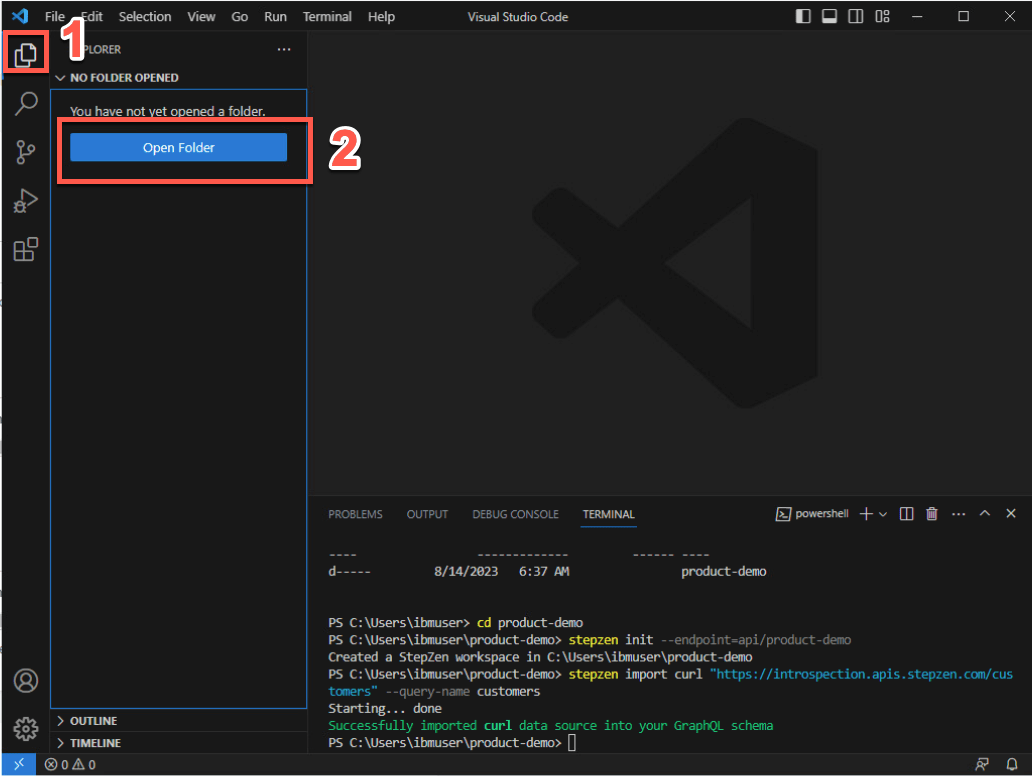
- Great, your first GraphQL API is created. Let’s explore the graphQL schema! On Visual Studio Code, click on Explorer icon (1) and click Open Folder (2).
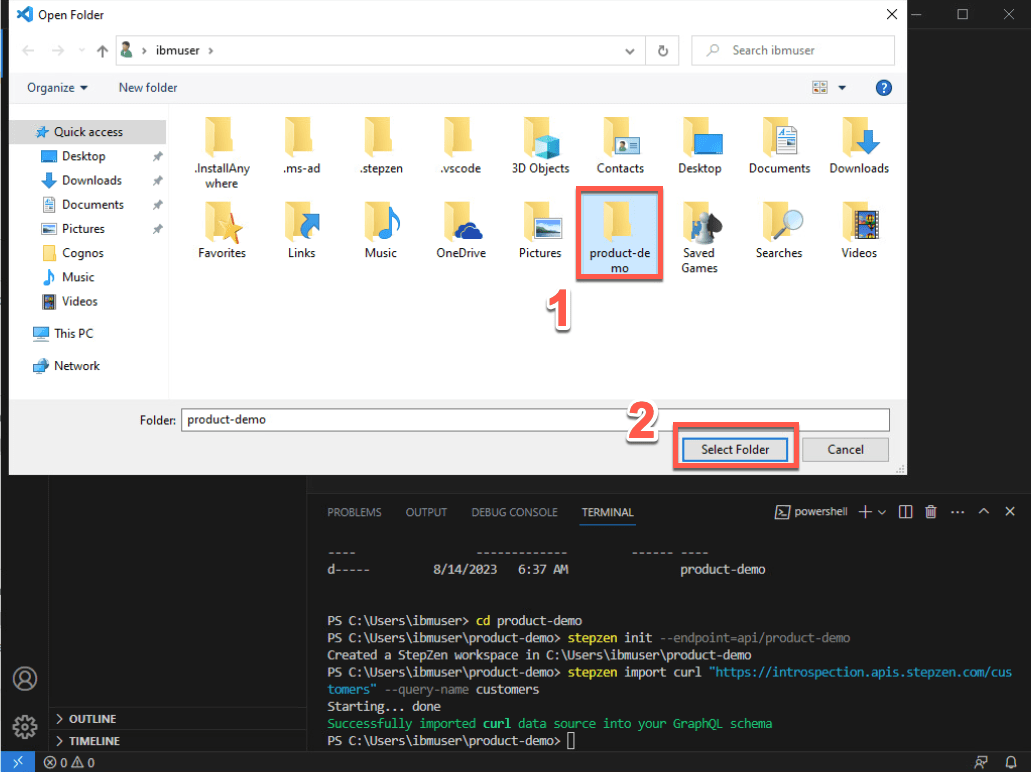
- Select the new created product-demo folder (1) and click Select Folder (2).
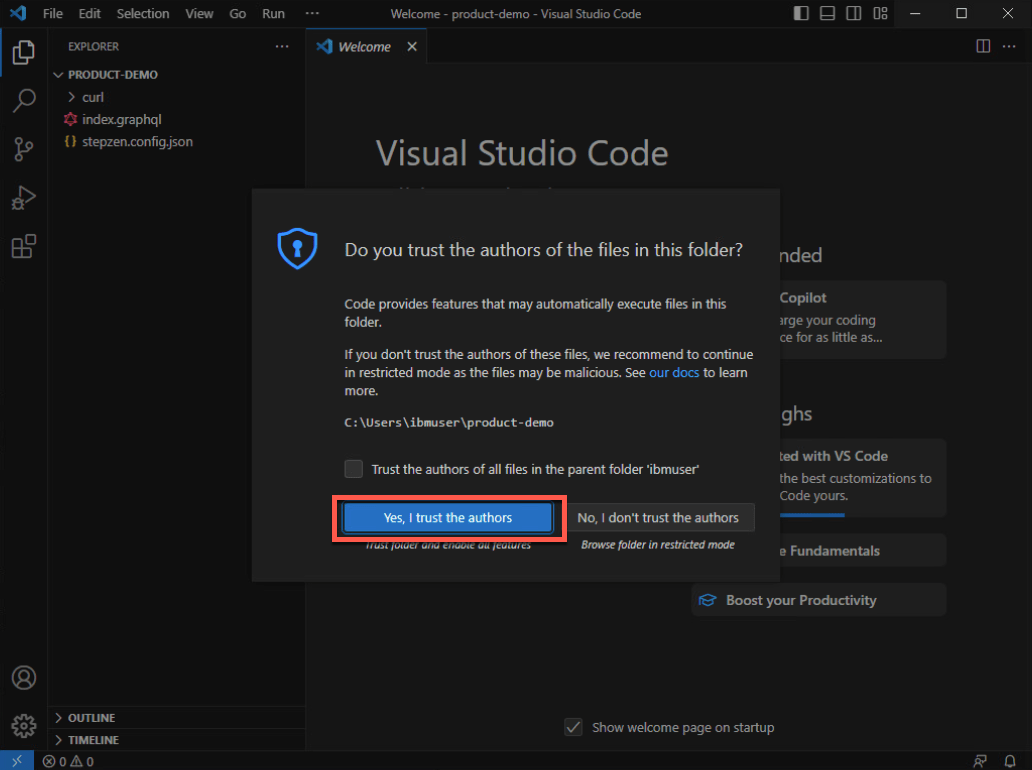
- If necessary, click Yes, I trust the authors button.
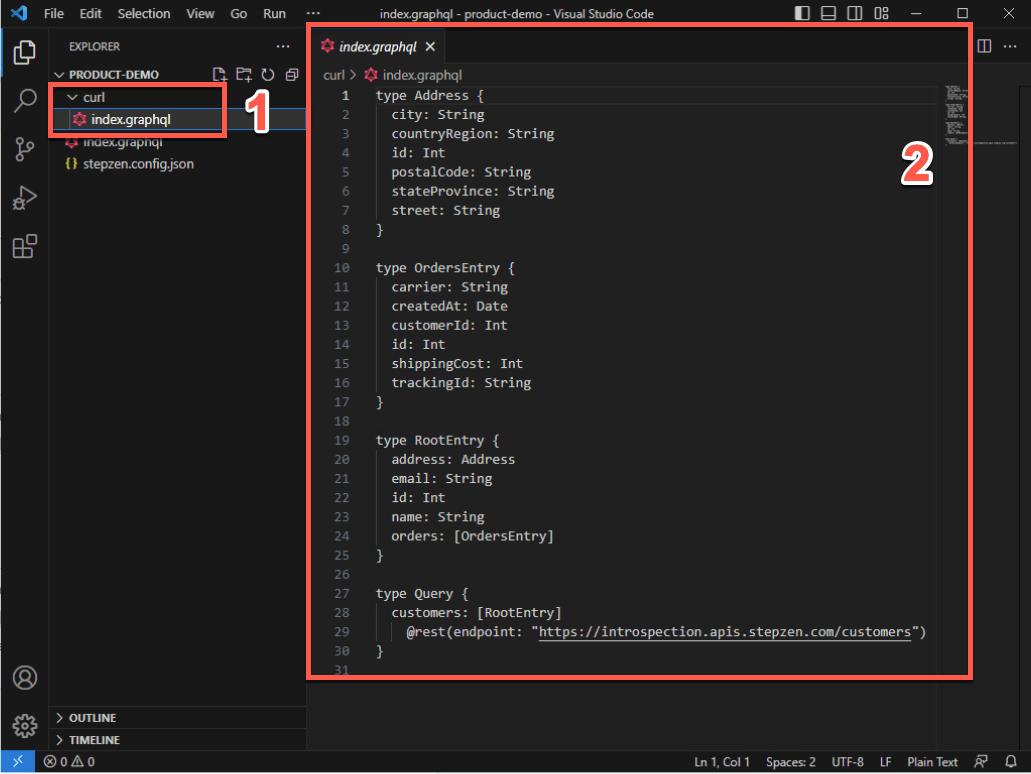
- To see the GraphQL schema, open the curl folder and select the index.graphql file (1). You are welcome to explore and check the .graphQL file (2).
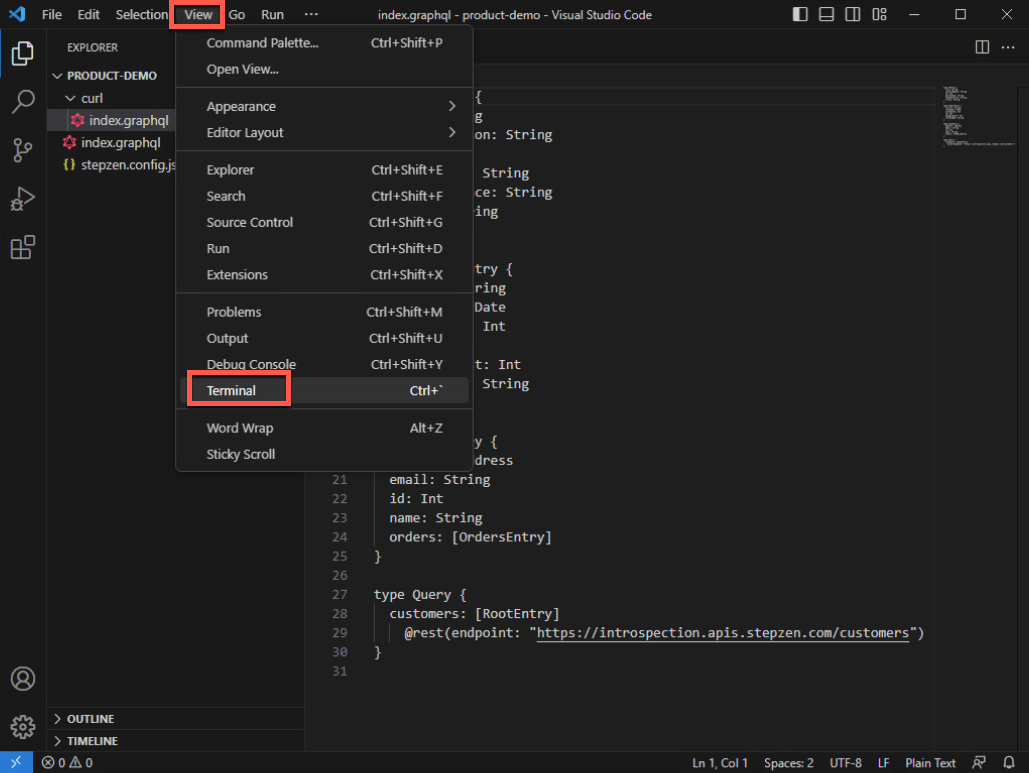
- If necessary, click View > Terminal to see the terminal window again.
You will not deploy this GraphQL yet. Before that, let’s import another REST endpoint.
5 - Adding a new REST API in your GraphQL API
In this section, you will import a different endpoint. Let’s do it!
- Execute the command below to import another REST API.
stepzen import curl "https://introspection.apis.stepzen.com/orders" --query-name "orders" --query-type "Order"
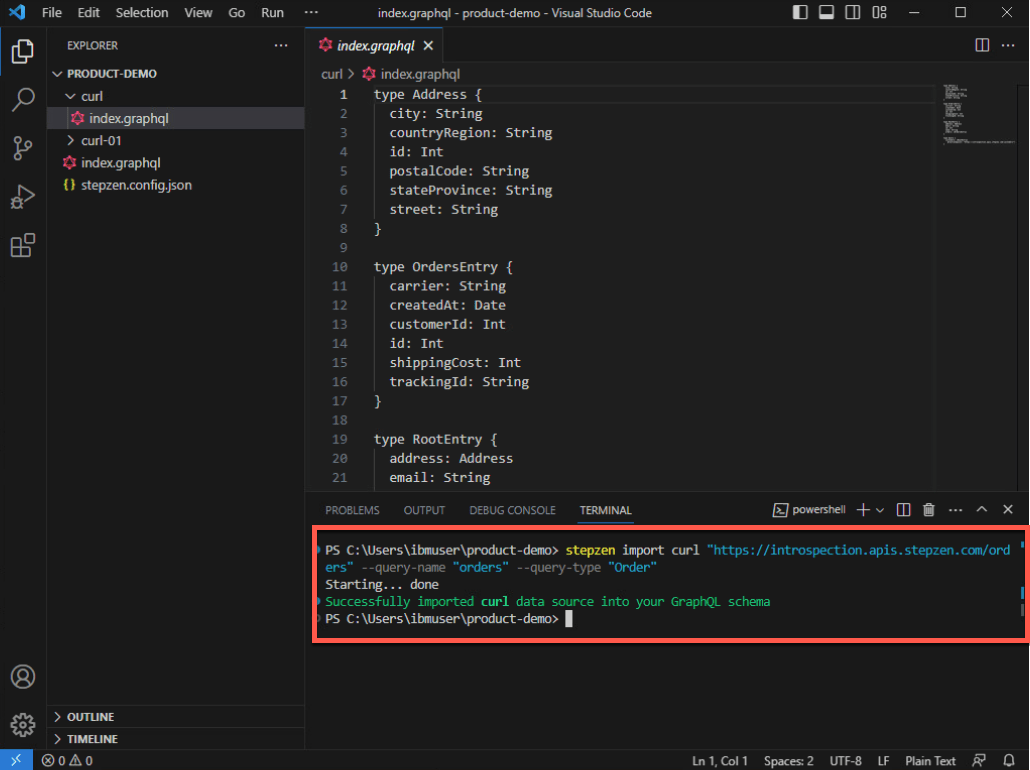
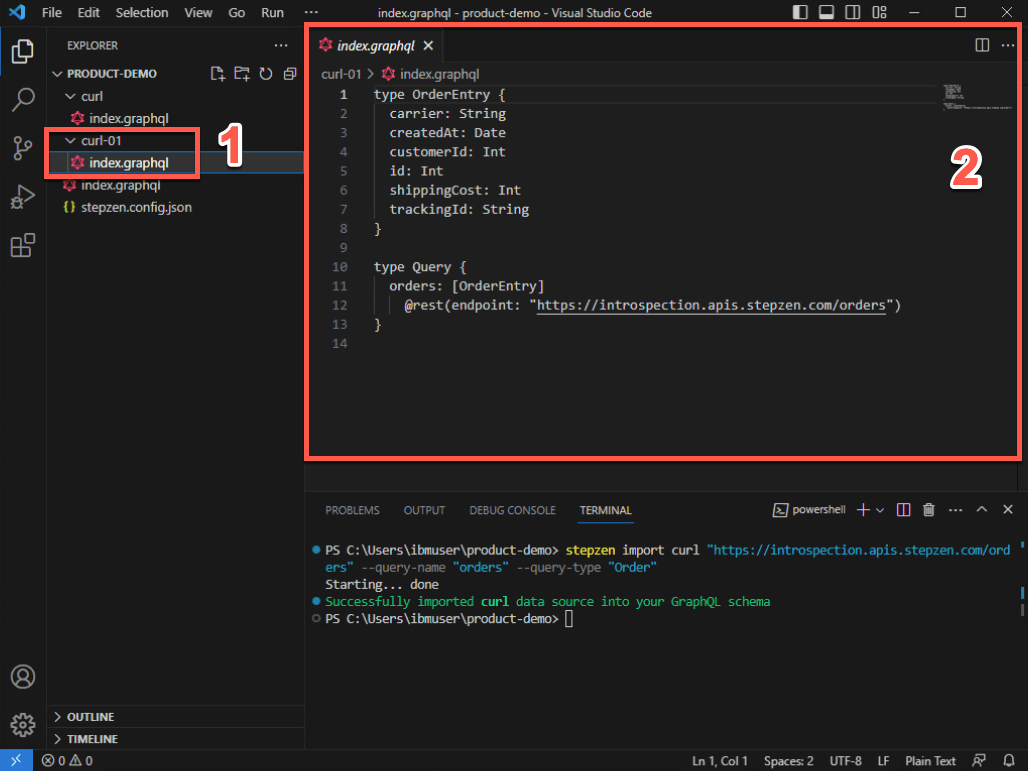
- To check the new graphQL schema, open the curl-01 folder and open the new index.graphql file (1). You are welcome to explore the new schema (2).
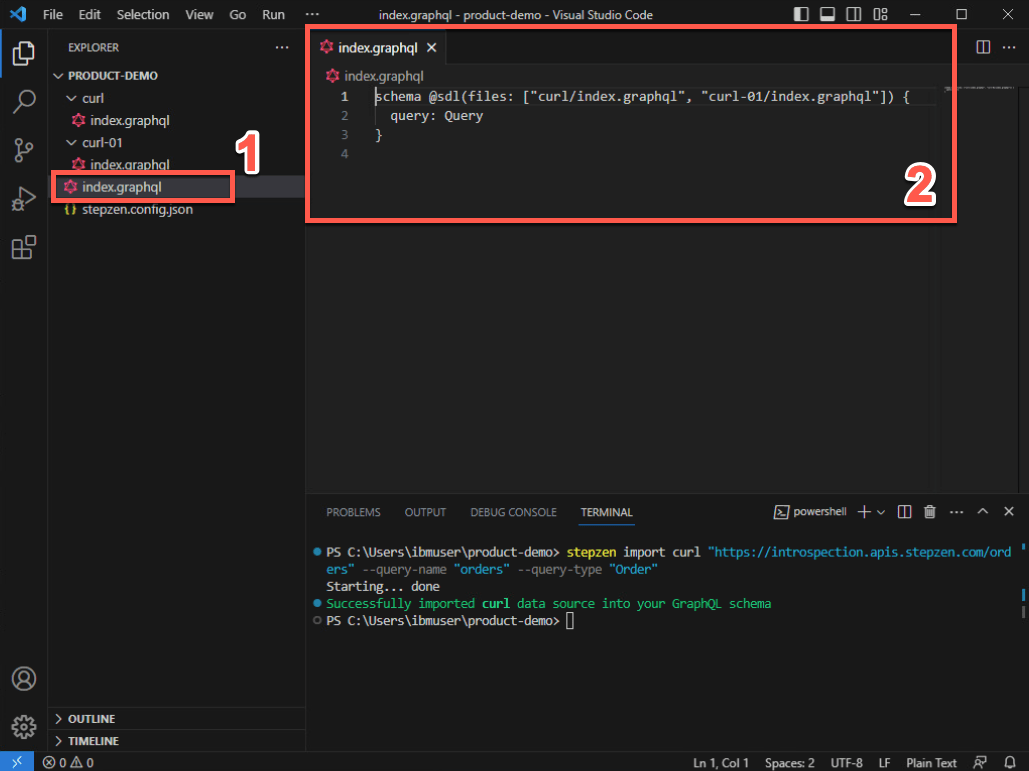
- Open the third schema, the index.graphql file in the product-demo folder (1) and check this schema is referencing the other two schemas (2).
- Now, you are able to run the command below to initialize your endpoint.
stepzen start
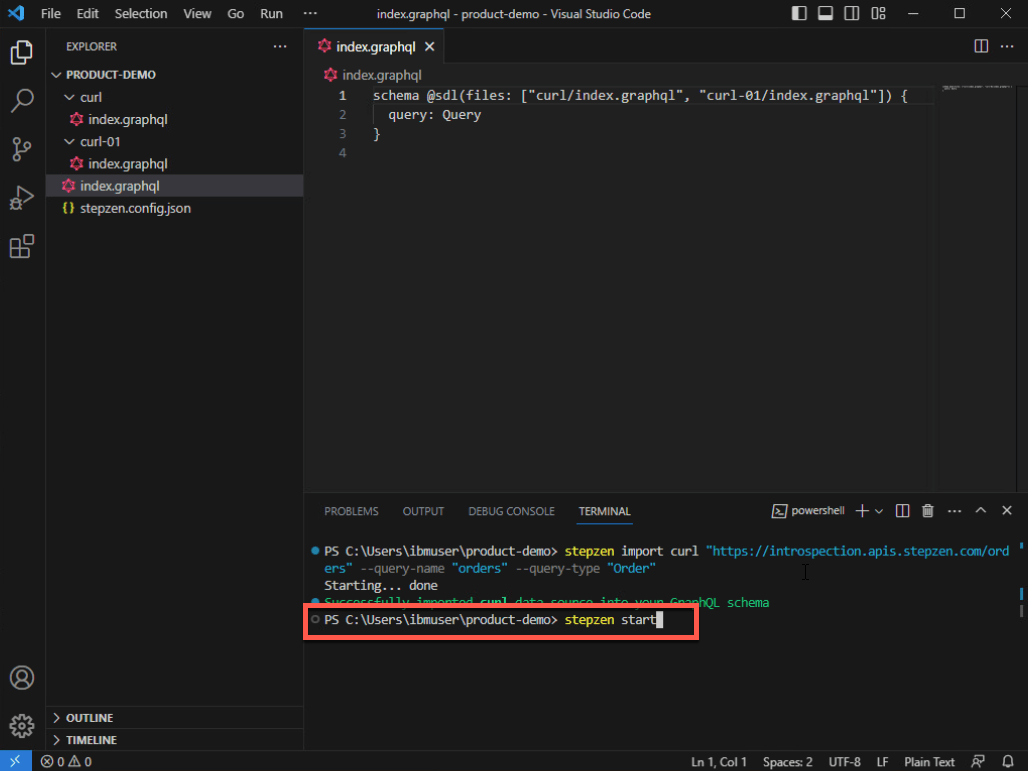
This command does three things
- Deploys the code in the current directory (or the directory provided via the —dir flag) to the specified endpoint on StepZen.
- Watches the directory for changes and automatically deploys them to the endpoint specified.
- Share a URL with StepZen’s Schema Explorer that enables you to test your API by exploring the queries and types available and querying the API running on StepZen.
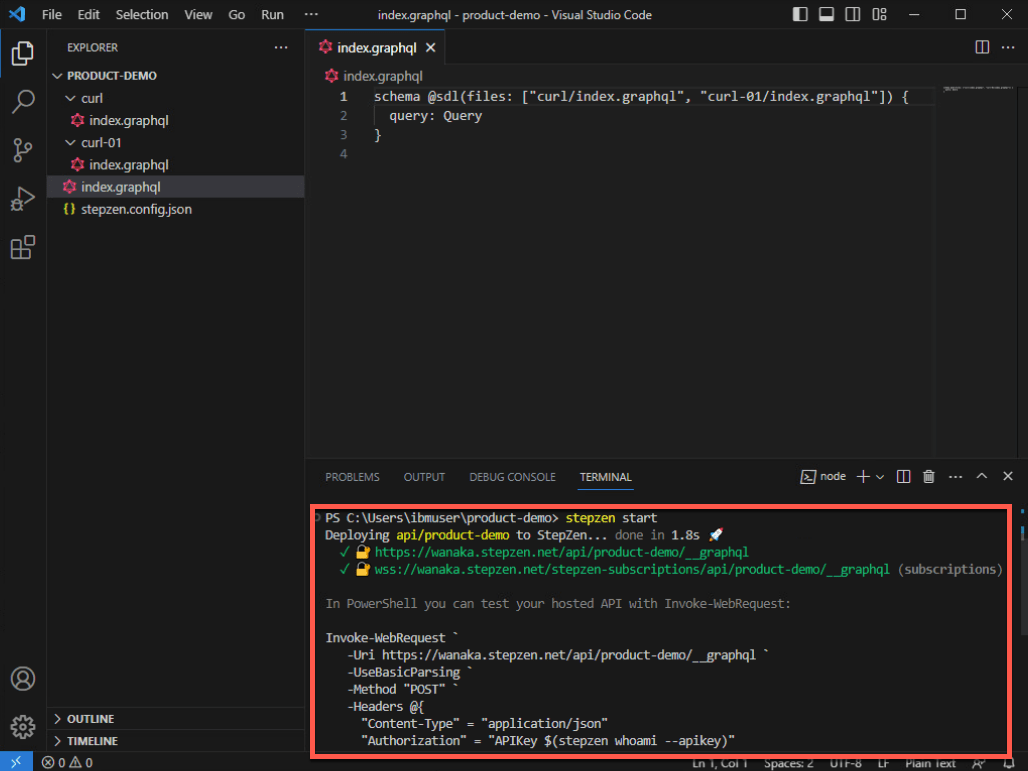
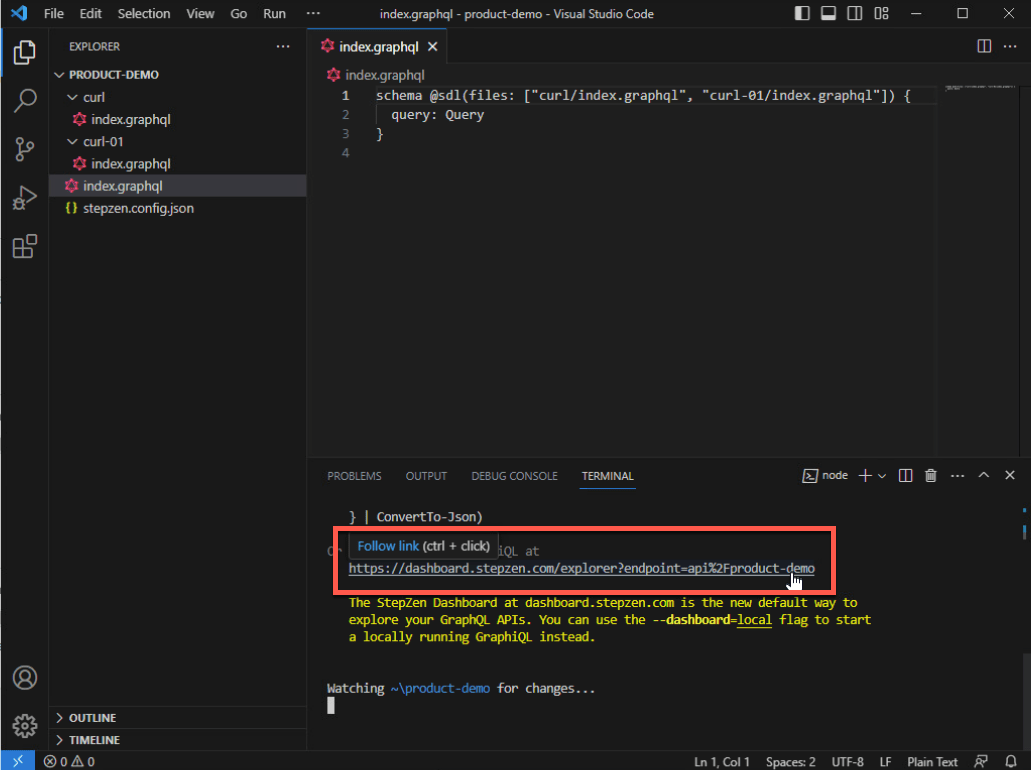
- The StepZen dashboard provides a playground for testing your GraphQL API. Let’s open it to explore our GraphQL API. Scroll down your terminal page to see the Dashboard URL of your API. Copy and paste it in you browser window.
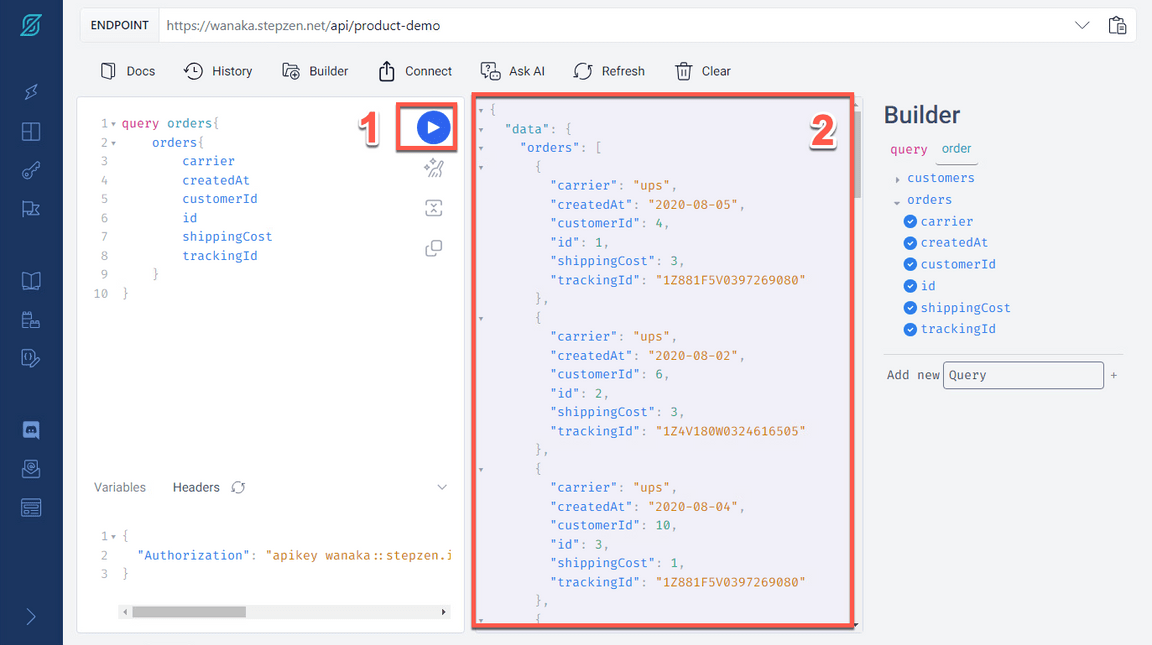
- In StepZen Dahsboard you can play with different queries. Go ahead and click Execute Query button (1) to test the orders query. Check the result data (2).
- You are welcome to play with the Builder section (1), to create queries with different values. For example, delete the order query, and create a customers query with some fields (2). Execute the query again (3) and check the result data (4).
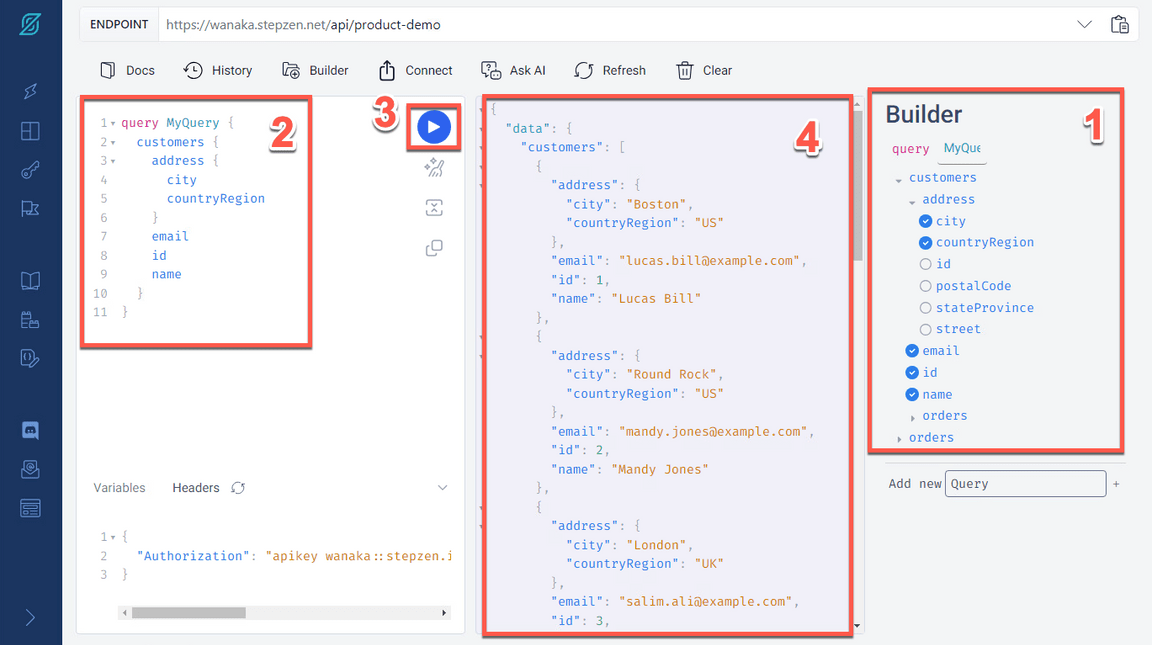
With these results, we are consuming data from two different REST APIs. And you can do that with APIs from different types of data sources as well. In the next section, you will inspect data from a MySQL database.
6 - Autogenerate GraphQL Schemas from MySQL Database
There are two ways to create your GraphQL API with StepZen when you have a SQL database backend.
- Use the command-line interface (CLI) command stepzen import [mysql | postgresql] to specify your database - StepZen introspects it and auto-generates a GraphQL schema for you.
- Write your schema code in a .graphql GraphQL Schema Definition Language (SDL) file. Use the GraphQL directive @dbquery to connect the database, and with just a few lines of code, you have a working schema.)
In this section, you will learn how to use stepzen import mysql. In this lab, you will use a sample MySQL database from StepZen.
- Back to your terminal, cancel the current execution (CTRL+C). And execute the command below to create a GraphQL API that connects data from a database backend.
stepzen import mysql --db-host='db.introspection.stepzen.net' --db-database='introspection' --db-user='testUserIntrospection' --db-password='HurricaneStartingSample1934' --name=mysql
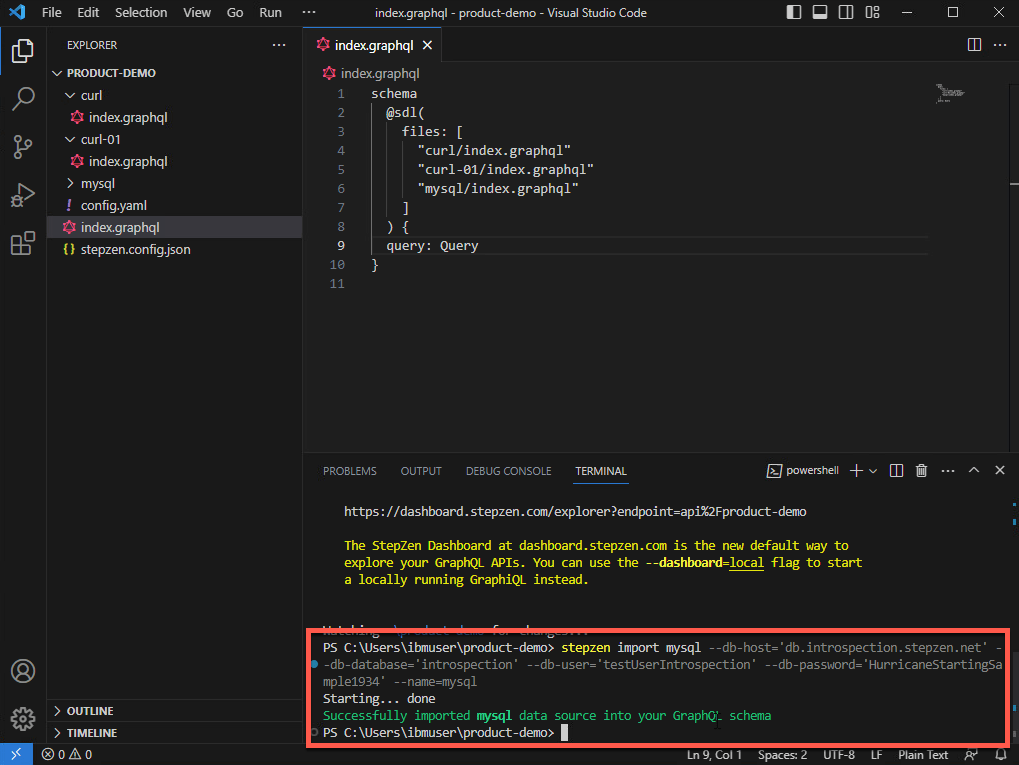
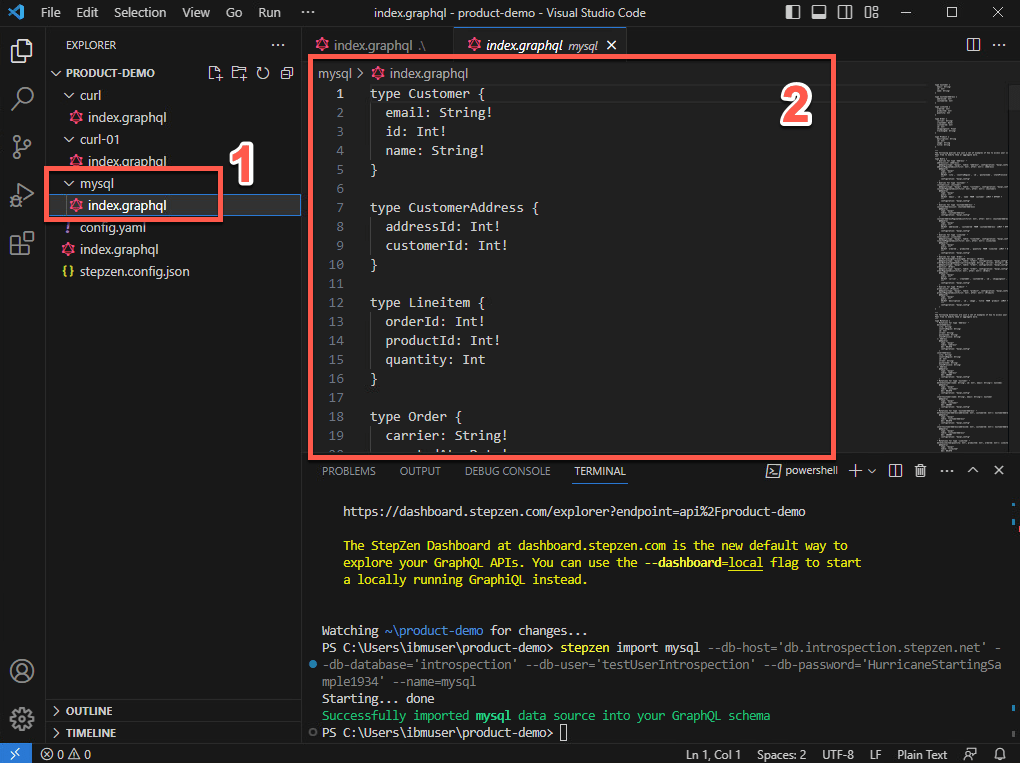
- To check the new graphQL schema, open the mysql folder and open the new index.graphql file (1). You are welcome to explore the new schema (2).
Before deploying the new API, in the next section you will merge the MySQL database and REST API endpoints.
7 - Creating a composition of building blocks using @materializer
Now that you have multiple subgraphs, you can link types across subgraphs with @materializer. Let’s do it!
- On the index.graphql from mysql folder (1), scroll down to see the ‘type Query’ declaration. Below the sentence ”Queries for type ‘Address’” include the query code below (2).
getAddressById(id: Int!): [Address]@dbquery(type: "mysql"query: """SELECT * FROM `address` where `id` = ?"""configuration: "mysql_config")
This code is defining a getAddressById query to select address from mySQL database.
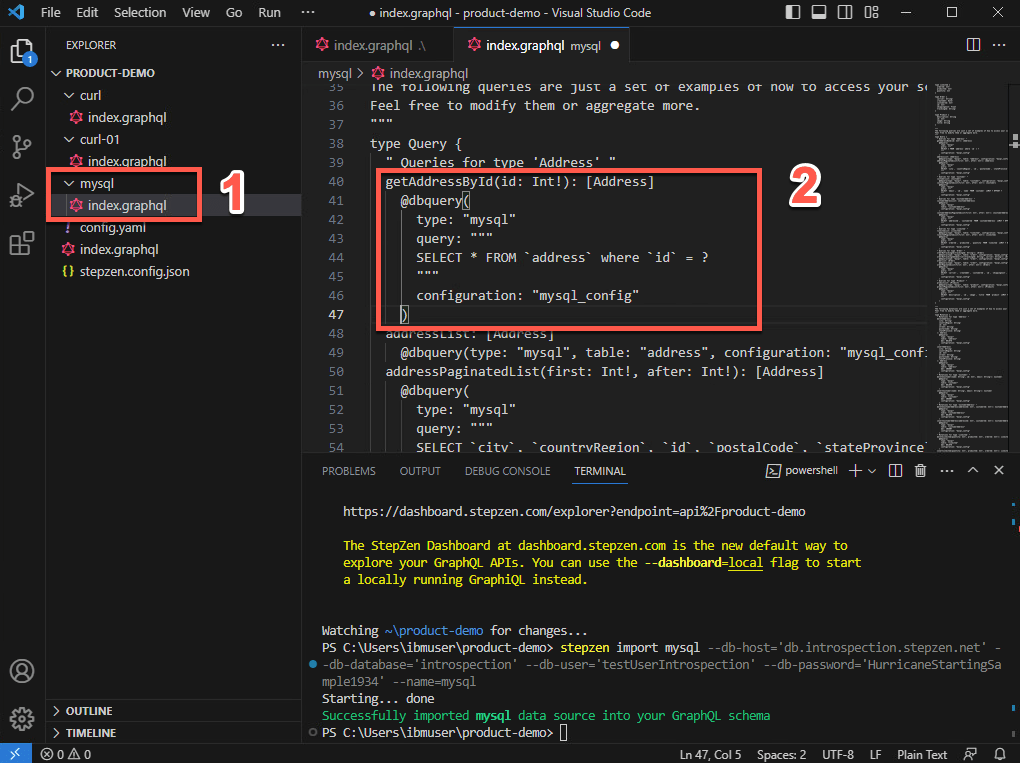
Save the file (File > Save or CTRL+S).
- Now open the index.graphql file from curl folder (1), this is the schema from customers REST API. Scroll down to see the ‘type RootEntry’ section. By now, the address is coming from the REST API endpoint. Let’s change it to get this value from MySQL database. Replace the current address type definition (address: Address) for the code below (2).
address: [Address]@materializer (query: "getAddressById")
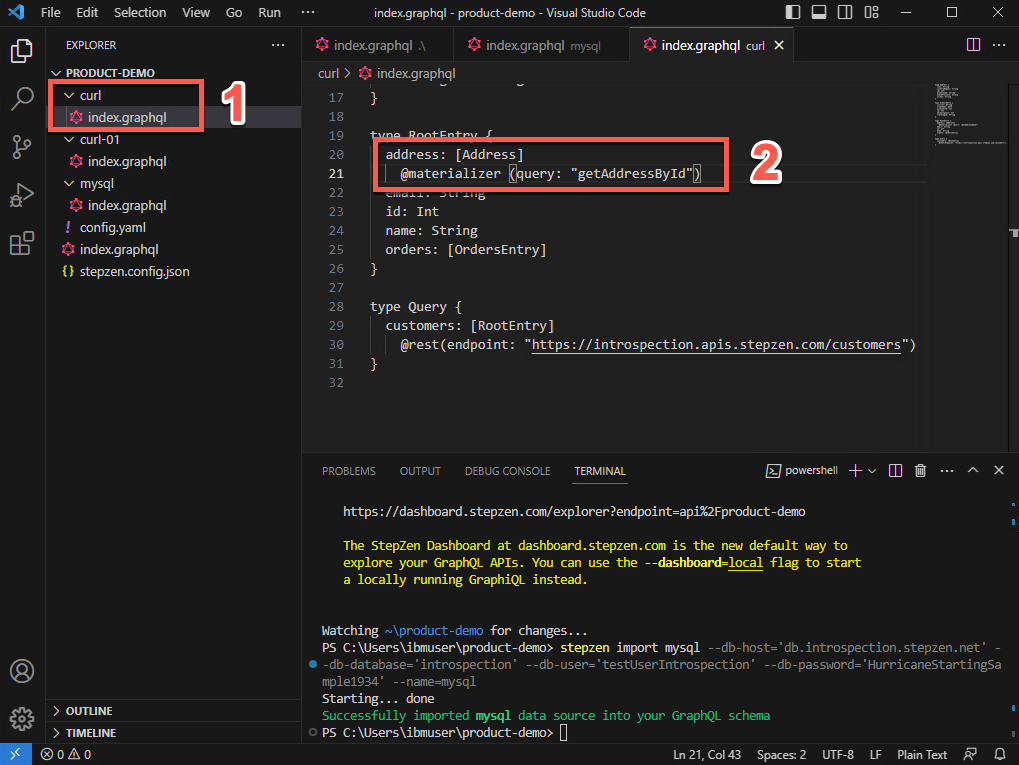
Save the file (File > Save or CTRL+S).
- Let’s deploy the new API. And refresh the StepZen Dashboard.
stepzen start
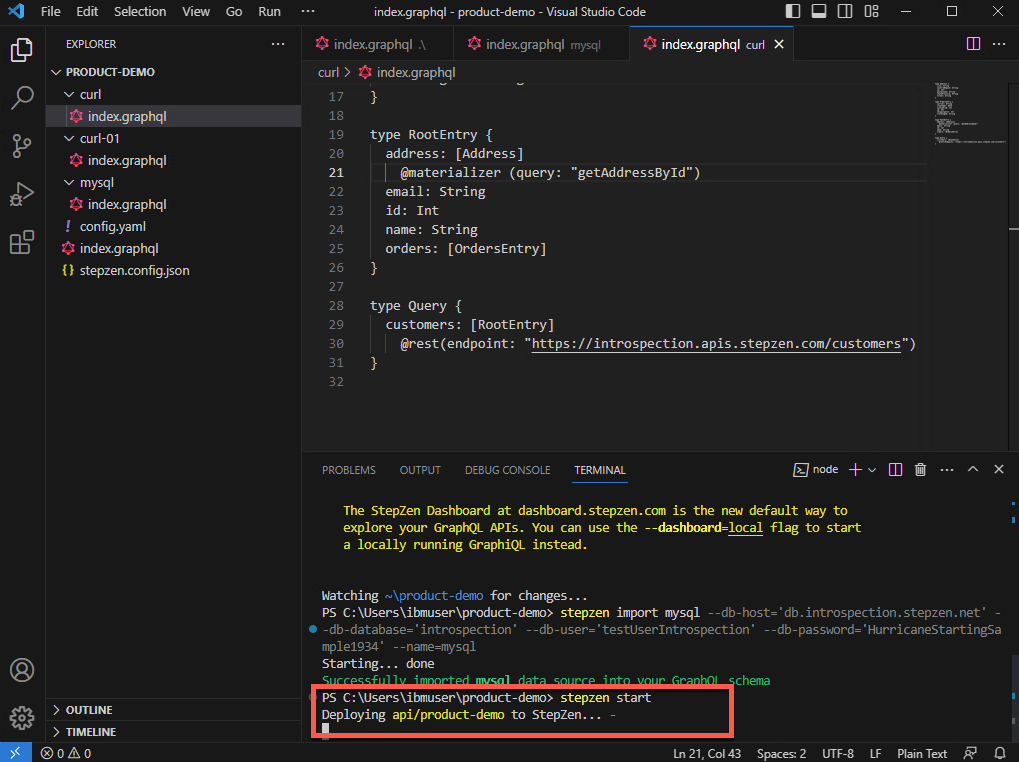
- On the StepZen Dashboard page, use the Builder section (1), to create a customers query including address attributes (2). Execute the query again (3) and check the result data is coming from Rest and MySQL database (4).
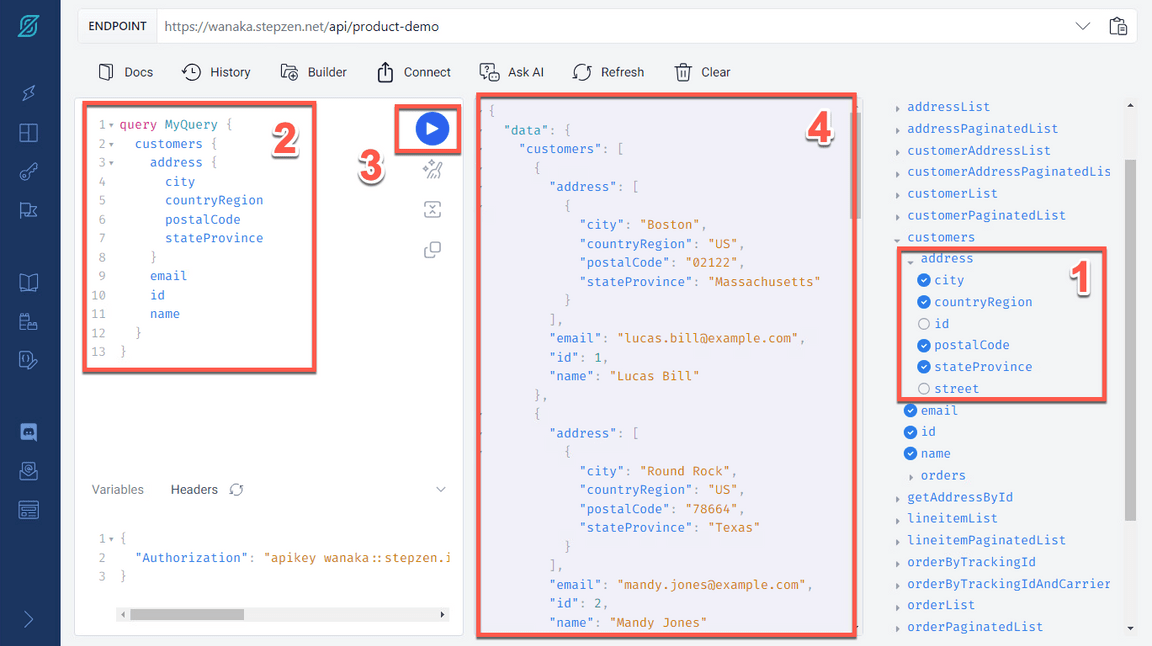
Great! You created a GraphQL API by doing a composition from REST API and MySQL database. Next section you will see how to use IBM API Connect to manage this API.
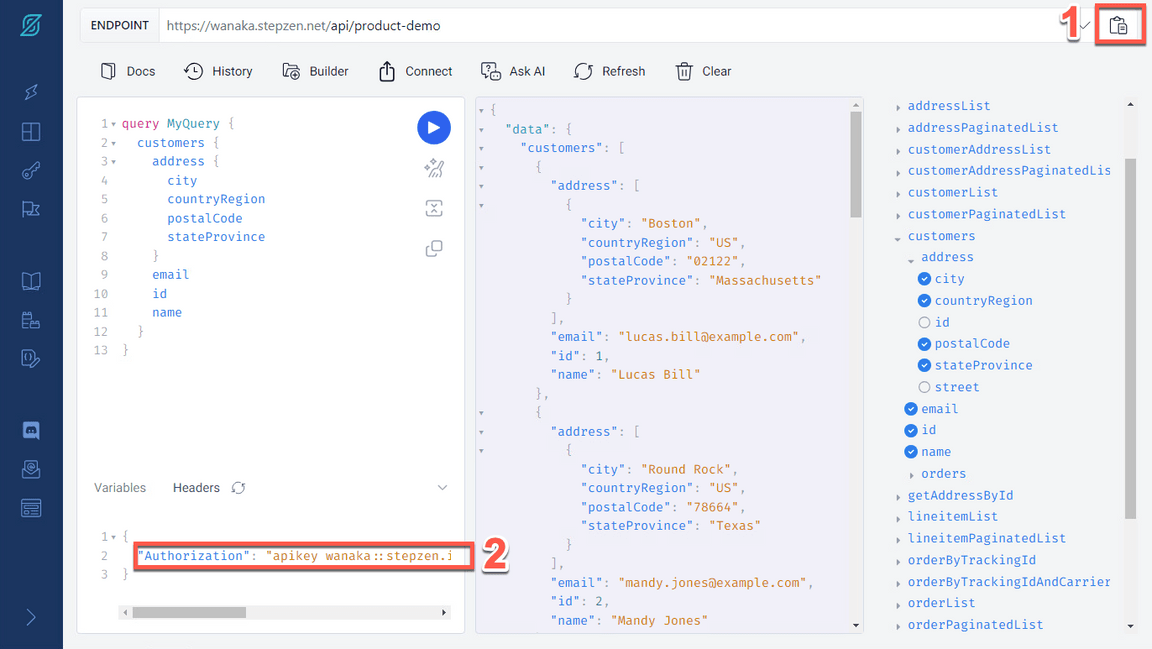
- Before you move to APIC section, take a copy of your API endpoint (1) and the Authorization header (2). You will need them later to invoke your API.
One important point to highlight here is about how StepZen controls access to GraphQL schemas and endpoints.
As you build out your GraphQL APIs, you will want to add access control mechanisms to prevent unauthorized use of these endpoints. StepZen supports two different solutions for this problem.
- API Keys: You can use API keys to control access to the entire endpoint. API keys are the default access control mechanism.
- Field Policies: You can use Field policies to control access to specific entry point fields on the endpoint. Field policies provide fine-grained access control to your GraphQL API, using a model similar to attribute-based access control.
StepZen provides two different types of API keys for use with an account: Admin Keys and API Keys. Admin keys provide administrative-level access to your account, and should only be used at development time. API keys provide more limited access to your account, and should be used for production.
In this lab, for simplification purpose, you will use the Admin Keys to access your API. In a real environment, you should use API Keys or Field Policies to improve your API’s security.
8 - Create a GraphQL Proxy API in APIC
IBM API Connect enables you to create a GraphQL API proxy definition that proxies a backend GraphQL server. API Connect extends the GraphQL standard by providing, in a GraphQL API definition, the ability to configure a range of settings that are used to calculate the complexity of a GraphQL request and an associated cost that counts towards the rate limit.
For this part of the lab, you need to have an API Connect environment. If necessary, check the Prerequisites section to learn how to create your API Connect on AWS Trial Account.
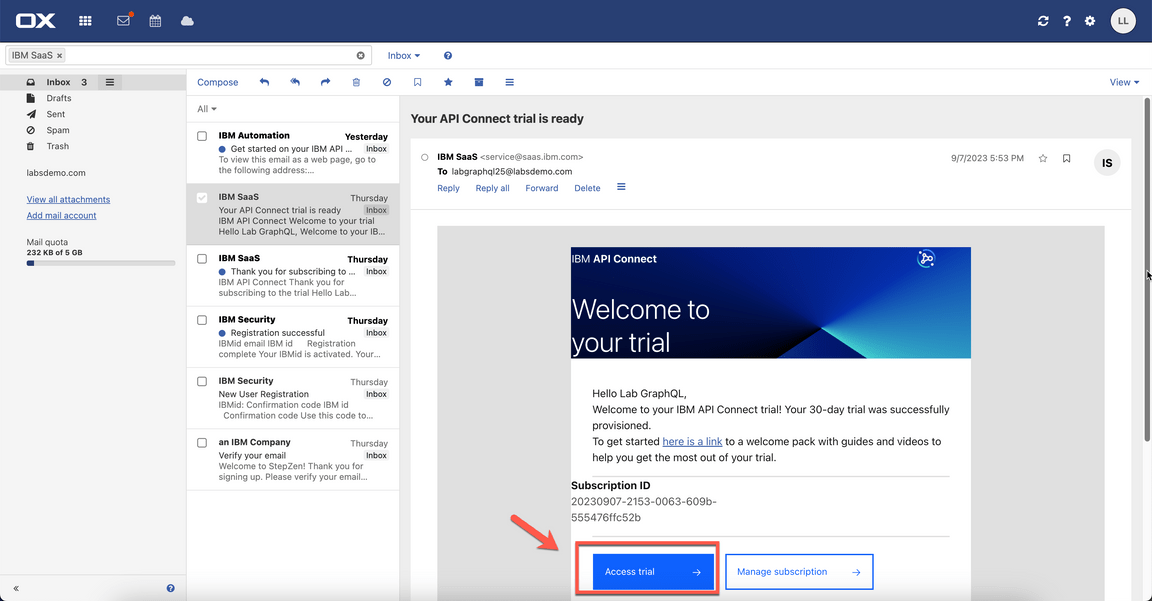
- If you received a lab account from your lab monitor, you need to open your email inbox to get your APIC environment URL. On your inbox (log in with your lab user and password), search for IBM SaaS (1), open the ”Your API Connect trial is ready” email (2).
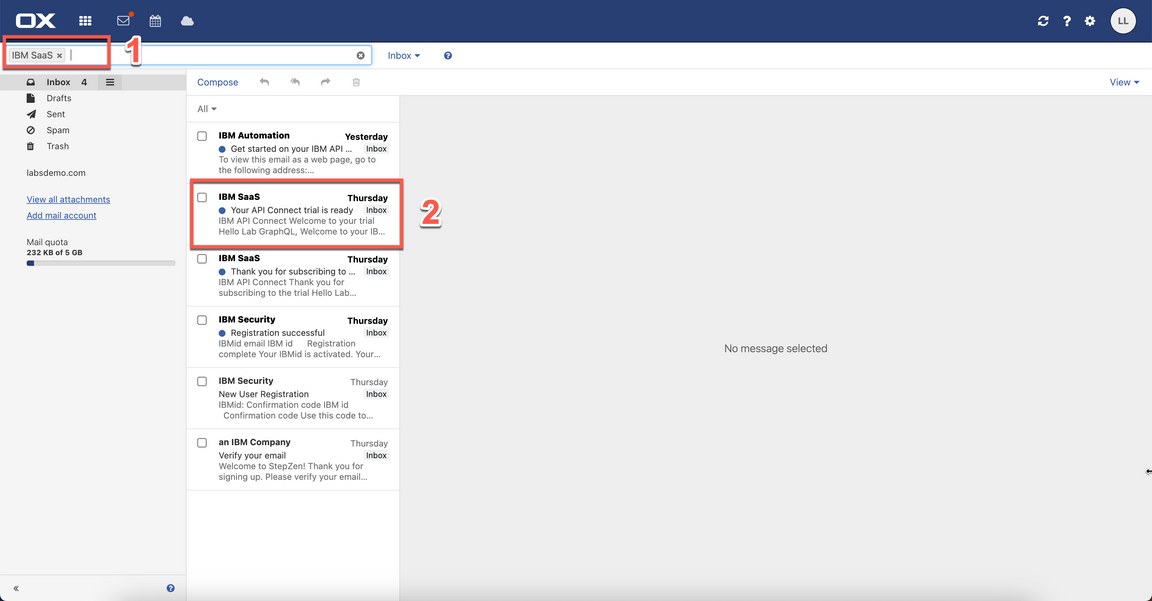
- Now, click Access trial button.
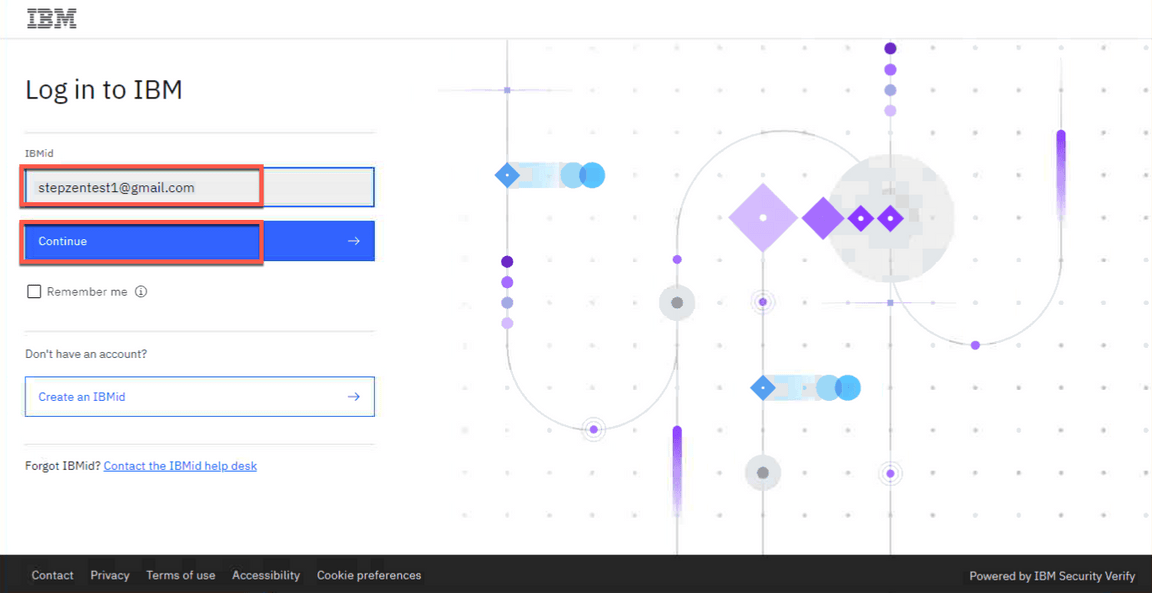
- Log in with your APIC user and password (same user and password received from your lab monitor or using the account that you created).
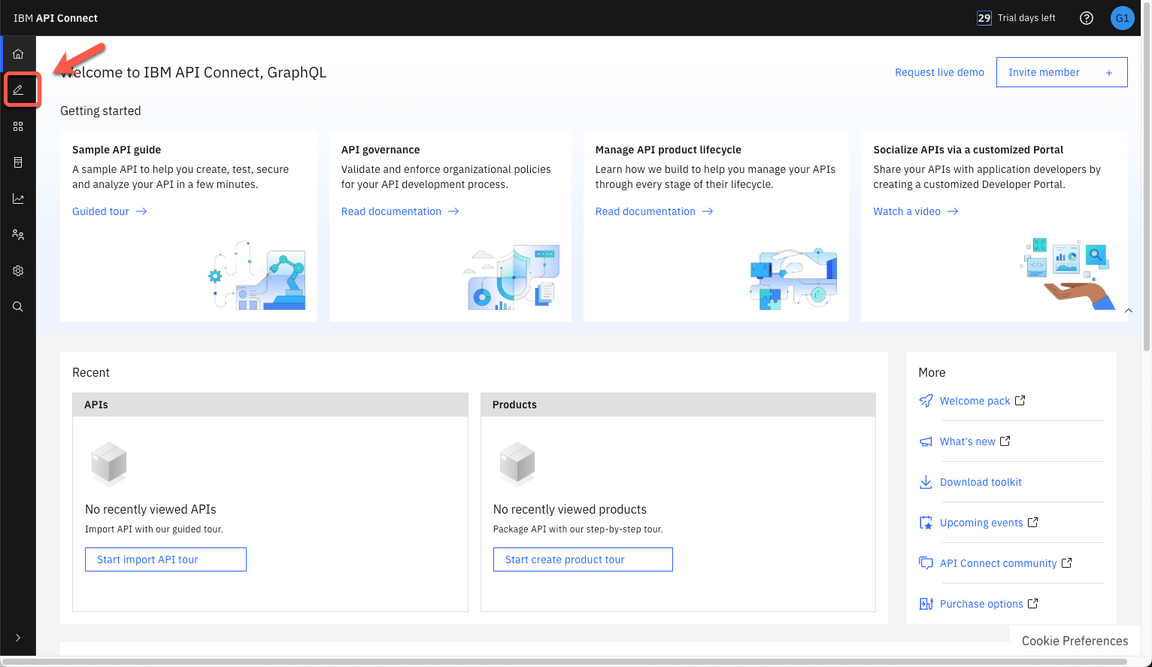
Here, you are on your API Connect Enterprise as a Service environment. API Connect Enterprise as a Service is a cloud-based edition of IBM API Connect. Using API Connect Enterprise as a Service enables you to work in the cloud to create, manage, secure, and socialize APIs using our latest user experiences, innovation, and industry standards for full API lifecycle management.
API Connect Enterprise as a Service uses software-as-a-service as a delivery model. With this model, API Connect is hosted on Amazon Web Services and is managed by IBM. You pay for using the software without worrying about owning and maintaining the underlying infrastructure. With API Connect Enterprise as a Service, you pay for usage through your AWS bill.
Let’s see how to create a GraphQL Proxy API. Click on the Develop menu.
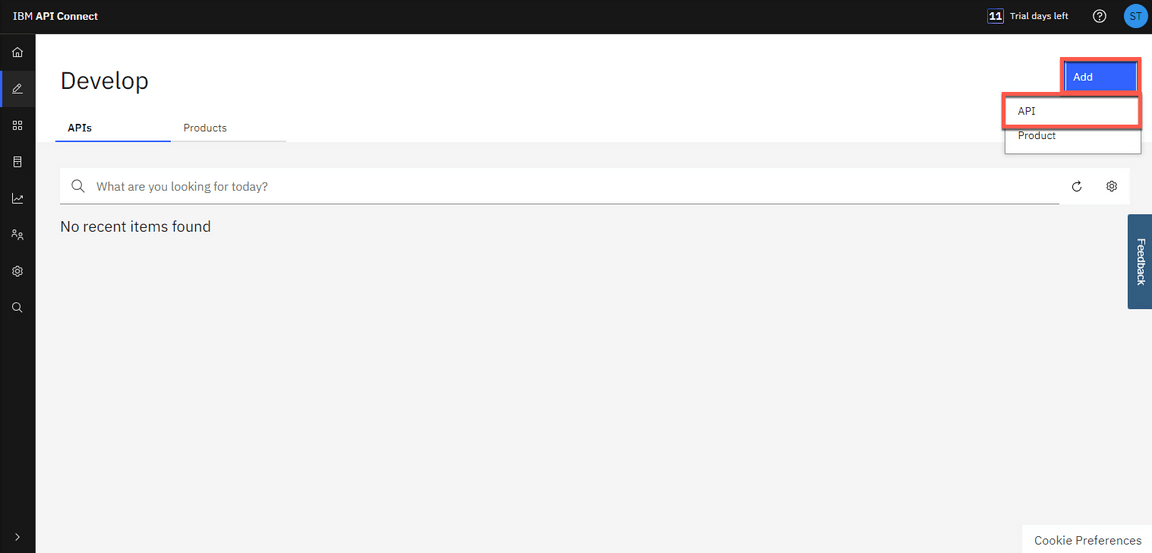
- Then click Add->API.
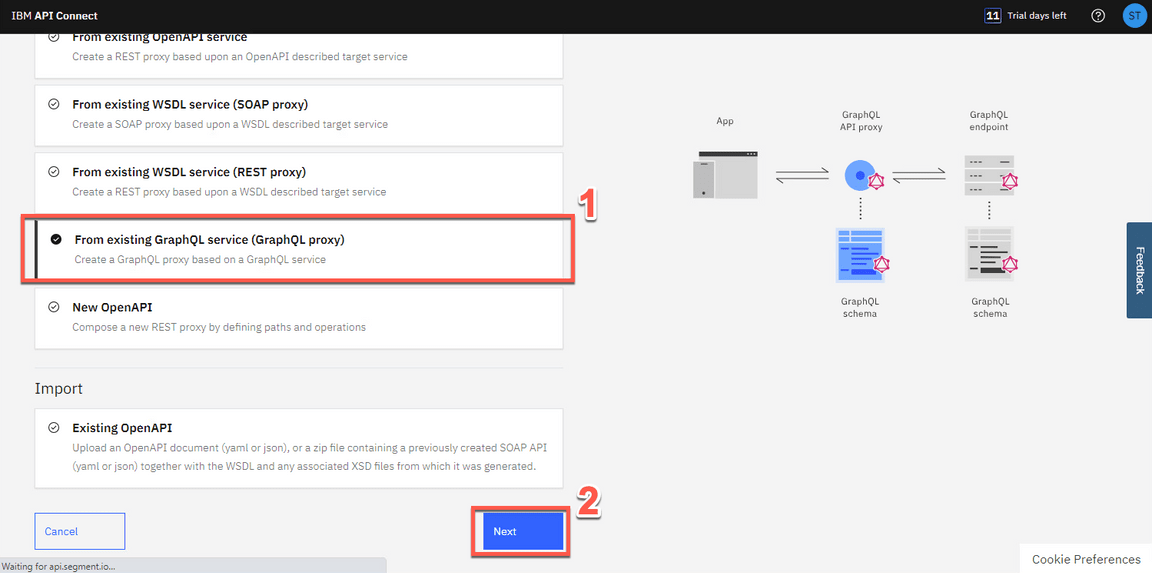
- To create a GraphQL proxy, select From Existing GraphQL service (GraphQL proxy) (1). When you point to an existing GraphQL server, API Connect introspects the service and automatically creates a GraphQL proxy service. Then click Next (2).
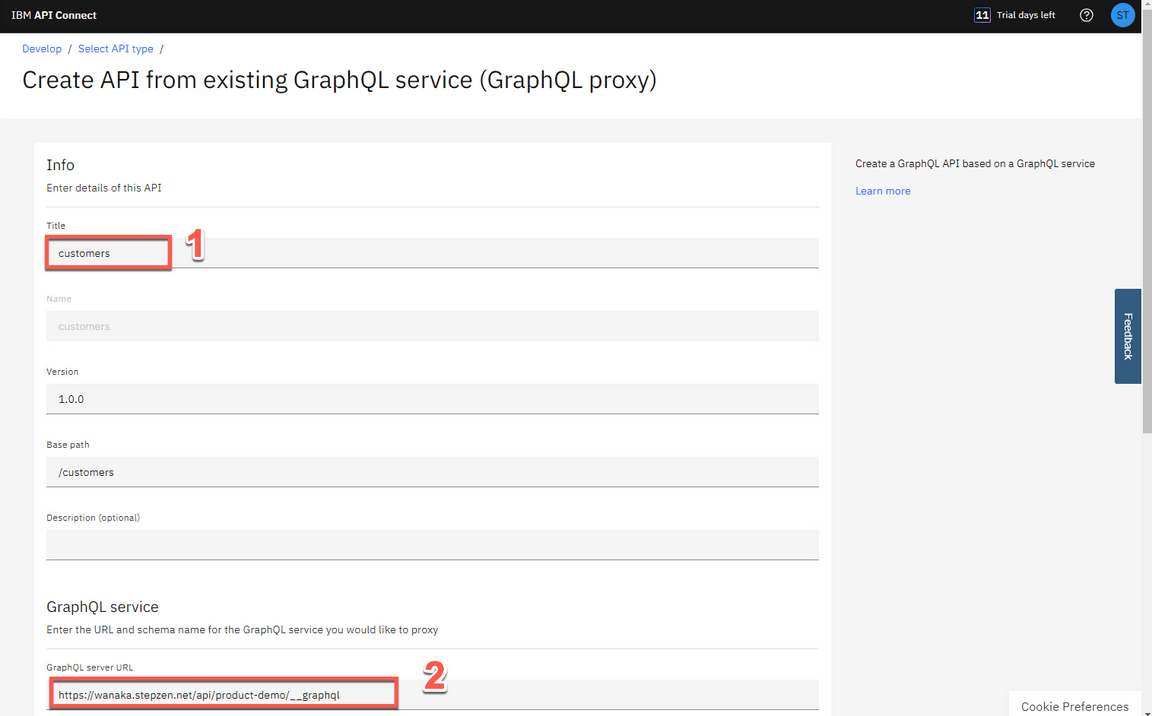
Enter the following values:
Title: customers (1) GraphQL server URL: [Your API URL copied from StepZen Dashboard] (for example: https://wanaka.stepzen.net/api/product-demo/__graphql) (2)
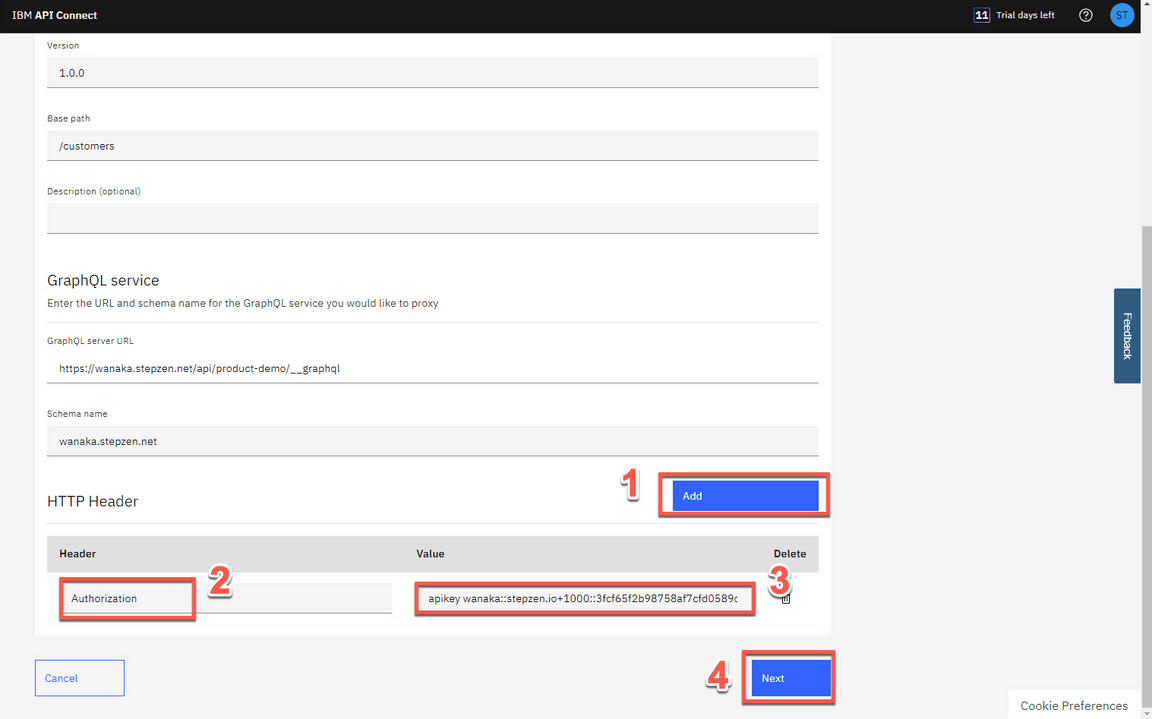
As described earlier in this lab, your StepZen API is using an API Key approach to control access to the entire endpoint. Because of that, you need to include the API Key in the Authorization Header of the HTTP Header. Here you will include that to read the API Schema for introspection to setup this proxy API, and it will be used this one time only and not be saved for later to call the API itself. Let’s do it!
In the HTTP Header section, click Add (1) to enter Authorization (2) as Header and paste the API Key value that you copied from the StepZen Dashboard Headers section as Value (3). Then click Next (4).
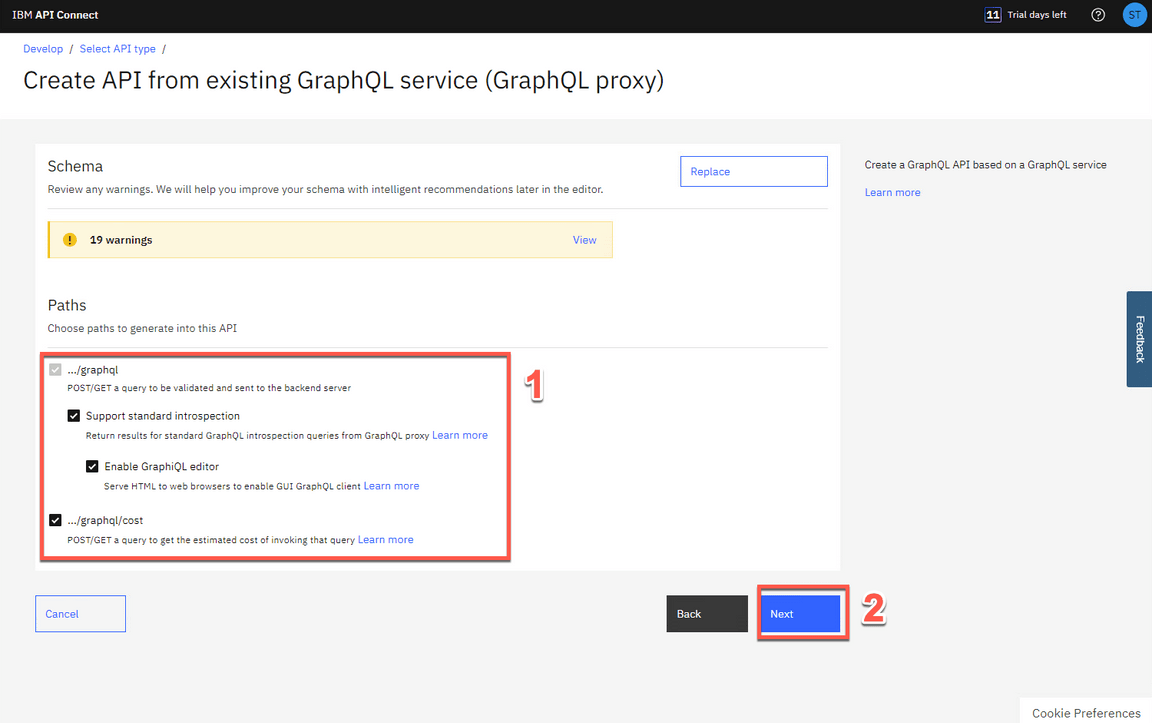
- The schema validator reports warning and errors if found. Ignore the Schema warning by now, will fix this warning in later steps. In the Paths section, select all the available endpoints (1), then click Next (2).
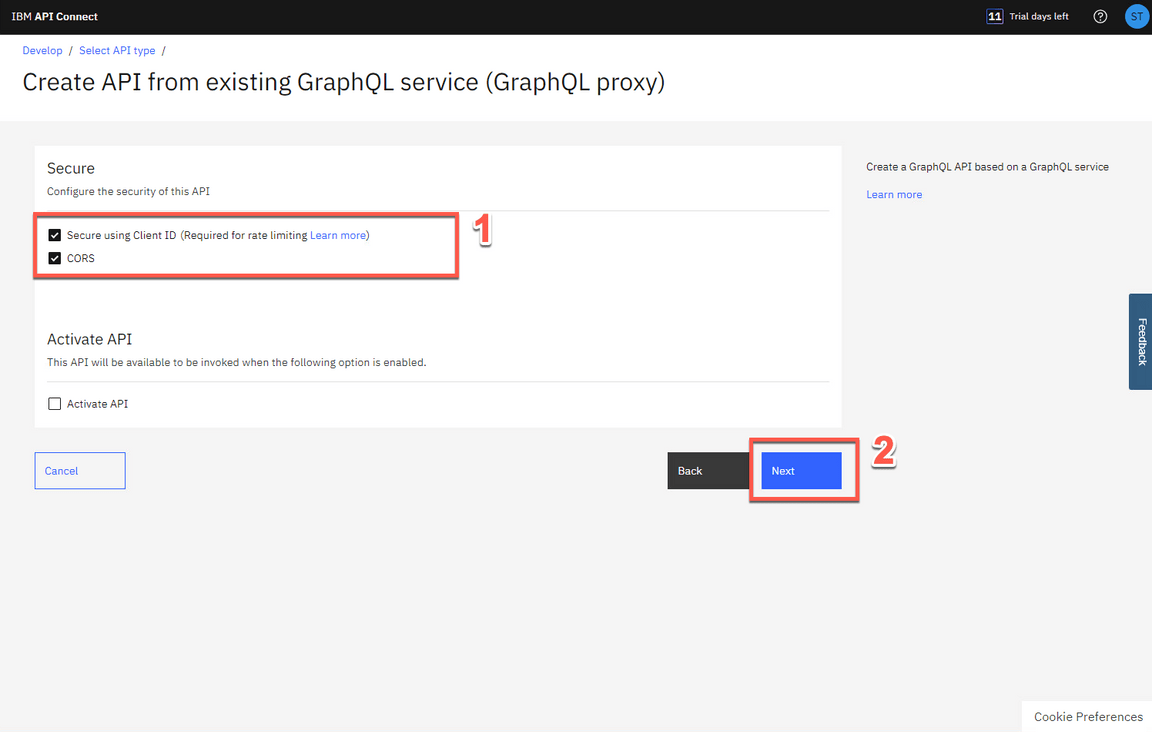
- Keep both Secure using Client ID and CORS checked (1) and click Next (2).
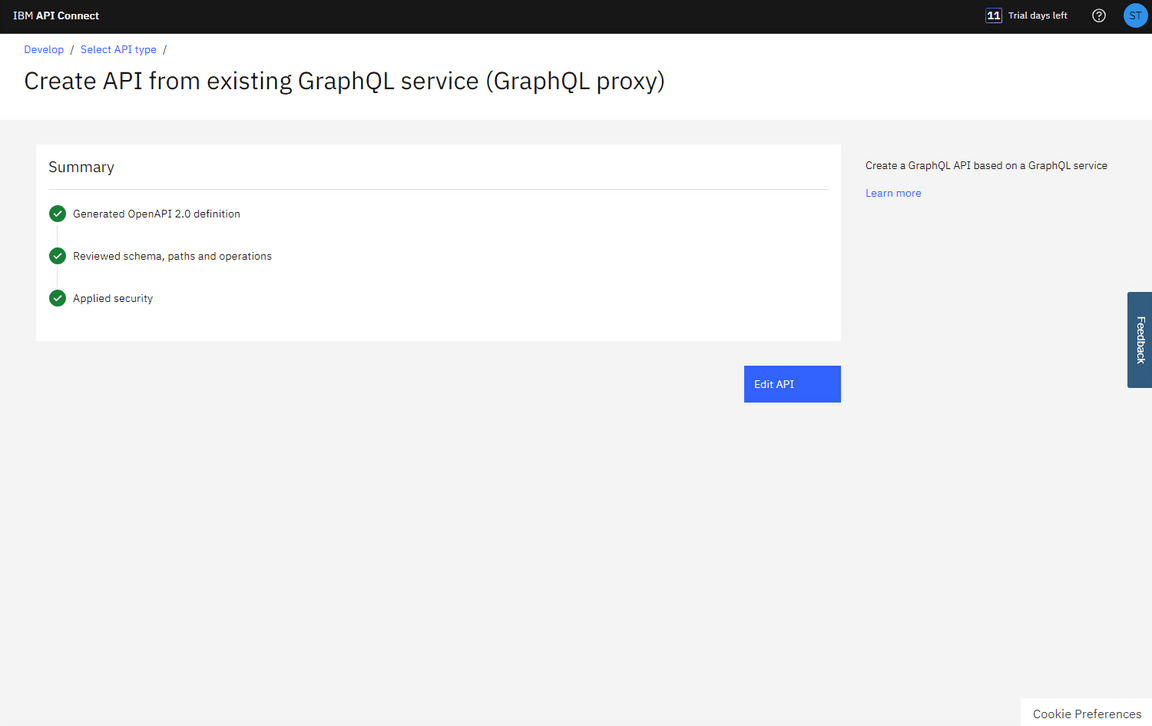
- Great! API Connect successfully created a GraphQL proxy API.
9 - Editing and Testing the GraphQL Proxy API
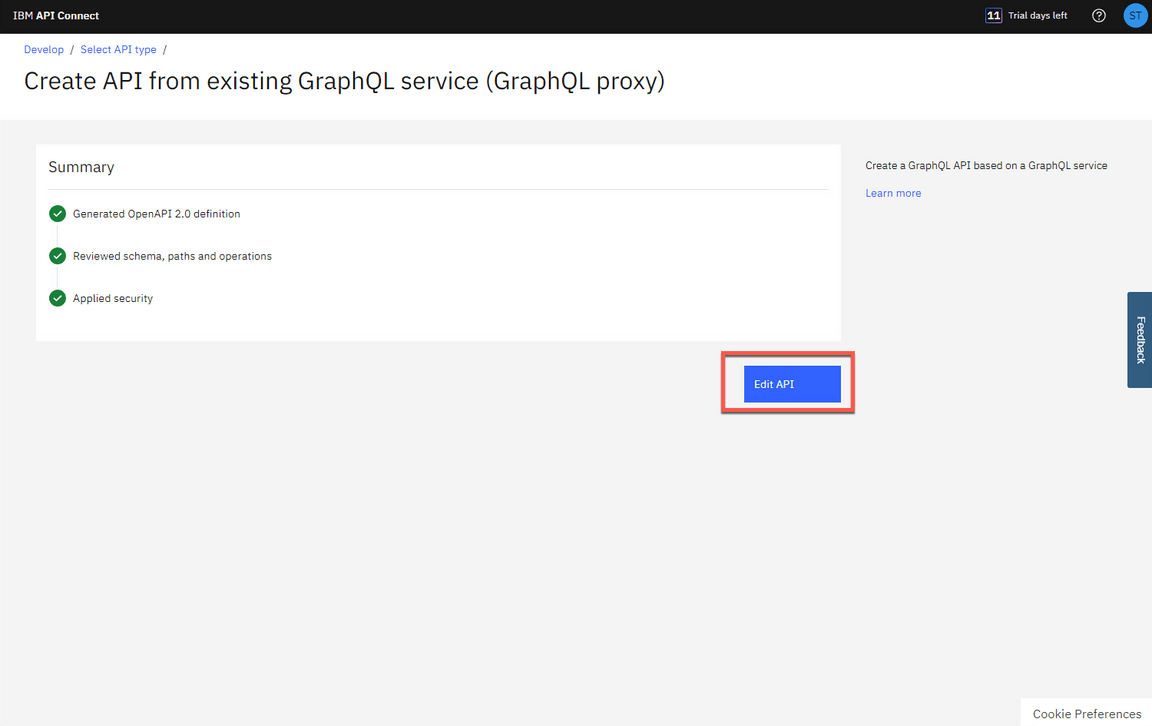
- Now, let’s edit the API to view more details on the proxy API just created. Click Edit API to continue.
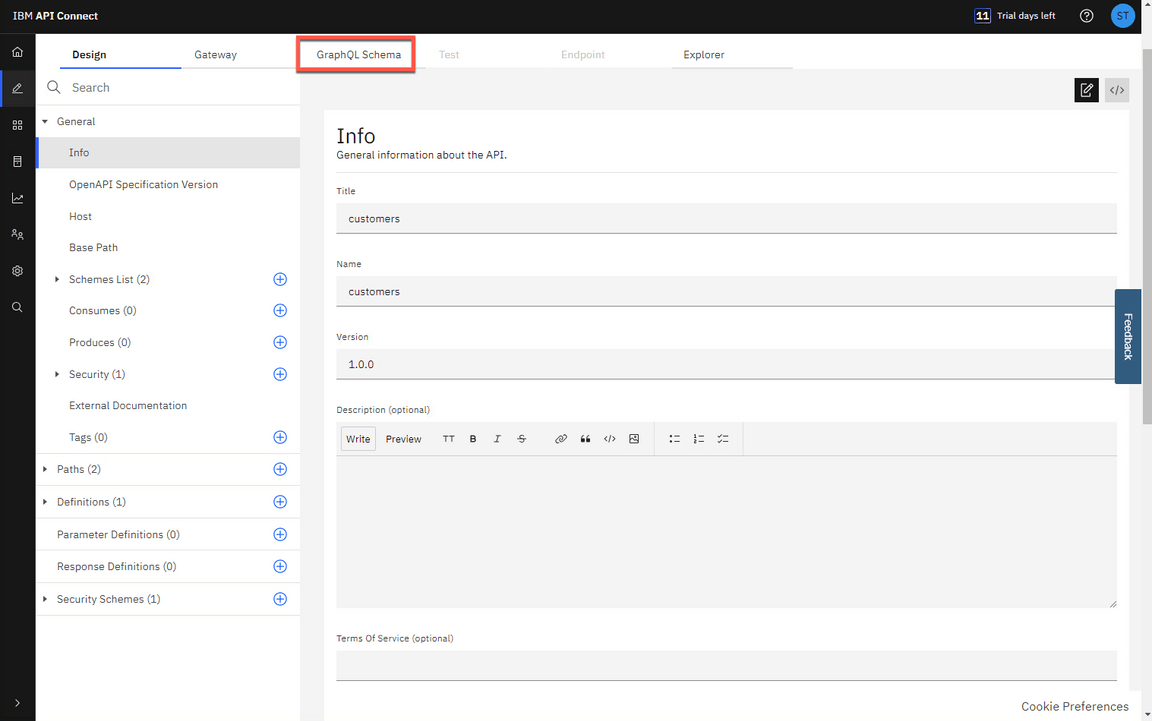
- GraphQL APIs are structured the same as REST APIs with some additional options. Just like REST APIs, you will be able to add security schemas, paths and definitions from the left menu bar. You can also view the Gateway, Test and Explorer tabs similar to REST APIs. You will notice a new tab for GraphQL APIs. Click on GraphQL Schema tab to view the schema.
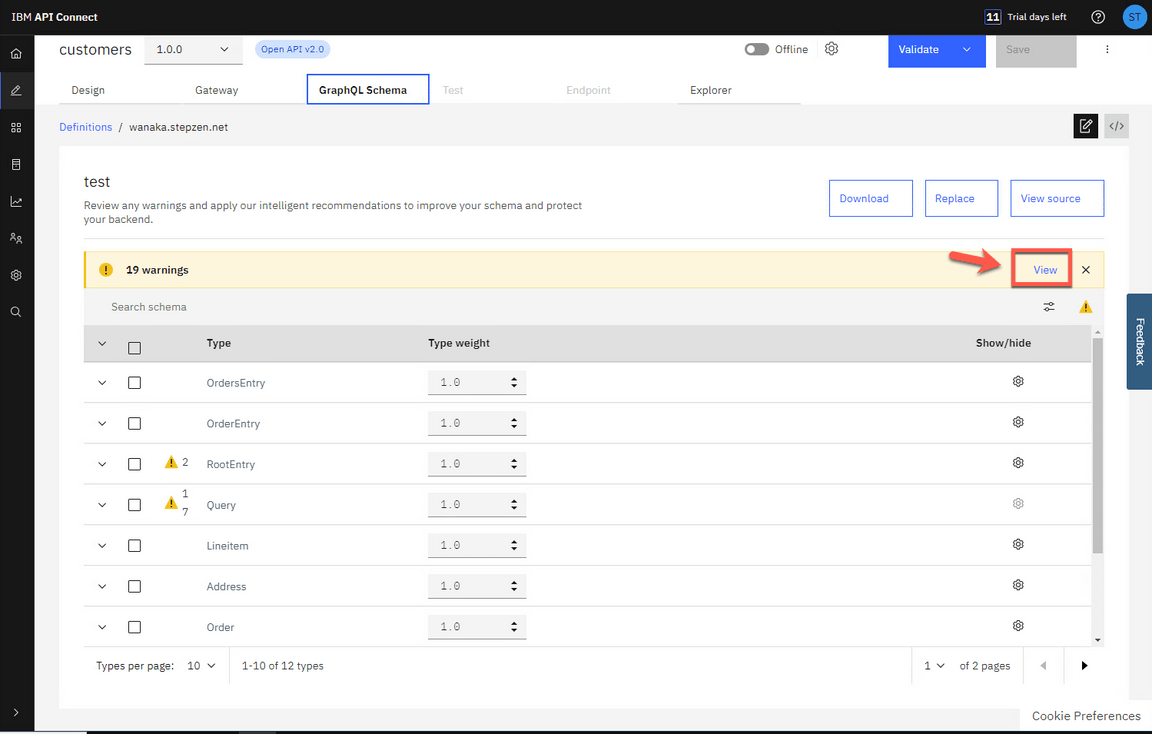
- The GraphQL Schema tab displays Type for every type in your GraphQL schema, and Type Weight information for the cost or expense of each type. The weighting factor is used when calculating the type cost for a request to the GraphQL API. For example, a field that requires extensive CPU or memory use on the server to retrieve its value would be given a higher cost. Click View in the Warning message.
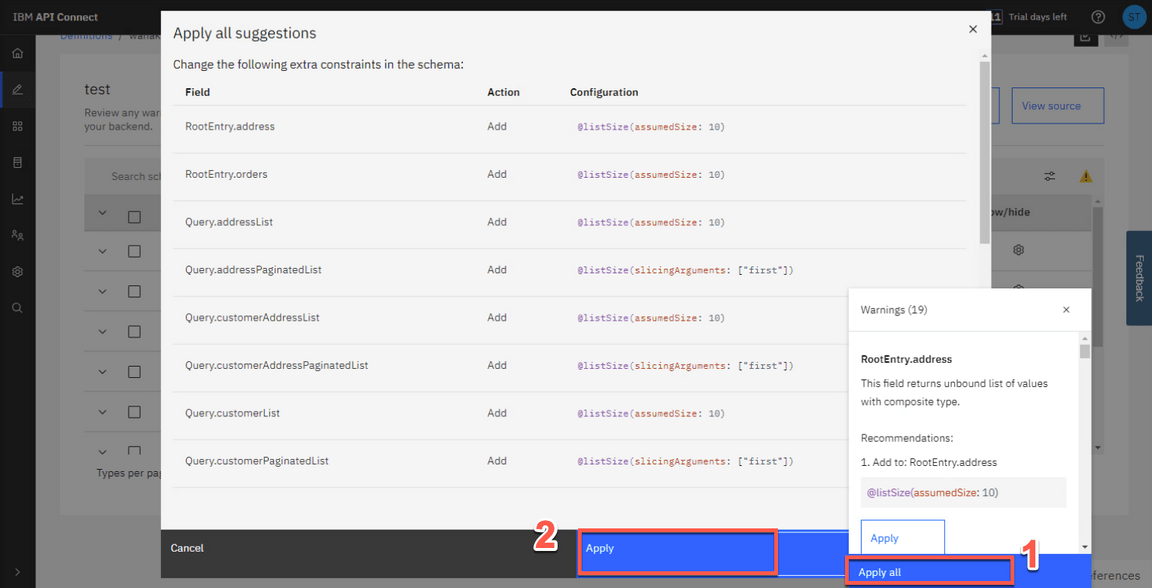
- In addition to the warning details, the Warning window gives an option to fix the warning by applying the limits. While this Artificial Intelligence is often very accurate, for a real scenario it is important to carefully examine the results and only accept them when they are accurate, since this affects the security of your application. In our case, click Apply all (1), then click Apply (2).
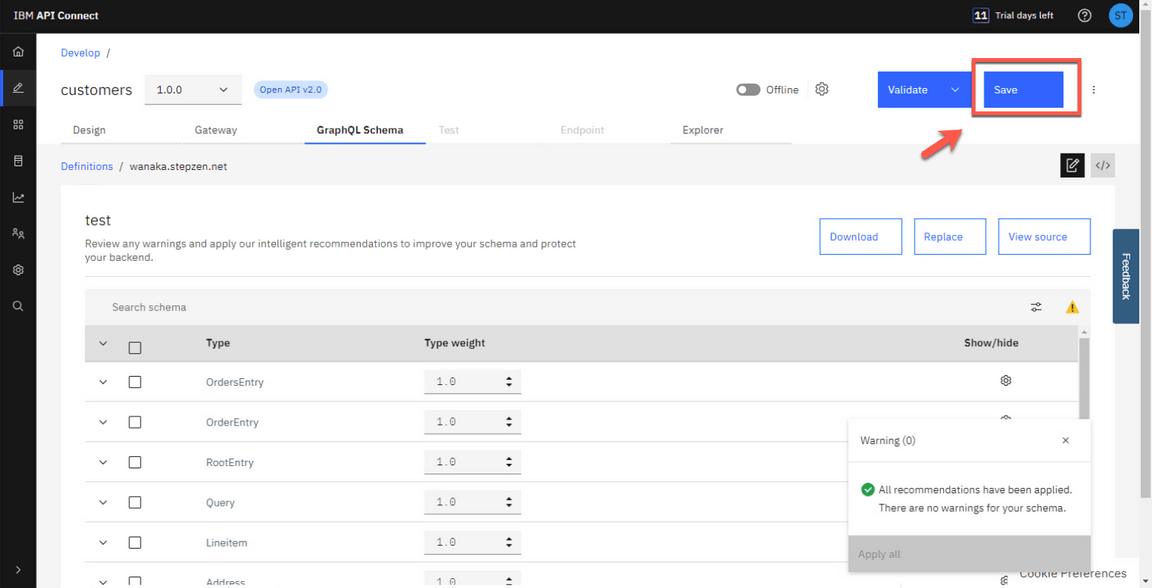
- After applying the recommendations, the warning message is removed. Click Save to save the API definition .
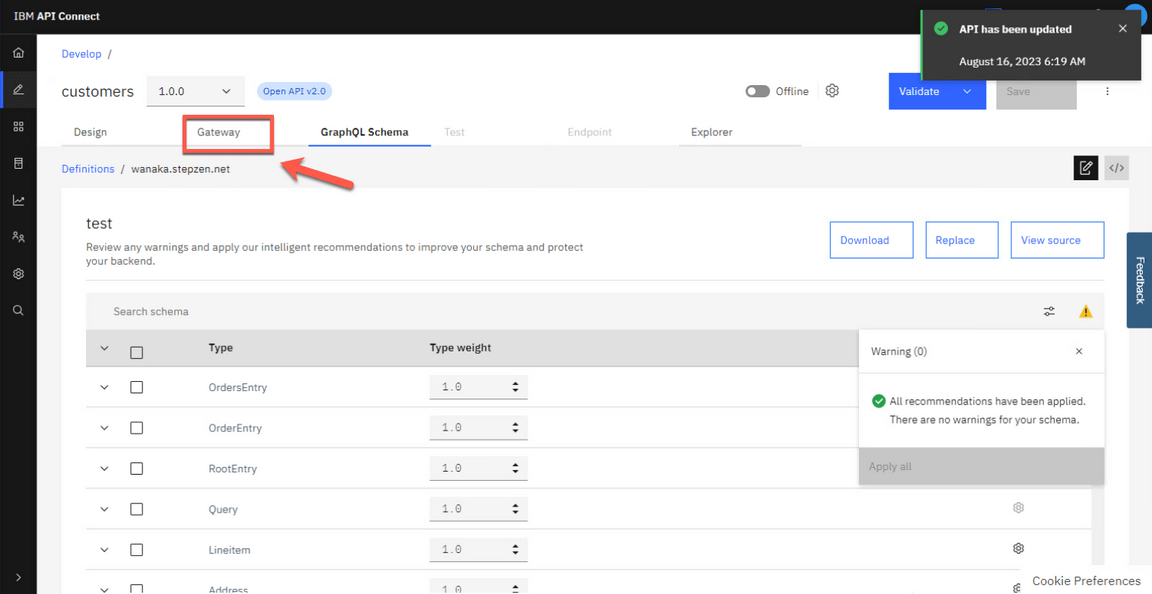
- Now, let’s open the Gateway view.
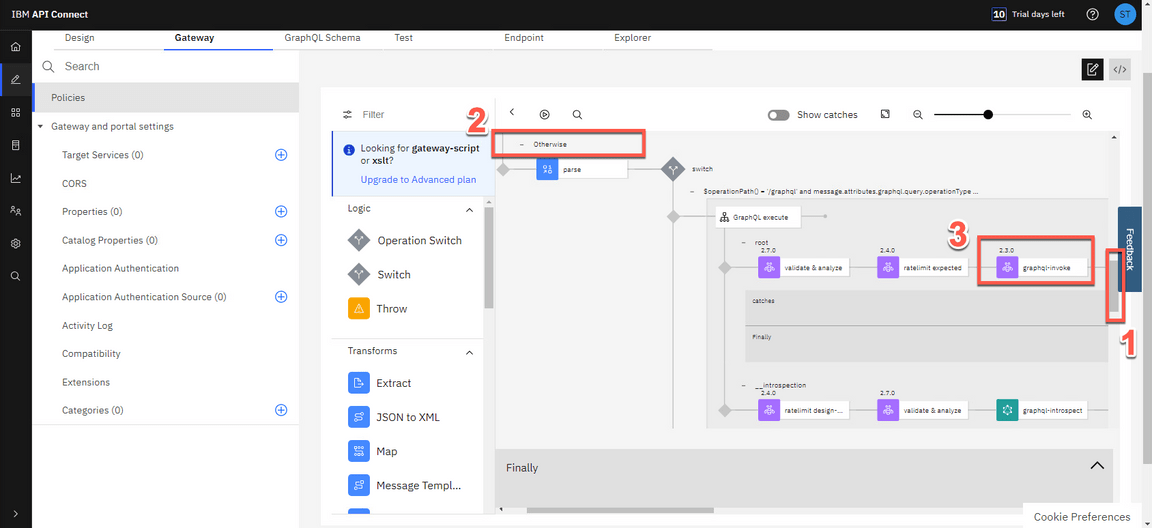
- The flow is automatically created as part of the initial API creation. You may apply additional logic by dragging and dropping items from the palette to the canvas. Let’s do a small change to allow Authorization header propagation. Scroll down the flow (1) and on the Otherwise ramification (2), you should see a graphql-invoke node, click on it to edit (3).
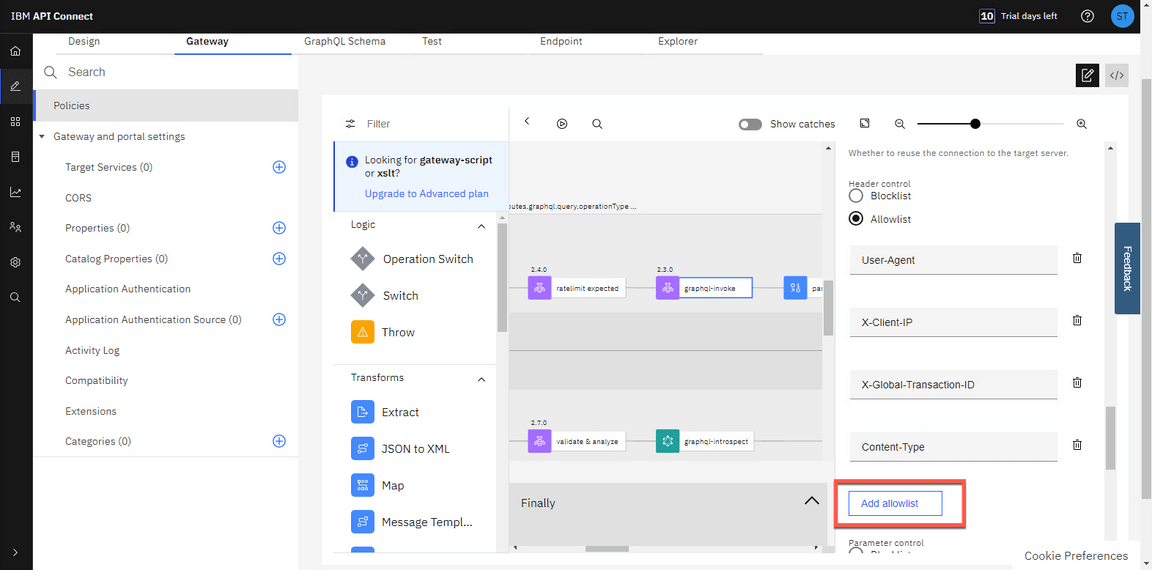
- On the graphql-invoke node definition, scroll down to see the Header control section. Click on Add allowlist to add a new header in the list.
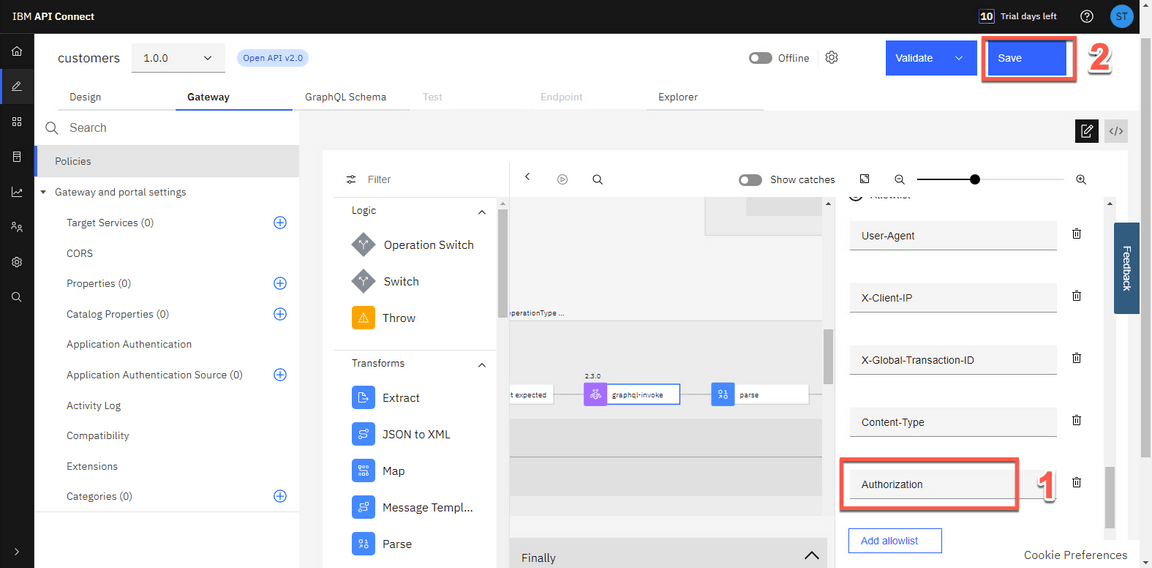
- Enter Authorization as the new header allowed (1) and click Save button (2). This means that we will send the Authorization header on to the backend.
- Now, let’s test the API. To publish the API toggle the button from offline to online.
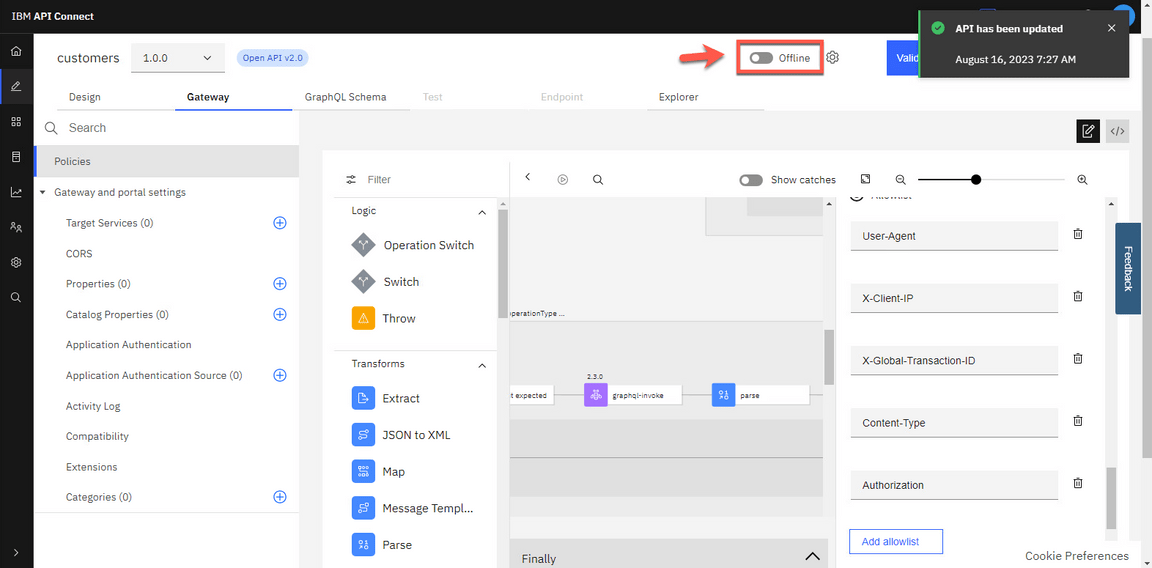
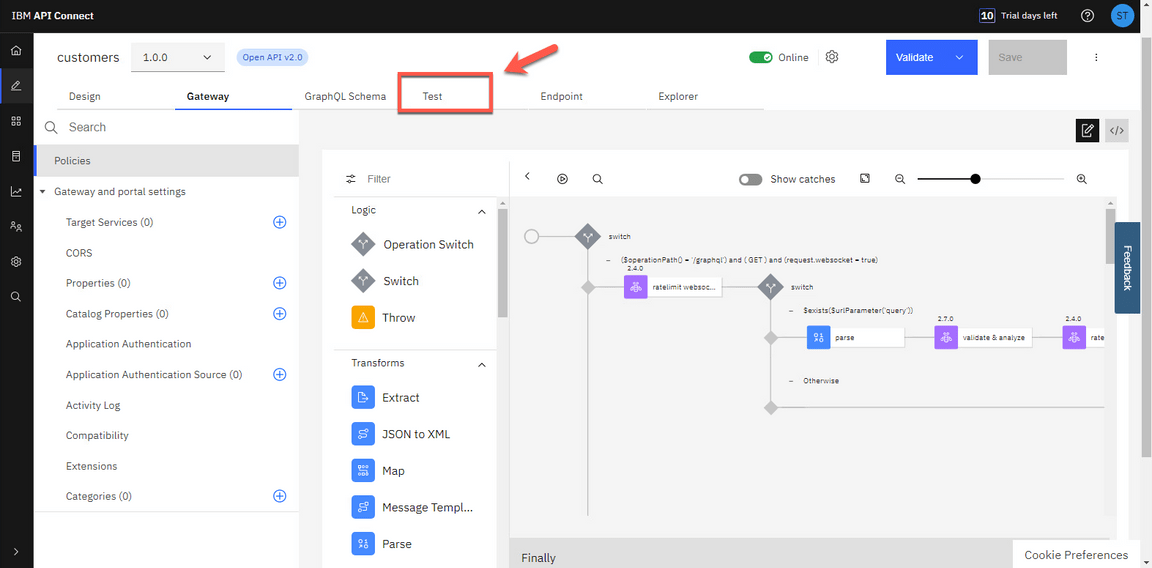
- After successfully publishing the API to API Gateway, additional tabs appear on the screen. Select Test tab to test the API.
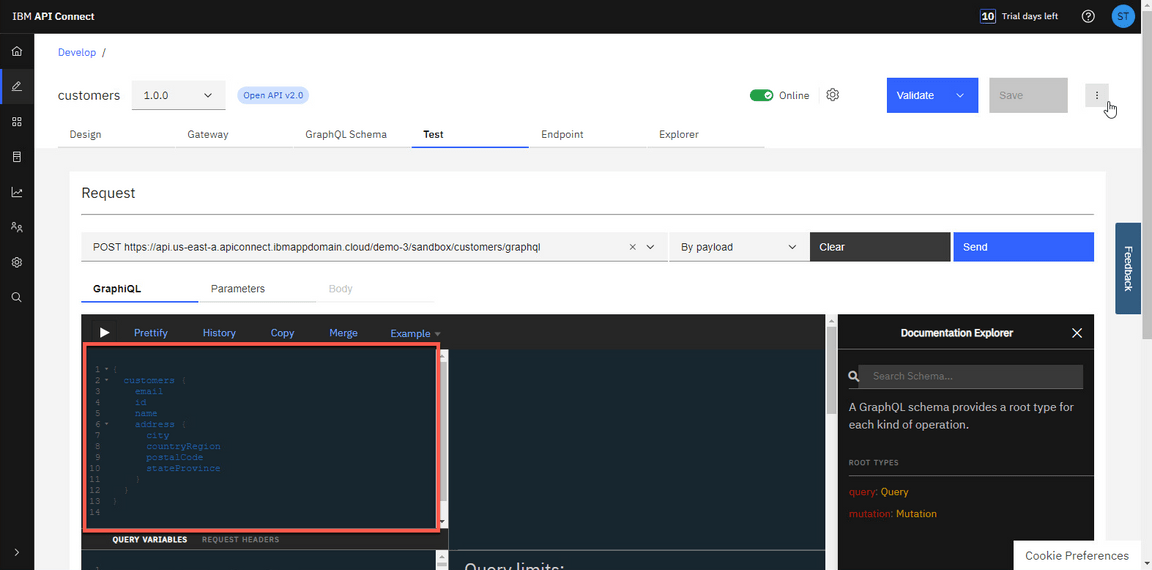
- The Test feature also includes a GraphQL Editor. Enter the following GraphQL query in the GraphQL Editor. It is not JSON, but looks somewhat similar to the JSON that will come back as the response. You may use Prettify option to improve the visualization of the GraphQL query.
{customers {idnameaddress {citycountryRegionpostalCode
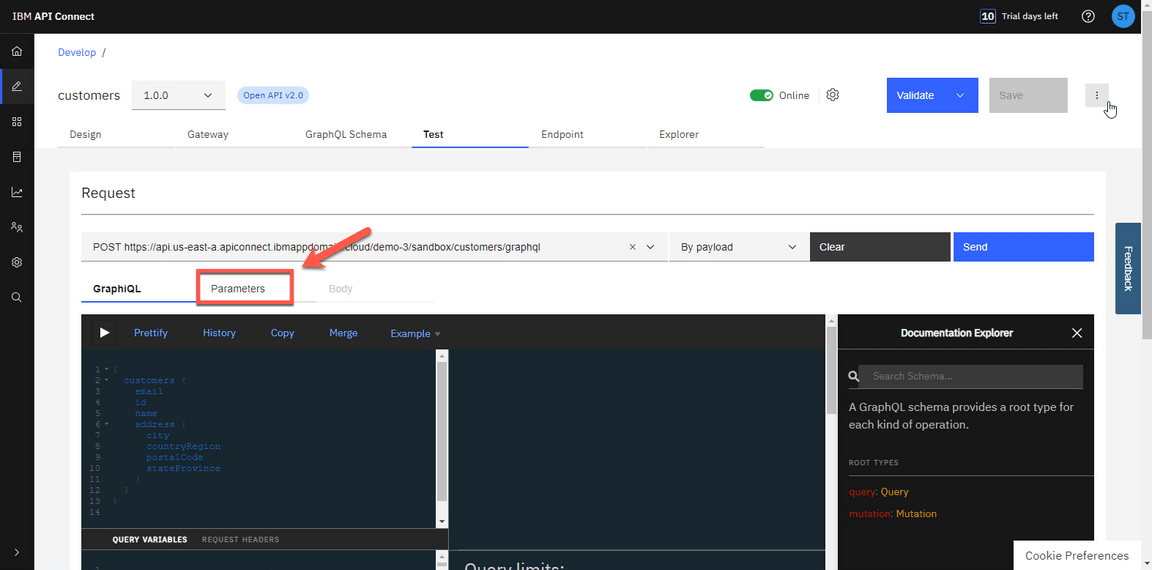
- Now you need to include the Authorization heard. Open the Parameters tab.
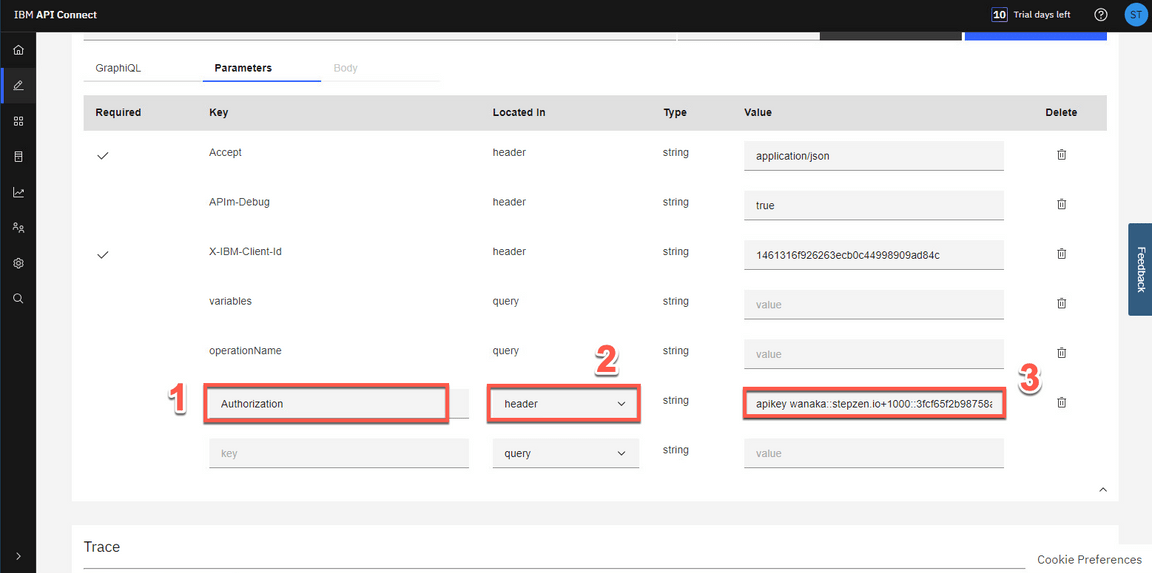
Everytime that you invoke your API you need to pass your API Key as the Authorization header. So let’s include it in our test. On the bottom of the Parameters list, include a new parameter with the following value:
Key: Authorization (1) Located In: header (2) Value: [paste the API Key value that you copied from the StepZen Dashboard Headers] (3)
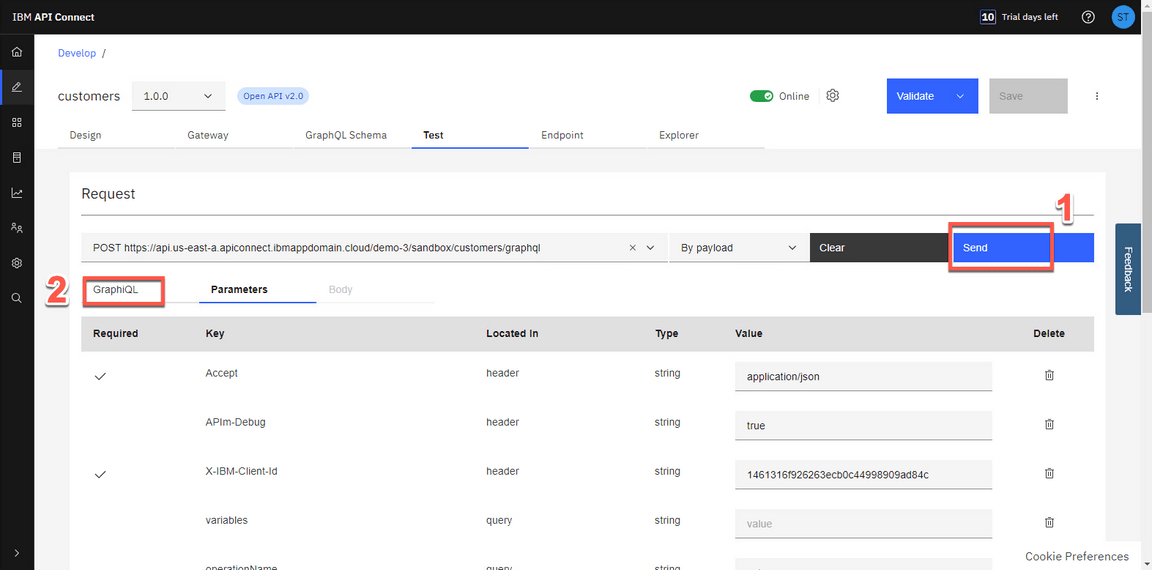
- Now click the Send button (1) and open the GraphiQL tab (2) again to see the result.
- On the Trace section, you should see an HTTP Status: 200 (1) and in the Response data you have the data returned from your GraphQL API (2).
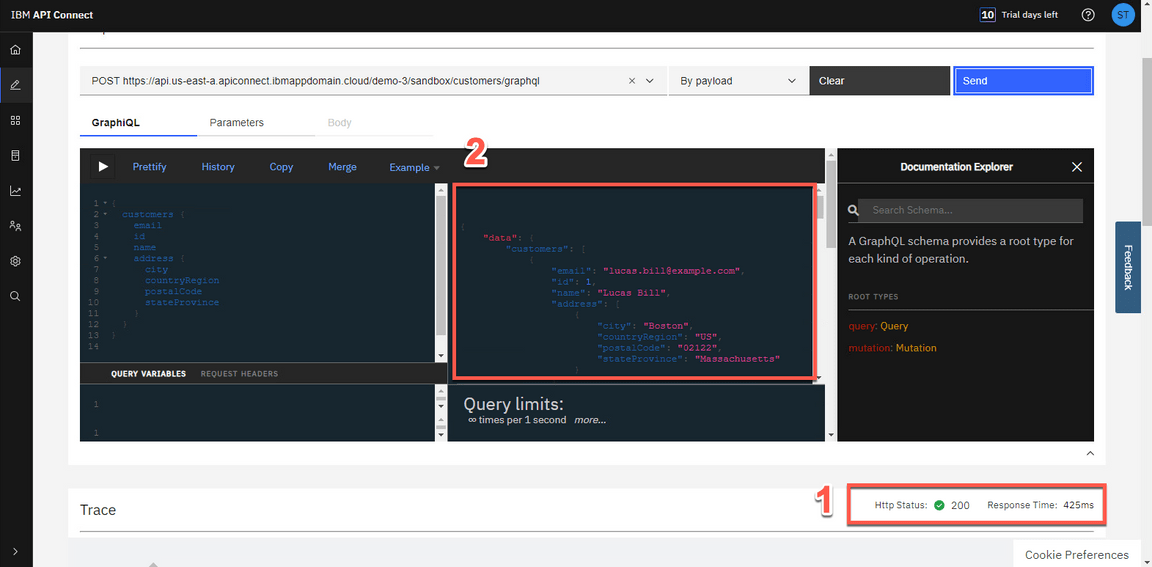
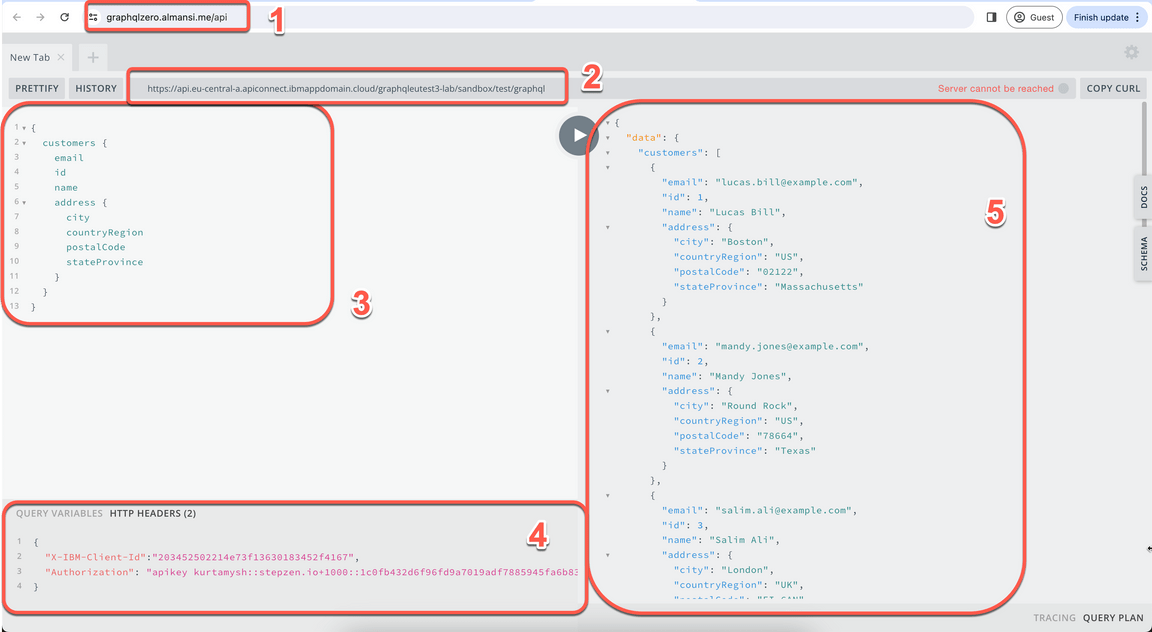
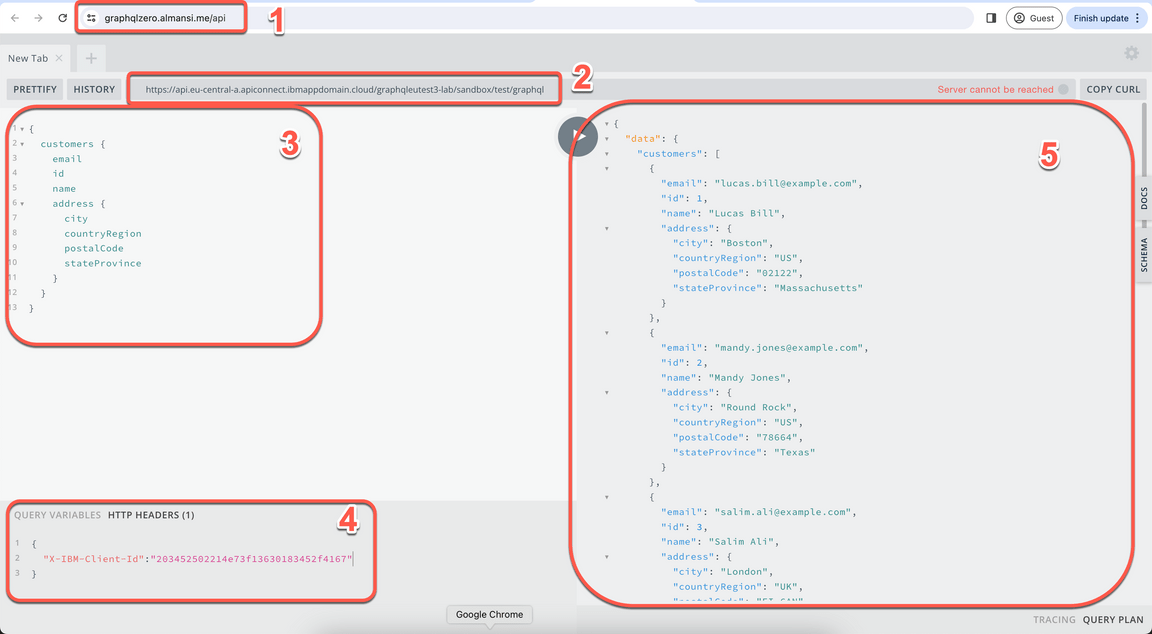
TROUBLESHOOTING: On the latest version of APIC on AWS, we are having some issues with the test UI. Maybe you are not able to see the data returned from your GraphQL API, but you should receive an HTTP Status 200 (sucesss). Another way to test your API is using a GraphQL sandbox. For example, open this URL (1), copy and paste the requested URL from APIC (2), enter the Graphql query (3) and in the HTTP Header section, enter a JSON with the Authorization header parameter that you included in APIC, and copy and paste the X-IBM-Client-Id from APIC parameters tab (4). And click on the Play button to see the graphQL returned data (5).
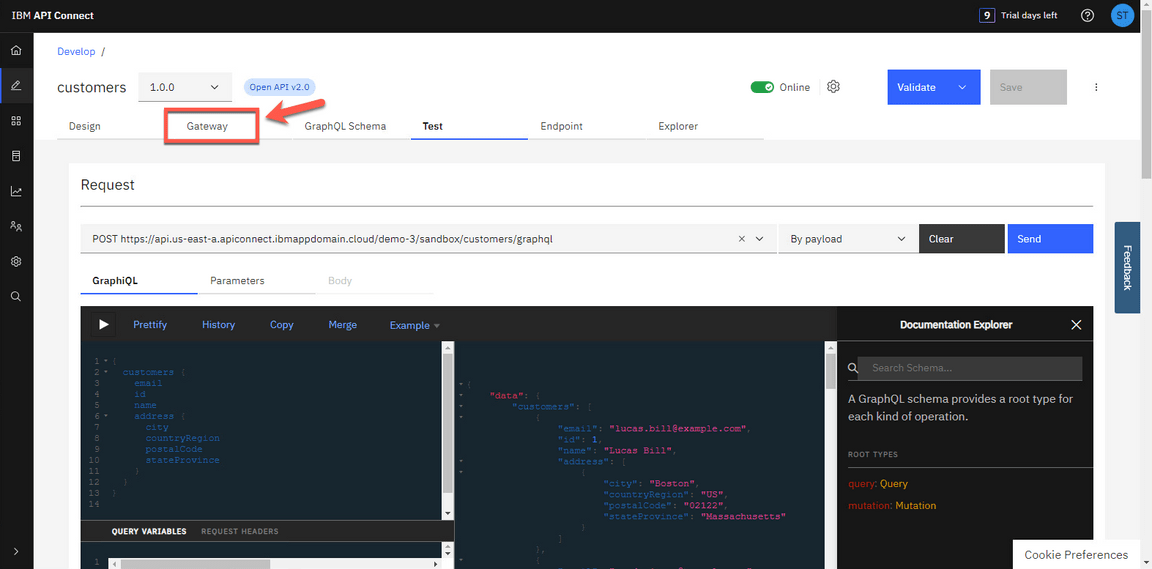
- Great, but you can simplify it, by hard coding the Authorization header parameter in your GraphQL API Proxy flow. Let’s do it! Open the Gateway tab again.
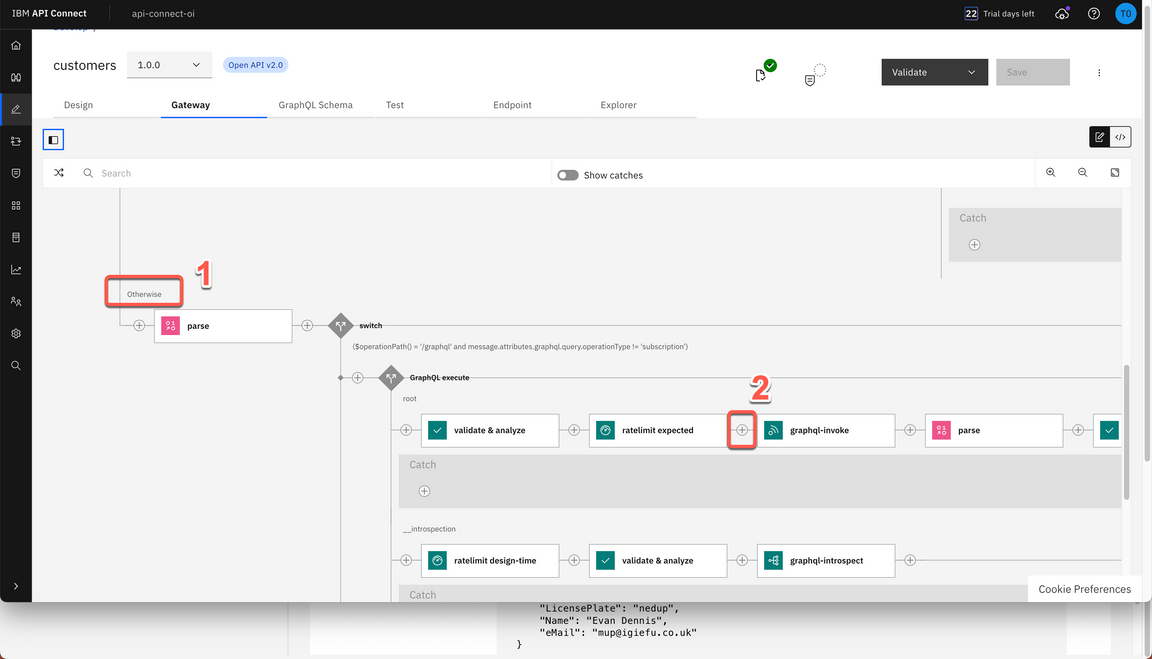
- On the Otherwise (1) which starts with a Parse, you will add a node before the graphql-invoke node. On the Palette view, scroll down to see the Policies section (2). Drag and drop the Set Variable (3) node between the ”ratelimit expected” node and the ”graphql-invoke” node (4).
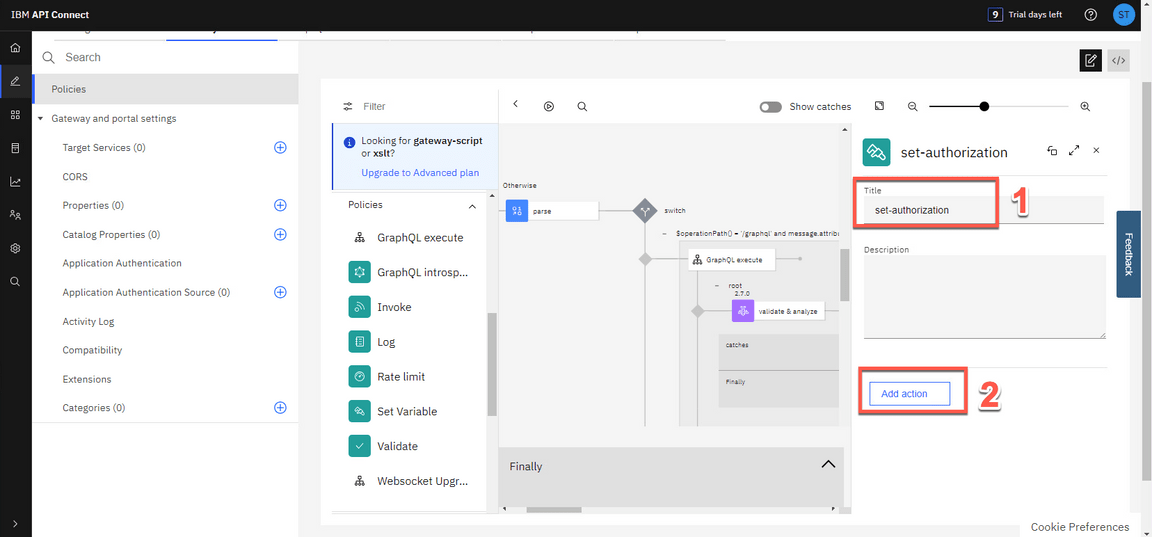
- Enter set-authorization as Title (1) and click Add action (2).
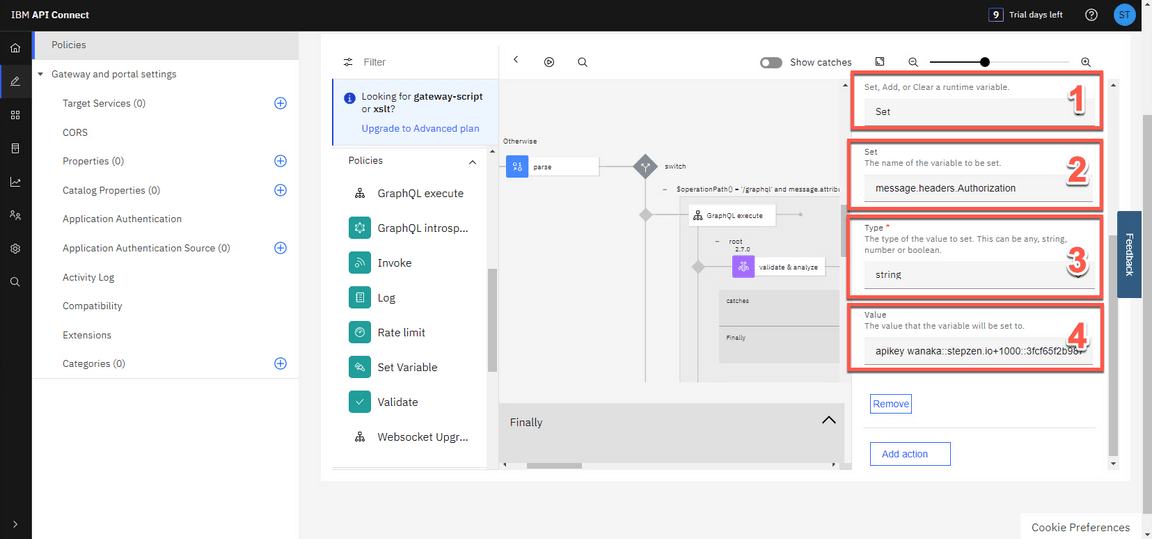
- Keep Set (1) as the type of the action. On the Set field, enter message.headers.Authorization (2) as the name of the variable to be set. Select String (3) as type of the value to set. And in the Value field, paste the API Key value that you copied from the StepZen Dashboard Headers (4).
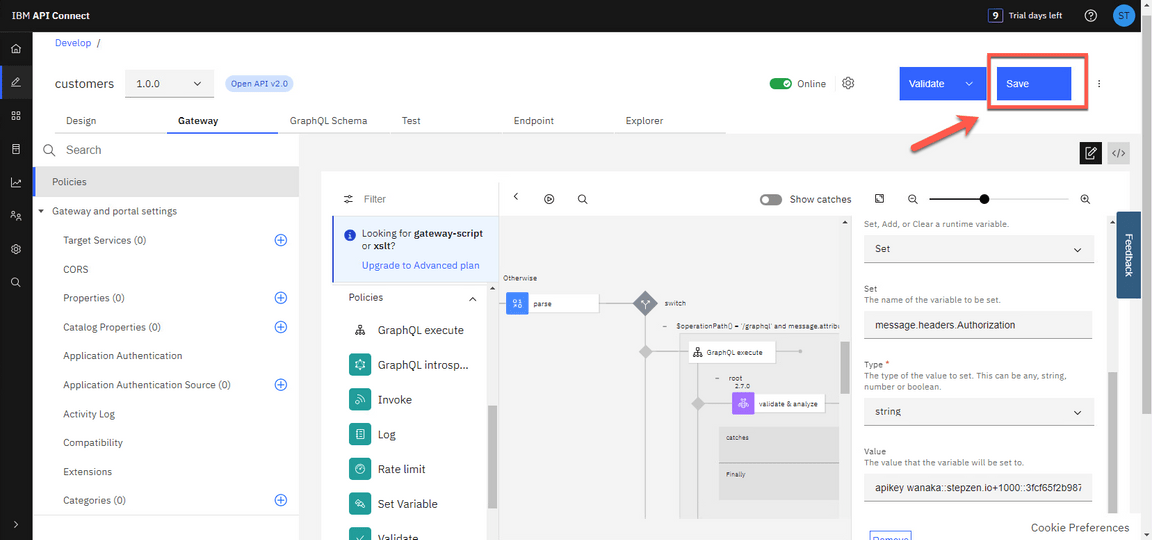
- Then click Save.
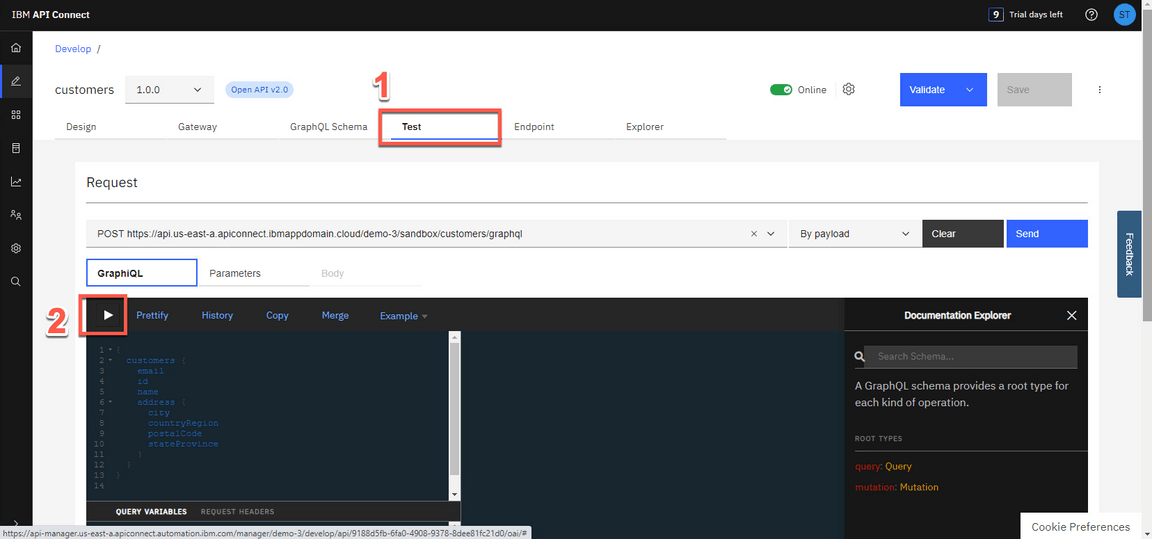
- Let’s test our API again, this time without passing the Authorization token. Open the Test tab (1), and click the Execute Query button (2). (Note: if you want, you can check in the Parameters tab that there isn’t an Authorization header parameter).
TROUBLESHOOTING: You can keep using the external GraphQL playground to test your api(1), but now in the HTTP Header section, remove the Authorization header parameter (4). Then click on the Play button to see the graphQL returned data (5).
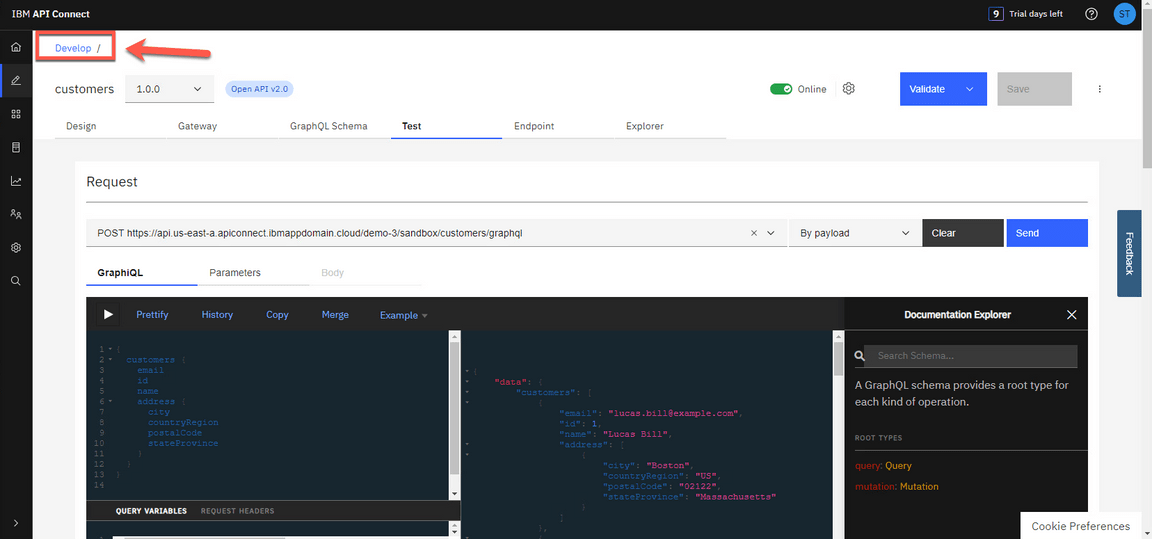
- Great! Now your GraphQL Proxy is running and available to be used. You are welcome to change the GraphQL query to test more scenarios. You can also use the Example button to help start your creativity. Next section you will learn how to create a product to apply GraphQL RateLimits. On breadcrumbs, return to Develop page.
10 - Create a Product and apply GraphQL RateLimits
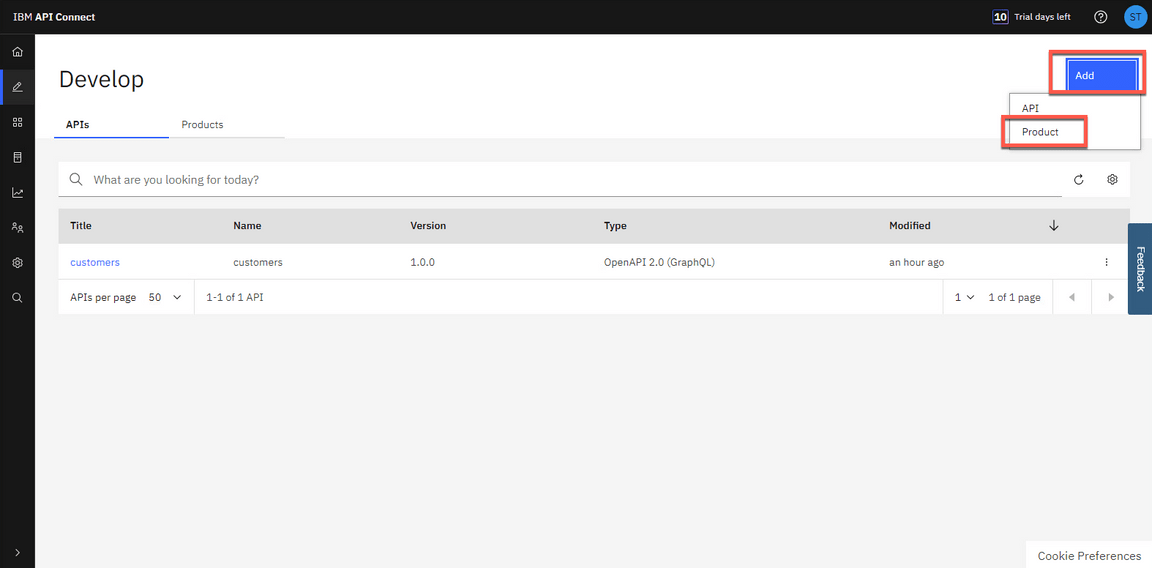
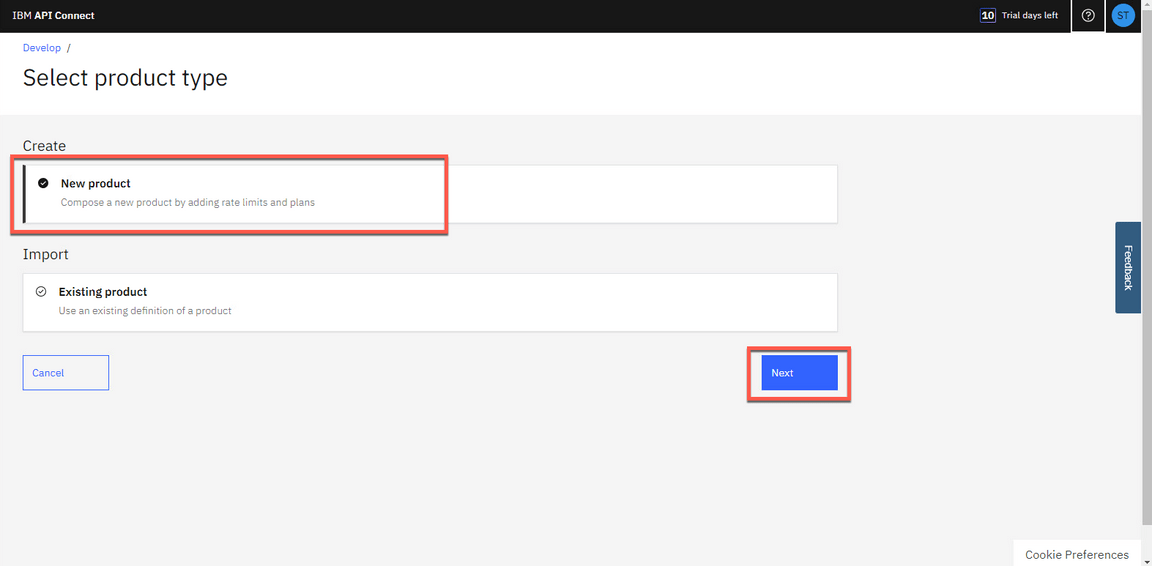
- Click Add->Product.
- Select New product (1) and click Next (2).
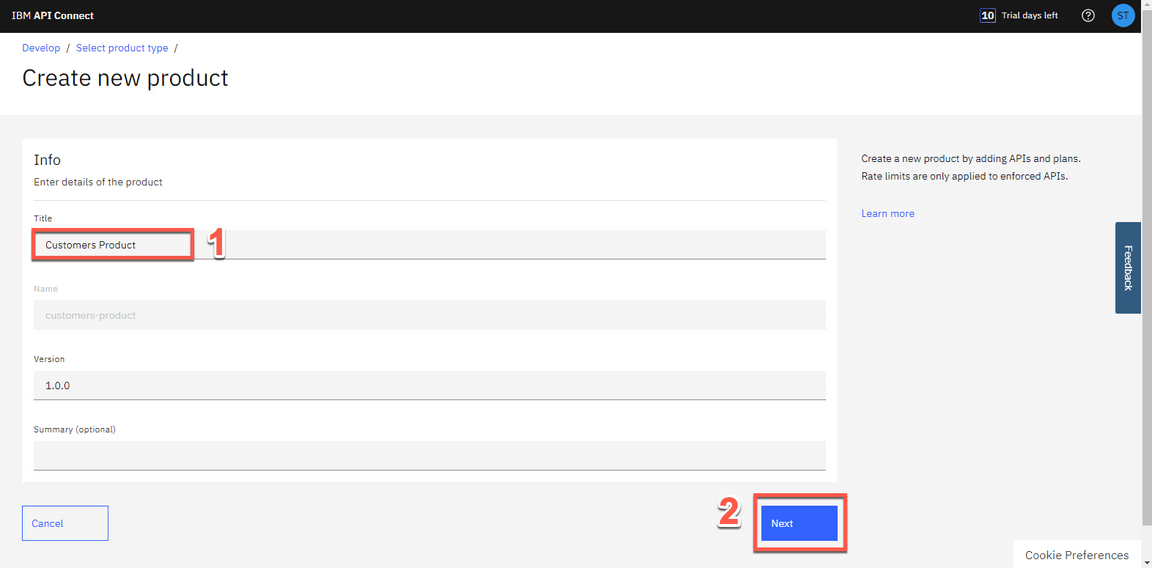
- Name the product as Customers Product (1) and click Next (2).
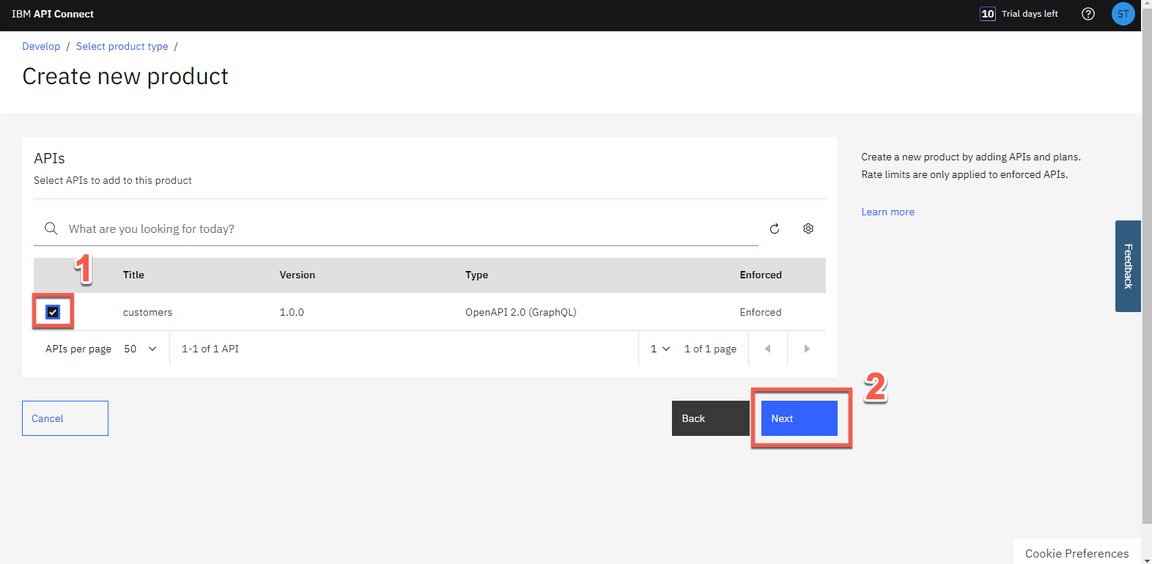
- Add Customers API to the product by selecting customers (1). Then click Next (2).
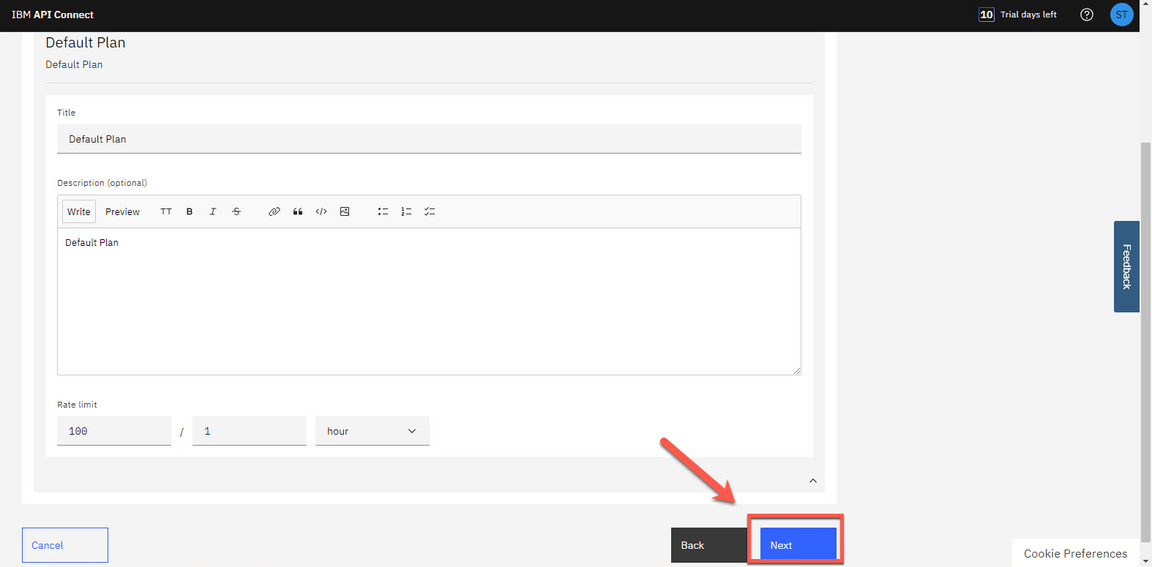
- The Default Plan contains traditional rate limiting options, but in the next steps, you will be able to list GraphQL Rate Limits. For now, just click Next.
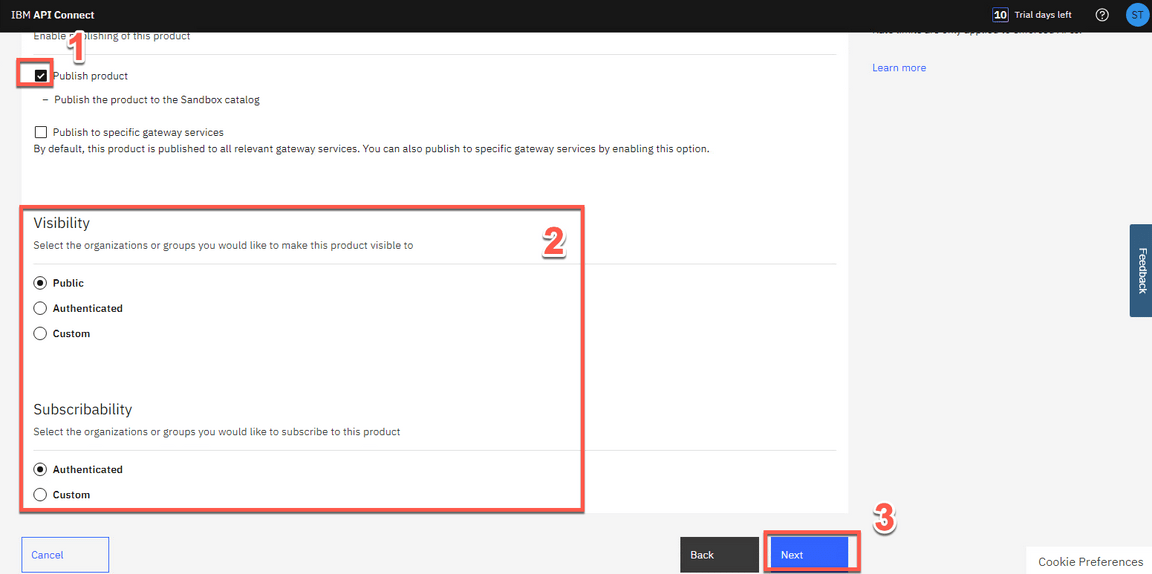
- Publish the Product to Sandbox Catalog by selecting Publish product (1). Accept the default for Visibility and Subscribability (2) and click Next (3).
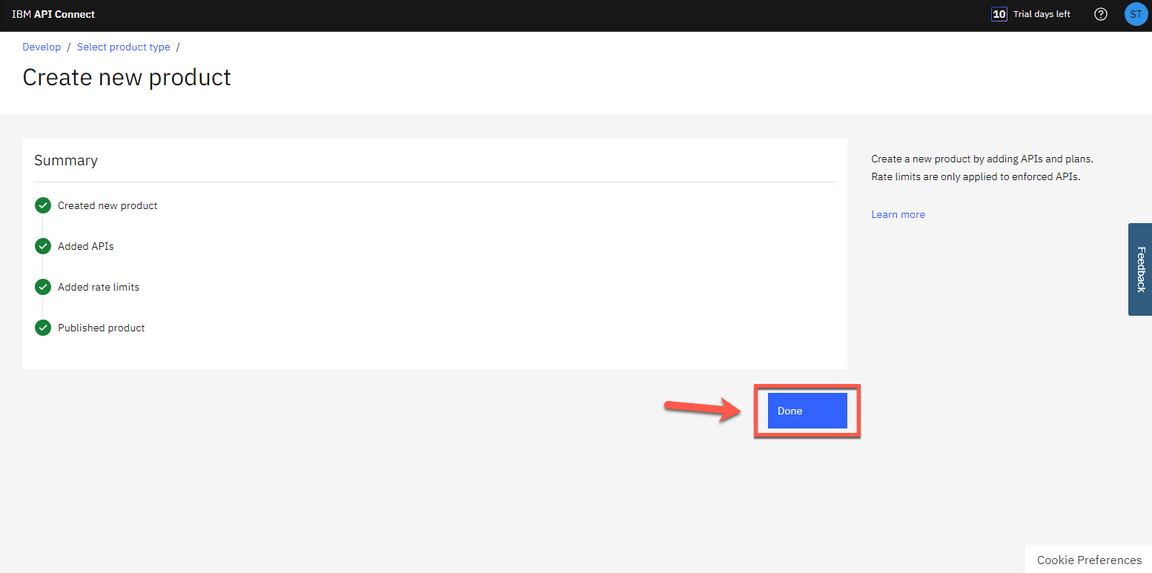
- Great! You have your new product. Click Done.
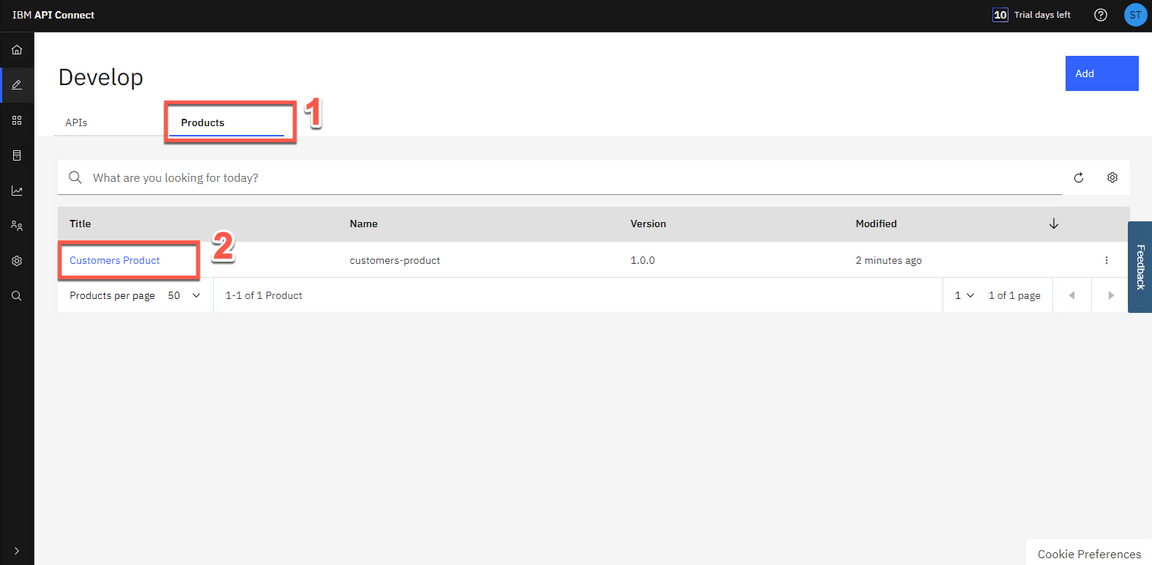
- Back to the Develop view, open Products tab (1) and click on Customers Product (2).
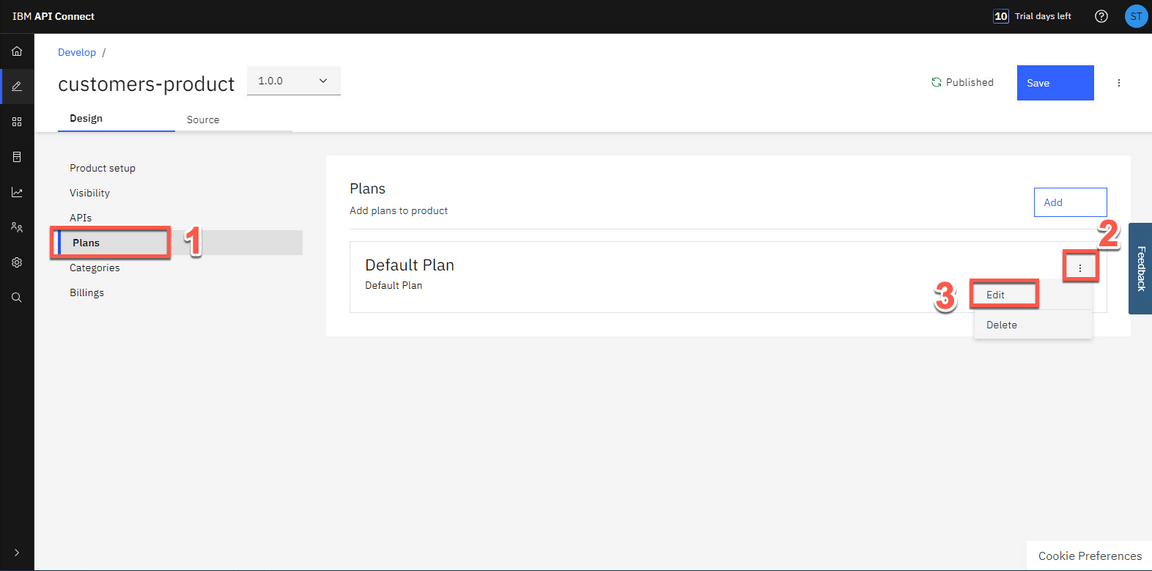
- Open the Plans section (1), and on the Default Plan, open the context menu (2) and select Edit (3).
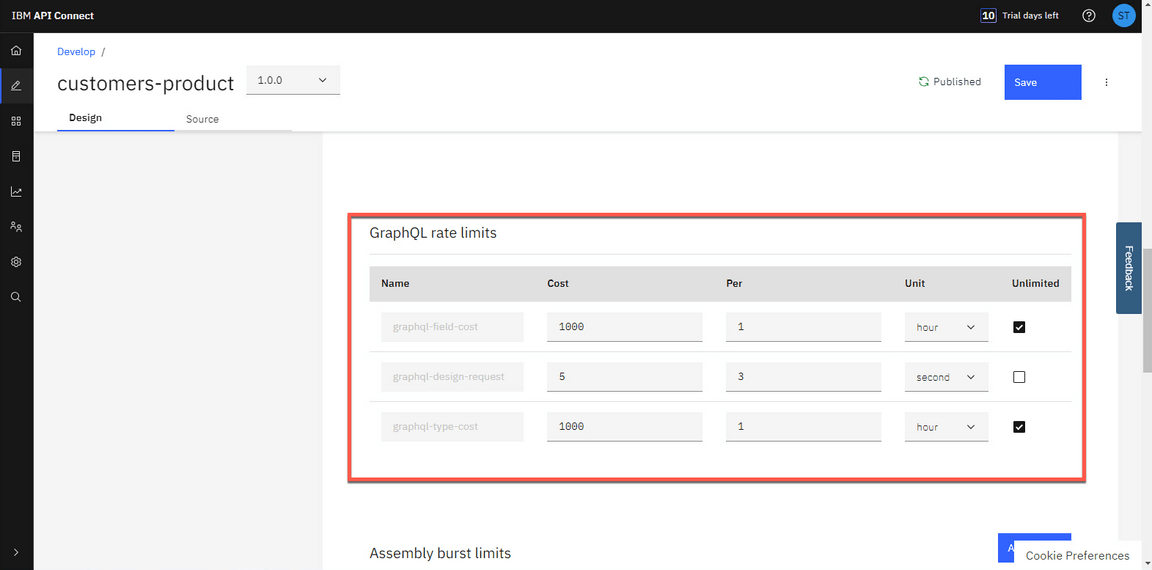
Scroll down, and now you can see the GraphQL rate limits. You will be able to adjust GraphQL cost parameters from this section (including costs per field or type). You can set a limit or make it unlimited. In this tutorial, you will not be making any changes.
If you want to understand how the GraphQL rate limits work, check this documentation page.
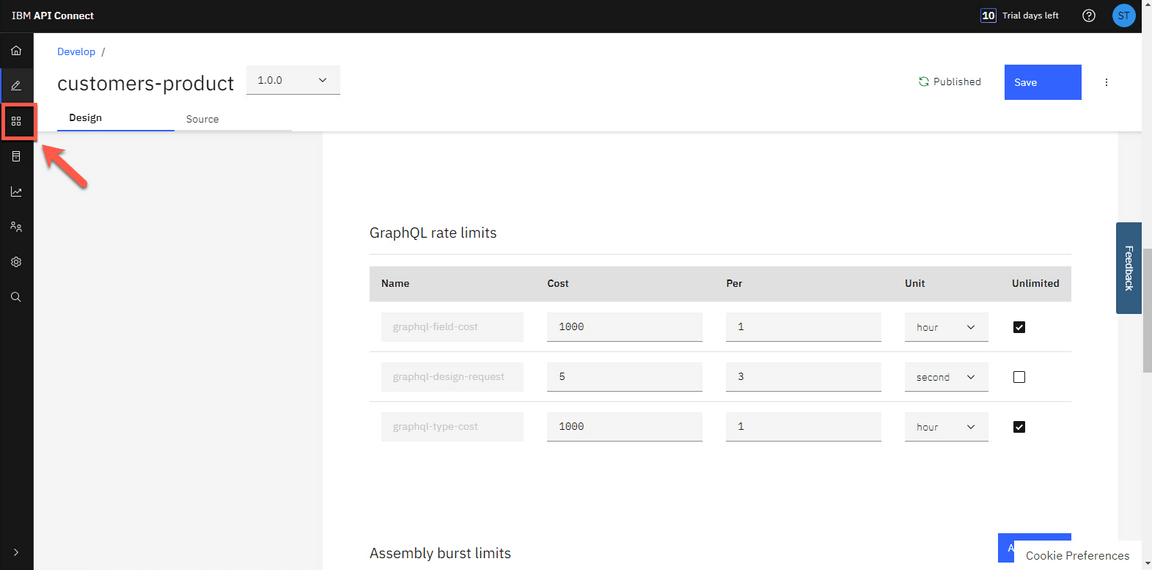
- On the left menu, click Manage icon to manage our Sandbox catalog.
Next section, you will explore the Developer Portal.
11 - Explore the API from Developer Portal
Now that you’ve published your API, you need to make sure that your API consumers can discover it and use it. Your Developer Portal will allow customers to view the APIs, sign up and subscribe to plans in a self-service manner, test the APIs, download the OpenAPI - Swagger documents and more. Let’s explore it.
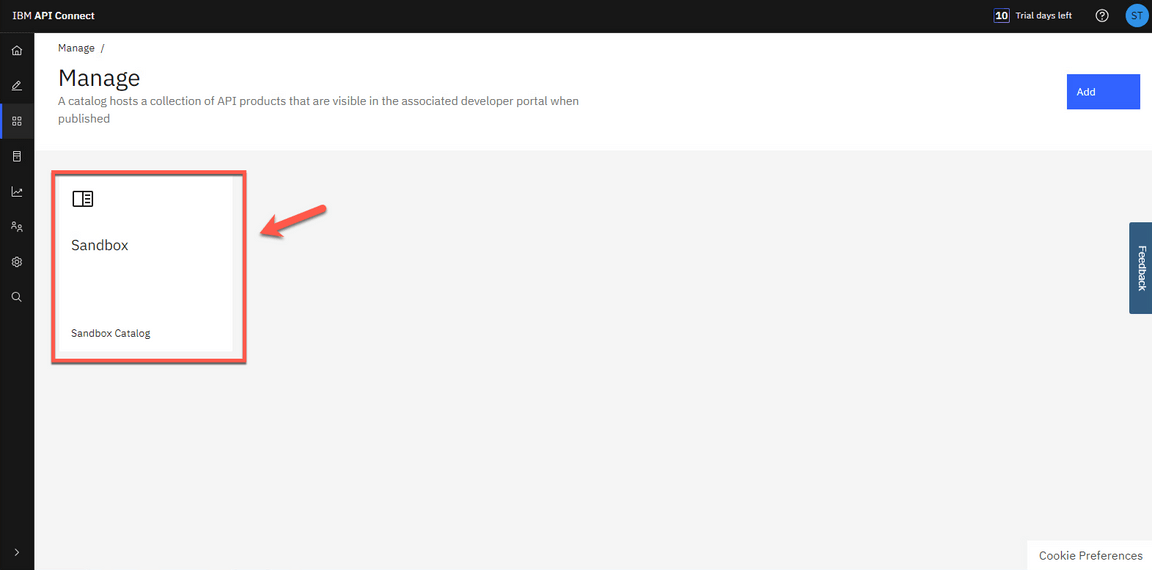
- Let’s get our Portal URL. On Manage page, open the Sandbox catalog.
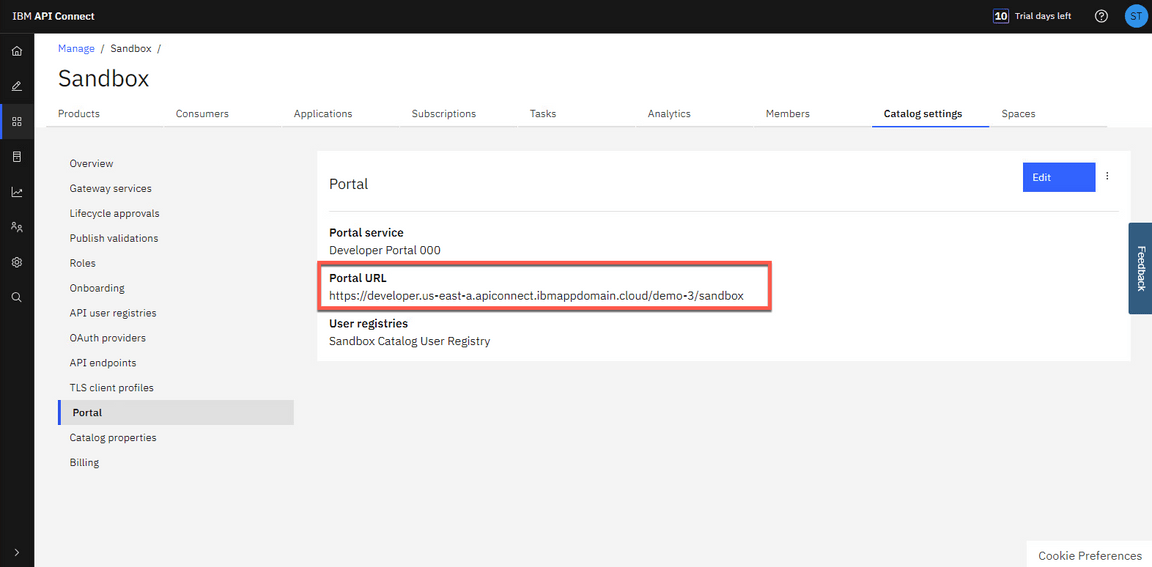
- Click Catalog settings (1) and open the Portal tab (2).
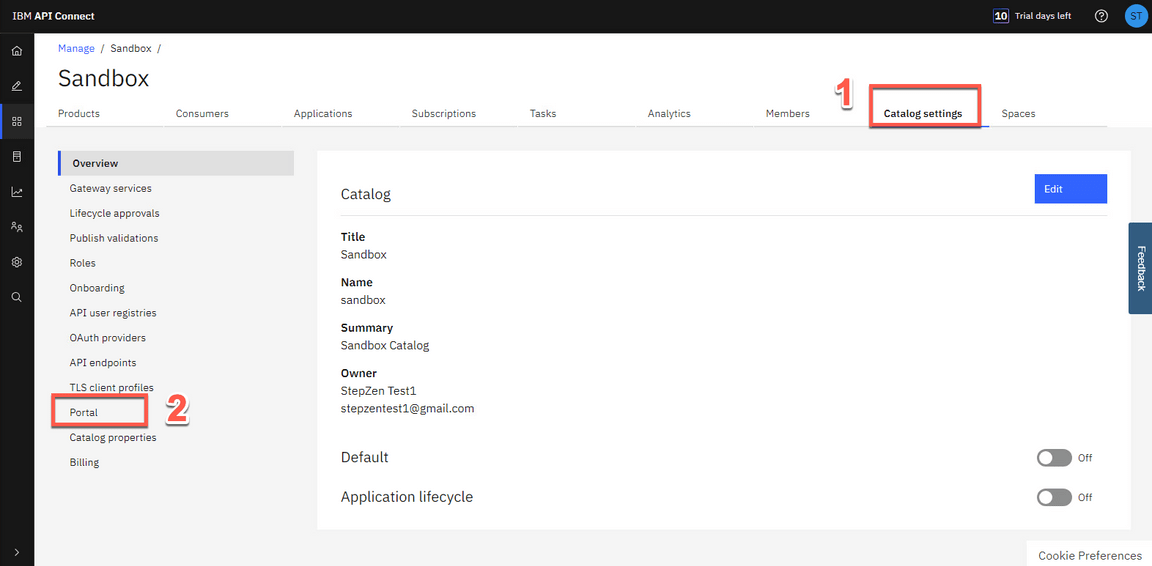
3.Great, here you have your Portal URL. Copy it, and open it in a new browser tab.
‘Note’: if you don’t have a portal URL in your environment, go ahead and create a new portal. It will require a few minutes for the portal to be ready.
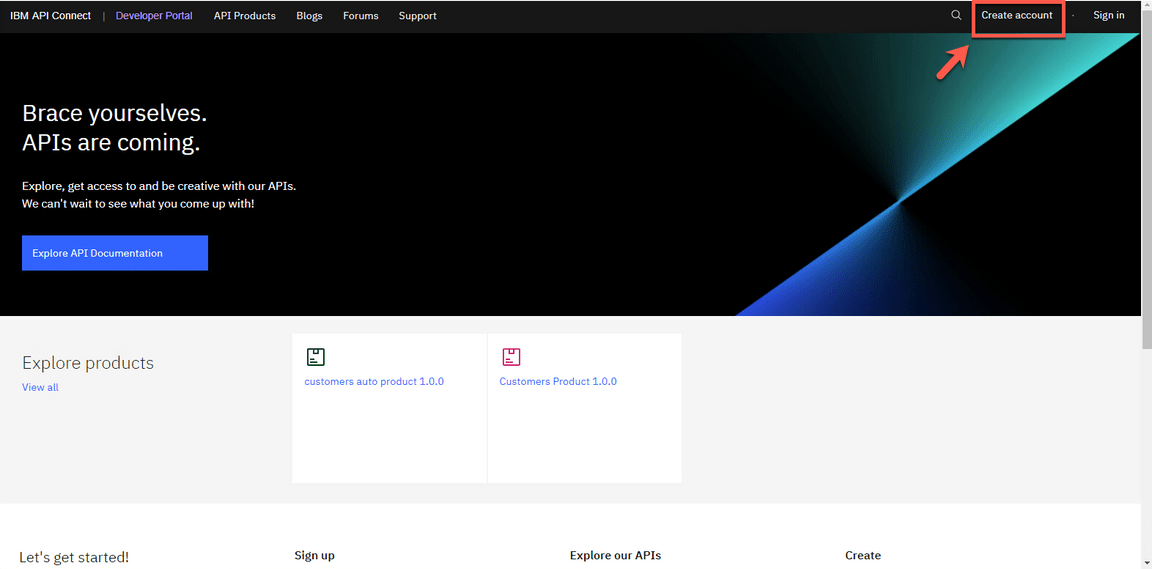
- This Developer Portal is your public-facing website and therefore it is highly flexible and customizable, but we’ll be using the default design. Note that all of these next steps are simulating what your API Consumer, your end-user customer, will do to find, buy, and use your API. Click Create account to create a new developer account.
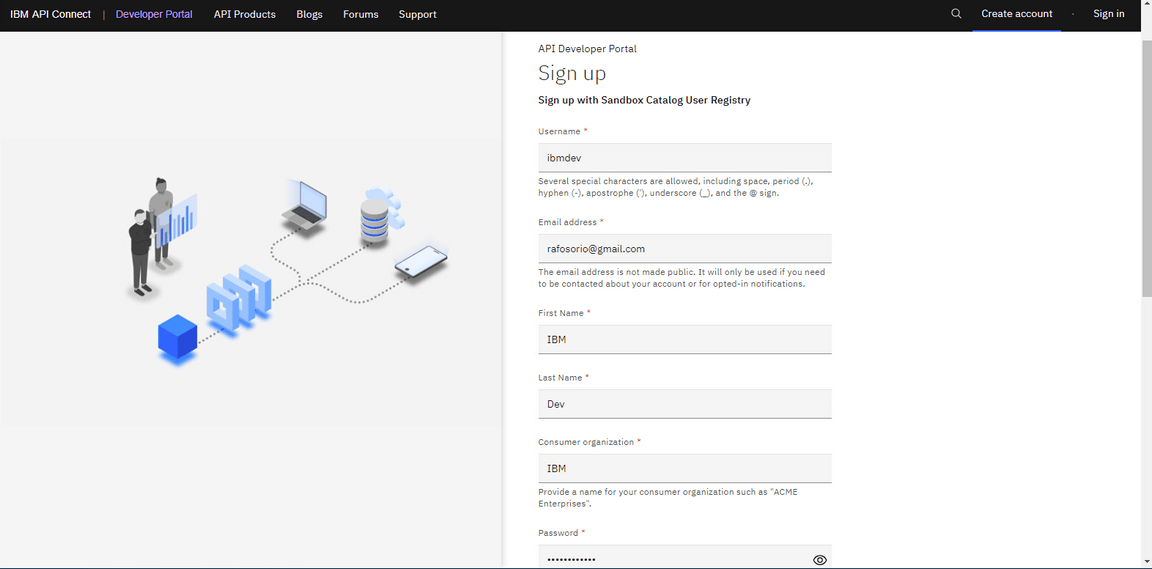
- Complete the registration form, go ahead and use any personal email. Take note of the username (not email) and password. You will need them later to log in to the Developer Portal.
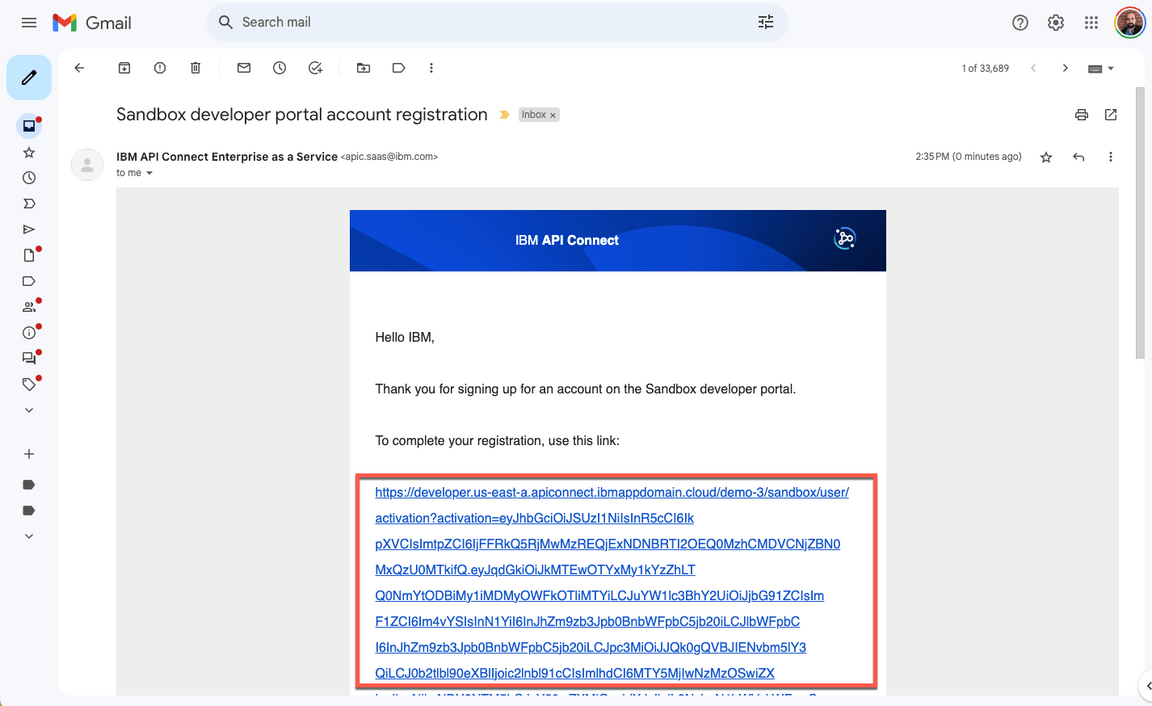
- You will receive an email to activate your new developer account. Click on the link to validate the registration.
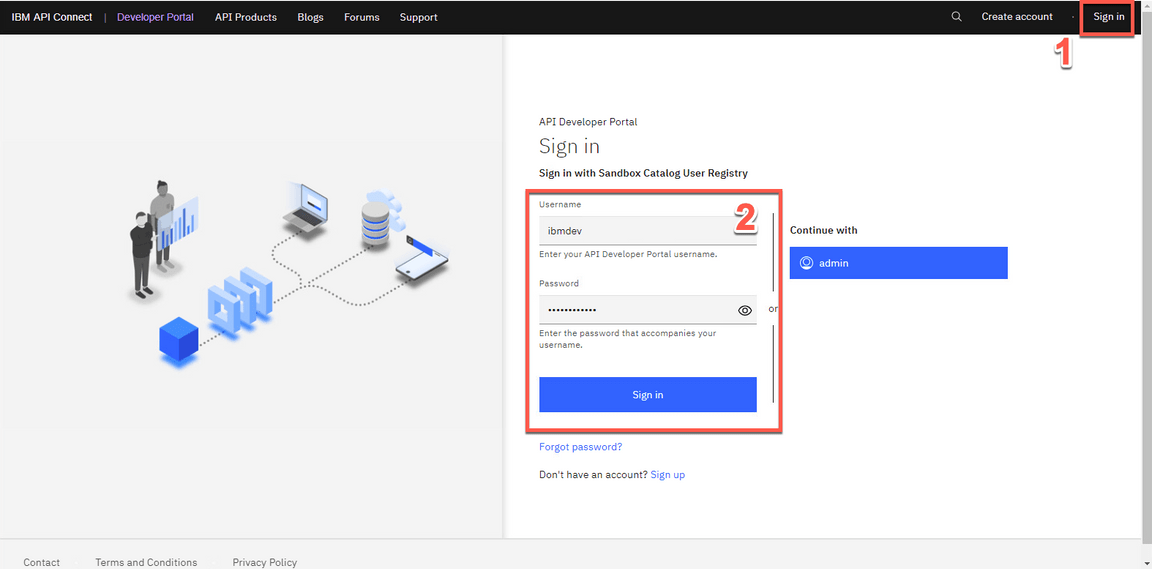
- Sign in (1) to Developer Portal using your developer’s username and password (2).
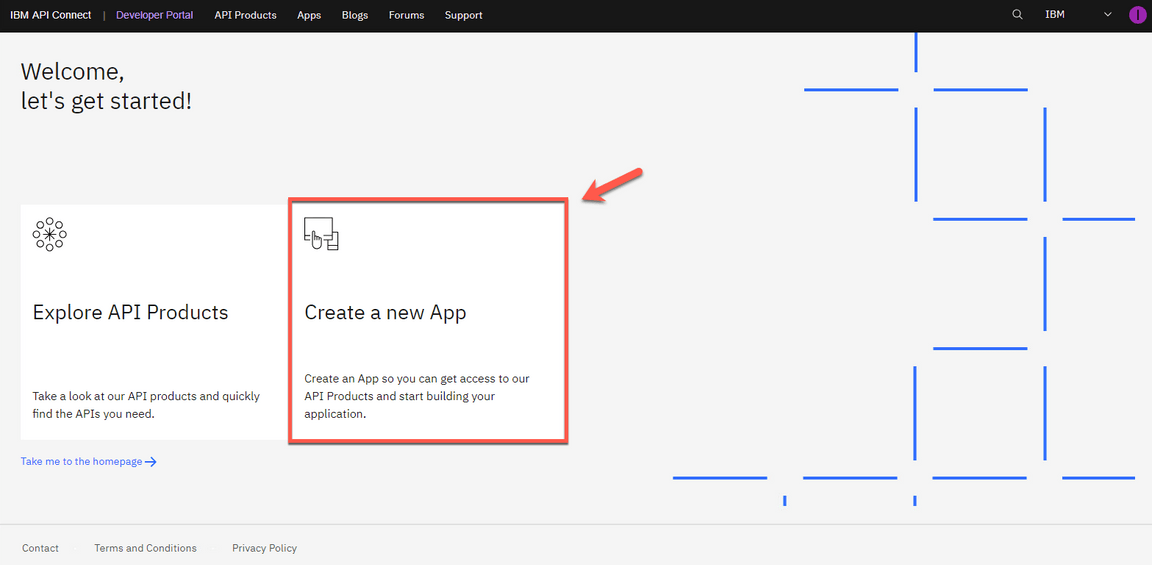
- Developer Portal displays all the products that are currently published. In your case, no Apps created yet. As a consumer/developer, we’re going to create a new application in the portal. This will give us an API key, allowing us to call our APIs. Click Create a new App.
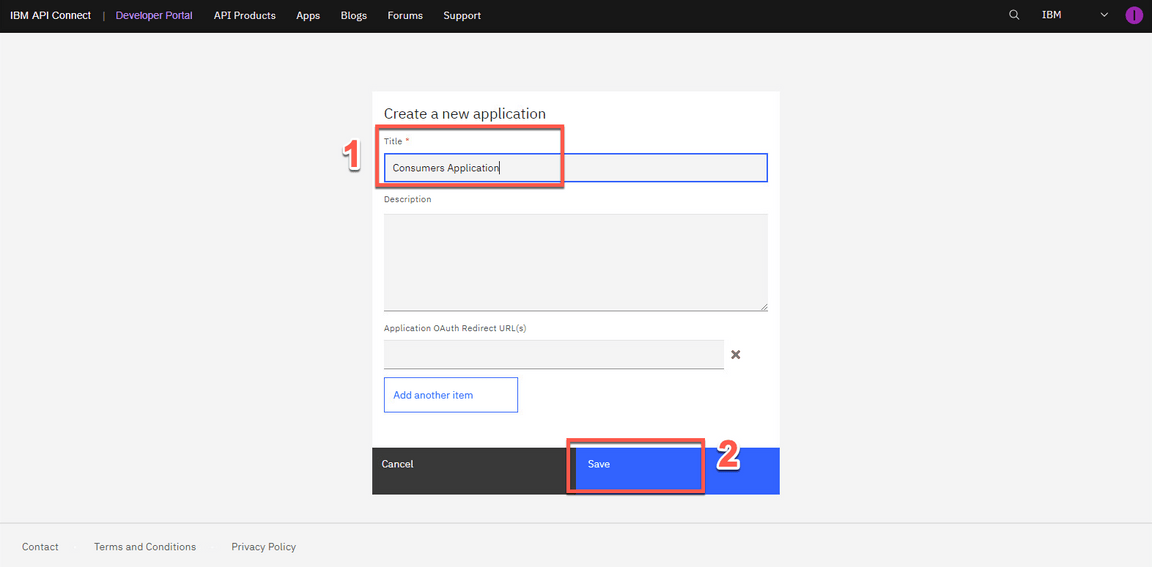
- Enter Consumers Application as the App Title (1). Click Save (2).
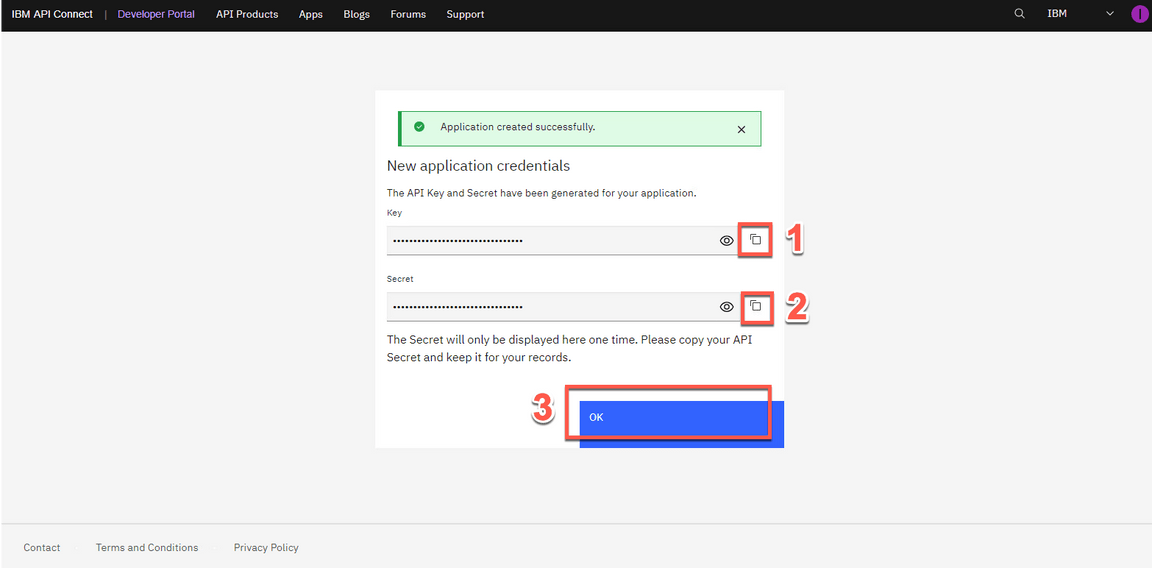
- On the Credentials dialog box, copy the API Key (1), copy the API Secret (2), then click OK (3).
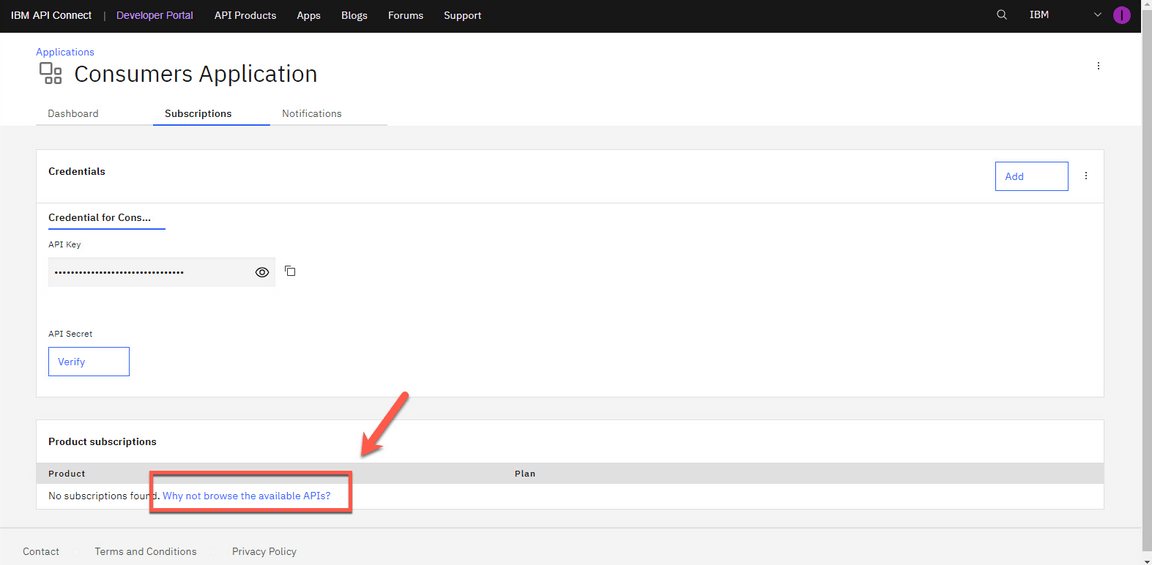
- You have not subscribed to any APIs, so let’s do it now. Click on Why not browse the available APIs? link.
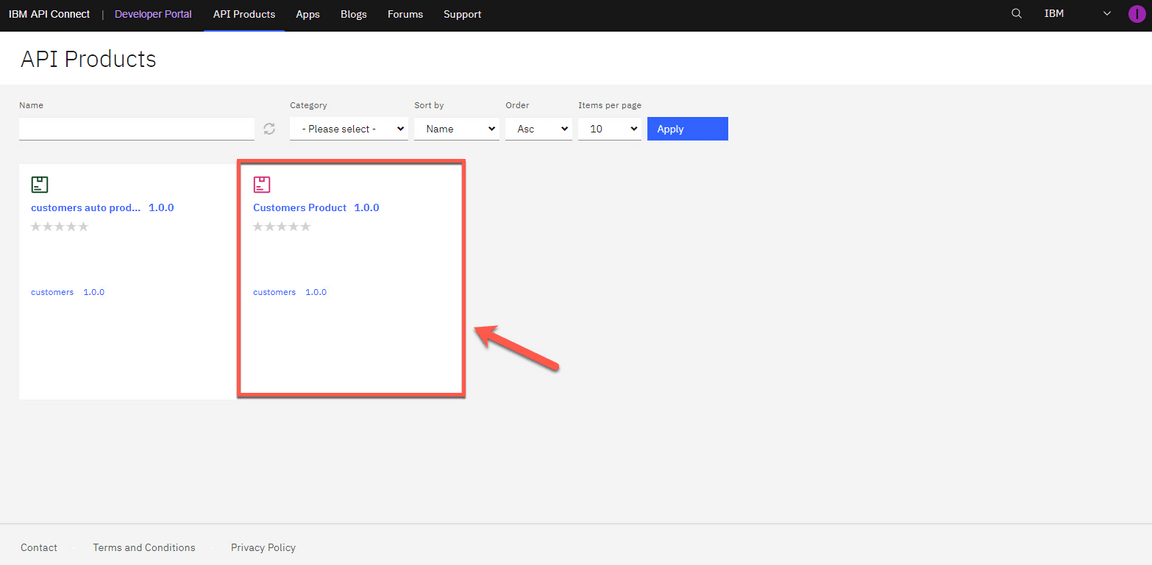
- Click on Customers Product 1.0.0.
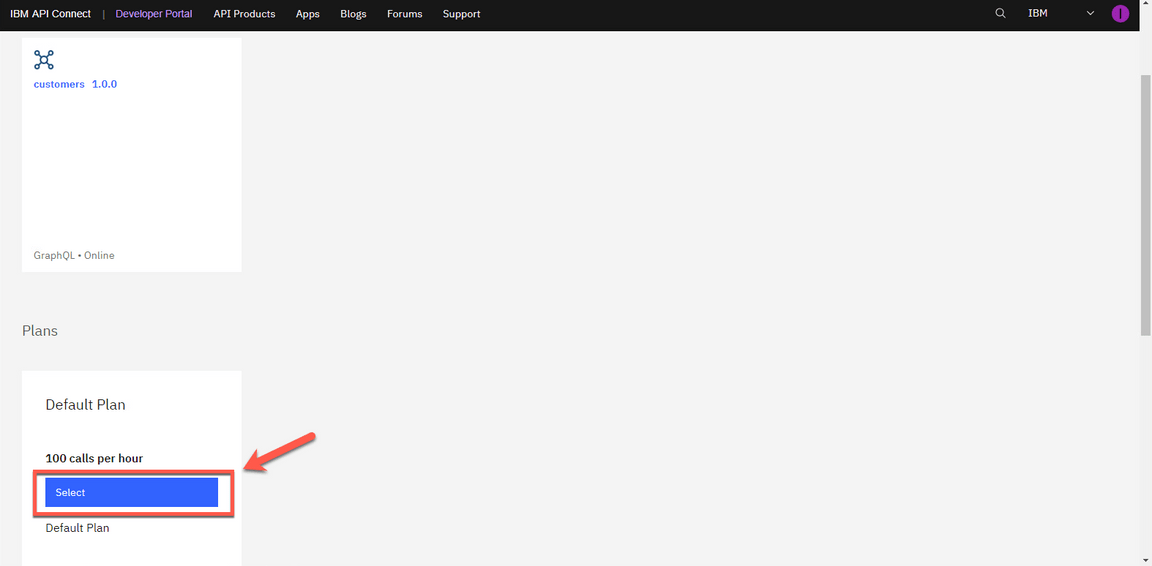
- In the Default Plan section, click Select.
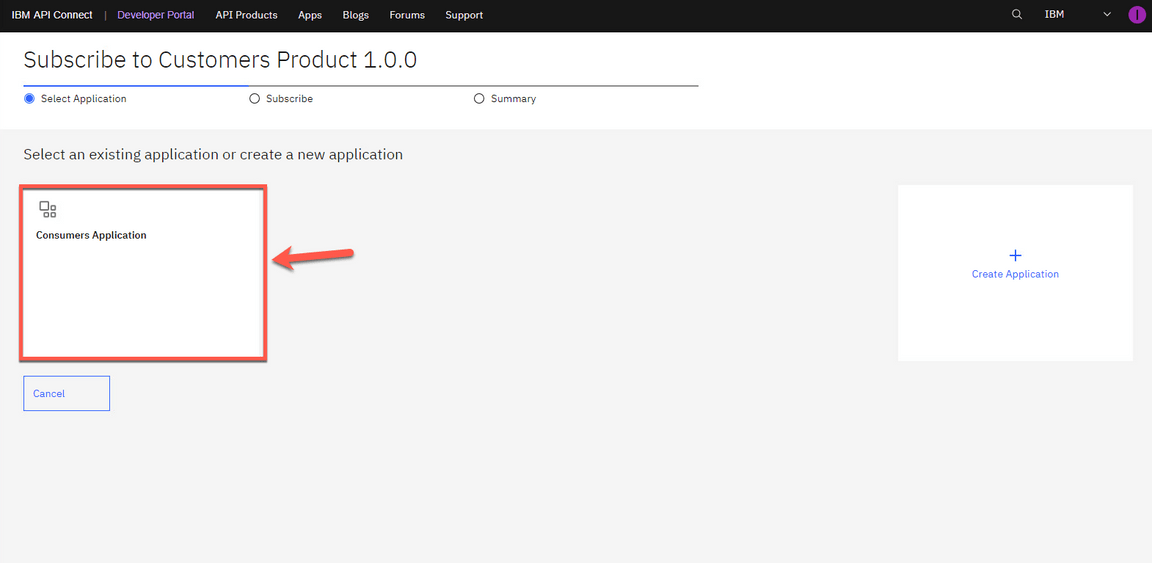
- Select the Consumers Application.
- Confirm the subscription by clicking Next.
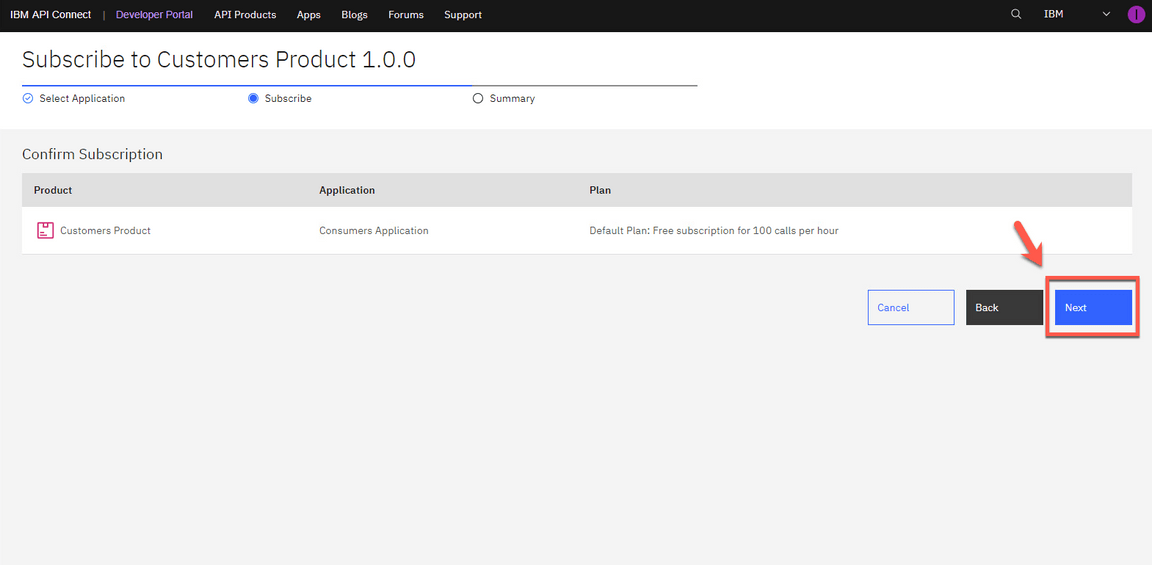
- Click Done.
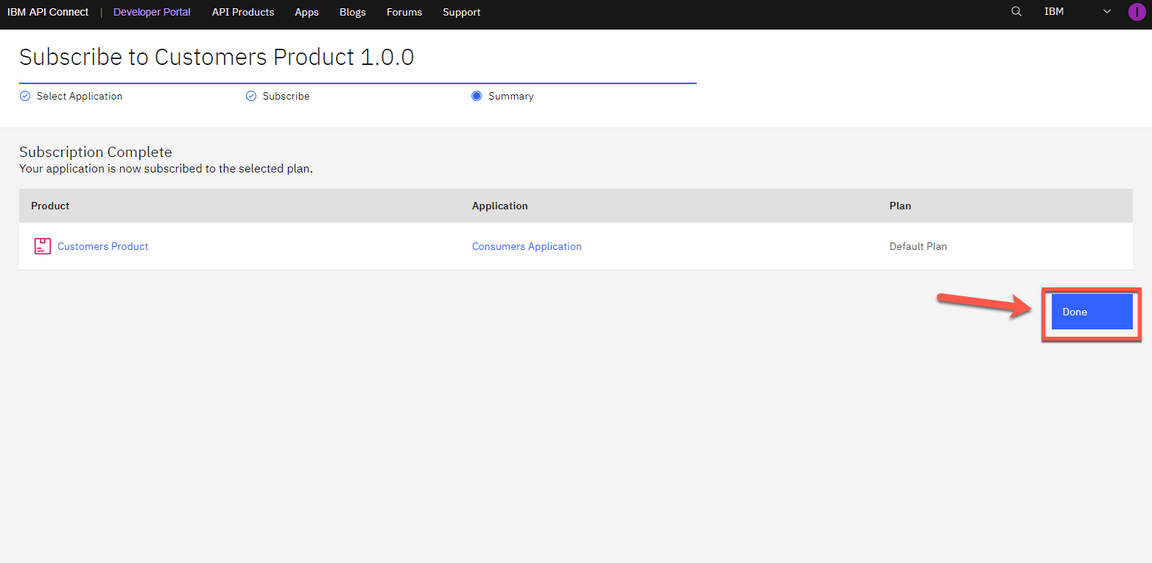
- You are now back at the product screen. Let’s explore your API here. Click the customers 1.0.0 API.
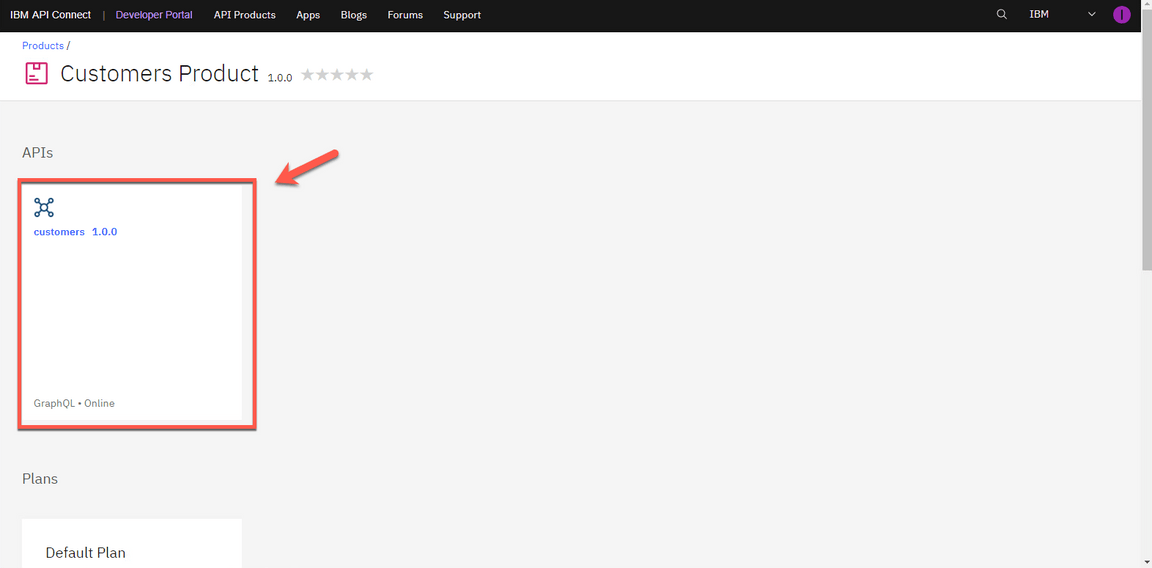
18.From Overview page, you can download the OpenAPI Document and get the API Endpoint. Note the portal has everything you need to call your API. Open the Try it tab.
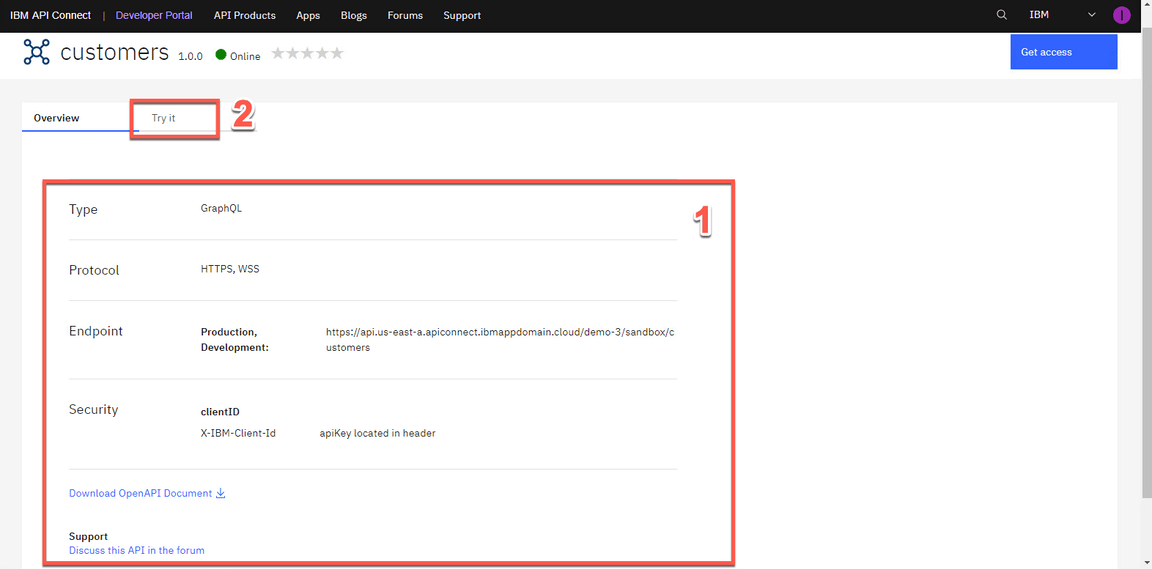
- Paste the API Key that you copied in the previous step (1). Paste the GraphQL below in the GraphQL editor (2). And click on Execute Query button (3).
{customers {idnameaddress {citycountryRegionpostalCode
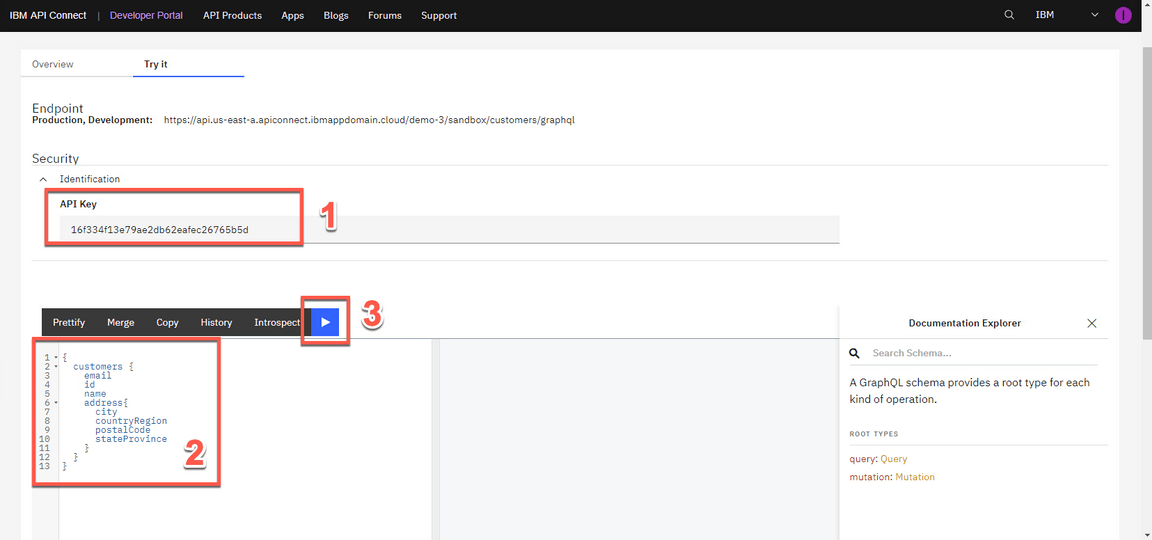
TROUBLESHOOTING: You can keep using the external GraphQL playground to test your api(1), but now in the HTTP Header section, paste the API Key that you copied in the previous stepr as your X-IBM-Client-Id header parameter (4). Then click on the Play button to see the graphQL returned data (5).

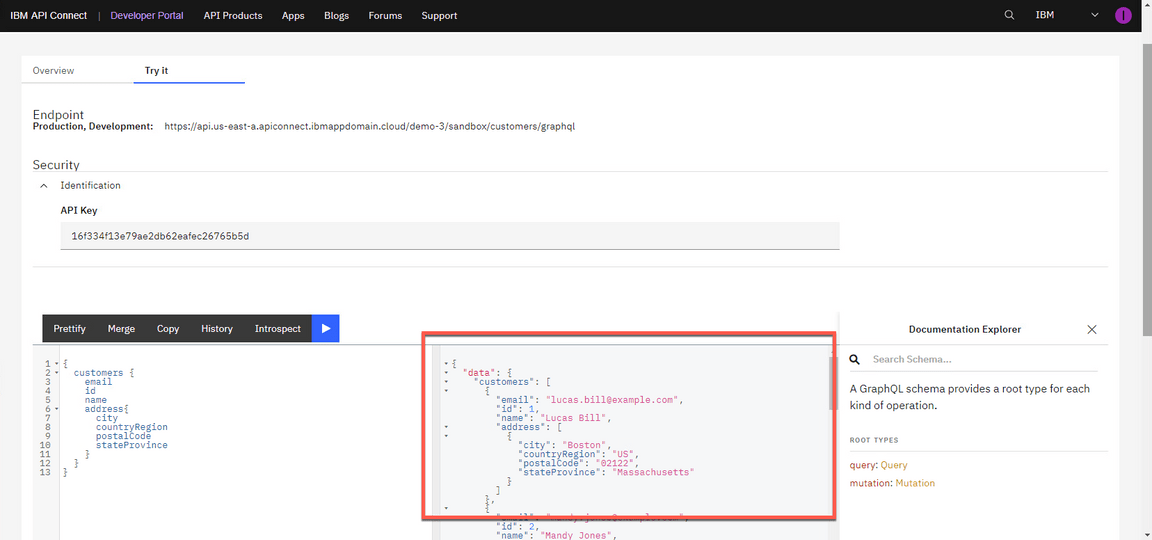
- Great! Your GraphQL Proxy API is running and available for your ecosystem. You are welcome to continue to test the API, using the GraphQL Editor. Submit requests with different field names and watch how quickly the results are returned in the results window. If this was a REST API multiple end points would be needed to achieve the same result.
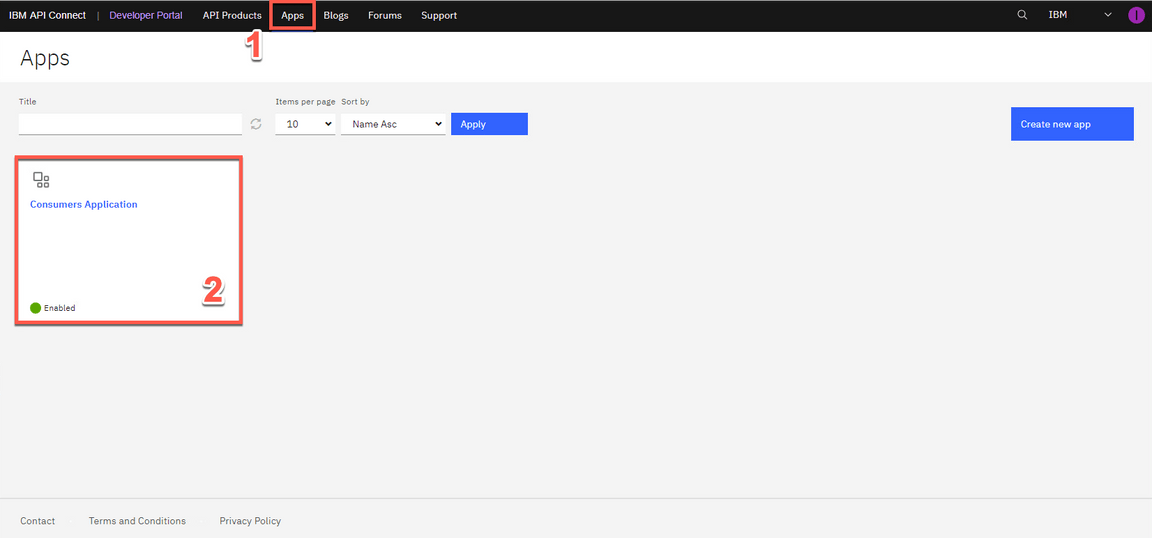
- That was the experience as the API Consumer, your paying customer. Now we return to your experience as an API Provider with an API that is being called, and you have analytics information about the usage of the application. Open the Apps page (1) and select the Consumers Application (2).
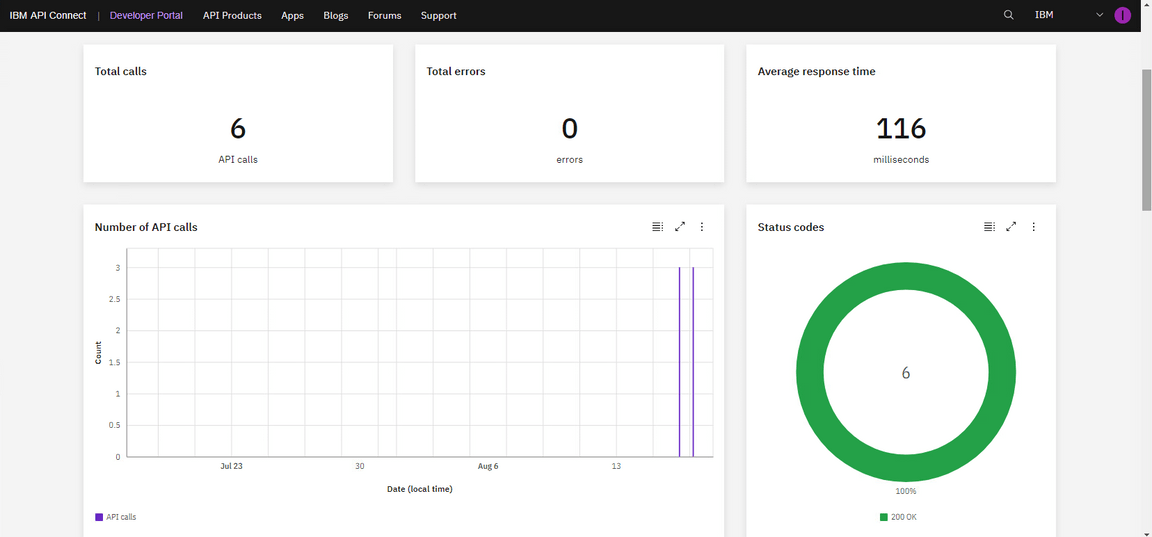
- In this page, the developers can view information and insights about the application.
Congratulations! You have successfully completed this lab!
Summary
Let’s summarize what you’ve done today.
In this lab you moved from Zero to Enterprise in the GraphQL domain. Initially you learned how to use StepZen to create a a federated GraphQL API by pulling data from disparate sources (REST API and MySQL). After that you learned how to use IBM API Connect to create a GraphQL API proxy definition that proxies a backend GraphQL API from StepZen, and you verified how to define rate limiting controls that reflect the amount of data that is returned from the server by a request to the GraphQL API.
