ACE Toolkit Demo
Introduction
Today's organizations use a wide variety of diverse Software as a Service (SaaS) applications, often without centralized coordination between them. However, integrating applications is essential to help organizations increase efficiency and optimize business workflows. For instance, in a typical sales process without application integration, sales reps may use Salesforce for customer relationships and Excel for quotes. After finalizing a sale, they must manually transfer data such as customer details, product information, and pricing data from Salesforce to Excel. This can be time-consuming and prone to errors, leading to delays in processing sales orders and potential inaccuracies in pricing.
By connecting your apps using IBM App Connect, the process becomes more streamlined, accurate and efficient because reps can automate data input to create quotes directly from their CPQ application with centralized tracking.
IBM App Connect can help you securely connect all your endpoints, from databases to packaged apps. It provides an out-of-the-box set of capabilities that will accelerate SaaS integration and automation across your business. Additionally, the development kit allows citizen integrators to understand and build powerful integrations with little to no training.
Focus Corporation, a hypothetical retail company engaged with IBM, is highly motivated to derive more revenue from first-time customers to their online storefronts. Focus has acquired another business and needs to integrate the different IT applications.
The Focus Integration expert would like to build complex, multi-style integrations with support for multiple programming languages and fully integrated with source and pipeline management tools like GIT, Maven, Jenkins, etc.
The Focus team requested a demo to learn how IBM App Connect for Developers Toolkit can help them to implement complex and advanced integration scenarios.
1. Create your Integration flow
1.1. Starting App Connect Toolkit
Narration
IBM App Connect is an industry-leading integration solution that connects any of your applications and data, no matter where they reside. With hundreds of prebuilt connectors and customizable templates, App Connect helps users of all skill levels rapidly connect Software as a Service (SaaS) applications and build integration flows.
The Focus team is looking for an advanced, fully customizable code platform. They would like to harness a lightweight, fast-performing engine that easily scales to support their growing needs. They need to enable support for multiple types of data integration, including event, application programming interfaces (APIs), services, sync/async, transactional batch processing and more. Focus Integration experts need to map data fields and transform data formats exchanged between applications, such as XML, JSON, CSV, EDIFACT, SWIFT and other industry protocols.
Because of that, they decided to explore IBM App Connect Enterprise for Developers (Toolkit). The Toolkit is an integrated development environment and graphical user interface based on the Eclipse platform. Focus Integration experts can use the IBM App Connect Enterprise Toolkit to build powerful integration applications, services, and APIs. And they can then deploy their integration solutions to the software run time, IBM App Connect Enterprise as a Service, containers, or a combination of those environments.
Action 1.1.1.
Open your App Connect Enterprise Toolkit by clicking the icon on the Launchpad (MAC OS) or Desktop (Windows) or executing ace toolkit in terminal window.

Action 1.1.2.
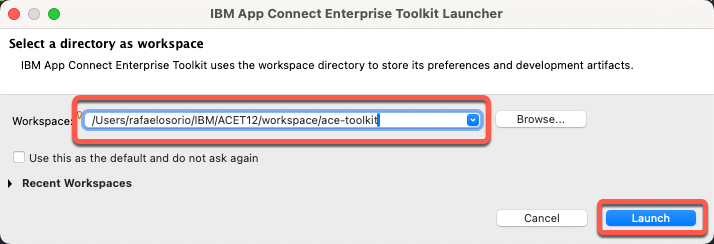
In the Workspace Launcher window, accept the default one. Click Launch.
Action 1.1.3.
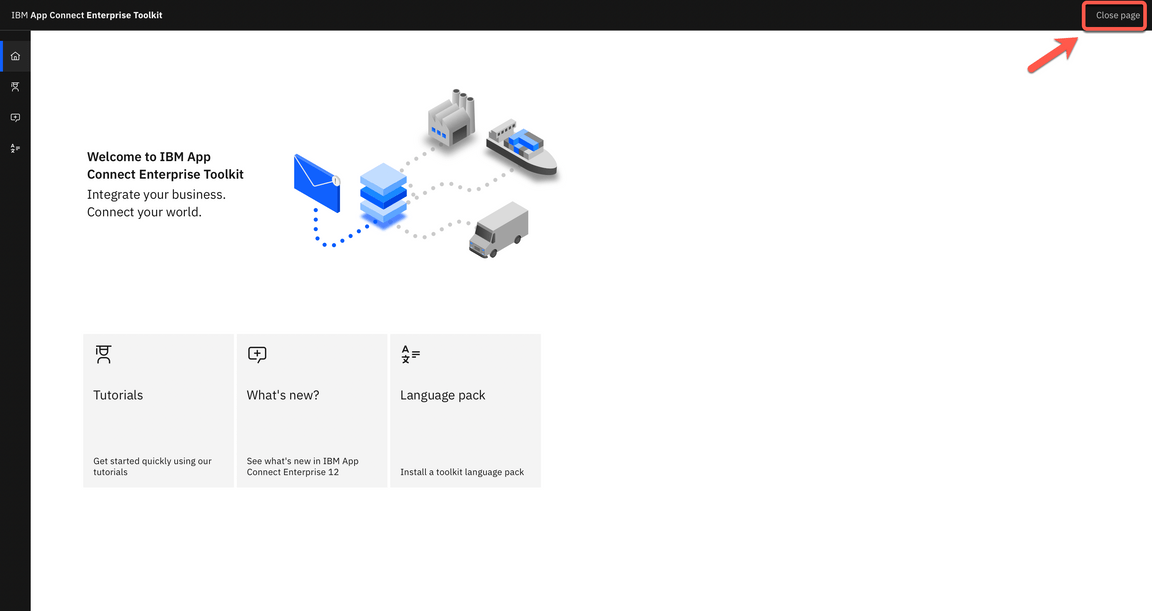
Close the welcome page.
1.2. Creating a REST API
Narration
From the Integration Development perspective, Focus Integration experts can create all manner of integration flows, as well as manage connectivity between services and endpoints.
The Focus team would like to explore how easy is to create an API flow that implements different types of message transformation.
App Connect provides a specific type of project to support REST API implementations, which can either be based upon a Swagger (v2) specification document or an OpenAPI (v3) specification document. REST APIs can be authored and deployed from the IBM App Connect Enterprise Toolkit.
Let’s see how easy is to create a REST API using the Toolkit. The Focus team will create a REST API from an existing OpenAPI v3 document.
Action 1.2.1.
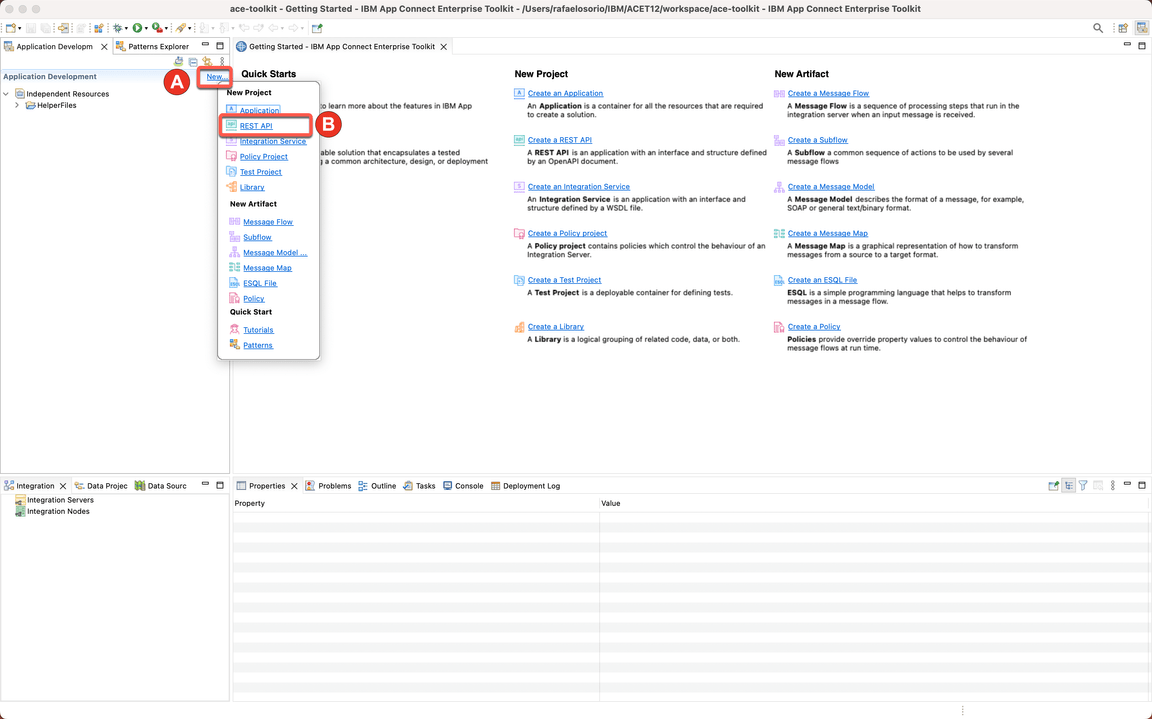
From the Application Development view click the New… hyperlink at the top right (A) and from the menu which appears, click on REST API (B).
Action 1.2.2.
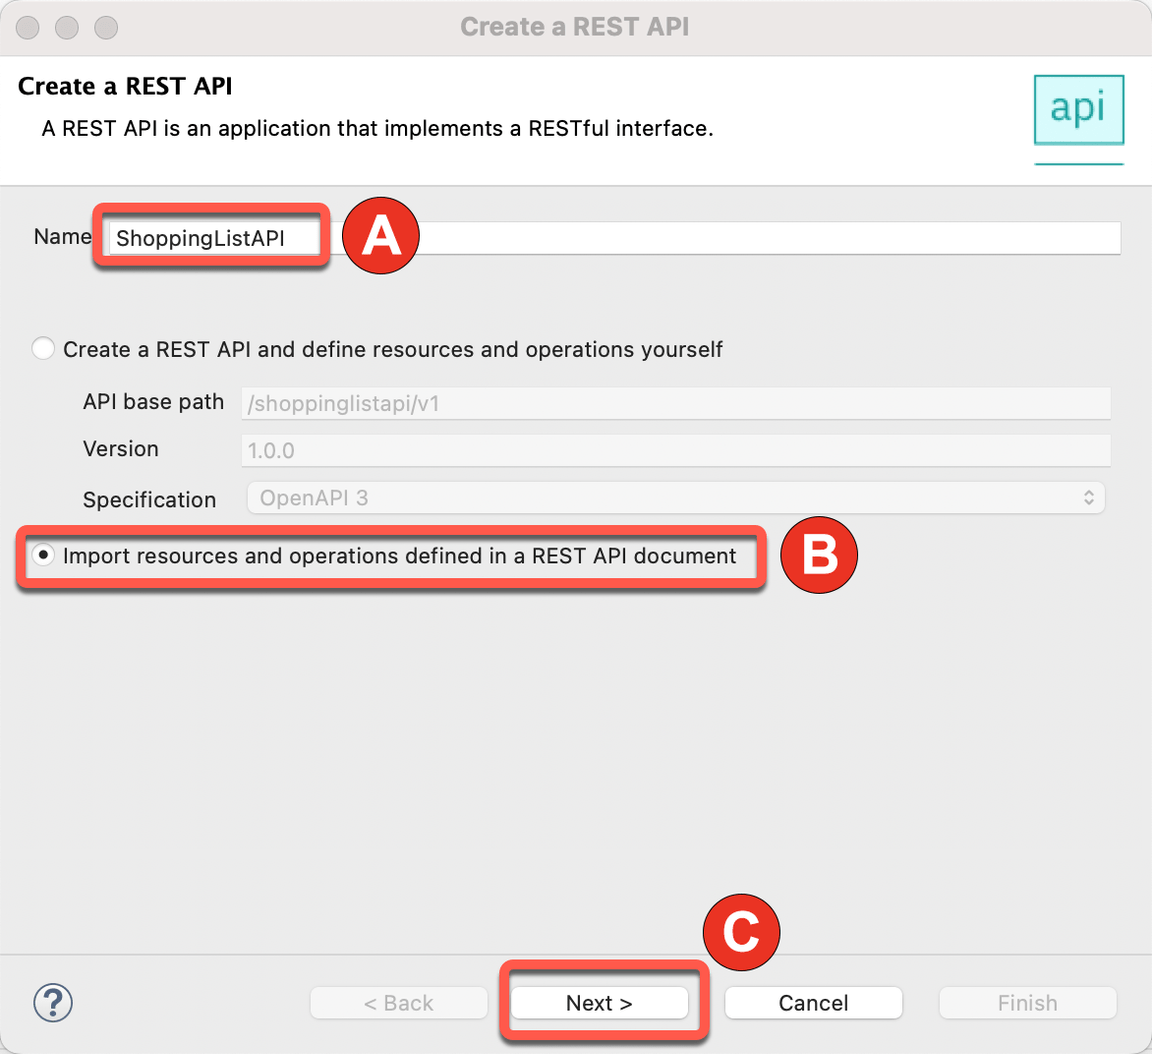
Type the Name ShoppingListAPI (A) and switch the radio button to the option labelled “Import resources and operations defined in a REST API document” (B) then click Next (C).
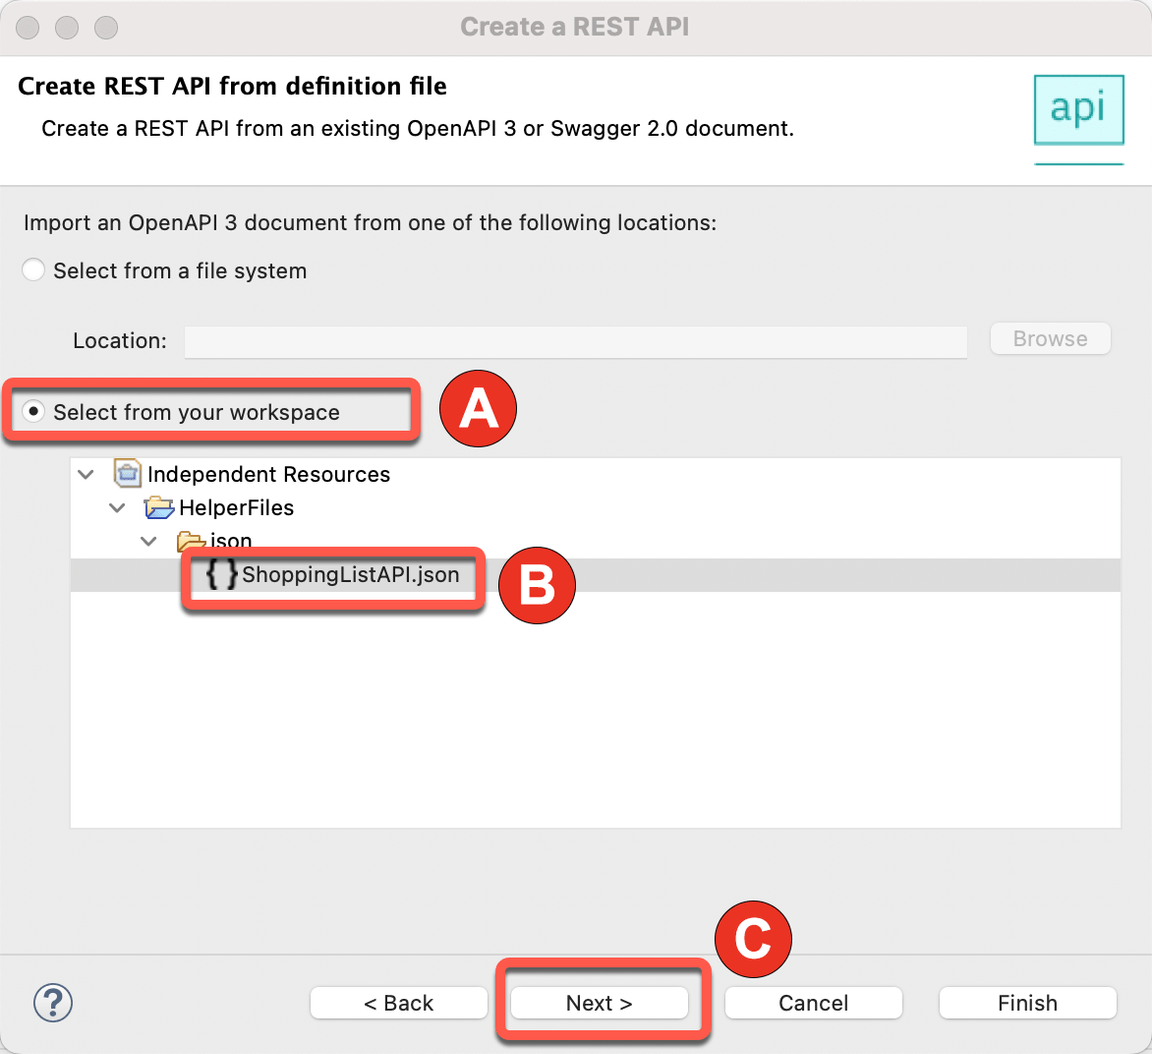
Action 1.2.3.
You will be asked to import an OpenAPI 3 document either from the file system or your workspace. Using the radio button to “Select from your workspace” (A), select ShoppingListAPI.json from the json folder in the HelperFiles project (B) (note: if you don’t see the HelperFiles project, maybe you forgot to import this project in the Demo Preparation part). Click Next (C).
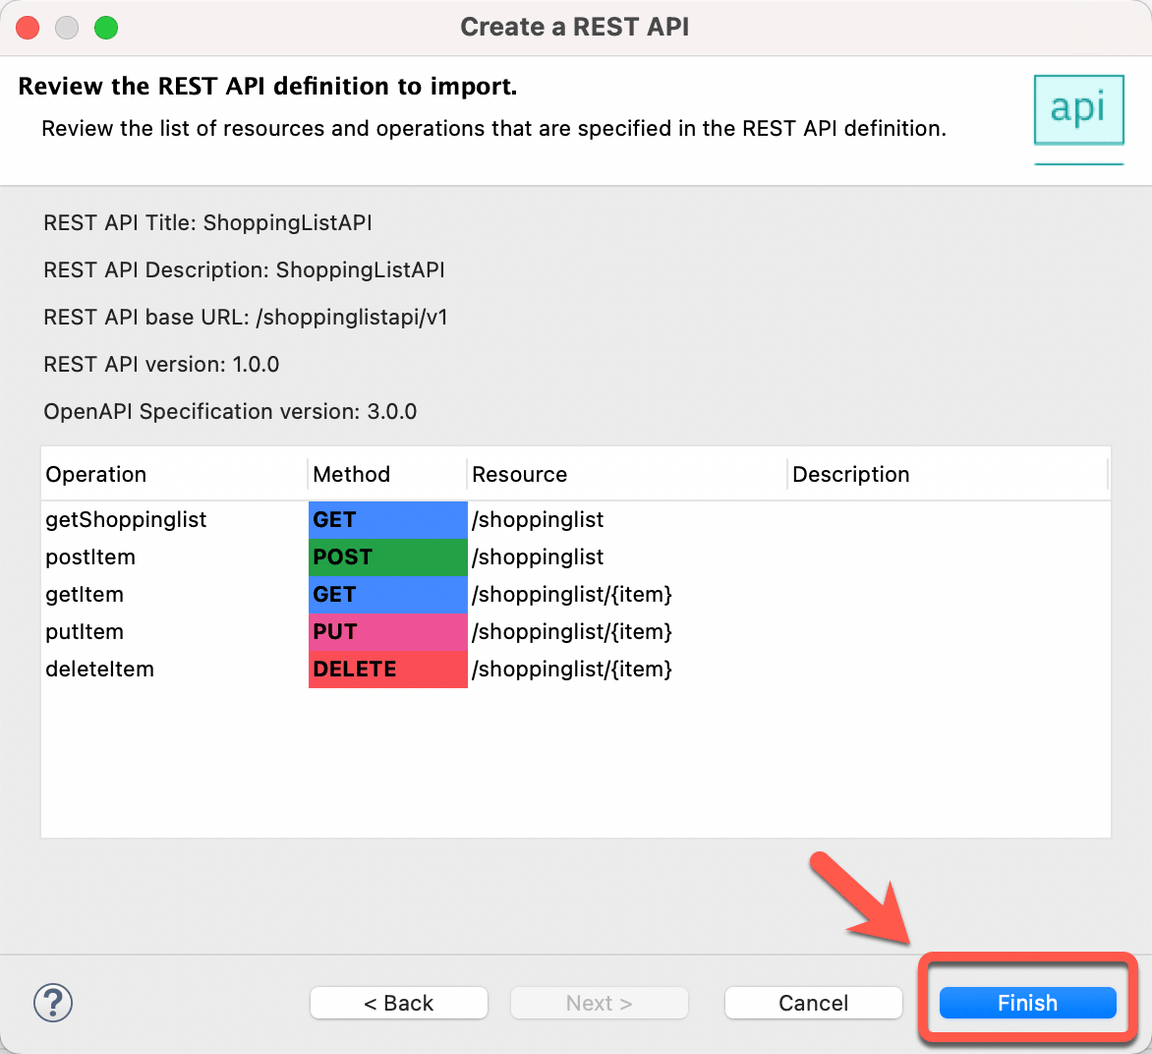
Action 1.2.4.
Click Finish.
1.3. Exploring the REST API details
Narration
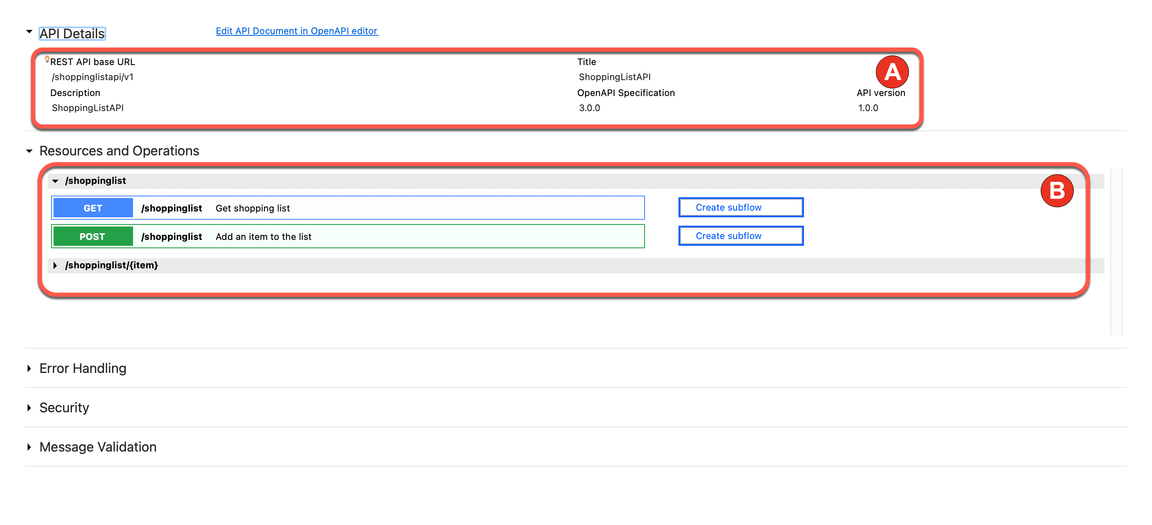
The Focus team created the REST API and they can see a summary page displaying details about the API such as its title and base URL. The next section down entitled Resources and Operations lists the operations in bright colors.
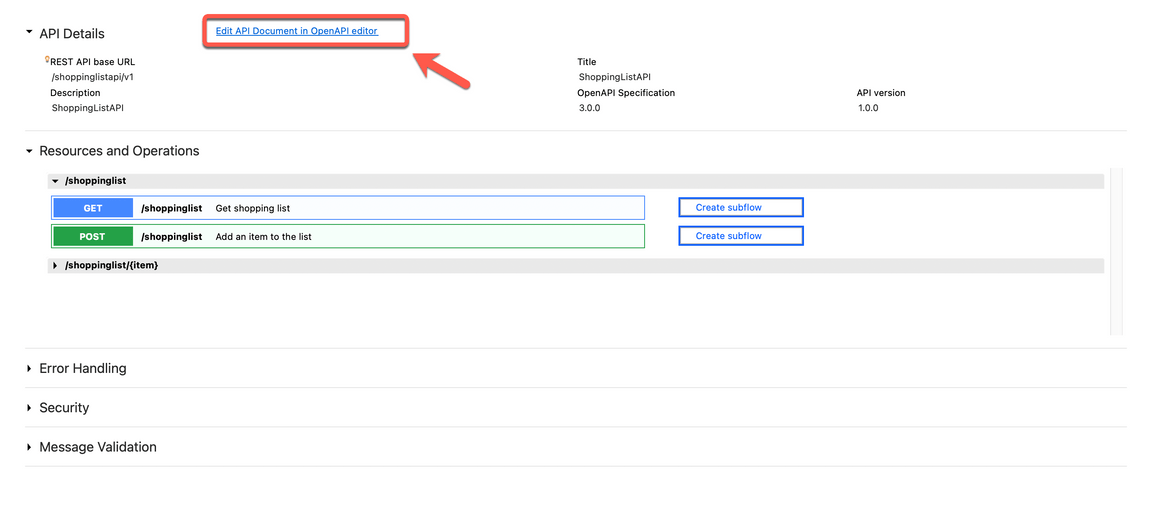
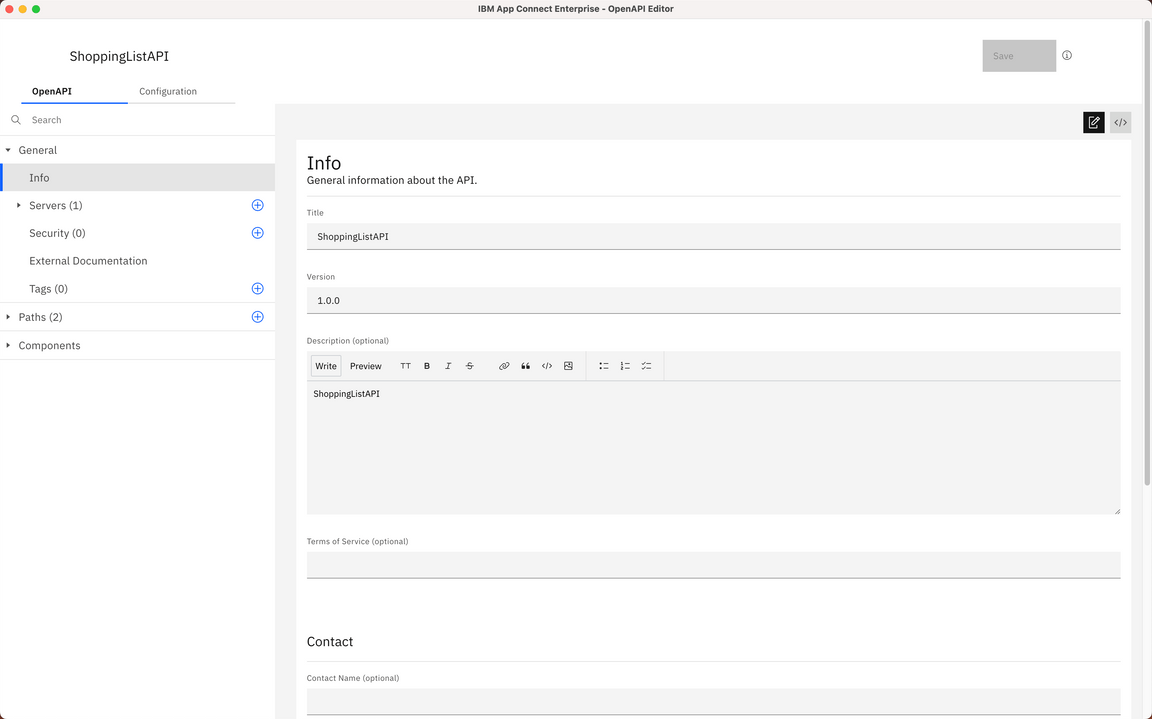
Focus developers can easily edit the API Document using the OpenAPI editor interface.
Action 1.3.1.
Show the API Details (A) and Resources and Operations (B) sections.
Action 1.3.2.
Click on Edit API Document in OpenAPI editor.
Action 1.3.3.
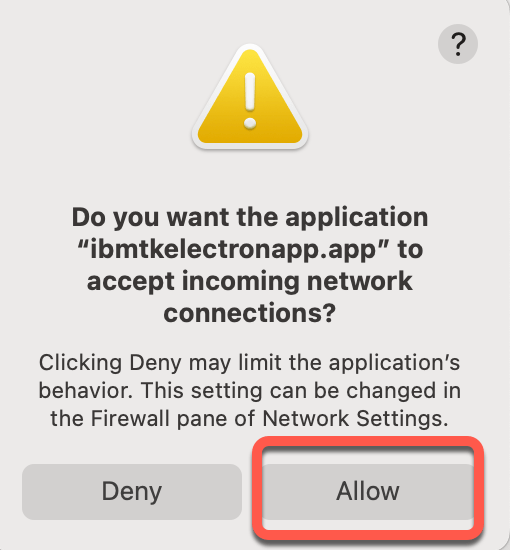
If necessary, accept the incoming network connections.
Action 1.3.4.
Show the OpenAPI Editor.
2. Add a new operation
2.1. Adding a new path
Narration
The Integration experts decided to create a new API operation to list the products of a specific department.
Action 2.1.1.
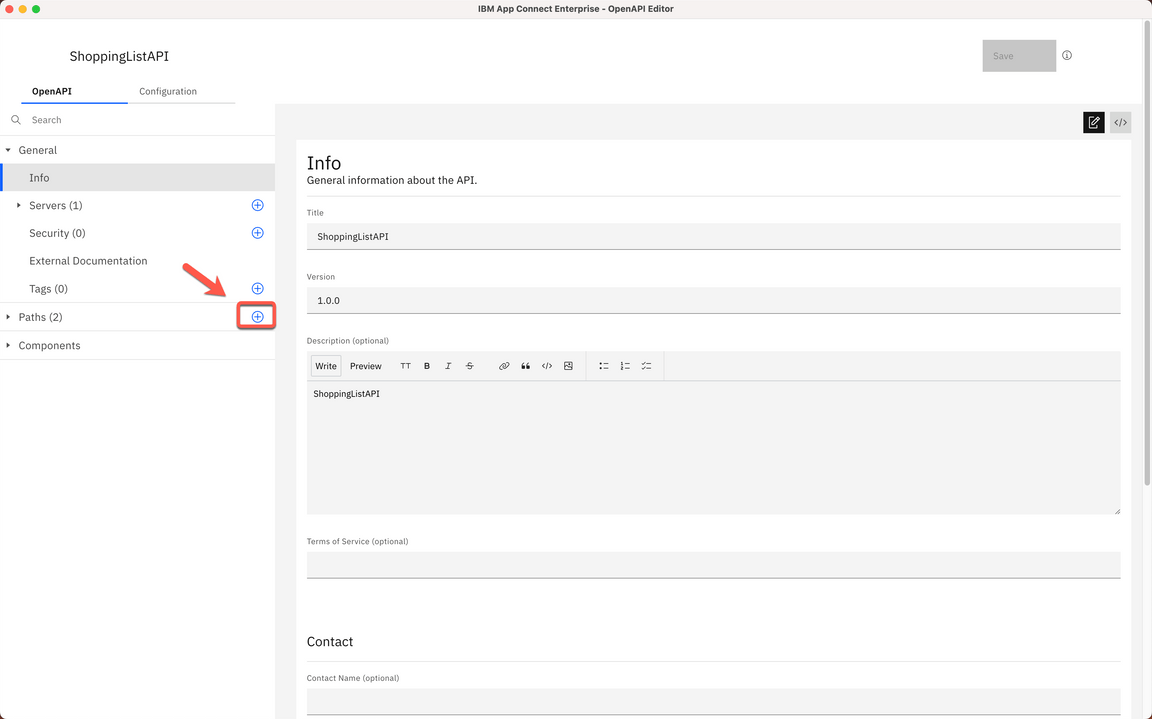
On the Path section, on left menu, click on the Plus button.
Action 2.1.2.
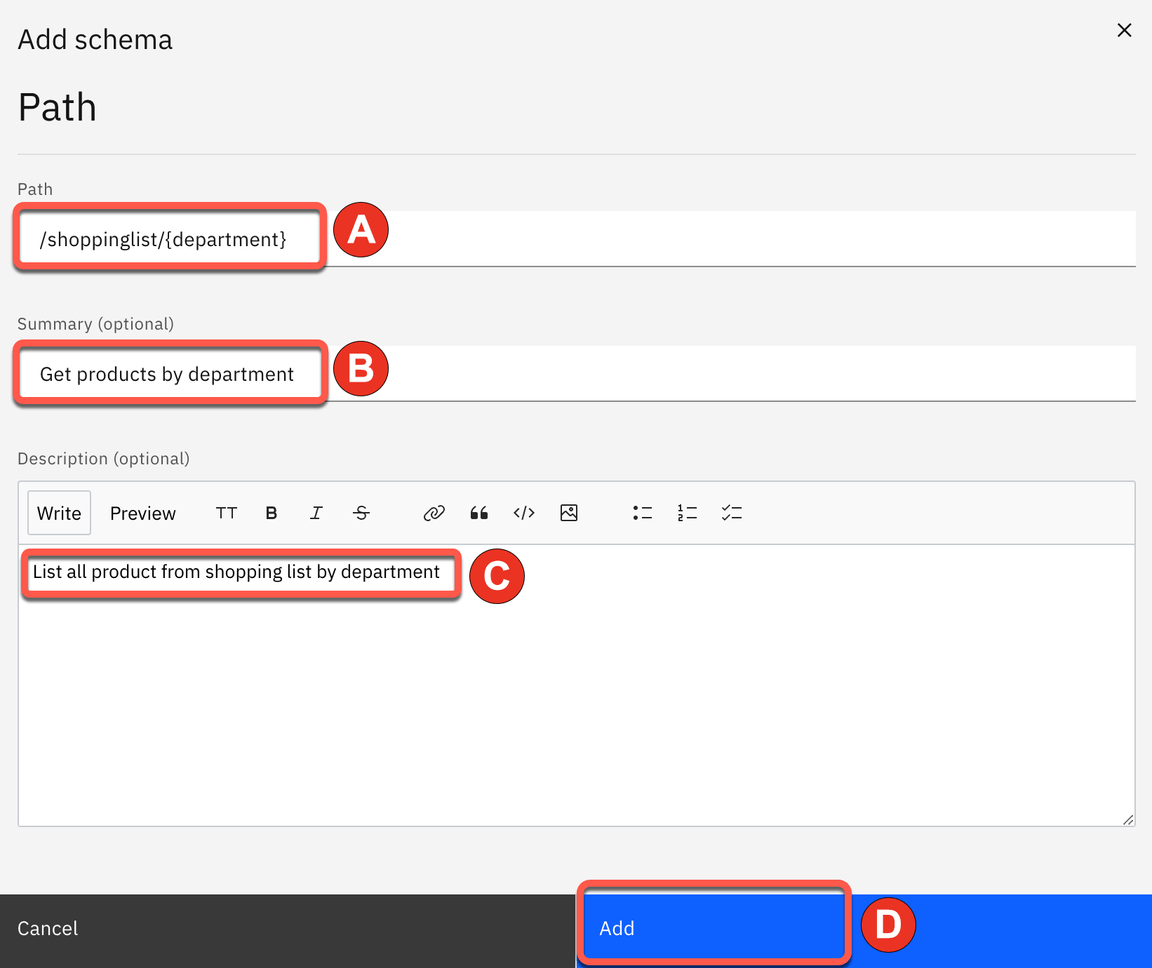
Enter /shoppinglist/{department} as the new Path (A). You are welcome to enter a summary (B) and description (C). Then click Add (D).
2.2. Adding a new operation
Narration
They go ahead and create a new path with the GET operation in the ShoppingListAPI.
Action 2.2.1.
On the Operations section of the new path, click on the Plus button.
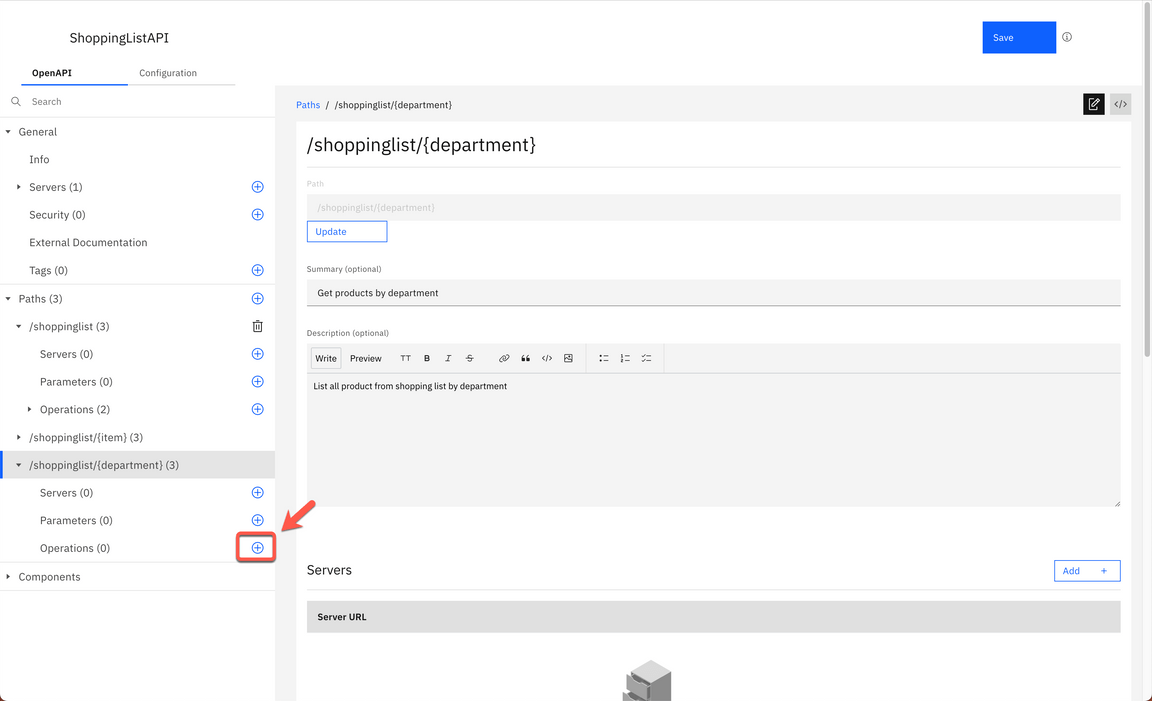
Action 2.2.2.
Select the get verb (A) and click Add (B).
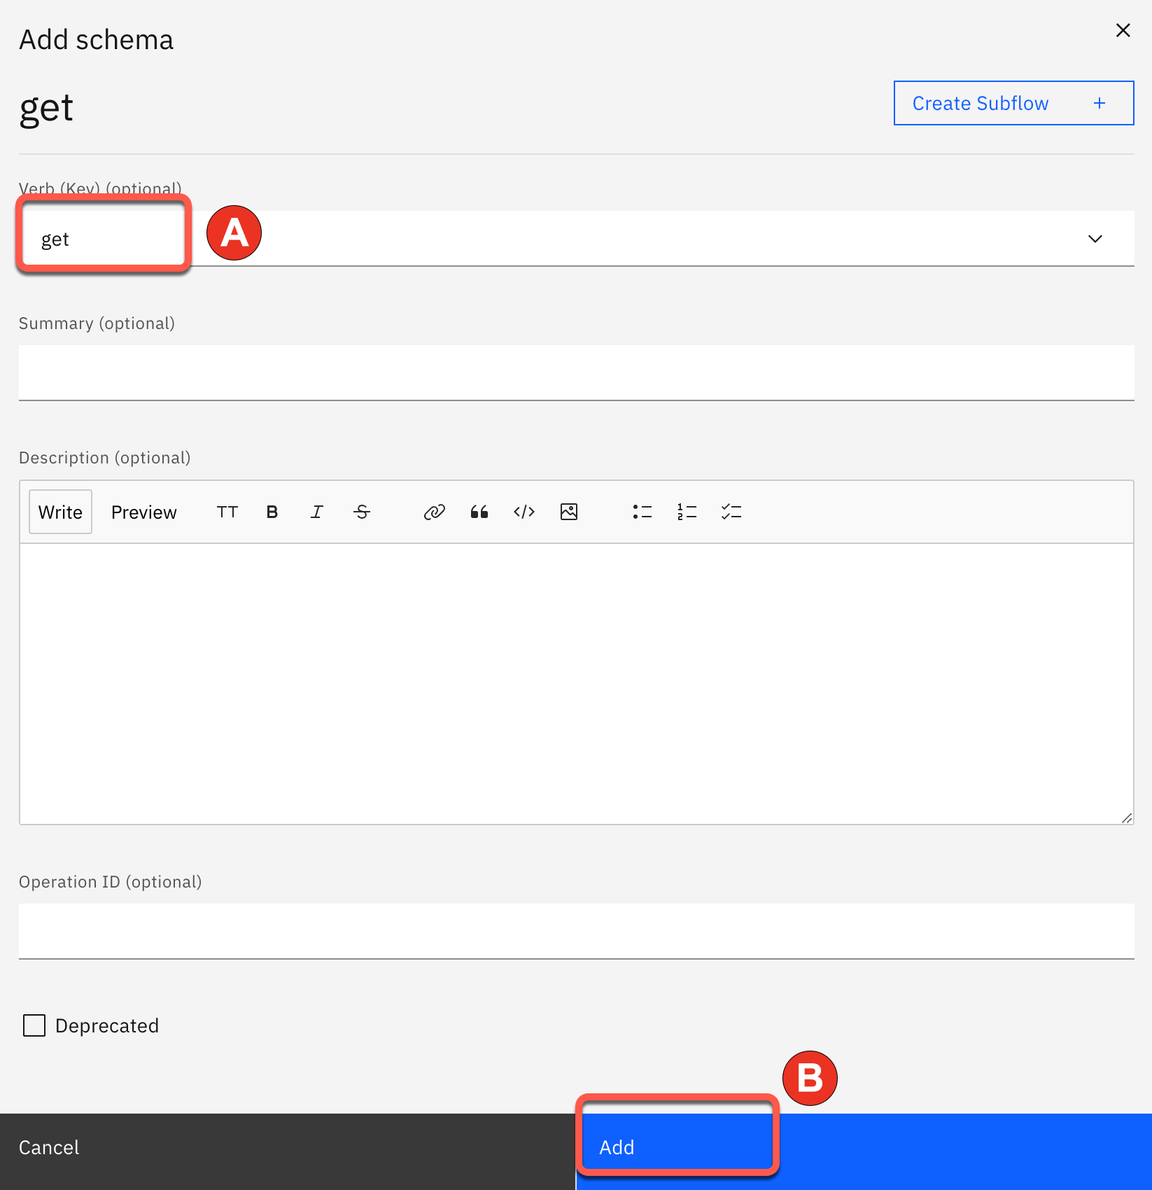
2.3. Defining parameter
Narration
This new path will receive the product department as parameter in the path request.
Action 2.3.1.
Scroll down to see the Parameter section (A) and click Add button (B).
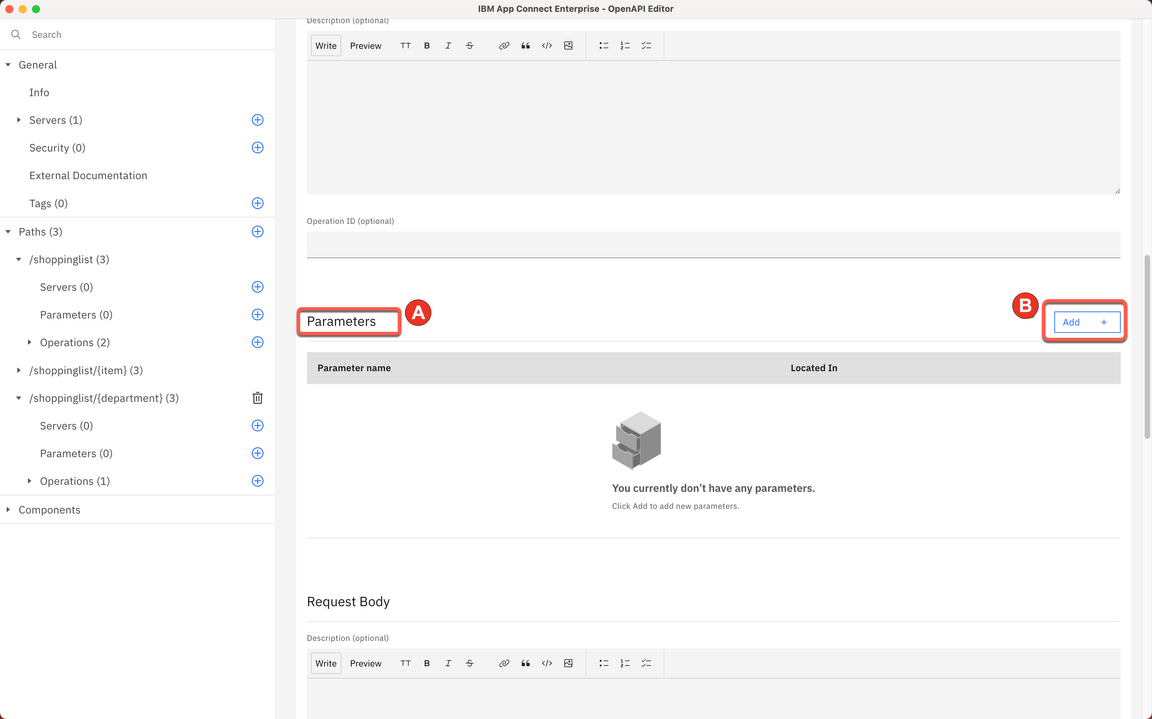
Action 2.3.2.
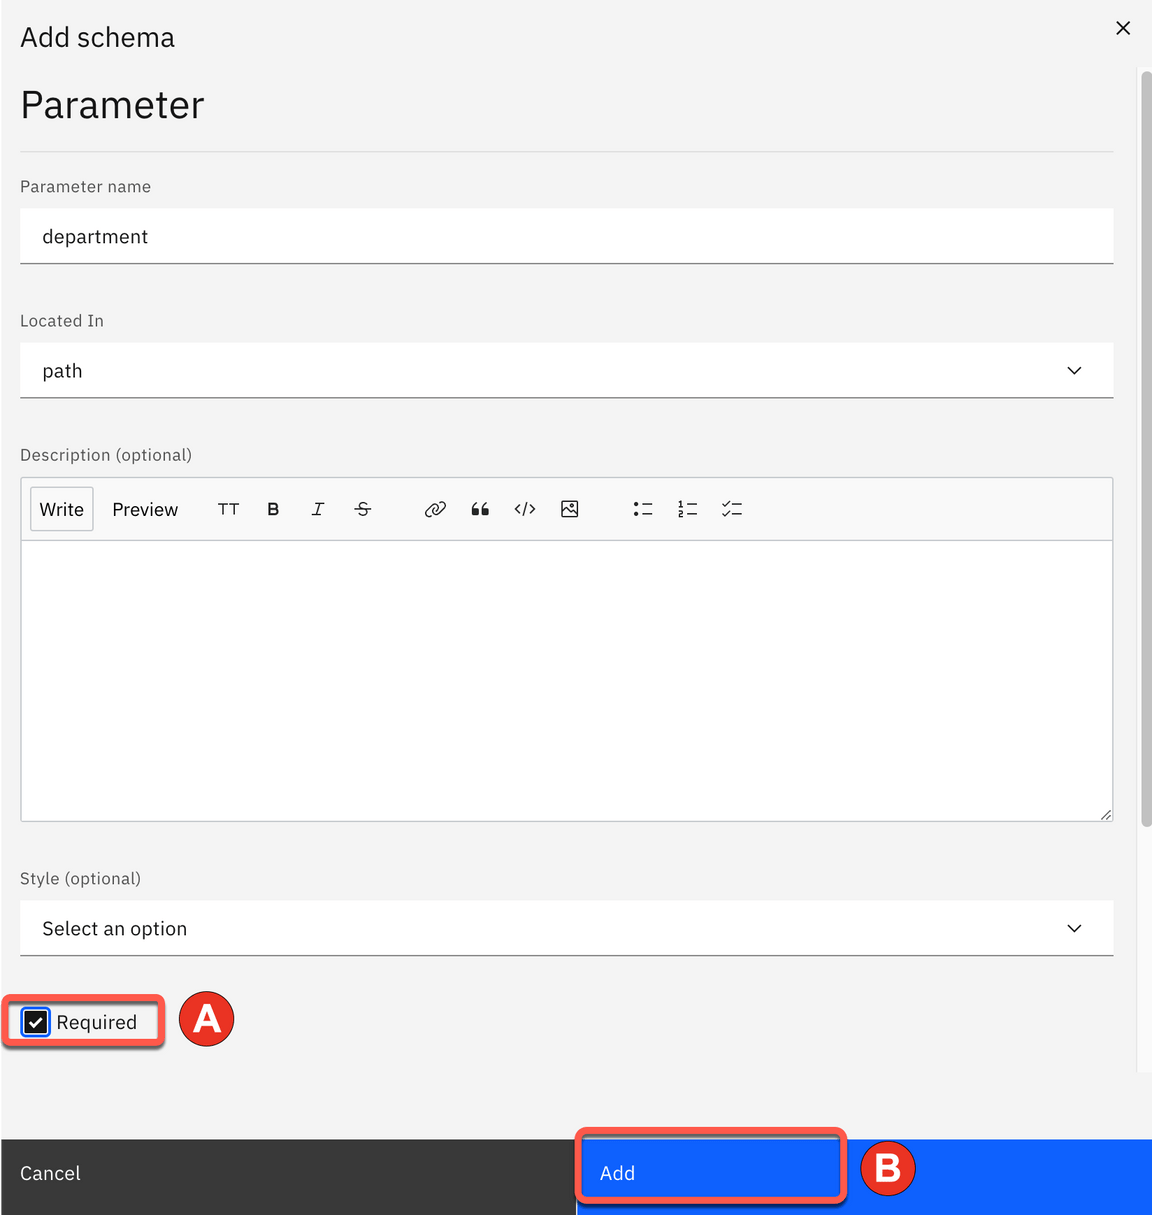
Enter department as Parameter name (A) and select path in Located In field (B).
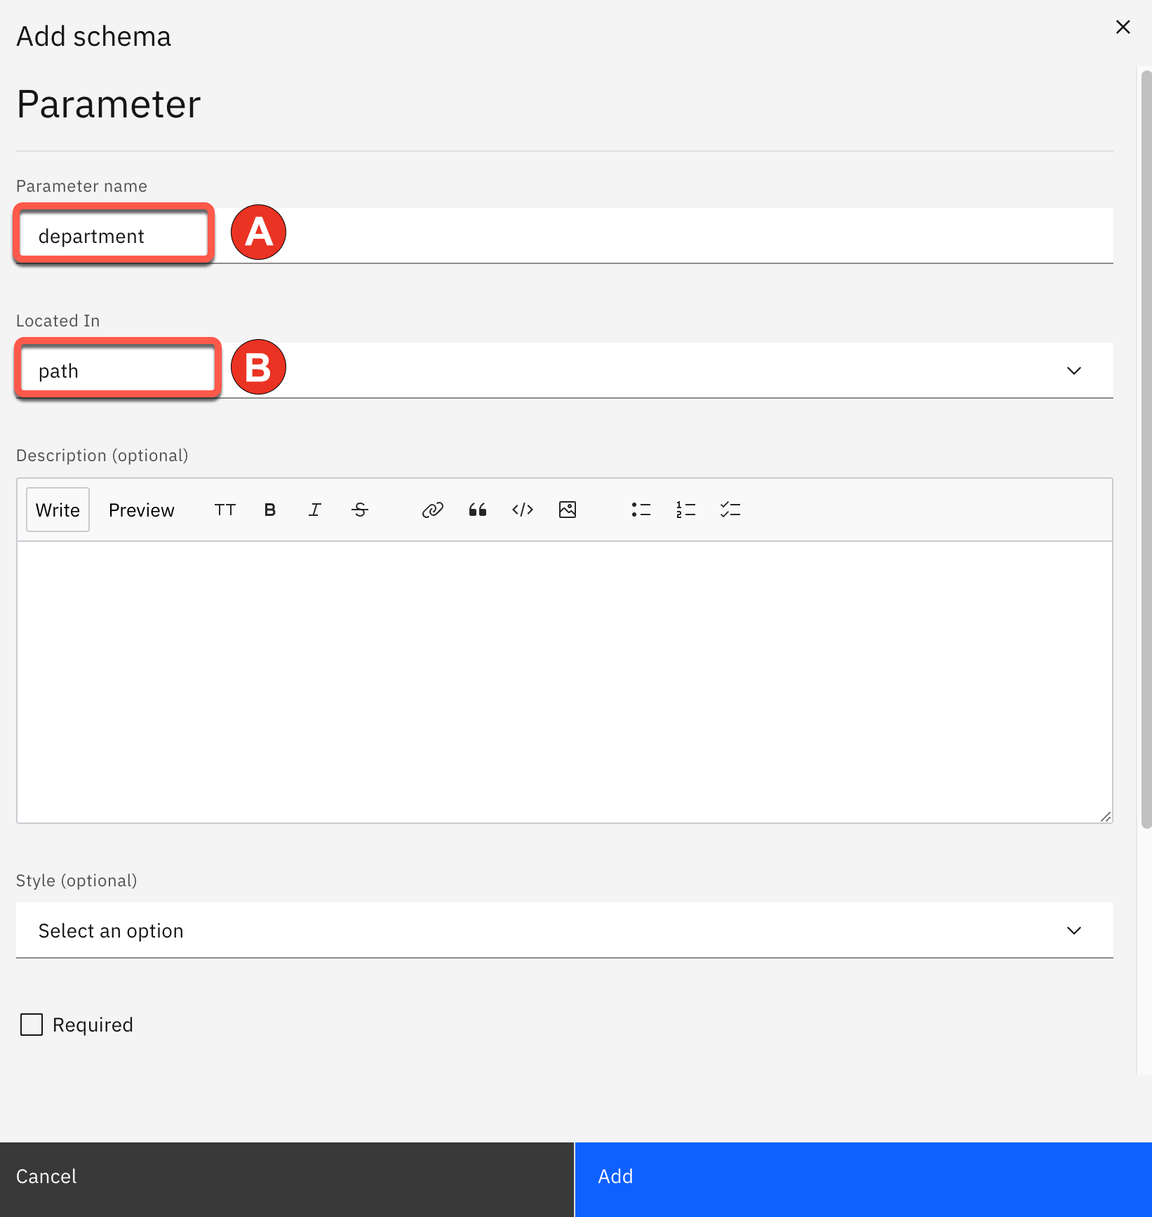
Action 2.3.3.
Scroll down to see the checkbox list and select Required field (A). Then click Add (B).
2.4. Defining schema
Narration
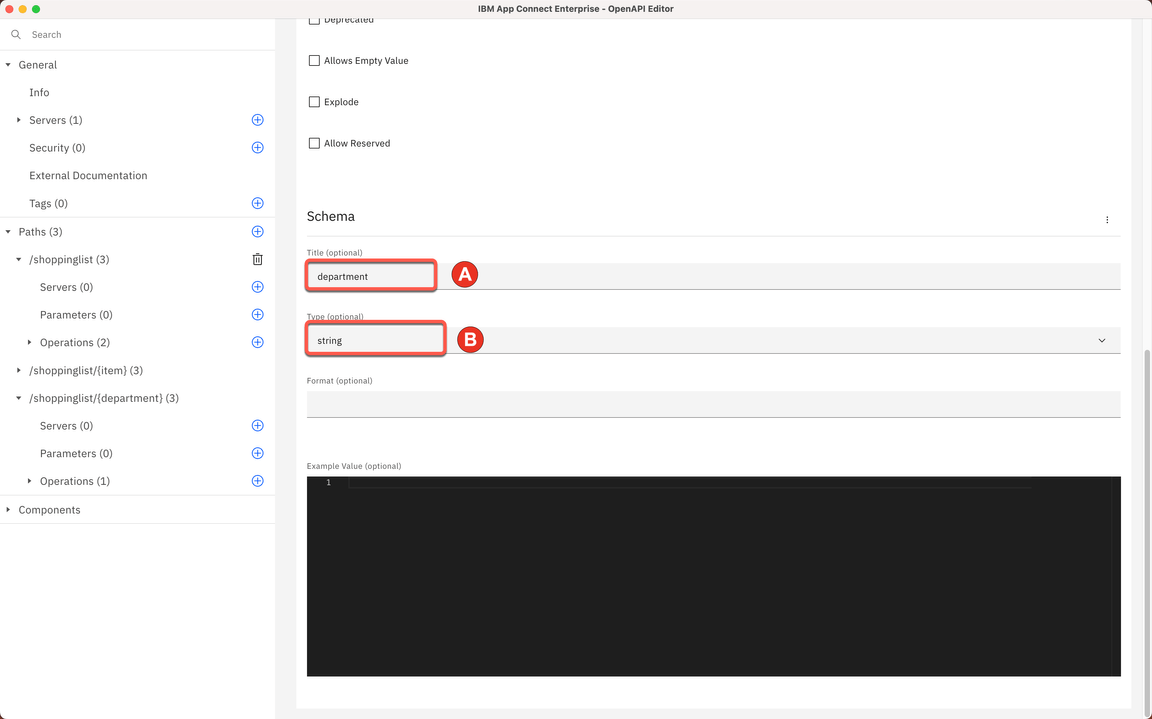
Focus developers define the schema of the parameter as a simple string.
Great, Focus’ developers successfully created a new operation in the ShoppingListAPI!
Action 2.4.1.
Scroll down to see the Schema section and type department as Title (A) and select string as Type (B).
Action 2.4.2.
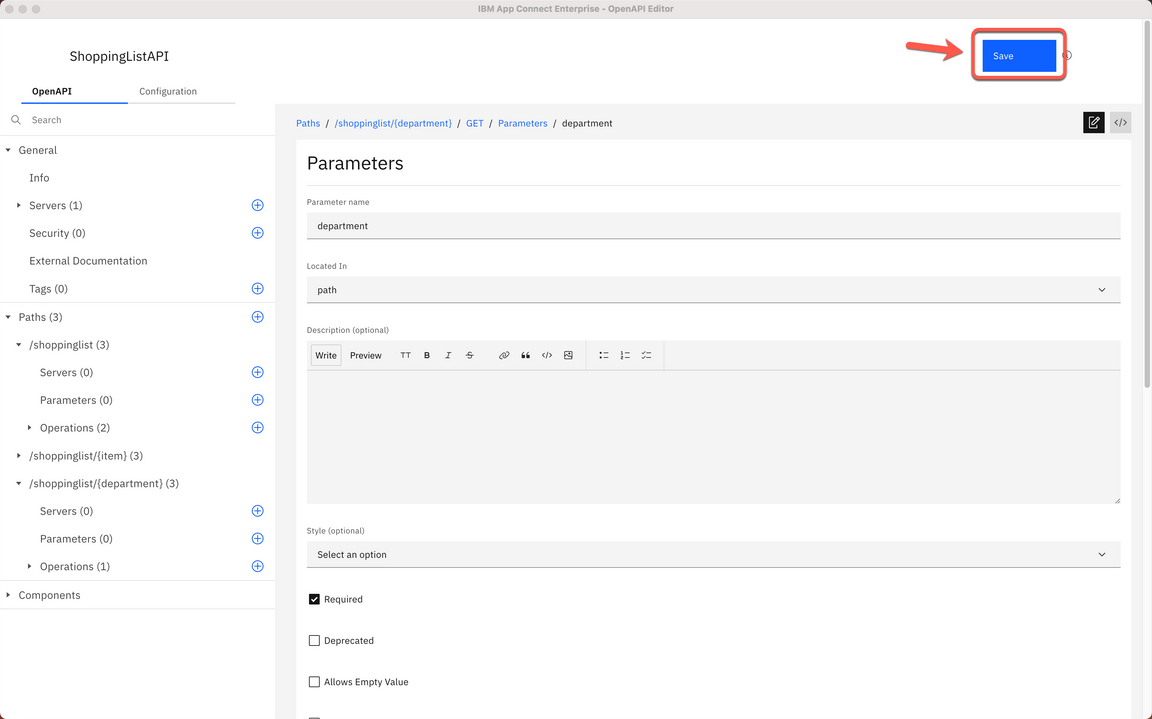
Scroll up and click Save.
Action 2.4.3.
Close the OpenAPI editor.
3. Create Subflow
3.1. Creating GetDepartment Subflow
Narration
With IBM App Connect it is really simple to implement the logic of your API operation. The Focus team can easily create a subflow to do it!
Action 3.1.1.
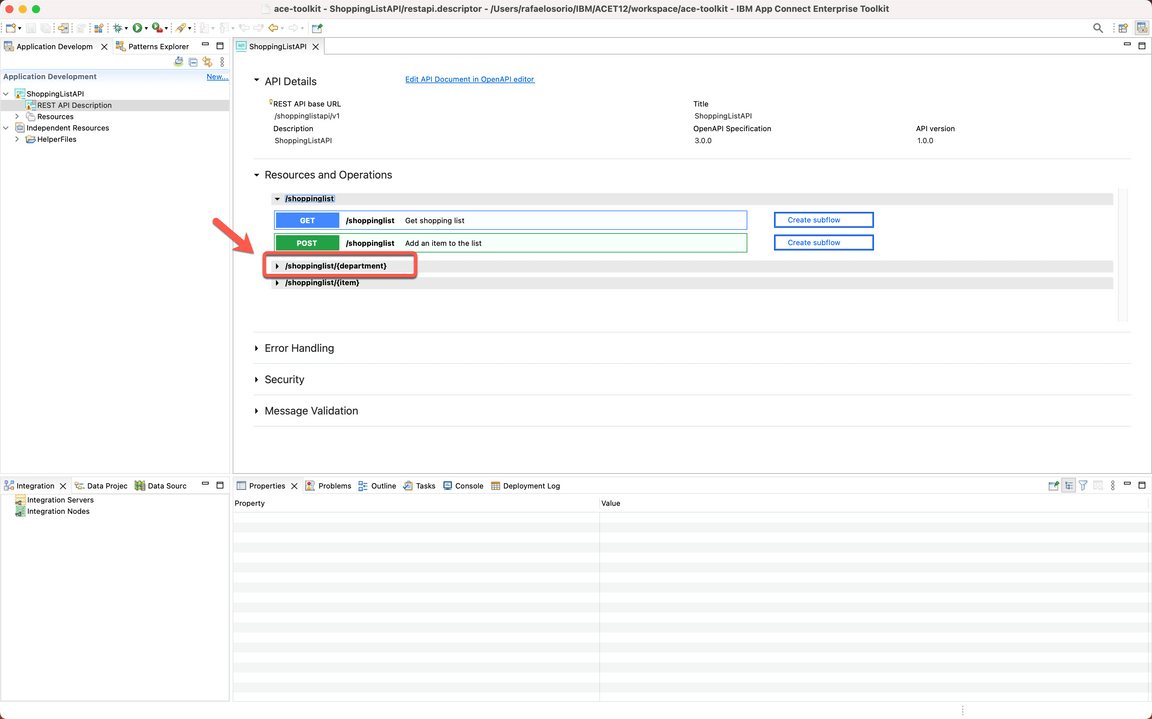
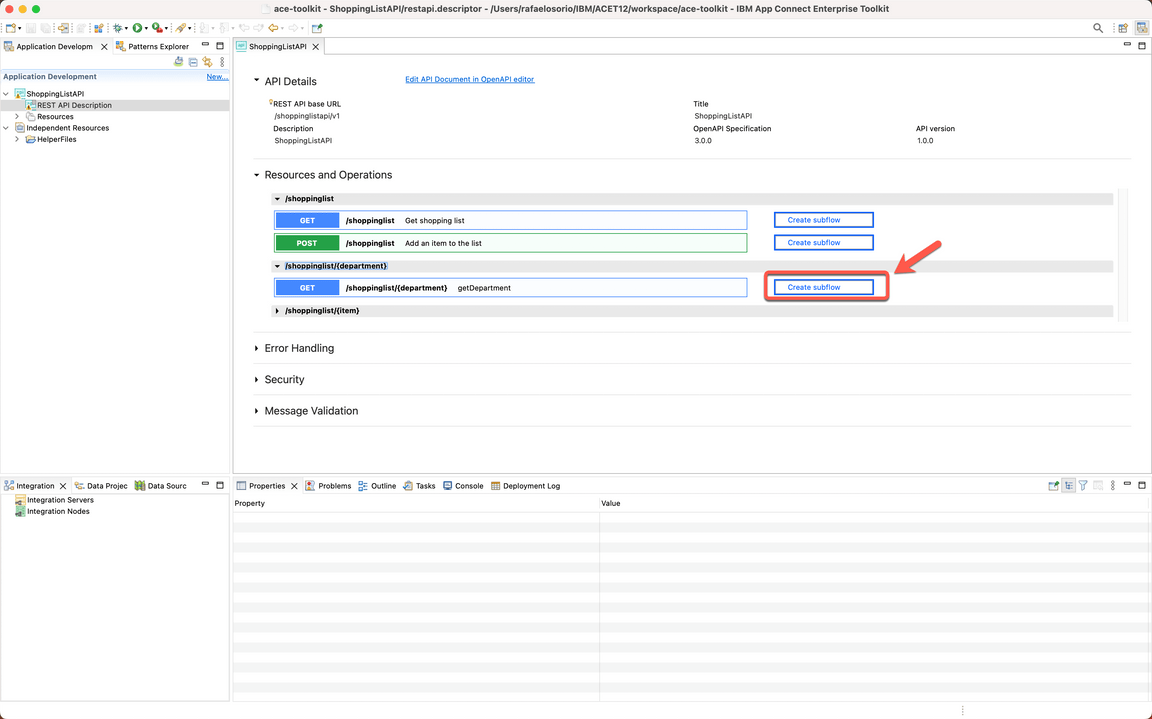
Back to the ShoppingListAPI description, open the /shoppinglist/{department} section.
Action 3.1.2.
Click Create subflow.
3.2. Connecting nodes
Narration
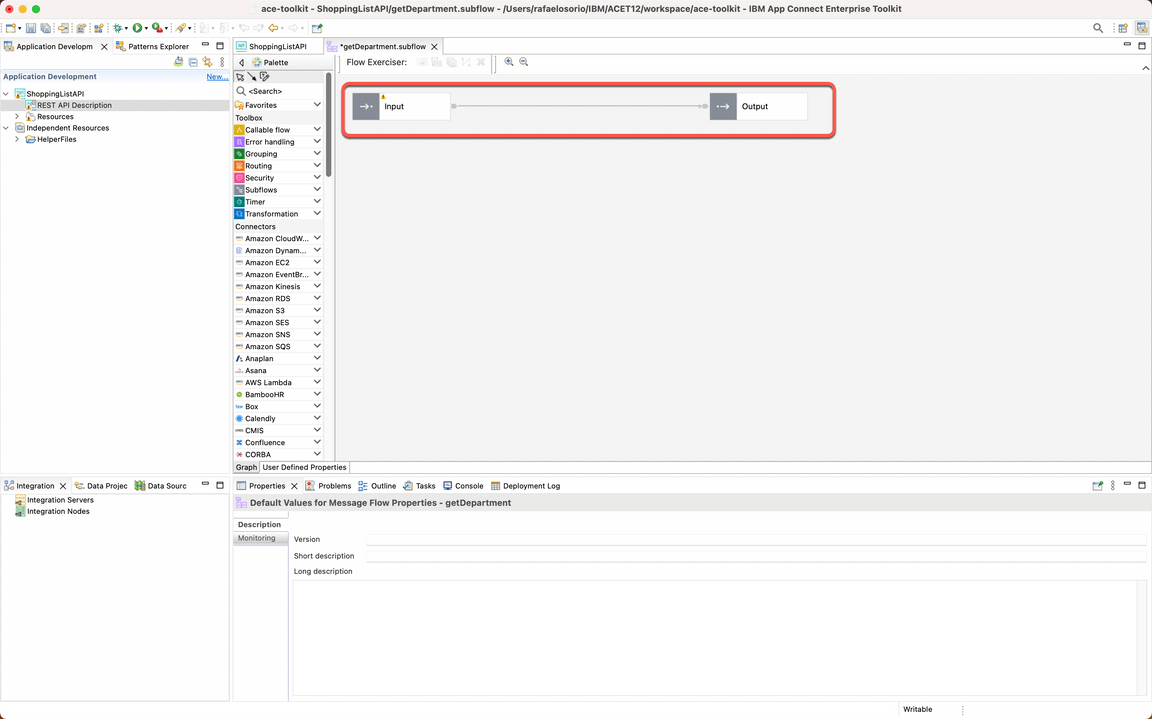
Here the Focus team has their subflow. A message flow is a sequence of processing steps that run in the integration runtime when an input message is received. You define a message flow by including a number of message flow nodes, each of which represents a set of actions that define a processing step.
In the flow editor, they can edit and change their flow. Message flows are created in the Toolkit using a drag and drop editor.
The flow is quite simple, consisting of only an Input and Output node. However, the Integration experts would like to explore how to do some message transformations. Let’s see how simple is to do it!
Action 3.2.1.
In the subflow, wire the Input node to the Output node (the out terminal of the Input node will be wired to the in terminal of the Output node)
4. Using the Mapping Assist feature
4.1. Add Mapping Transformation
Narration
First, they decided to explore the Mapping transformation.
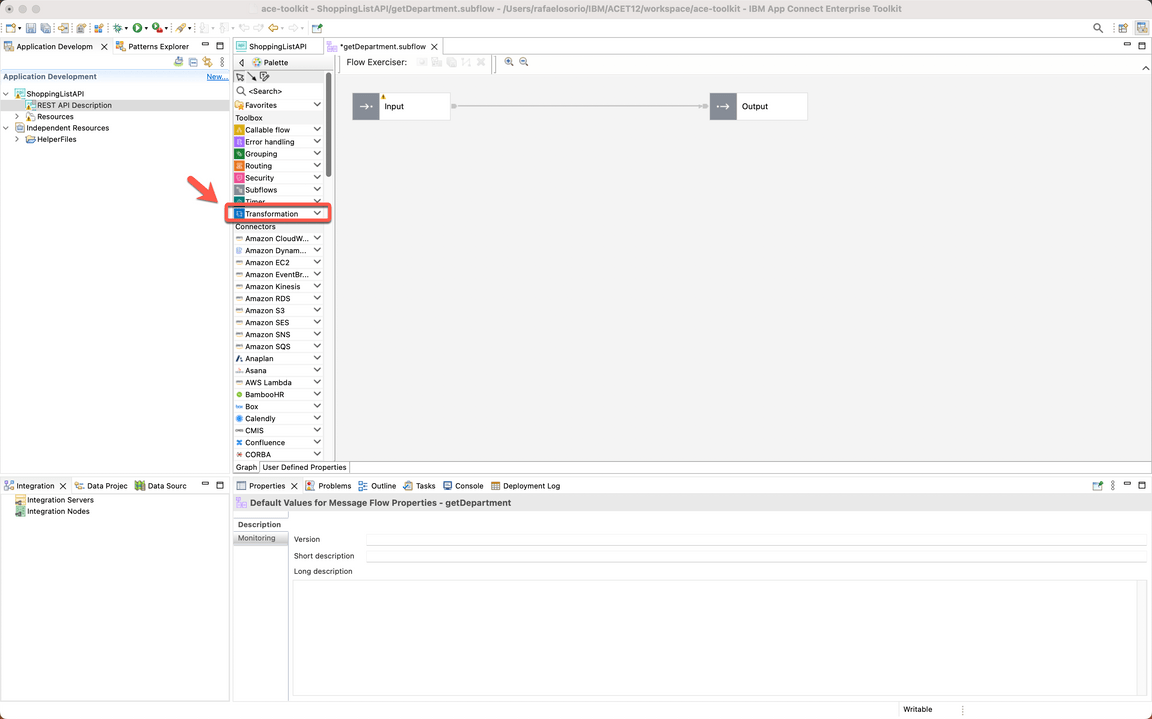
Action 4.1.1.
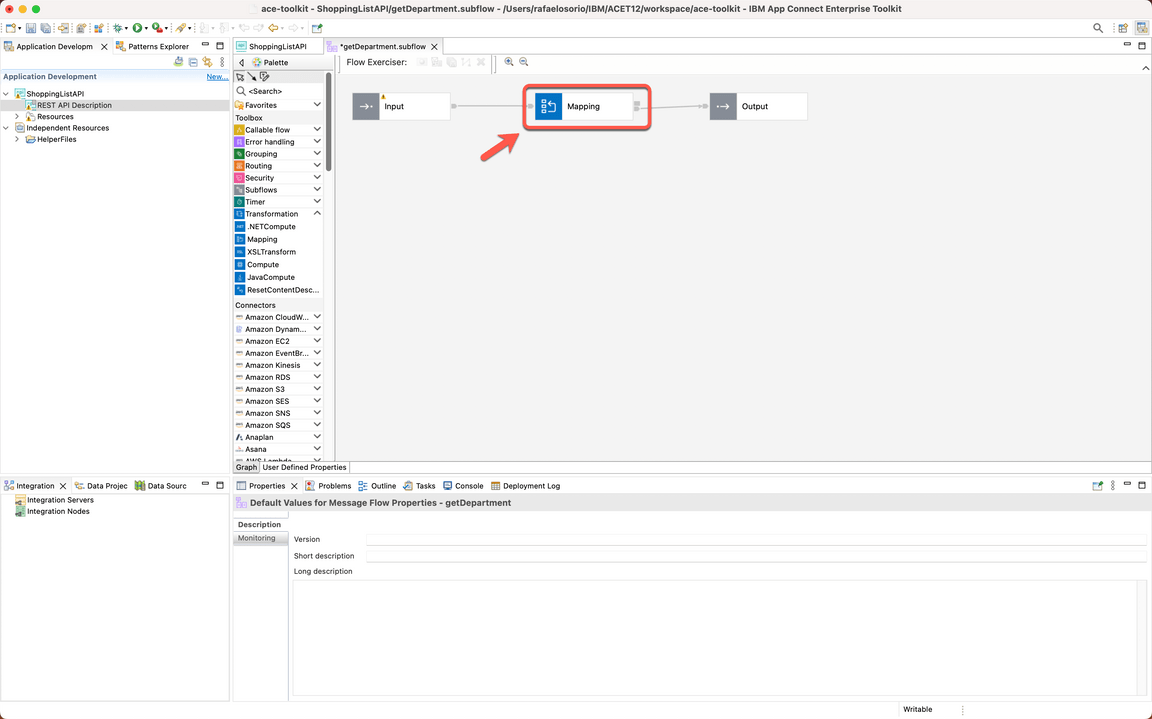
Open the Transformation section in the Palette.
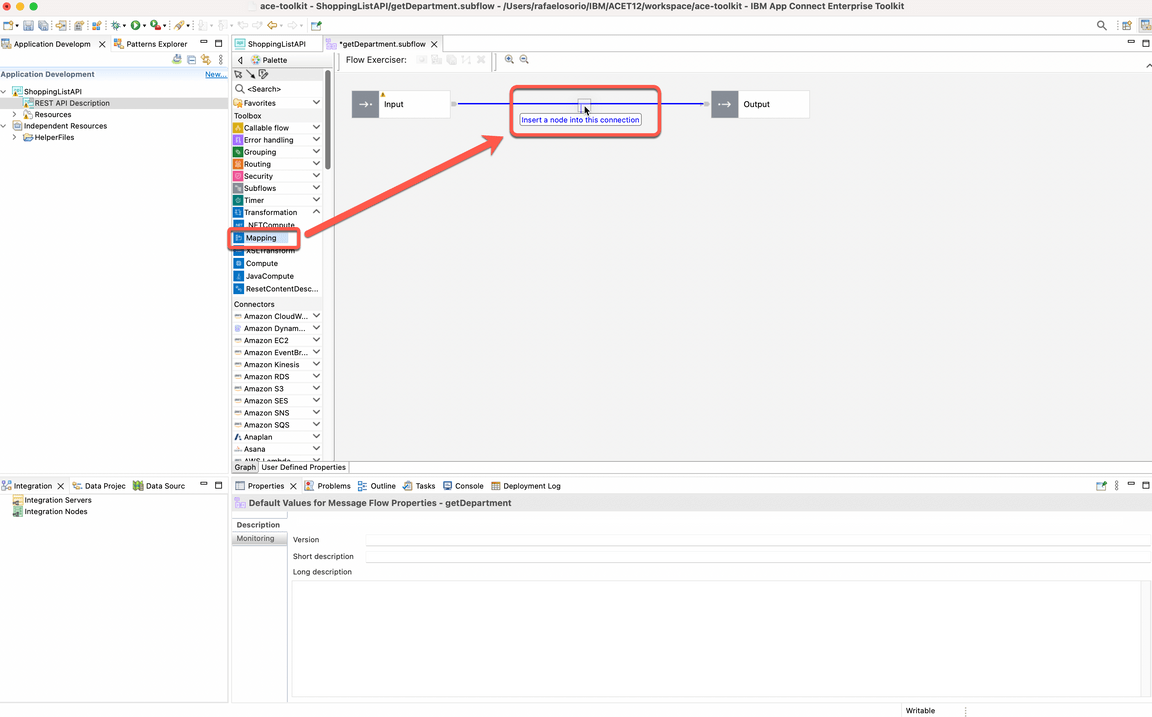
Action 4.1.2.
Drag and drop a Mapping node on to the wire and its terminals will be connected for you (the out terminal of the Input node will be wired to the in terminal of the Mapping node, and the out terminal of the Mapping node will be wired to the in terminal of the Output node).
4.2. Editing Mapping
Narration
With a mapping, they can use the Graphical Data Mapping editor to take input (source) objects and transform them before they save the resulting output (target) objects.
Action 4.2.1.
Double-click the Mapping node.
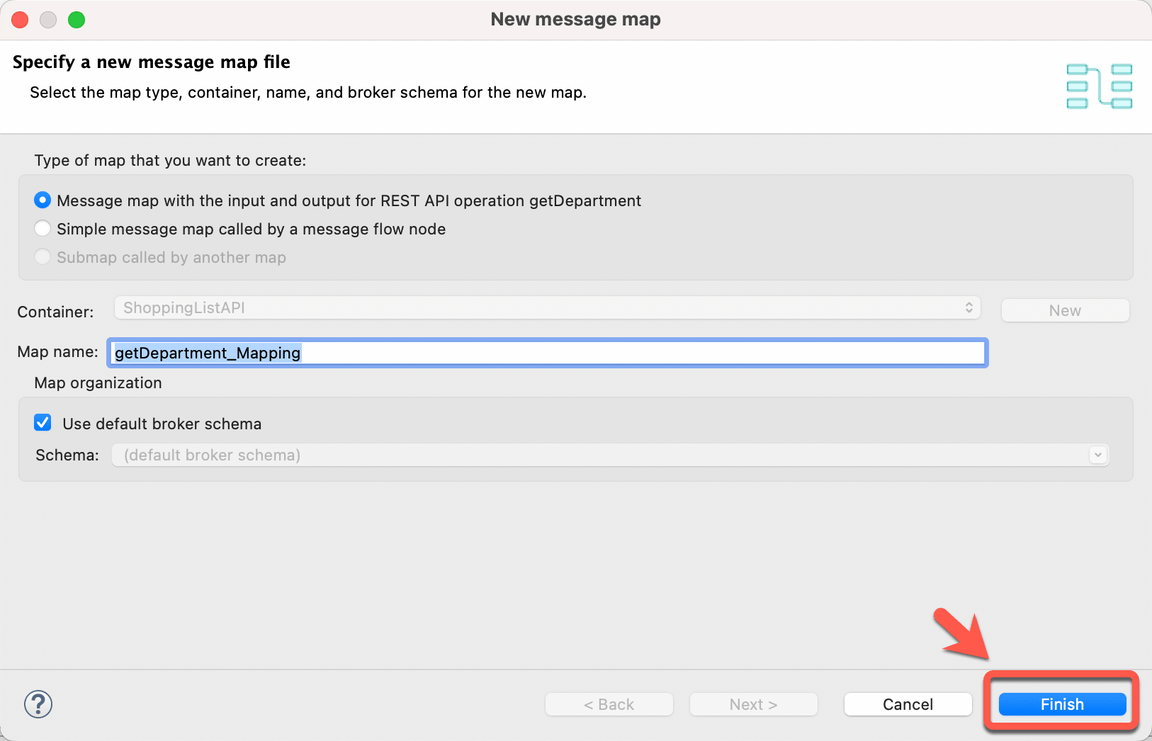
Action 4.2.2.
Leave the default settings and click Finish.
4.3. Adding new output
Narration
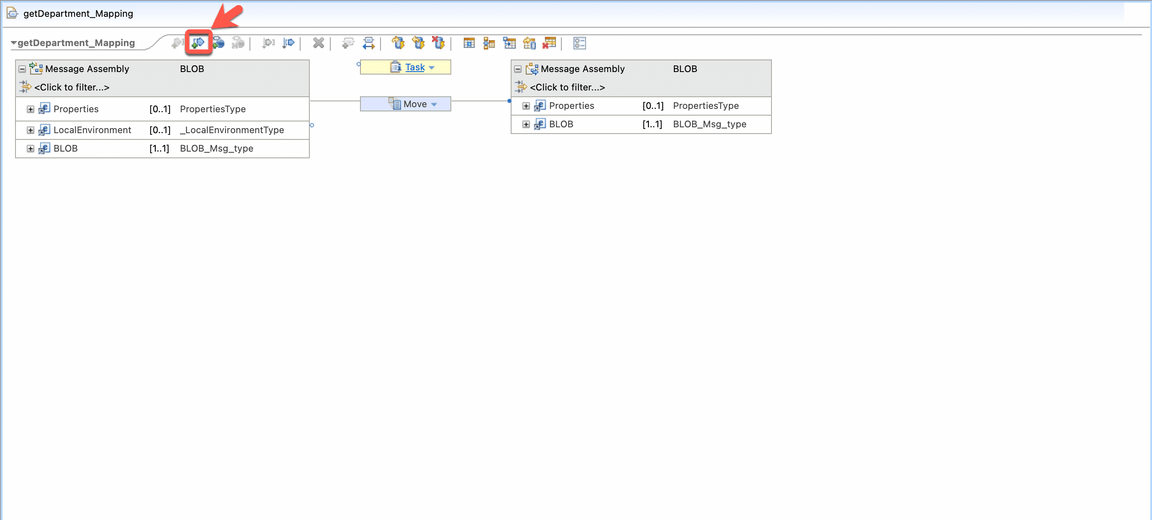
Initially, they will change the output object to use the Item JSON type.
Action 4.3.1.
Click on “Add an output object” button.
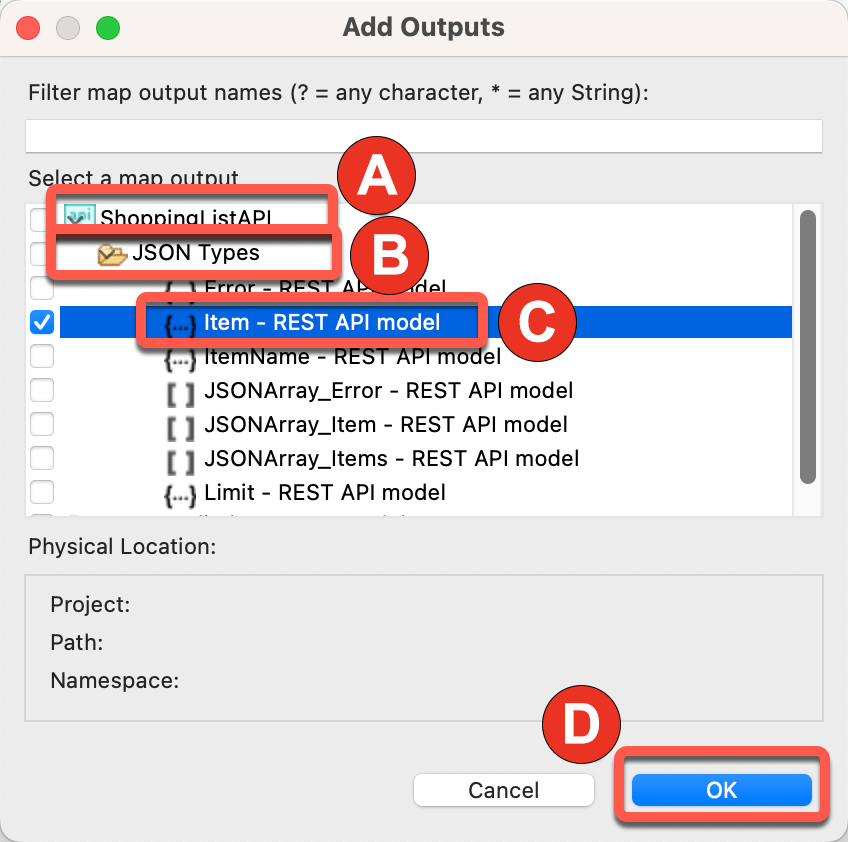
Action 4.3.2.
On the “Select a map output” option, open (double click) the ShoppingListAPI (A), open the JSON Types (B) and select Item - Rest API model (C), then click OK (D).
Action 4.3.3.
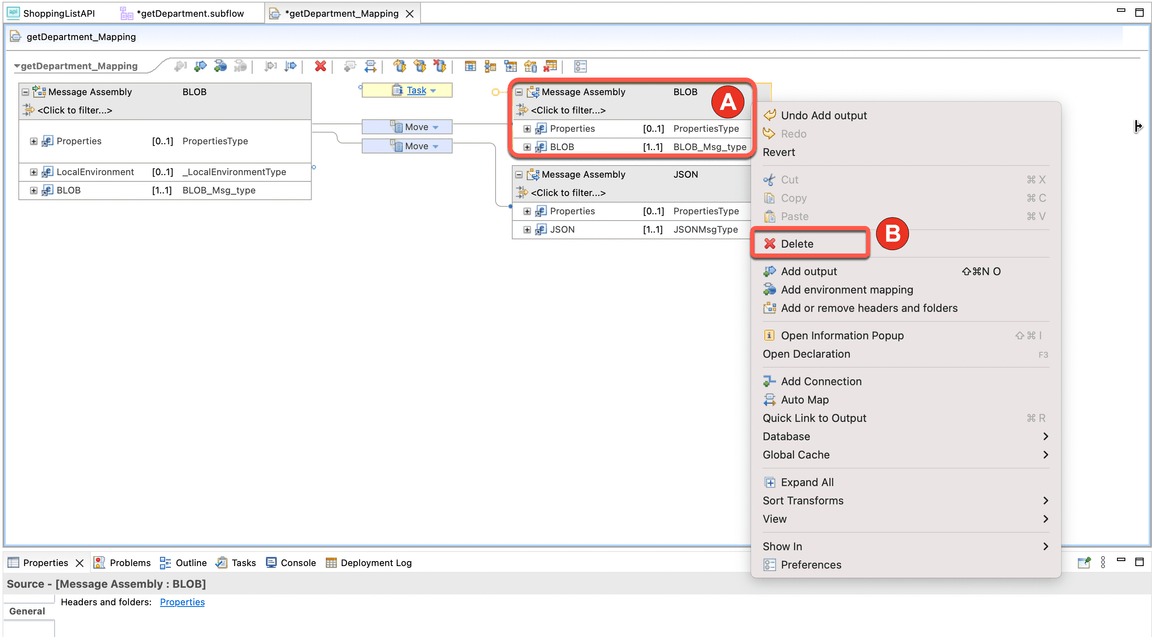
Select the original Message Assembly (A), right click and select delete (B) (or press delete on your keyboard).
4.4. Move Department value
Narration
The input objects are shown on the left side of the canvas, and the output objects are shown on the right side. You can create connections between the input and output elements by clicking one element, and dragging the mouse to the element that you want to connect to.
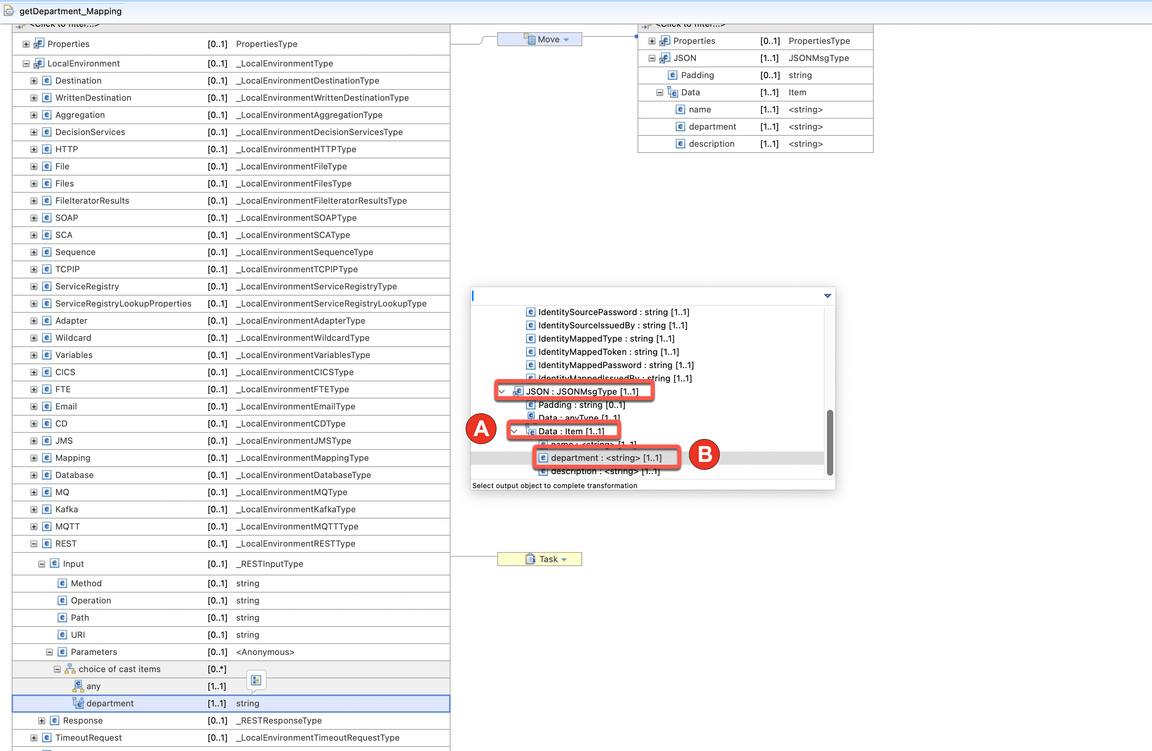
The Focus team can easily link the Department input parameter to the Department parameter of Item JSON Type.
Action 4.4.1.
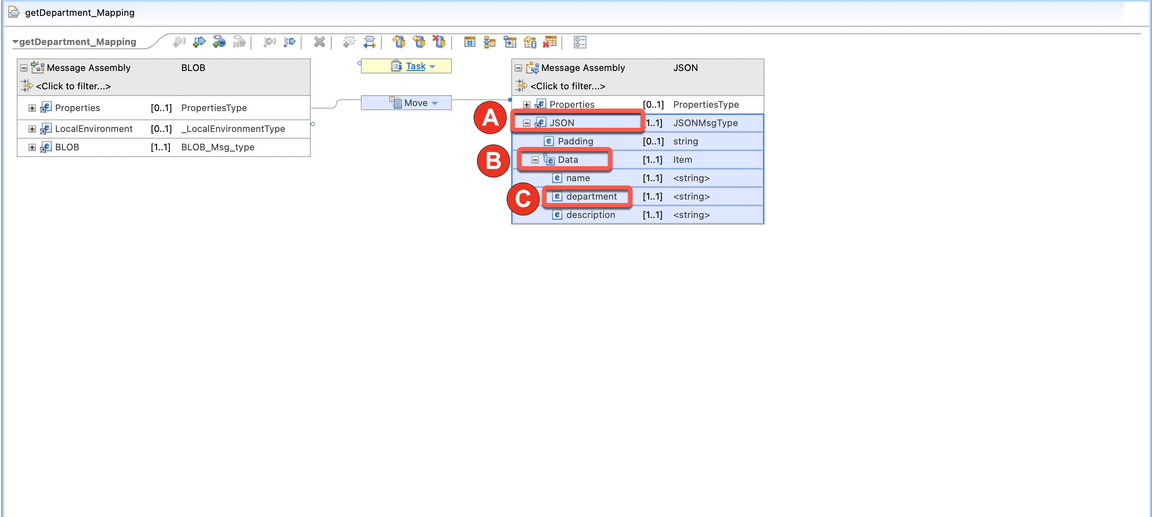
Expand the JSON message assembly on the right (A), then expand the Data section underneath (B). Notice that department is listed as a parameter (C).
Action 4.4.2.
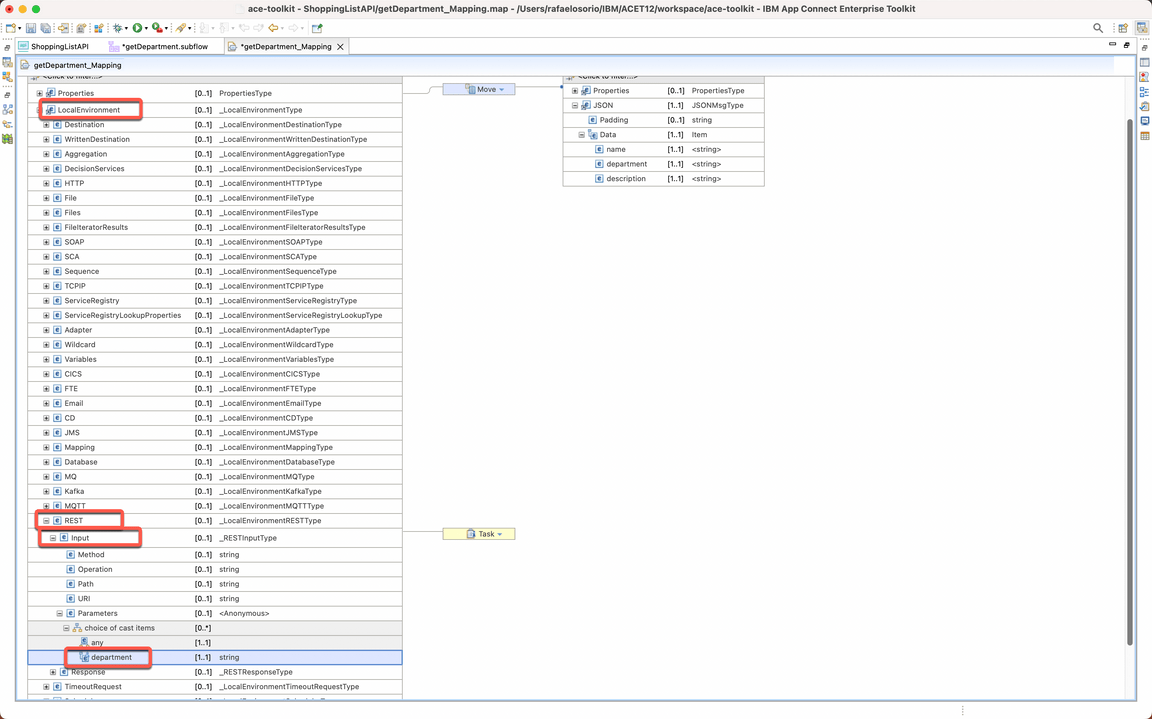
On the left Message Assembly, open the LocalEnvironment > REST > Input > Parameters.
Action 4.4.3.
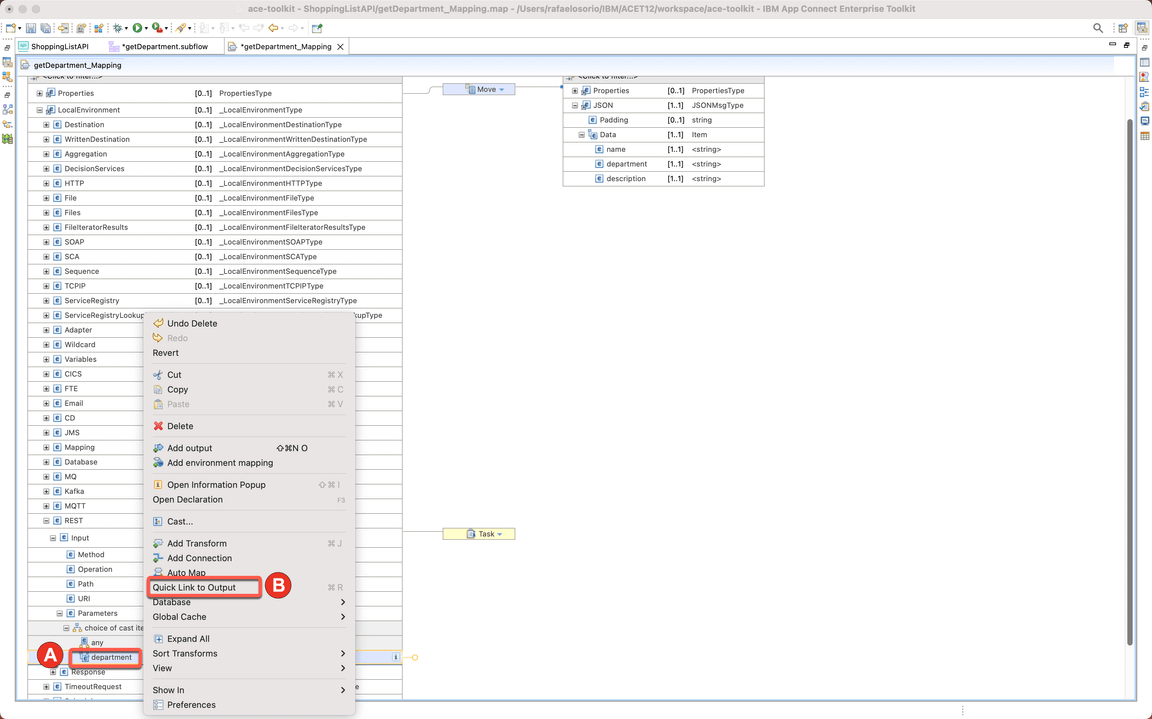
Right-click the department entry (A) and select Quick Link to Output (B).
Action 4.4.4.
In the dialog, scroll down and expand Data : Item [1..1] (A) and select department:string [1..1] (B).
4.5. Setting Cardinality
Narration
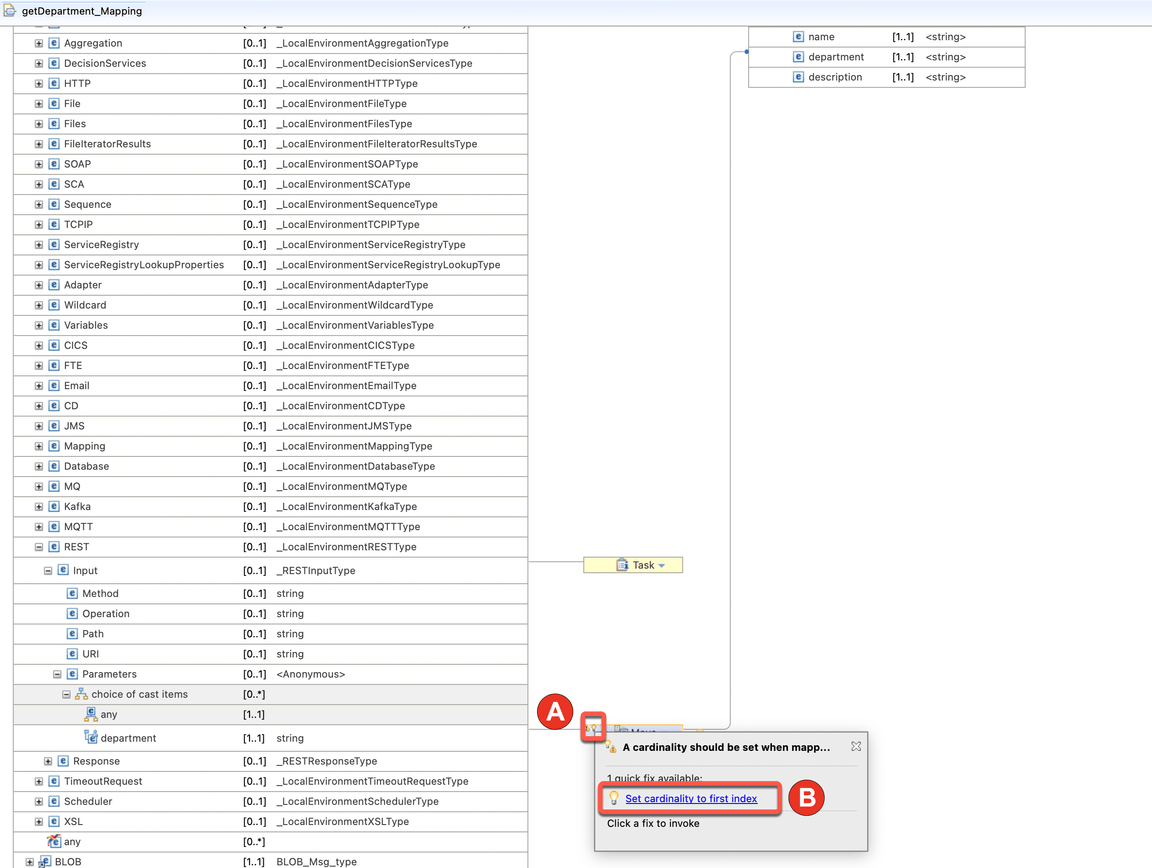
They use the Quick Fix capability to solve the cardinality issue of the new mapping.
Action 4.5.1.
Hover the mouse over the Quick Fix (light bulb) icon of the new Move box (A) and click the ”Set cardinality to first index” link (B).
4.6. Assigning values
Narration
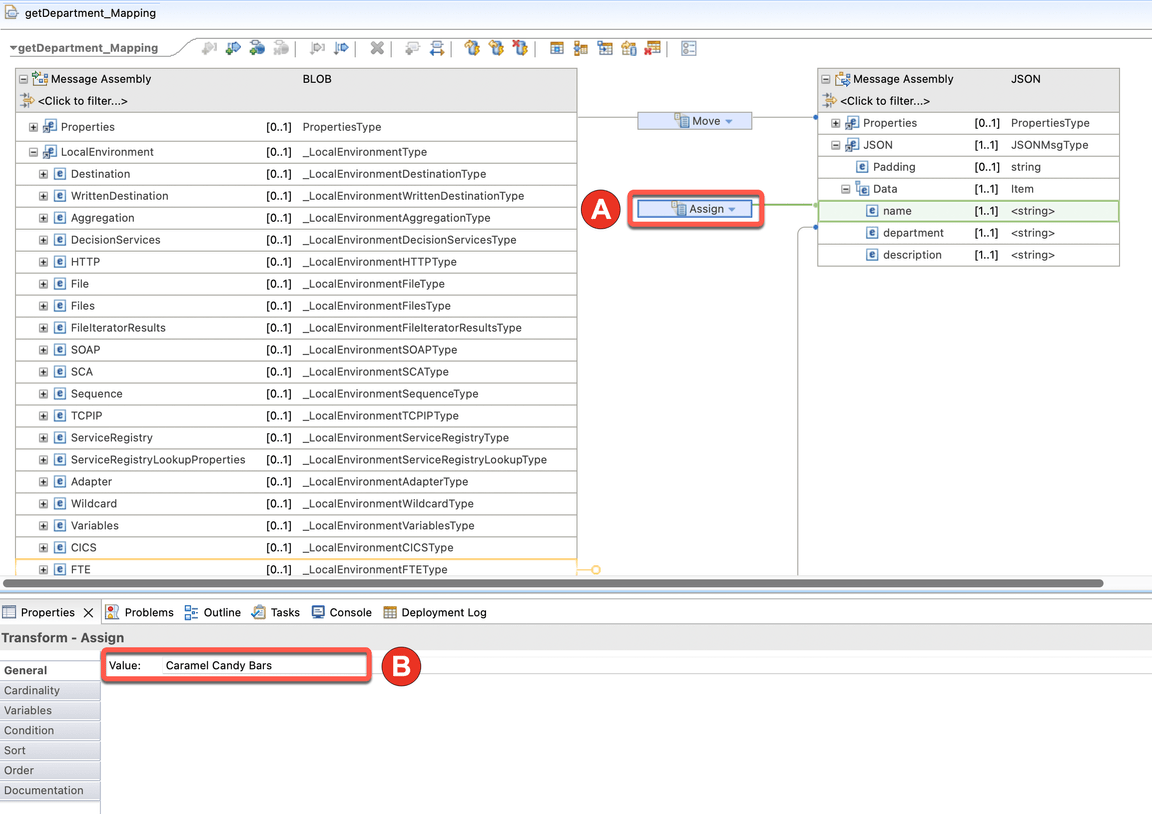
Now, for demo purposes, they will use the assign function to define a hard coded value to the name and description fields. In this demo, they decided to use the description field to just inform the type of transformation node that is processing the transformation, in this case the Mapping node.
Great, Focus’ developers successfully created a mapping transformation in the ShoppingListAPI!
Action 4.6.1.
On the new Message Assembly JSON, drag and drop the name field to the left (A). IBM App Connect Enterprise places an Assign action for this field (B).

Action 4.6.2.
Select the Assign action (A). Under the Properties for the Assign action, enter “Caramel Candy Bars” for the name value (B).
Action 4.6.3.
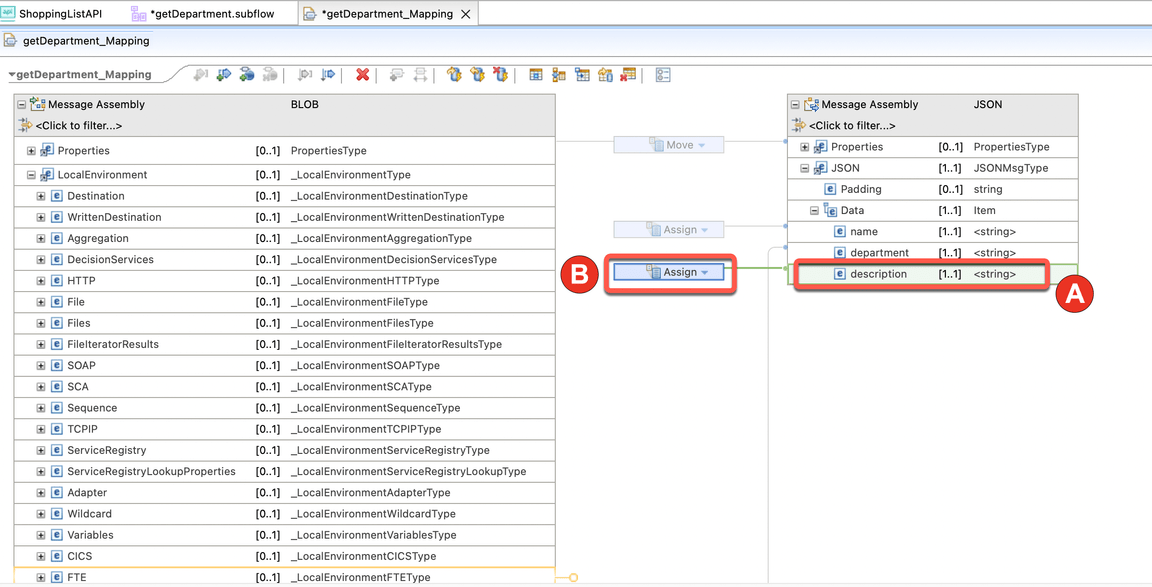
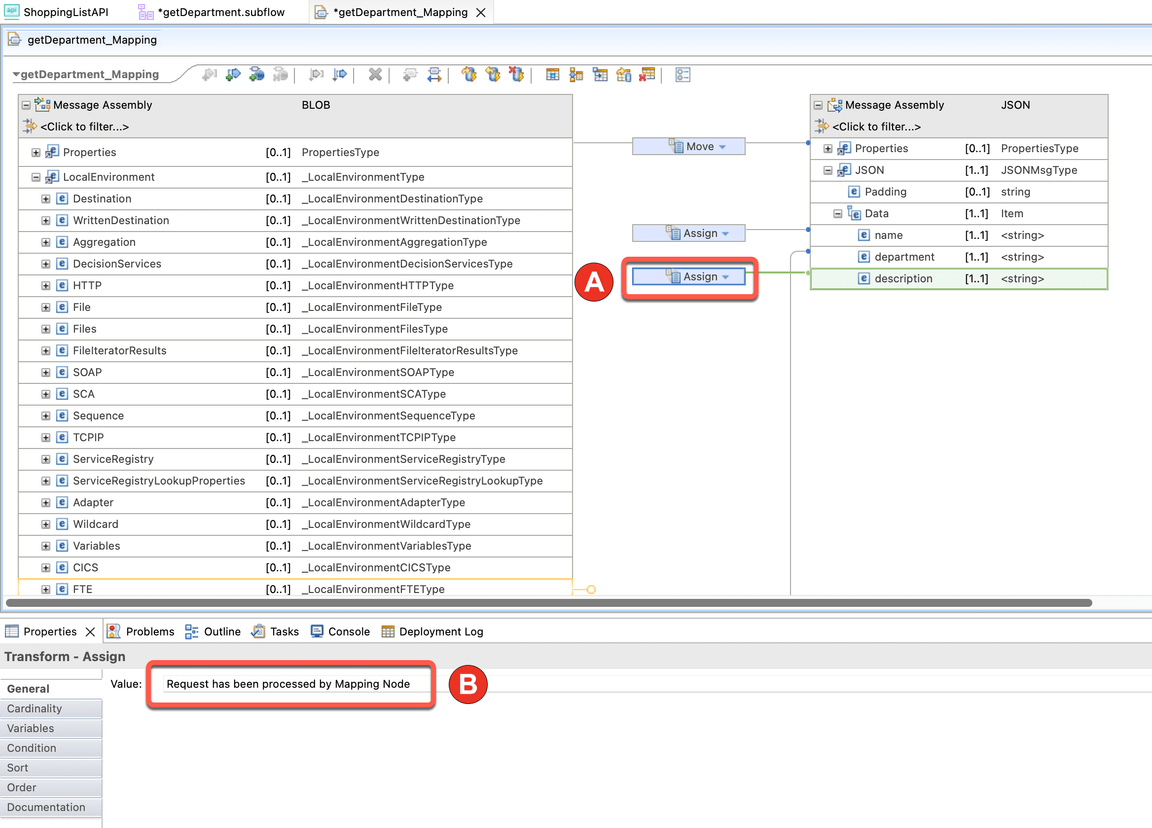
Repeat the same steps for the description field: drag and drop the description field to the left (A). IBM App Connect Enterprise places an Assign action for this field (B).
Action 4.6.4.
Select the Assign action (A). Under the Properties for the Assign action, enter “Request has been processed by Mapping Node” for the name value (B).
Note: In this demo, we are using the description field to just inform the node that is processing the transformation.
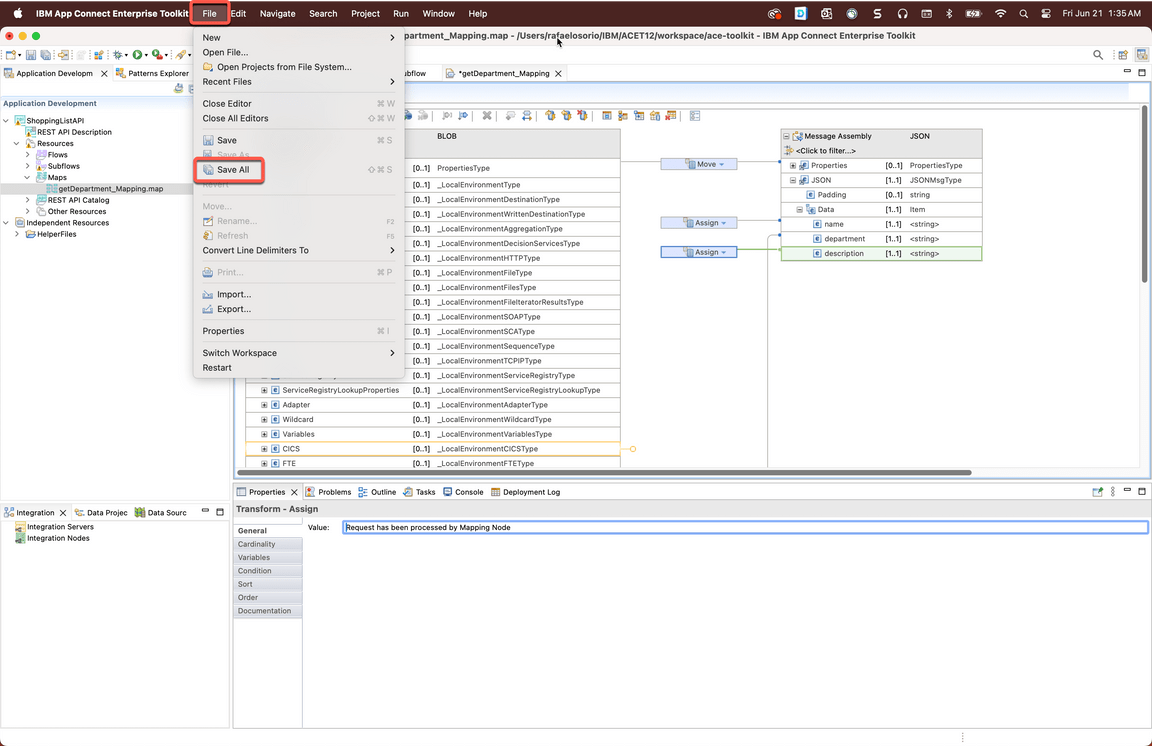
Action 4.6.5.
Click File > Save all.
5. Create local test server
5.1. Creating a local integration server
Narration
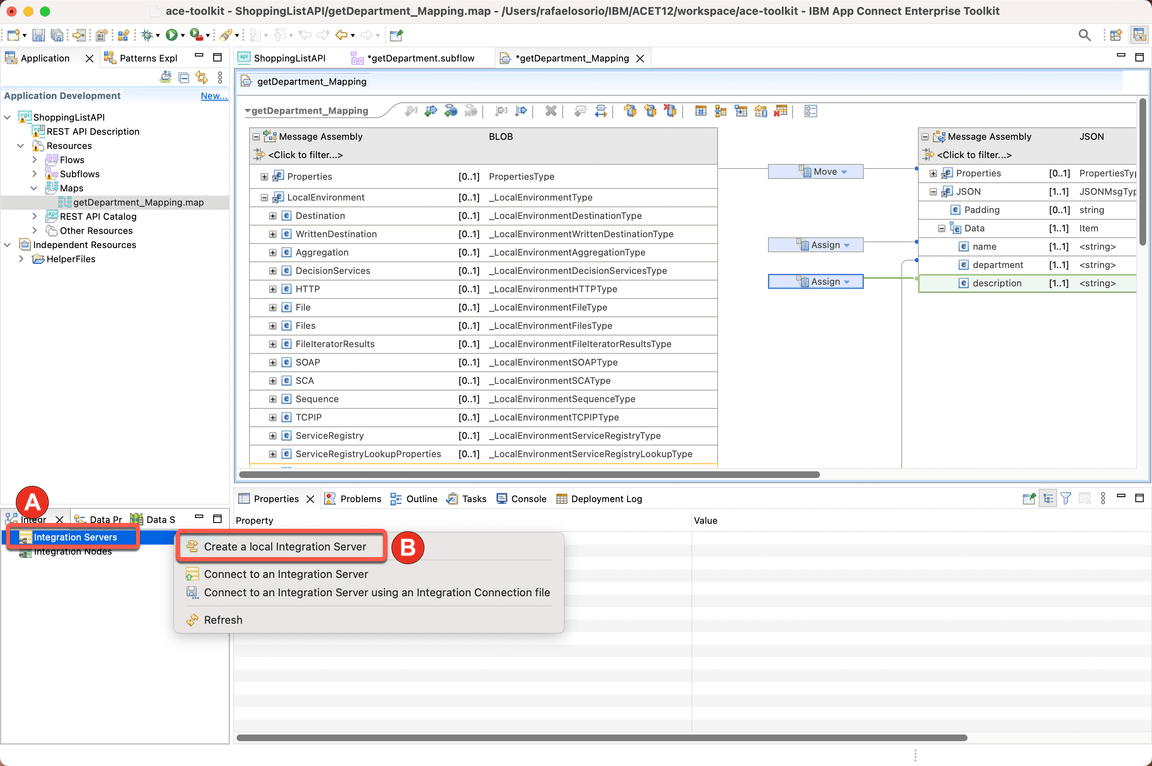
At this stage, they are ready to test the API. To publish the API, first they need to create a local integration server.
Action 5.1.1.
Right-click Integration Servers in the Integration Explorer tab (A) and select Create a local Integration Server (B).
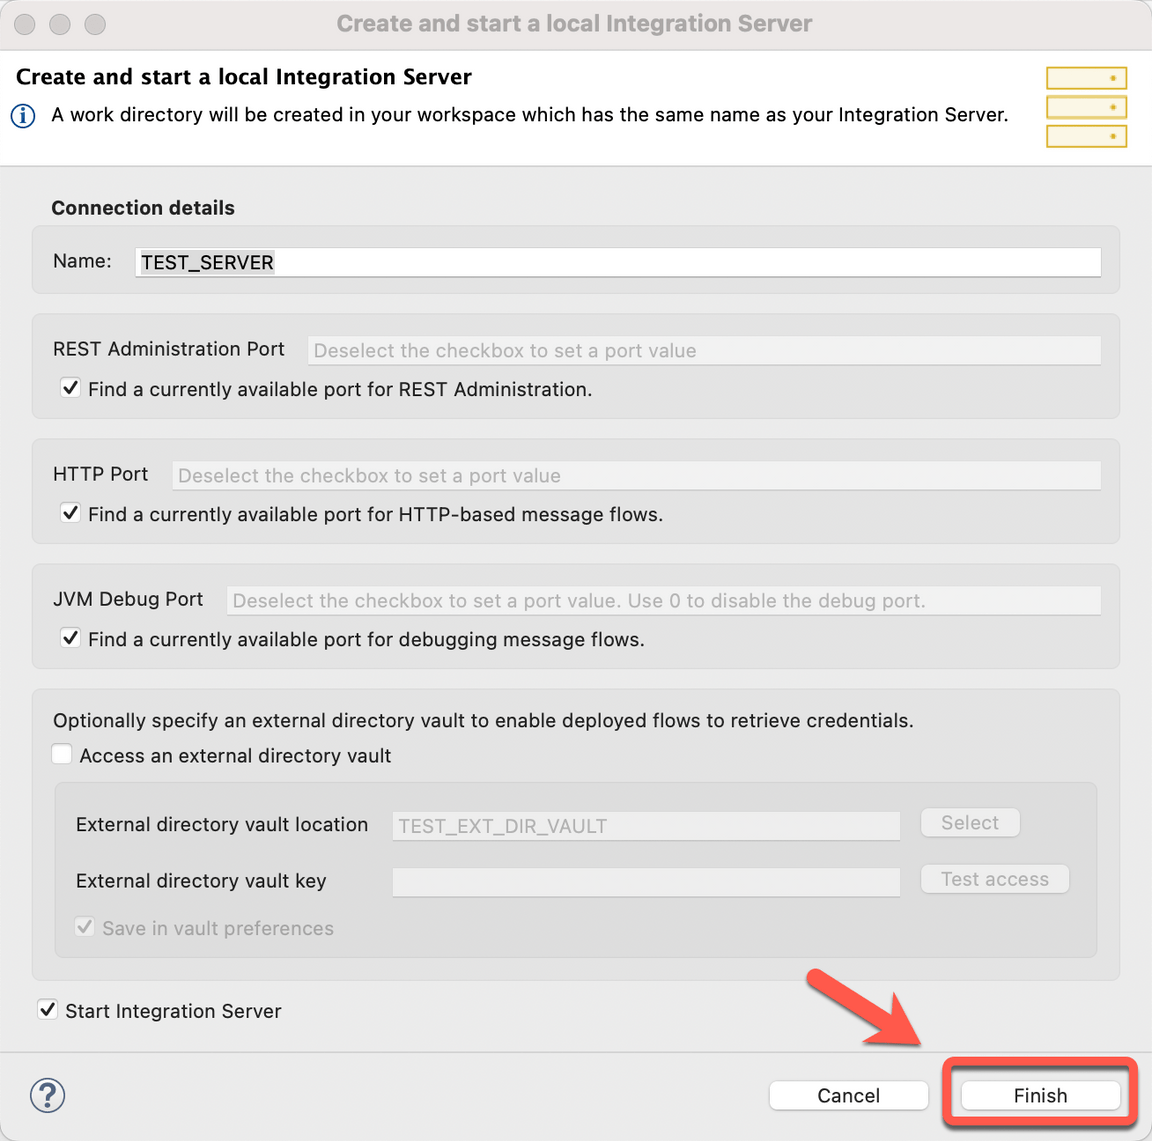
Action 5.1.2.
Keep the default values and click Finish.
Action 5.1.3.
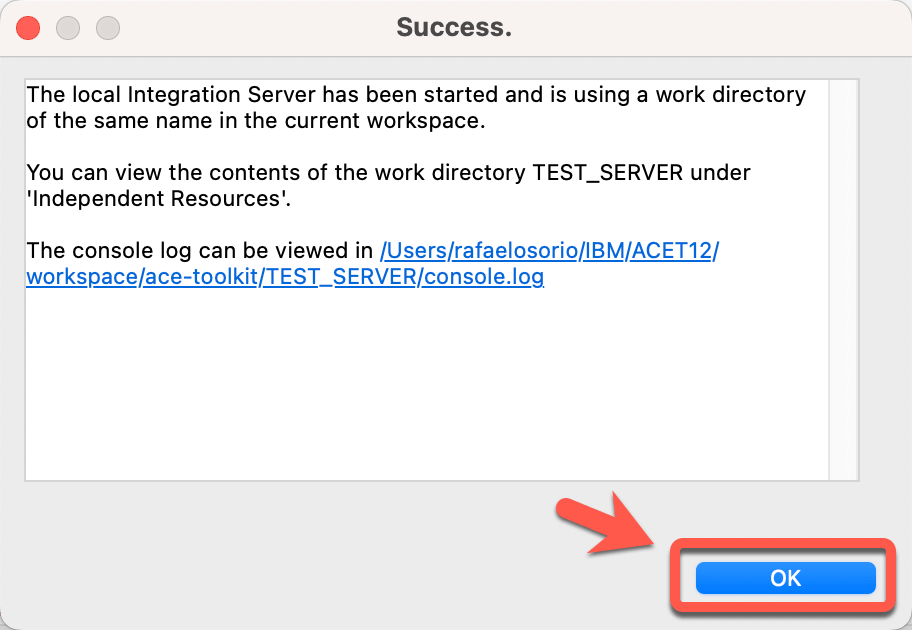
On the Success Dialog click OK.
5.2. Adding CORS authorization
Narration
Next, they need to configure the server so that the HTTP listener is enabled for CORS.
Action 5.2.1.
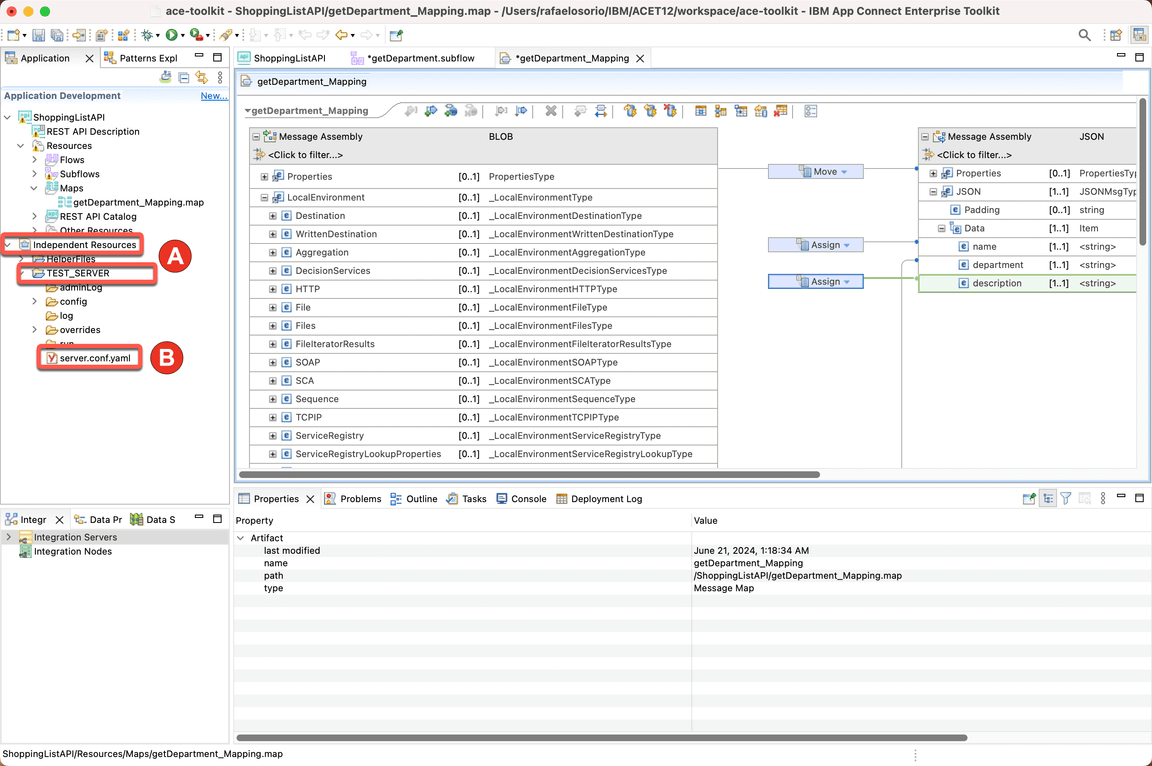
Expand the TEST_SERVER directory under the Independent Resources folder (A) and double-click the server.conf.yaml file (B) to open it in the IBM App Connect Enterprise text editor to the right.
Action 5.2.2.
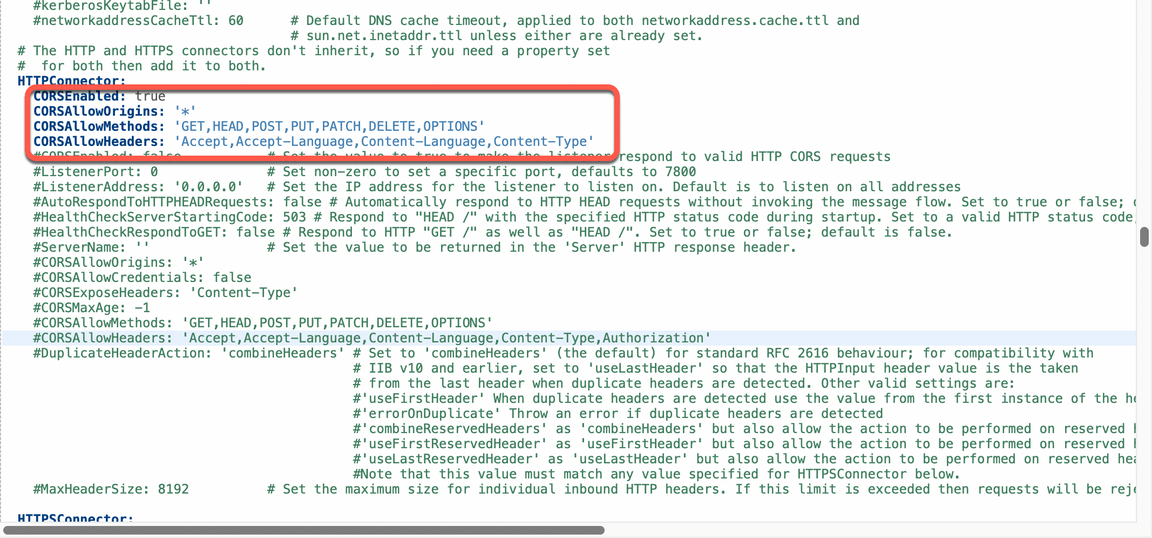
Scroll down to the HTTPConnector section and paste the code below:
CORSEnabled: trueCORSAllowOrigins: '*'CORSAllowMethods: 'GET,HEAD,POST,PUT,PATCH,DELETE,OPTIONS'CORSAllowHeaders: 'Accept,Accept-Language,Content-Language,Content-Type'
Action 5.2.3.
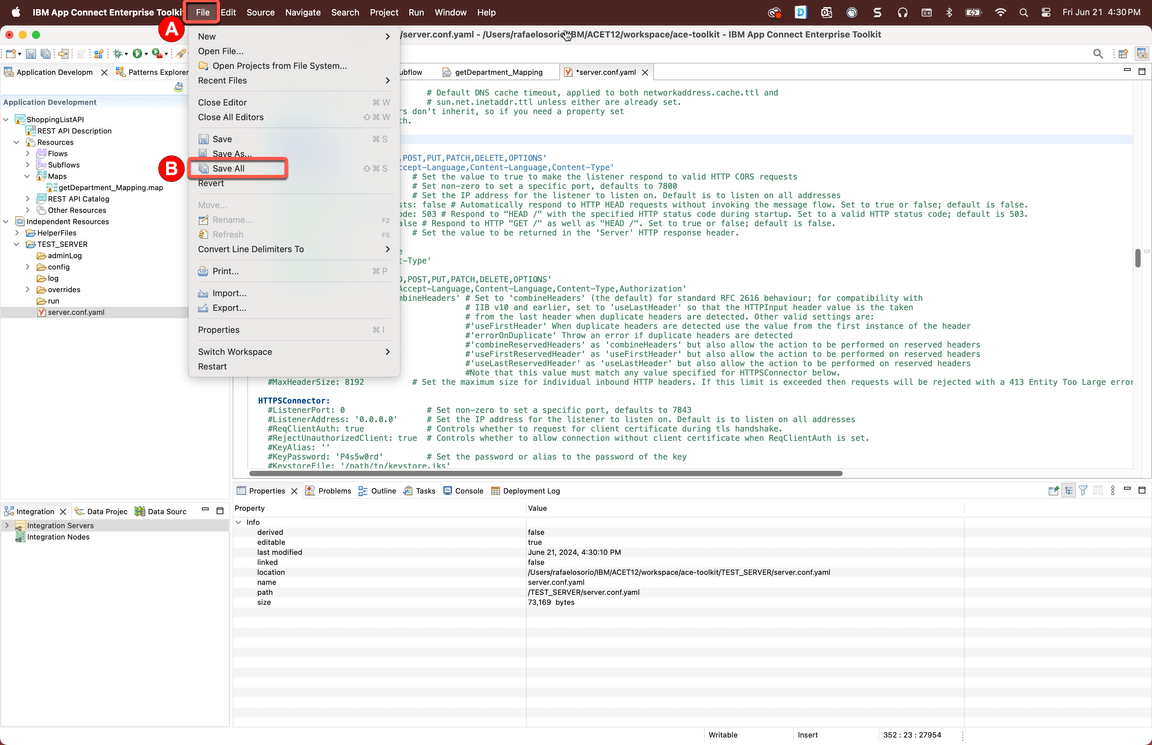
Save the changes to the server.conf.yaml file or click File (A) > Save All (B).
Action 5.2.4.
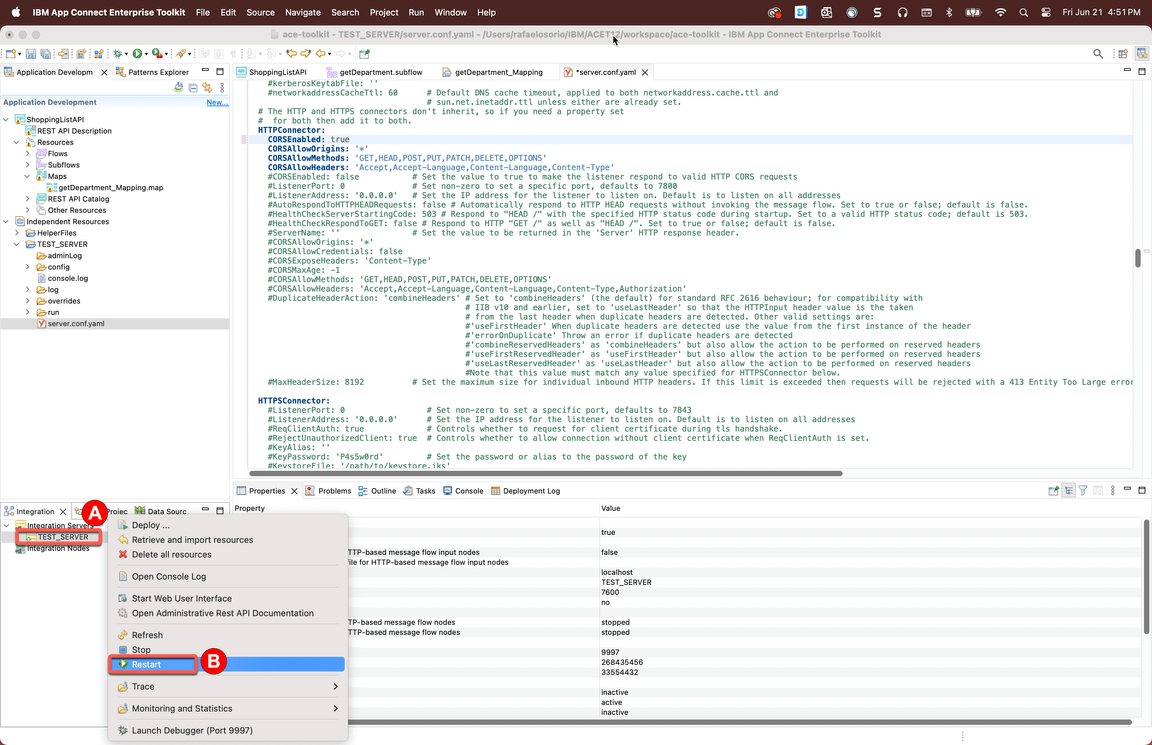
Back to the Integration Explorer view, right-click the TEST_SERVER (A) and select Restart (B).
Action 5.2.5.
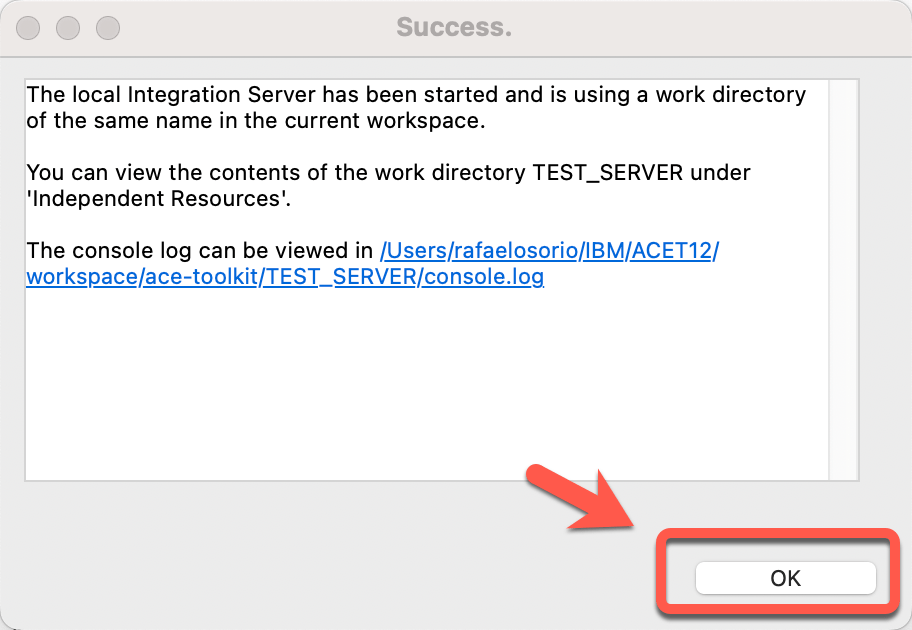
Click OK on the Success dialog again.
6. Test the API
6.1. Deploying the API
Narration
Now, they need to deploy the ShoppingListAPI to the new Local Integration server. They can do it, by dragging and dropping the API to the new server.
Action 6.1.1.
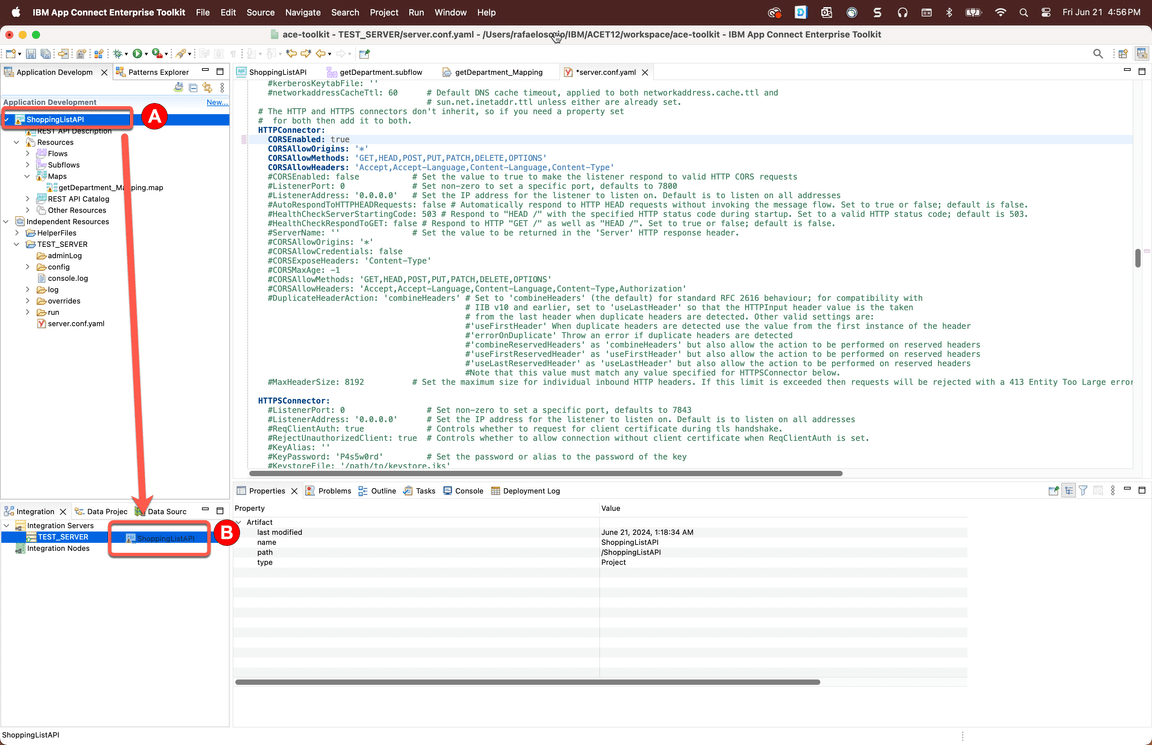
Deploy the REST API which we created earlier named ShoppingListAPI (A), by dragging and dropping it from the Application Development view on to the TEST_SERVER Integration Server (B).
Action 6.1.2.
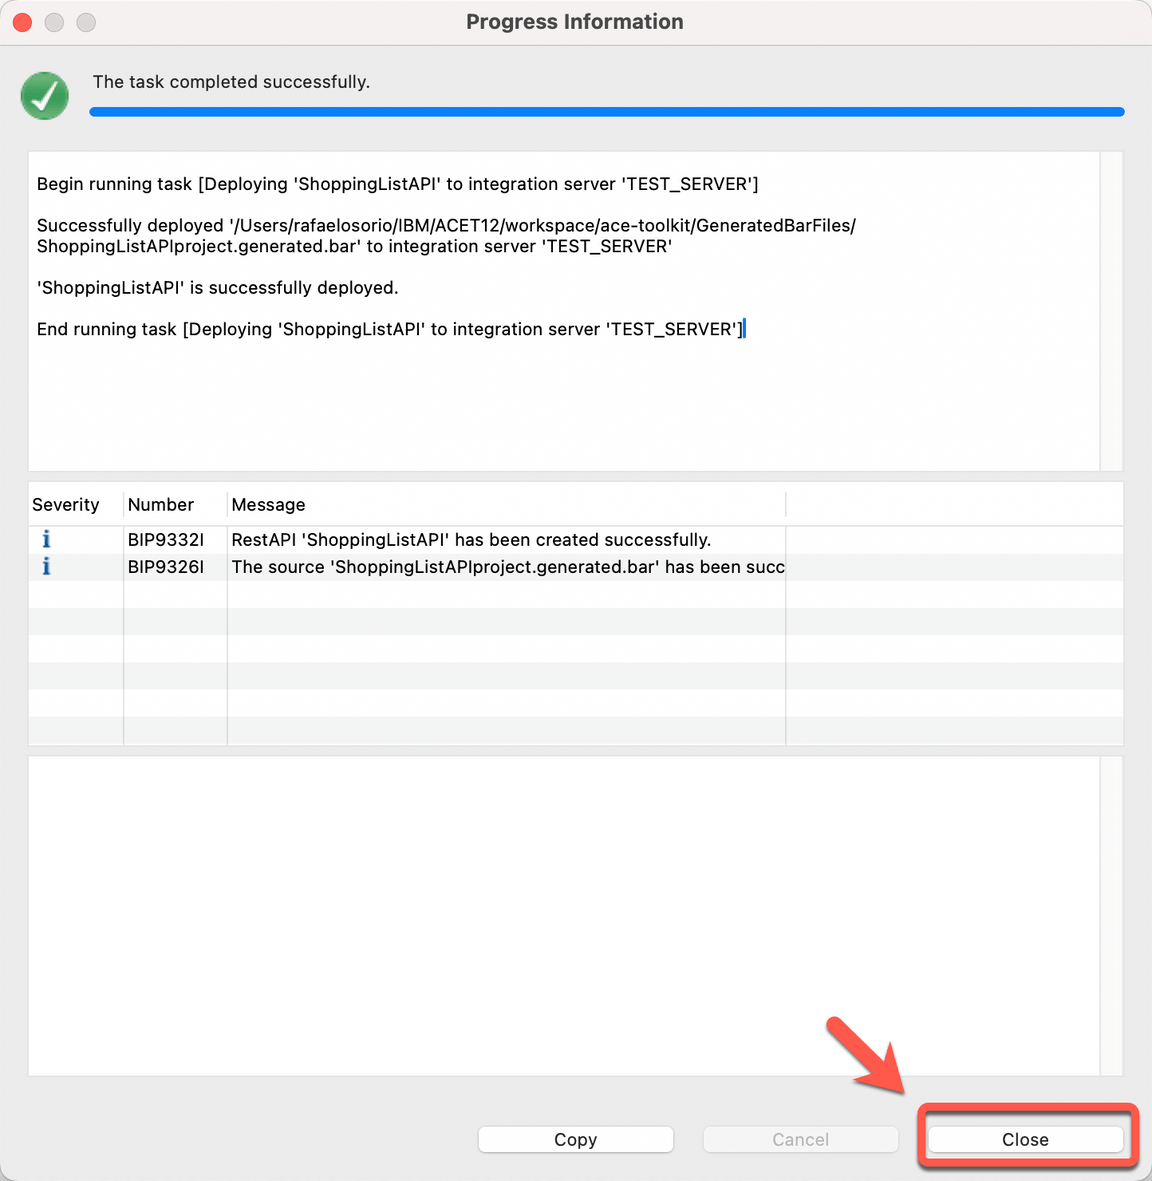
On the Progress Information dialog, click Close.
6.2. Starting Web User Interface
Narration
At this moment, the Focus Integration experts are ready to test the API. They start the Web User Interface.
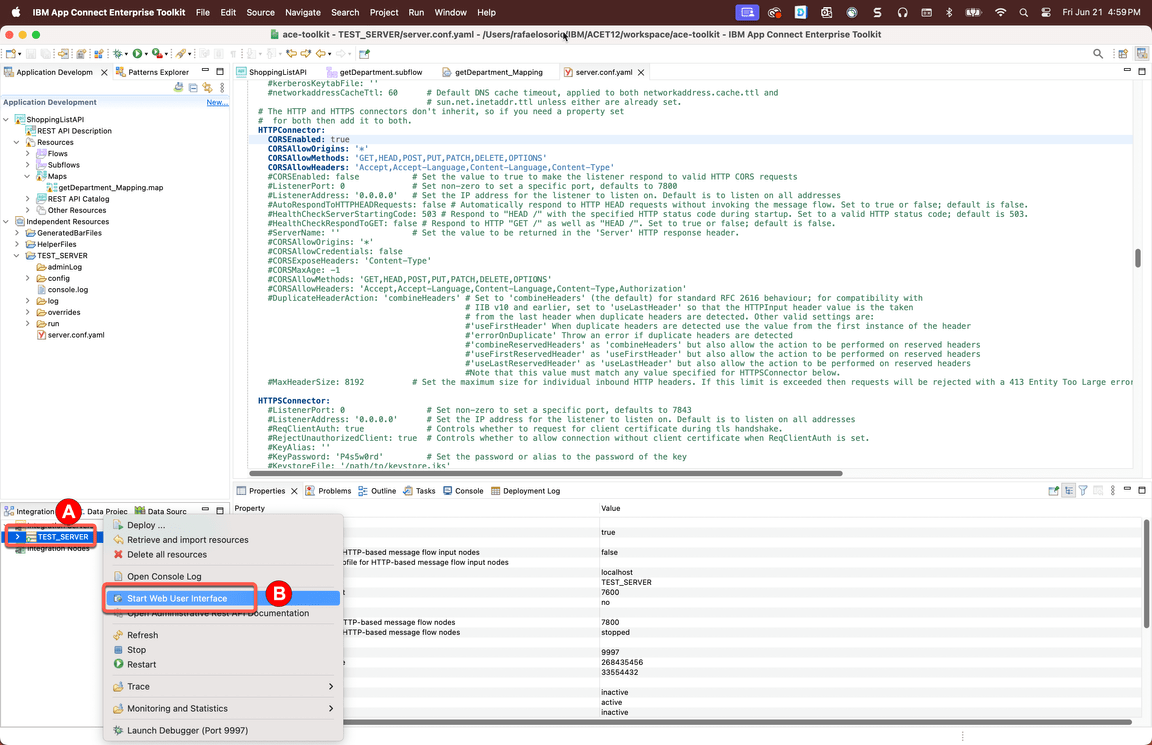
Action 6.2.1.
Right-click TEST_SERVER (A) and select Start Web User Interface (B).
6.3. Testing the ShoppingList API
Narration
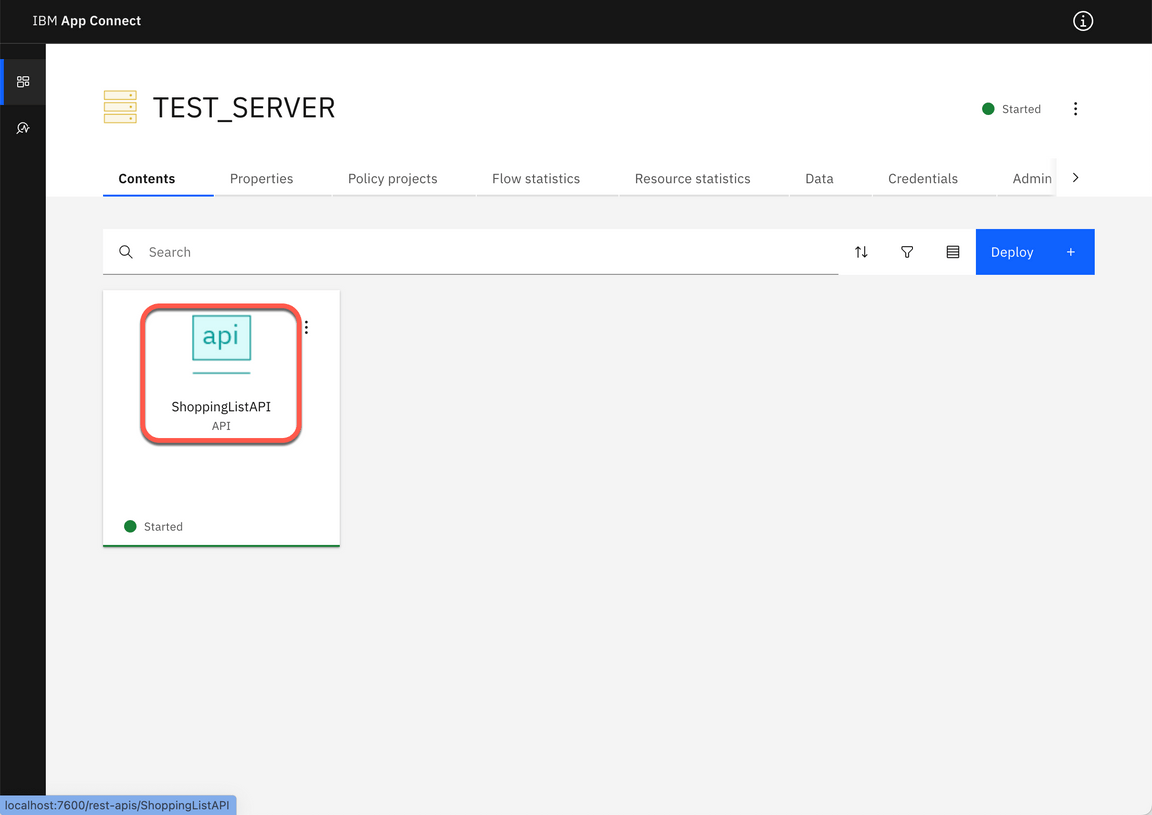
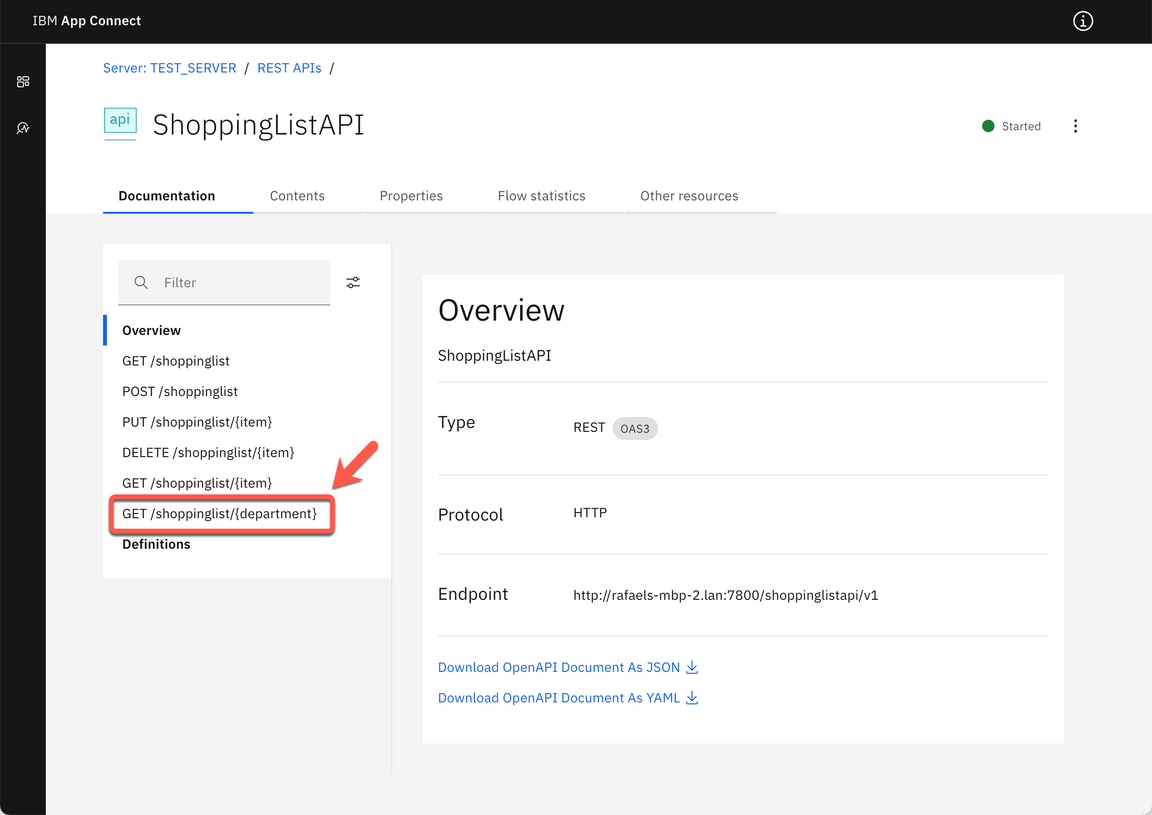
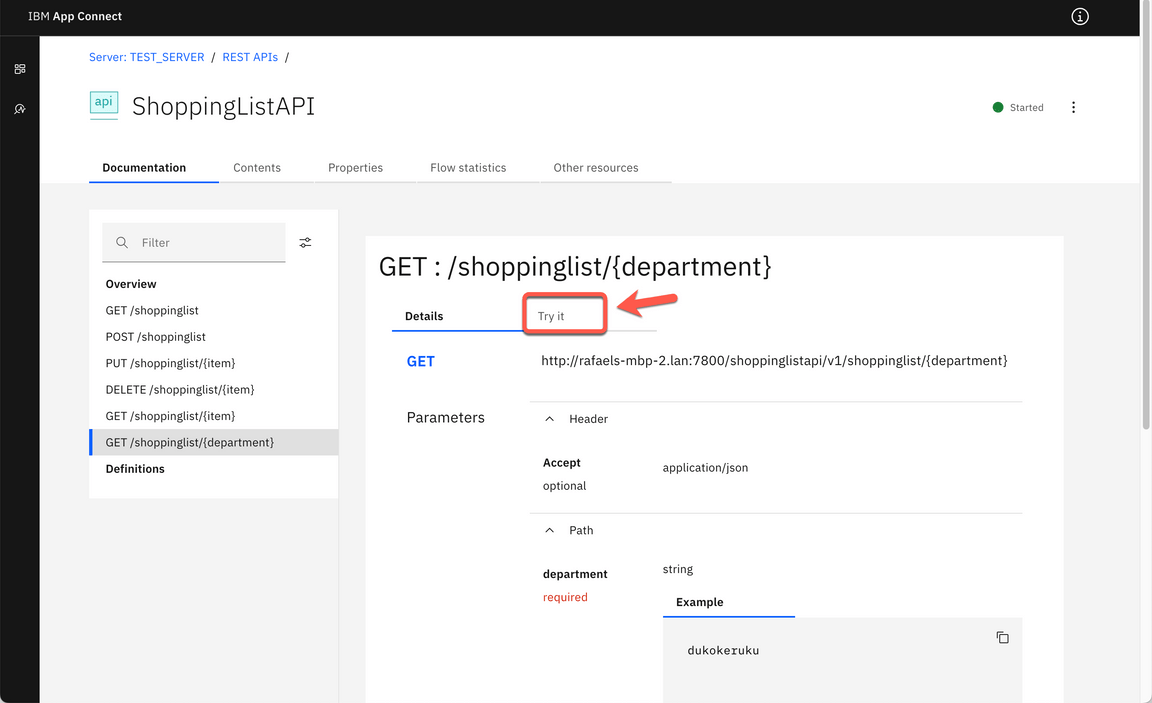
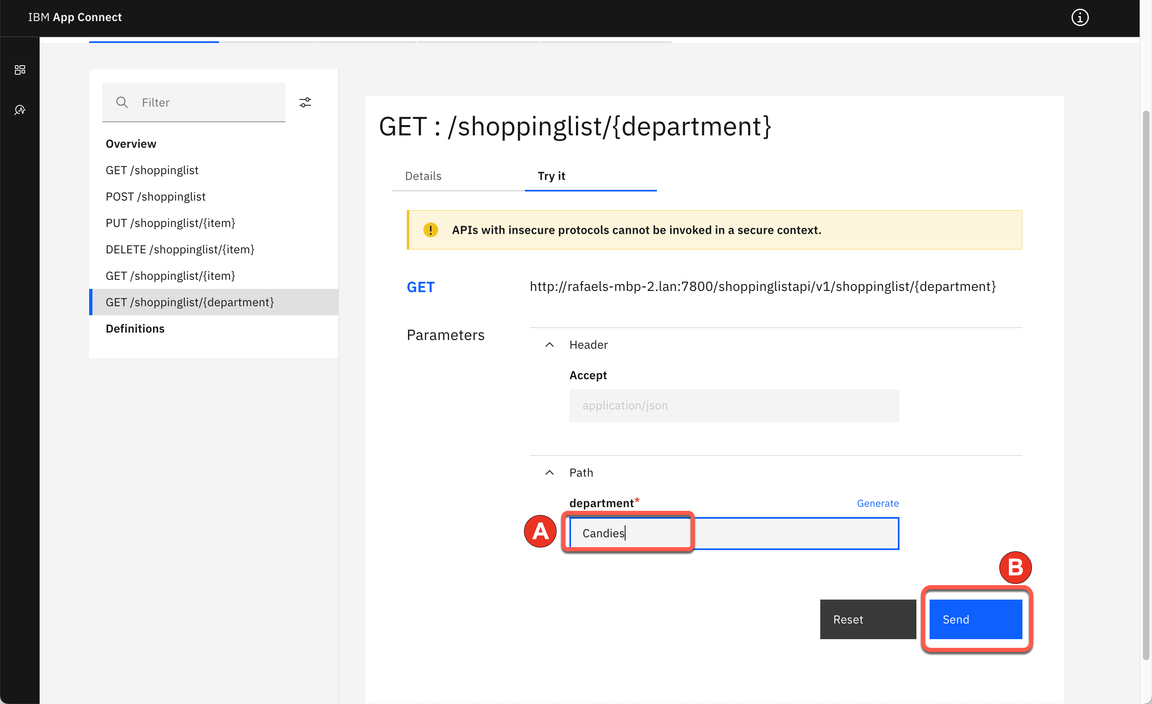
Select the ShoppingListAPI and the new Get Department operation. Note they can use the Try it capability, and enter any product department, for example “Candies”.
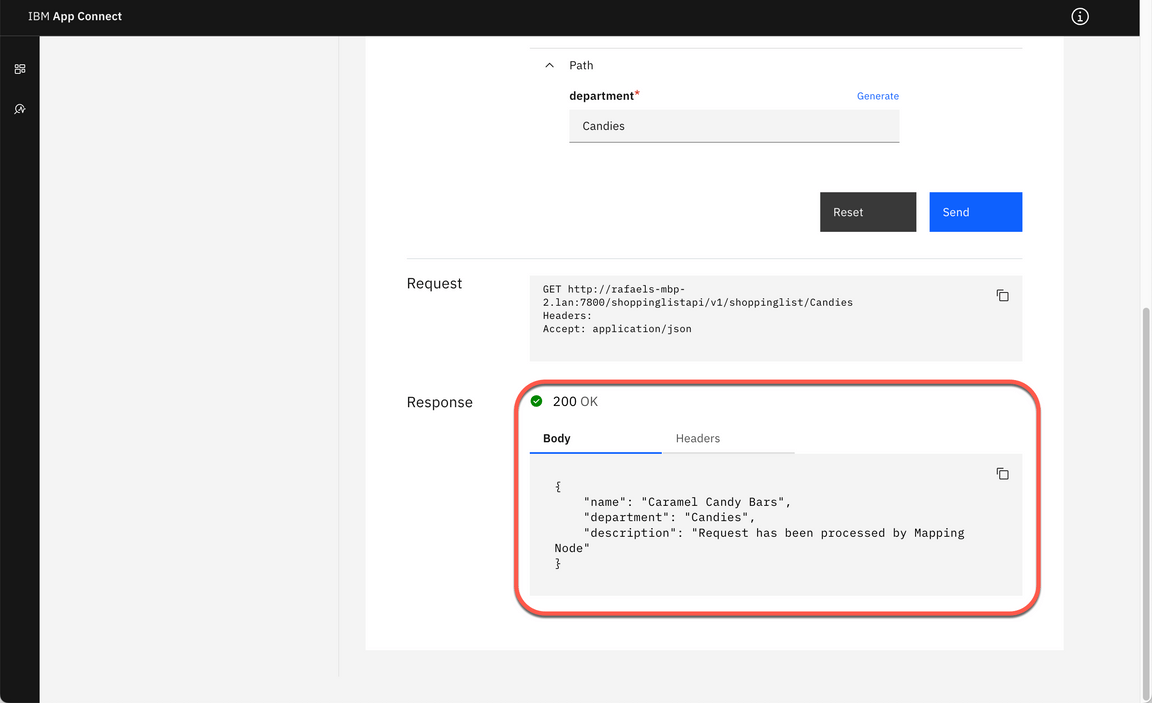
Great, the subflow was invoked and our mapping transformation created a response with our hard coded values. The Focus team verified it is really simple to implement a mapping transformation using IBM App Connect.
Action 6.3.1.
Click the ShoppingListAPI tile in the web user interface.
Action 6.3.2.
Select the GET /shoppinglist/{department} operation on the left.
Action 6.3.3.
Click the Try it tab.
Action 6.3.4.
Enter any department name (by now, we are not checking the department) such as Candies (A). Click Send (B).
Action 6.3.5.
Show the Response body. Show the assigned name and description fields.
7. Add Compute transformation
7.1. Adding Compute node
Narration
The Focus developers heard about ESQL language. Extended Structured Query Language (ESQL) is a programming language based on Structured Query Language (SQL) that is typically used to work with databases. ESQL is extended to access and manipulate data in messages and databases.
They would like to see how to use ESQL to transform and enrich messages using the Compute node. Because of it, they decided to explore the Compute node transformation.
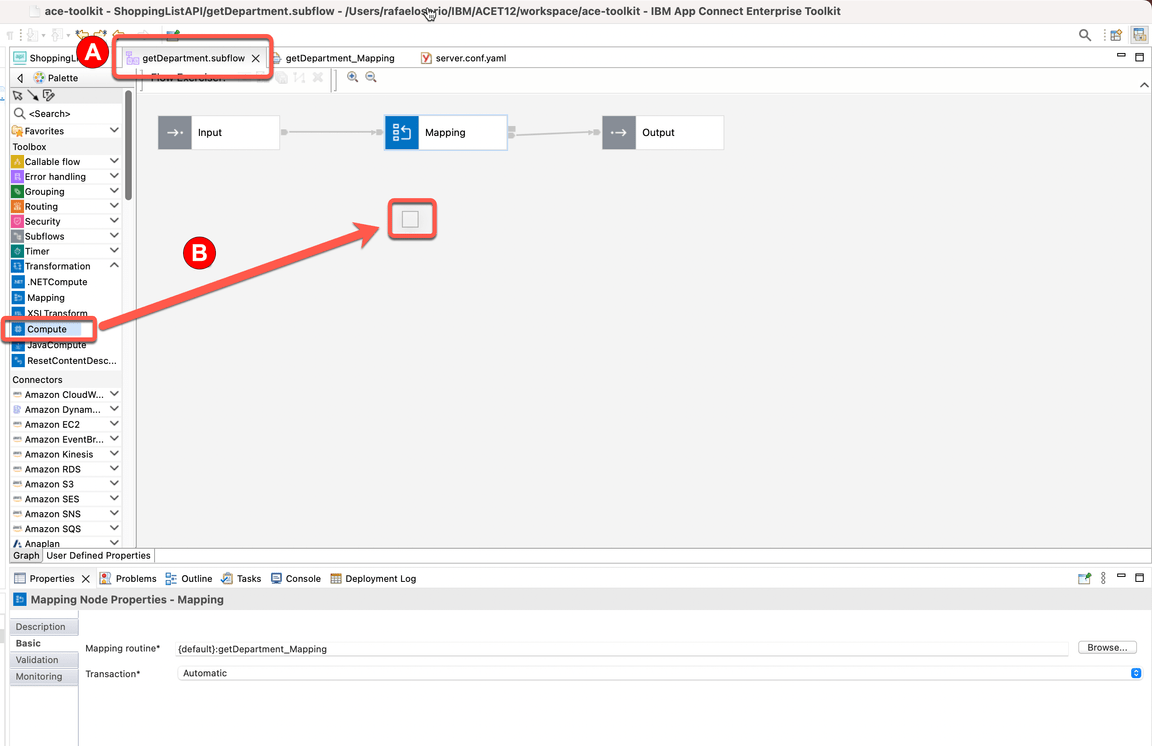
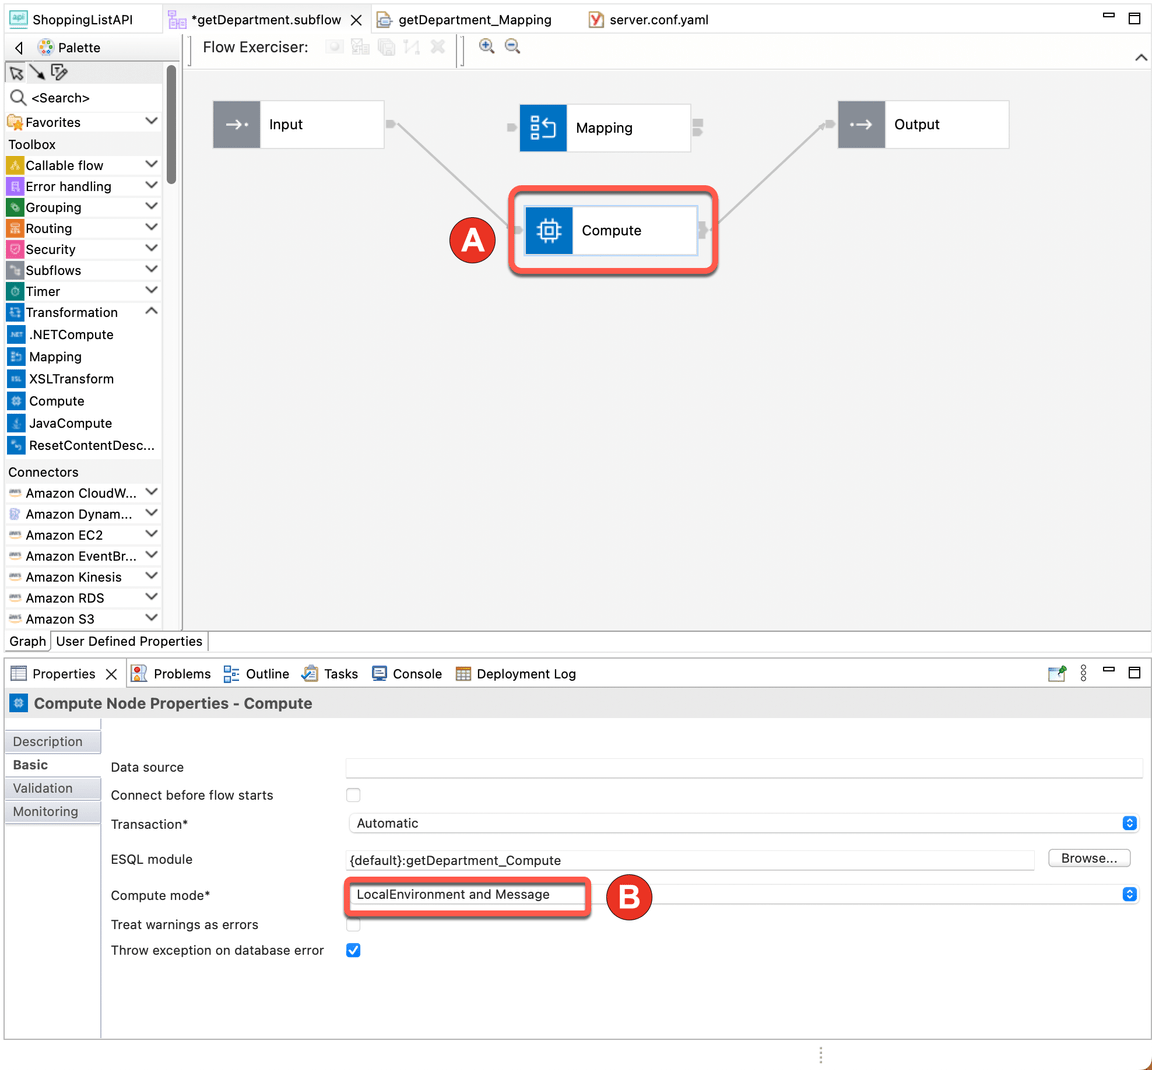
Action 7.1.1.
Back to the getDepartment.subflow (A), open again the Transformation menu and drag and drop a Compute node (B).
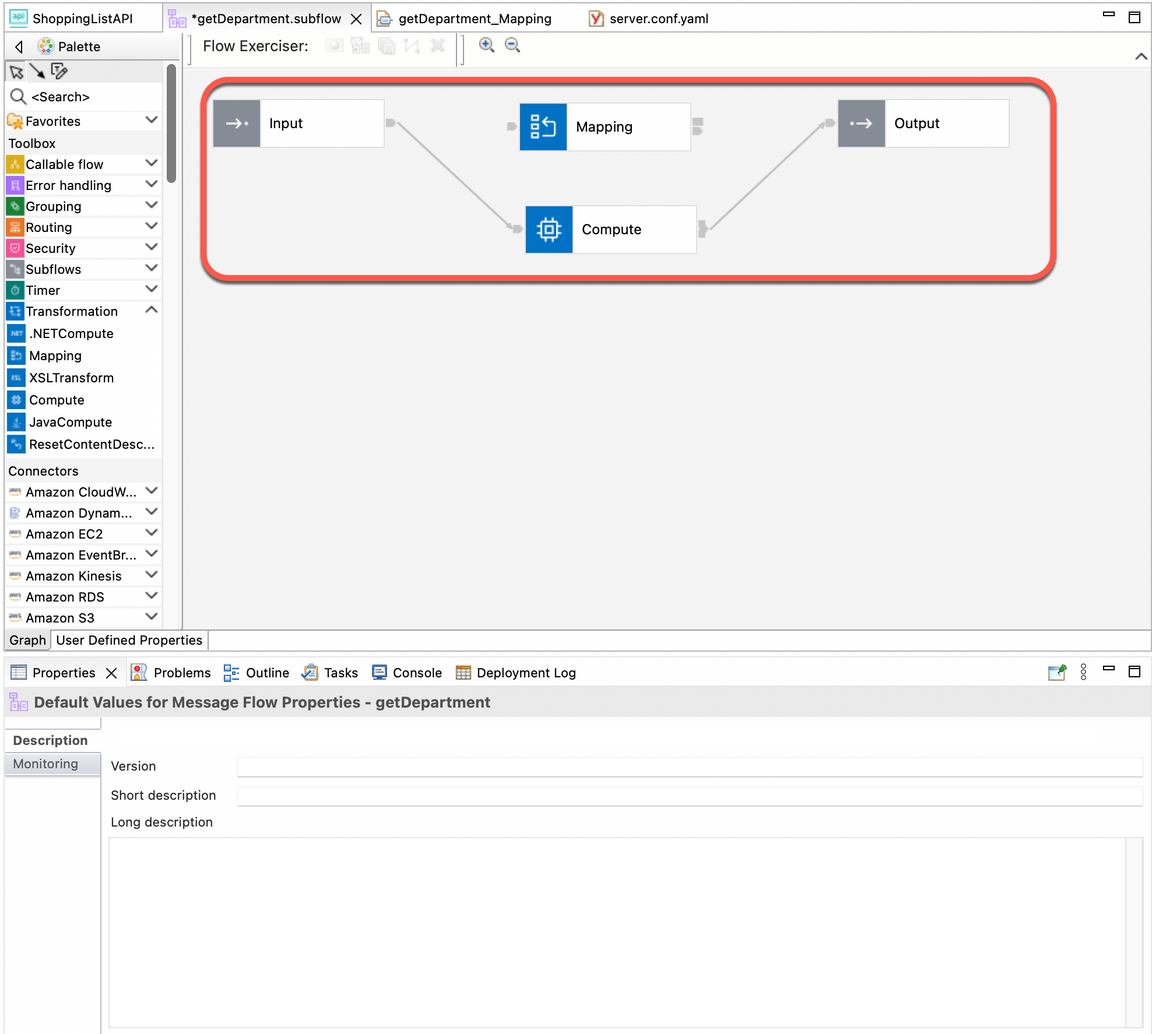
Action 7.1.2.
Readjust the connections of the Input and Output nodes to connect to the Compute node (the out terminal of the Input node will be wired to the in terminal of the Compute node, and the out terminal of the Compute node will be wired to the in terminal of the Output node).
Action 7.1.3.
Click on the Compute node (A). On the Compute node’s properties change the Compute mode to be “LocalEnvironment and Message” (B).
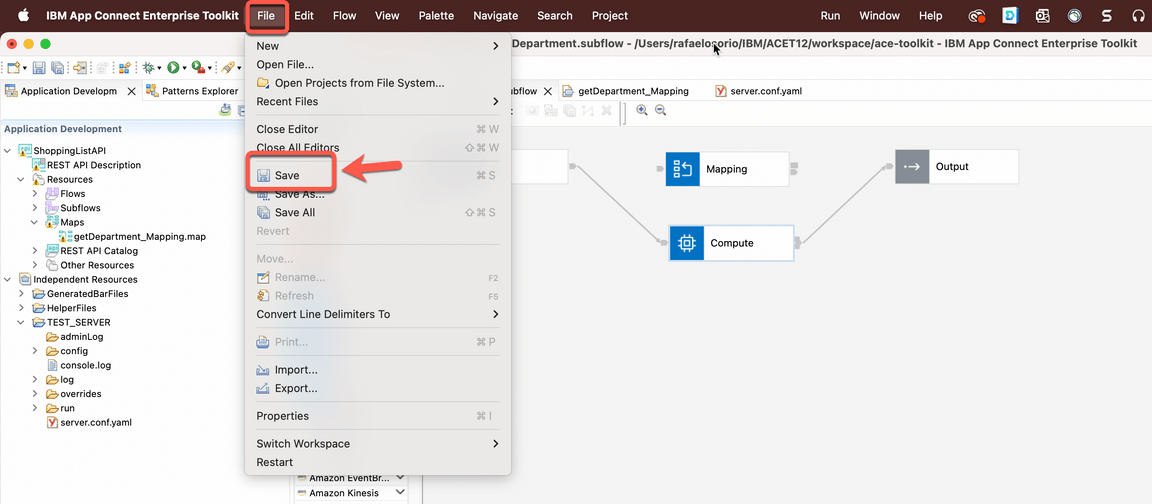
Action 7.1.4.
Save the subflow (you can safely ignore the red crosses on the Compute node - we will fix these up in the next step!).
7.2. Create Broker Schema
Narration
To simplify the demo, they decided to reuse a pre-created ESQL file.
First, they need to create a Broker Schema to include the ESQL file. A broker schema is a symbol space that defines the scope of uniqueness of the names of resources defined within it.
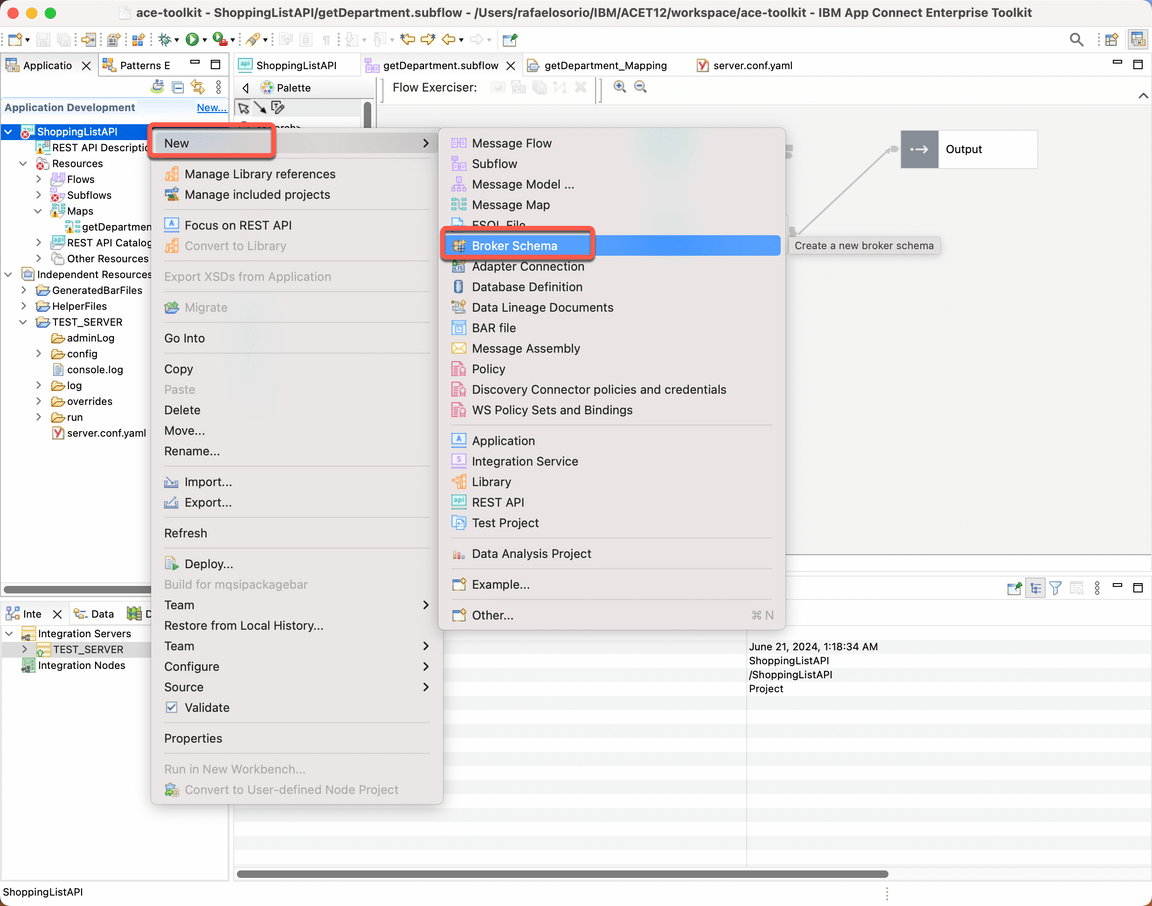
Action 7.2.1.
Right click the ShoppingListAPI and choose New > Broker Schema.
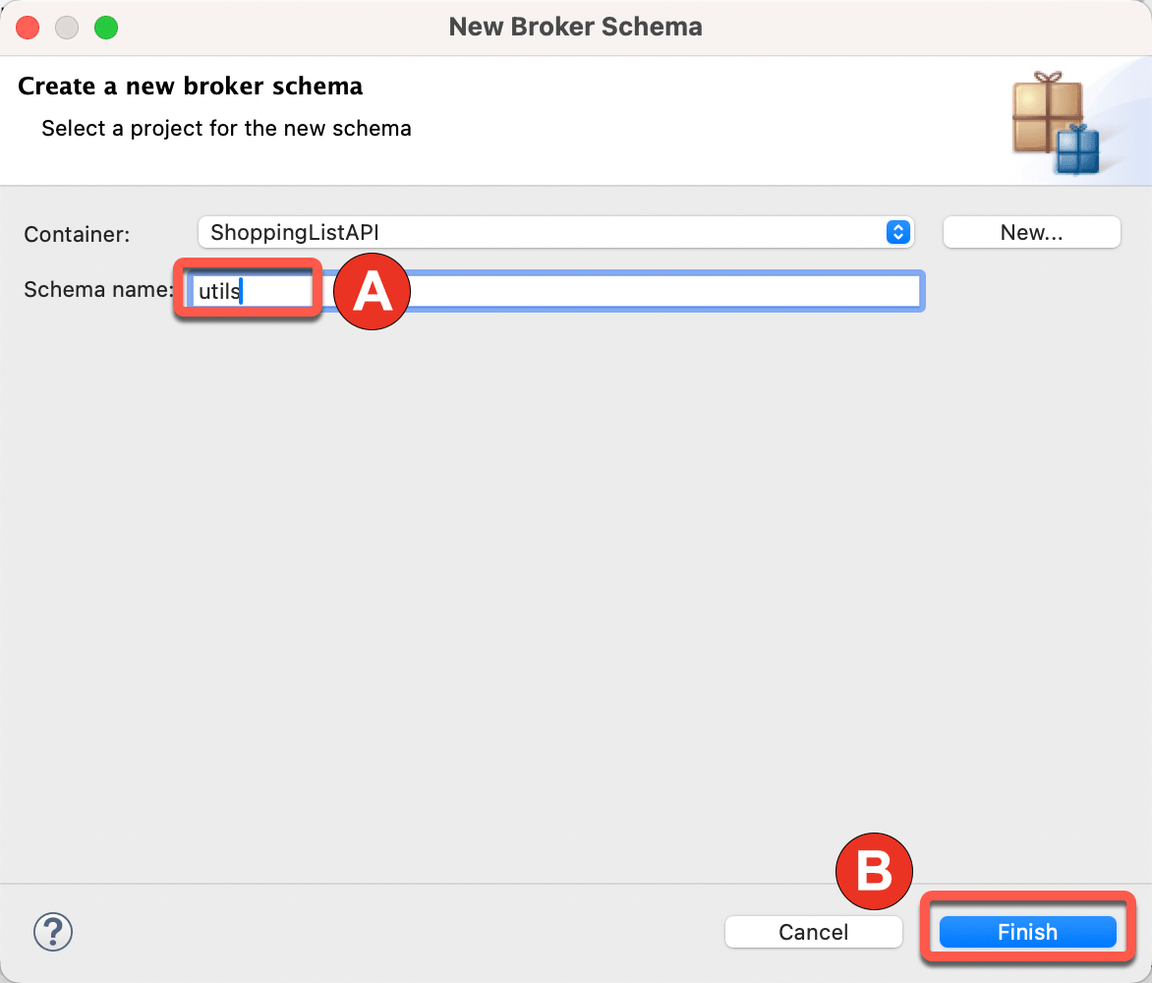
Action 7.2.2.
Type utils as the Schema name (A) and click Finish (B).
Action 7.2.3.
On the New Broker Schema dialog, click OK.

7.3. Copy ESQL file
Narration
Next, Focus developers will copy the pre-created ESQL file to the broker schema folder.
Action 7.3.1.
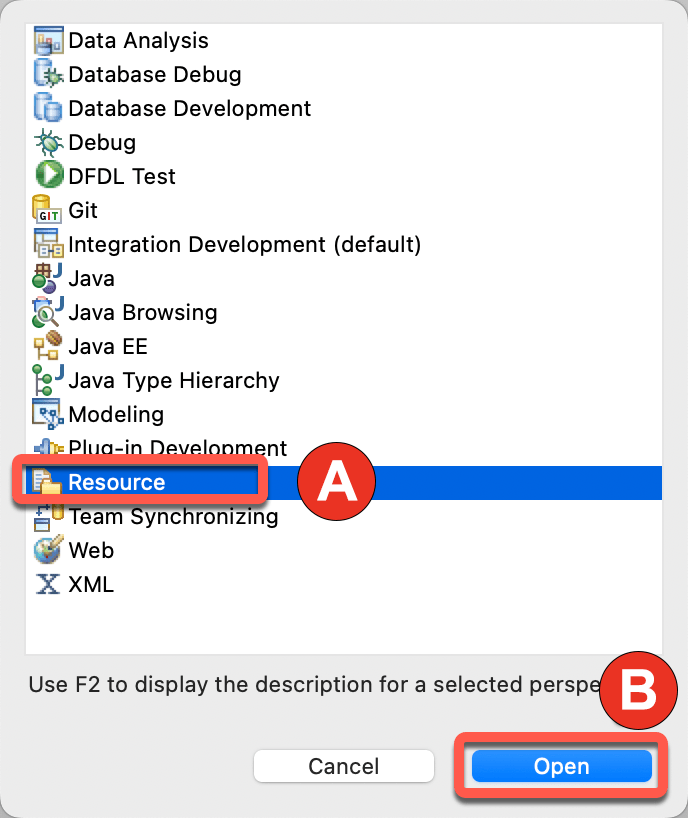
Switch to the Resource perspective using the menu Window > Perspective > Open Perspective > Other…

Action 7.3.2.
Choose Resource (A) and click Open (B).
Action 7.3.3.
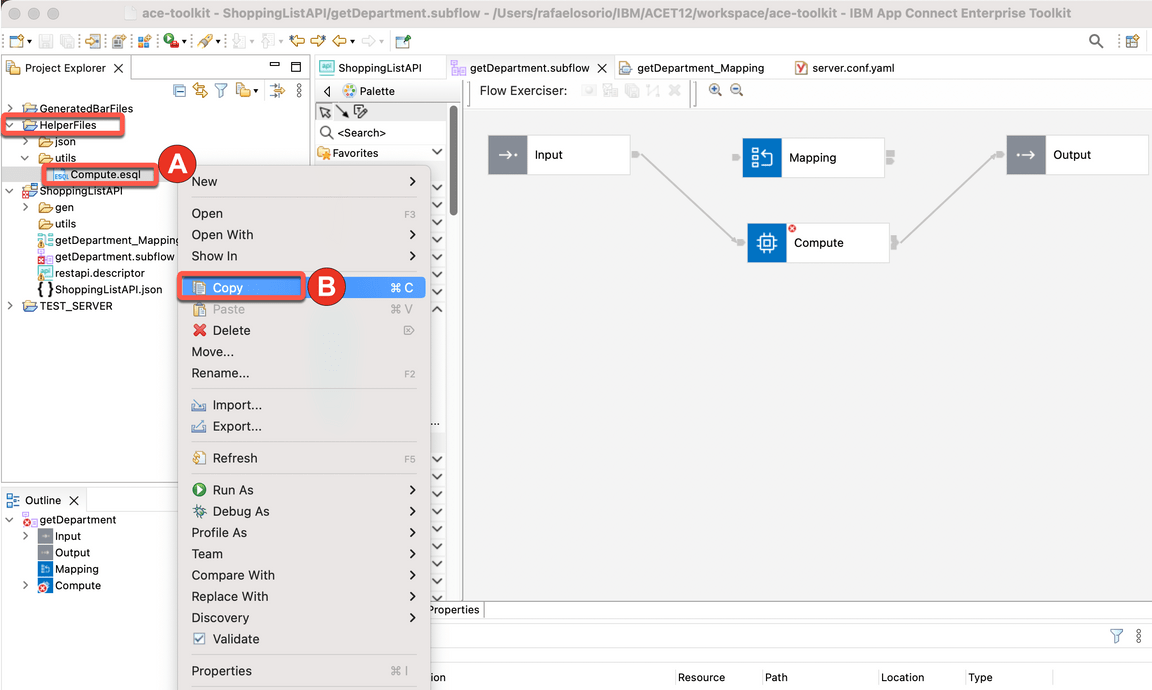
Using the Project Explorer view, open the HelperFiles project and the utils folder, right click on the Compute.esql file (A) and select Copy (B).
Action 7.3.4.
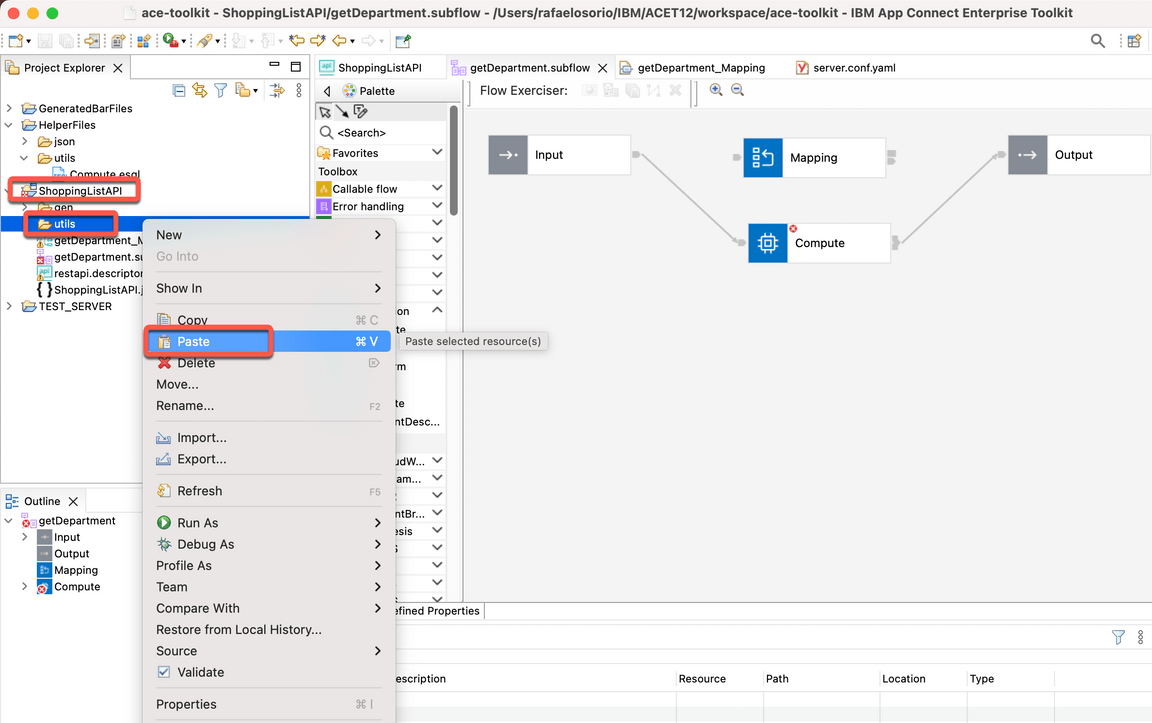
On the ShoppingListAPI project, right click on the utils folder, and select Paste.
Action 7.3.5.
Switch back to the Integration Development perspective using the Window > Perspective > Open Perspective > Integration Development menu.

7.4. Update the ESQL module
Narration
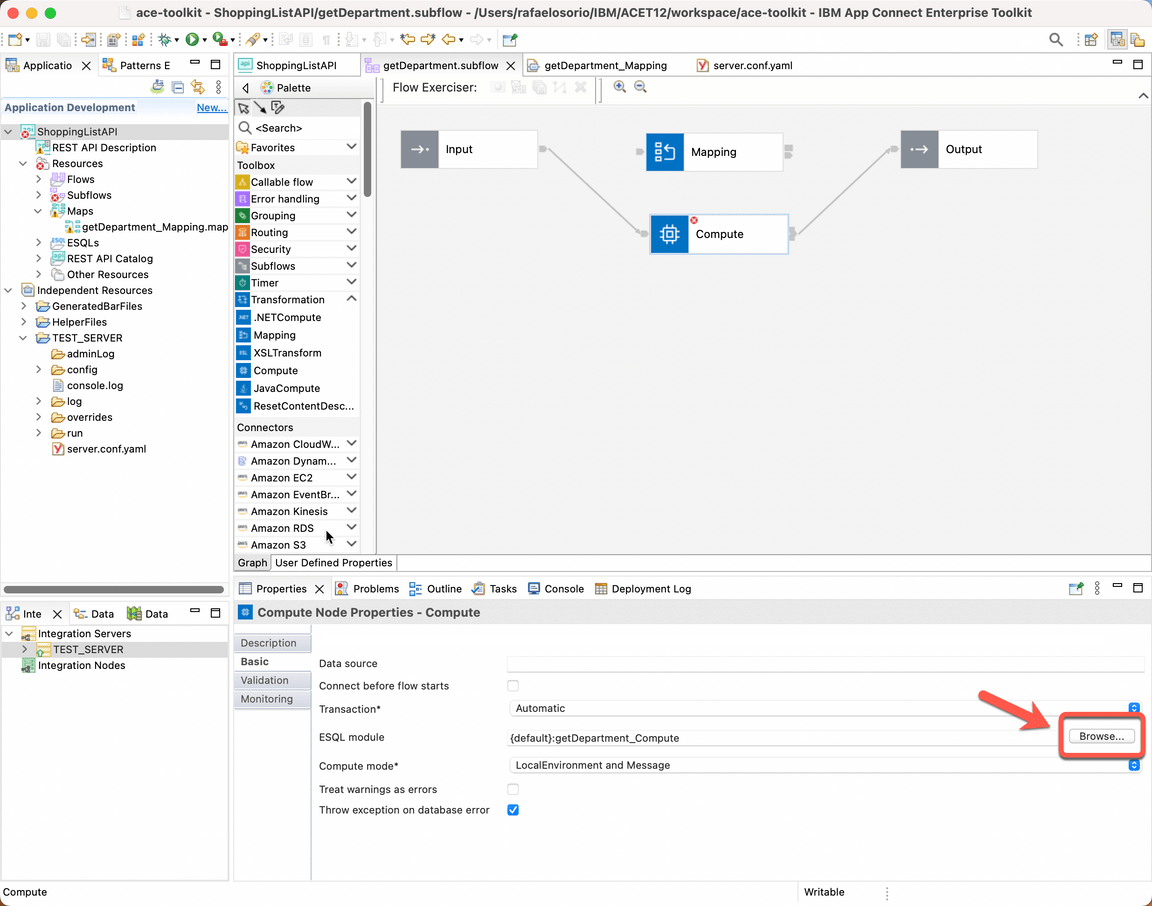
Now, they just need to update the Compute node to use the new ESQL file. They will use a specific module of the ESQL file: the getDepartment.
Action 7.4.1.
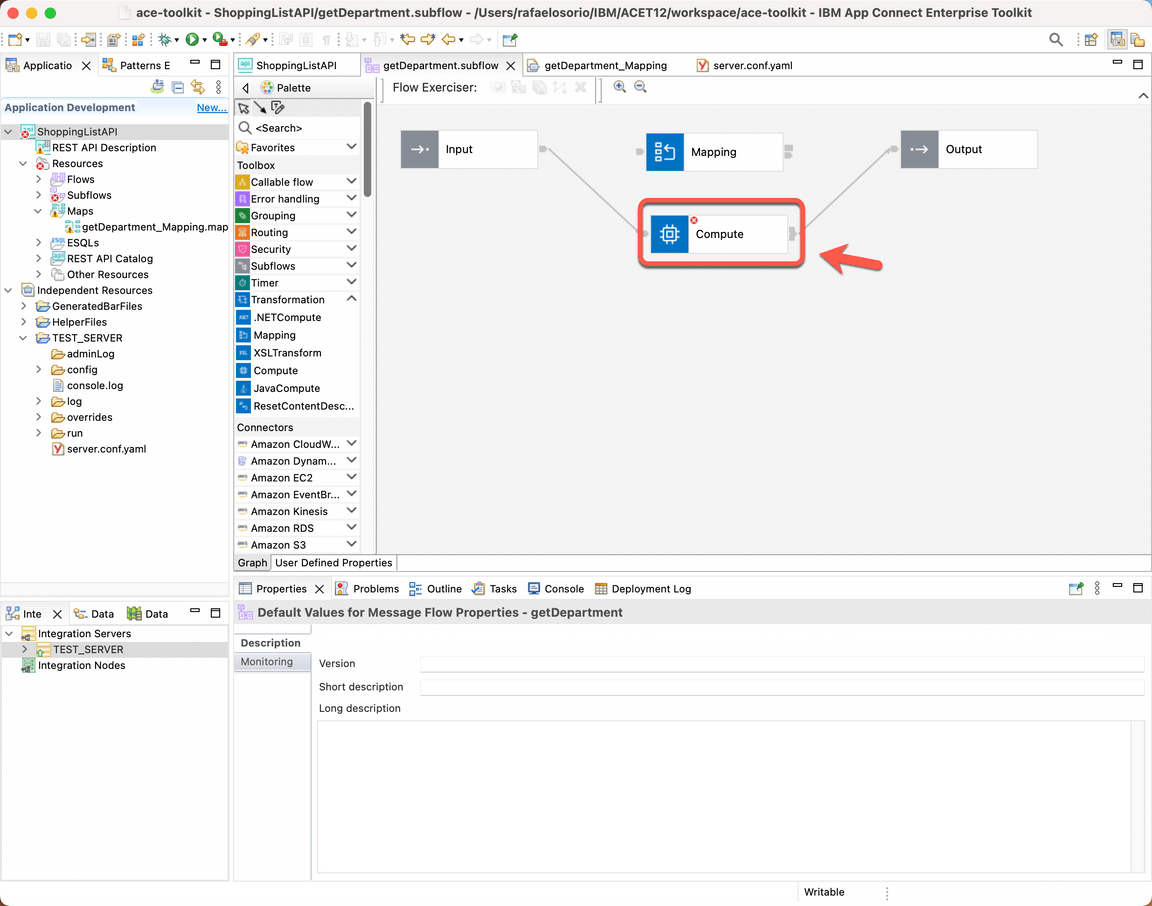
Return to the getDepartment subflow and click on Compute node again.
Action 7.4.2.
On the Compute node’s properties, you need to update the ESQL module property. Click Browse button.
Action 7.4.3.
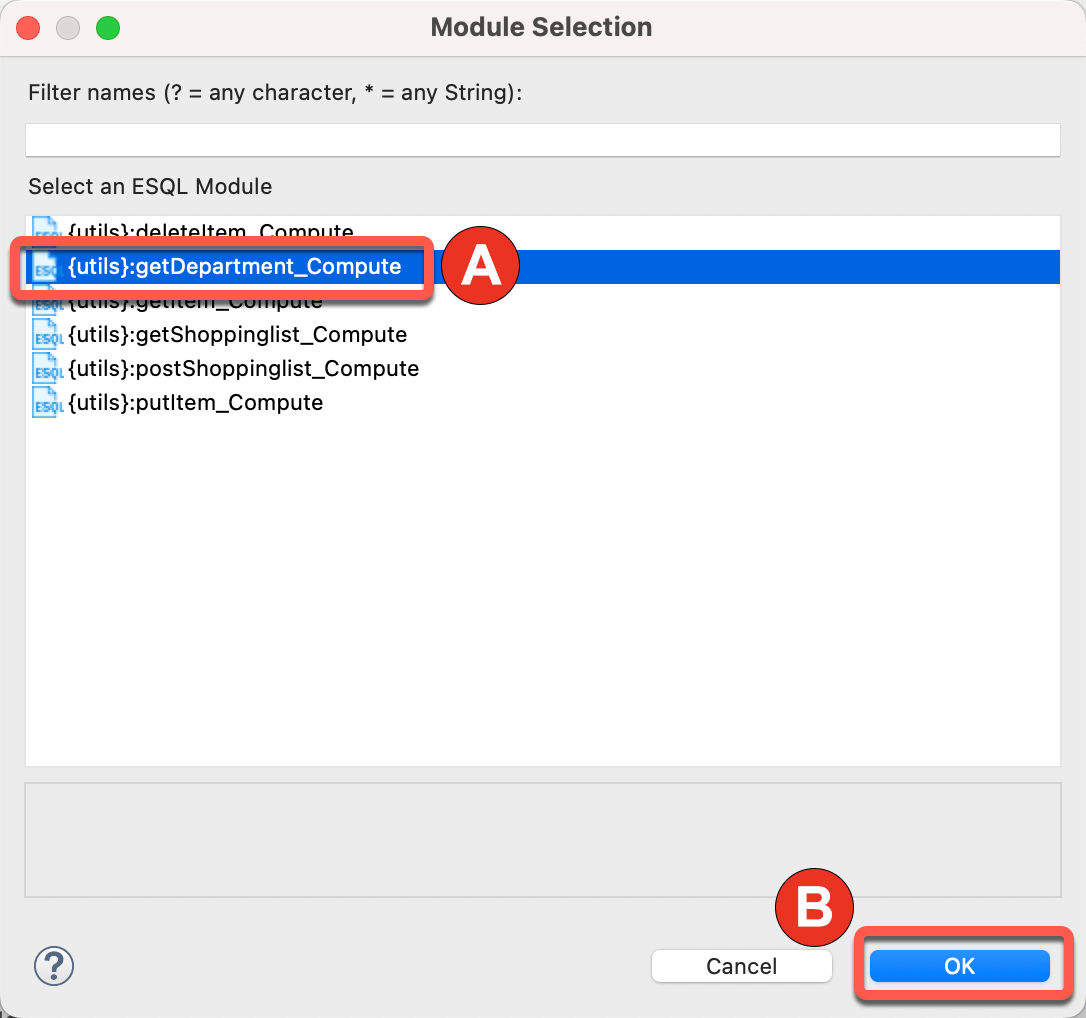
Select {utils}:getDepartment_Compute (A) and click OK (B).
Action 7.4.4.
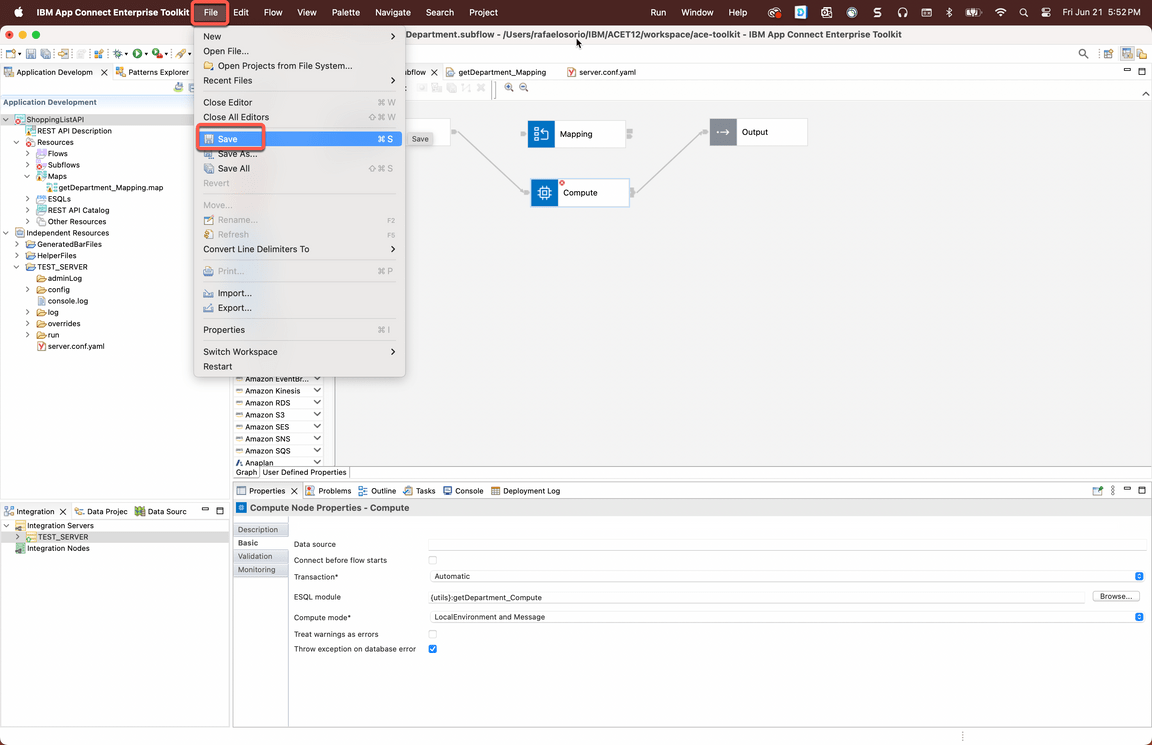
Save the subflow.
7.5. Review the ESQL
Narration
Let’s review the ESQL file. Focus developers can create and modify their ESQL code in the ESQL editor.
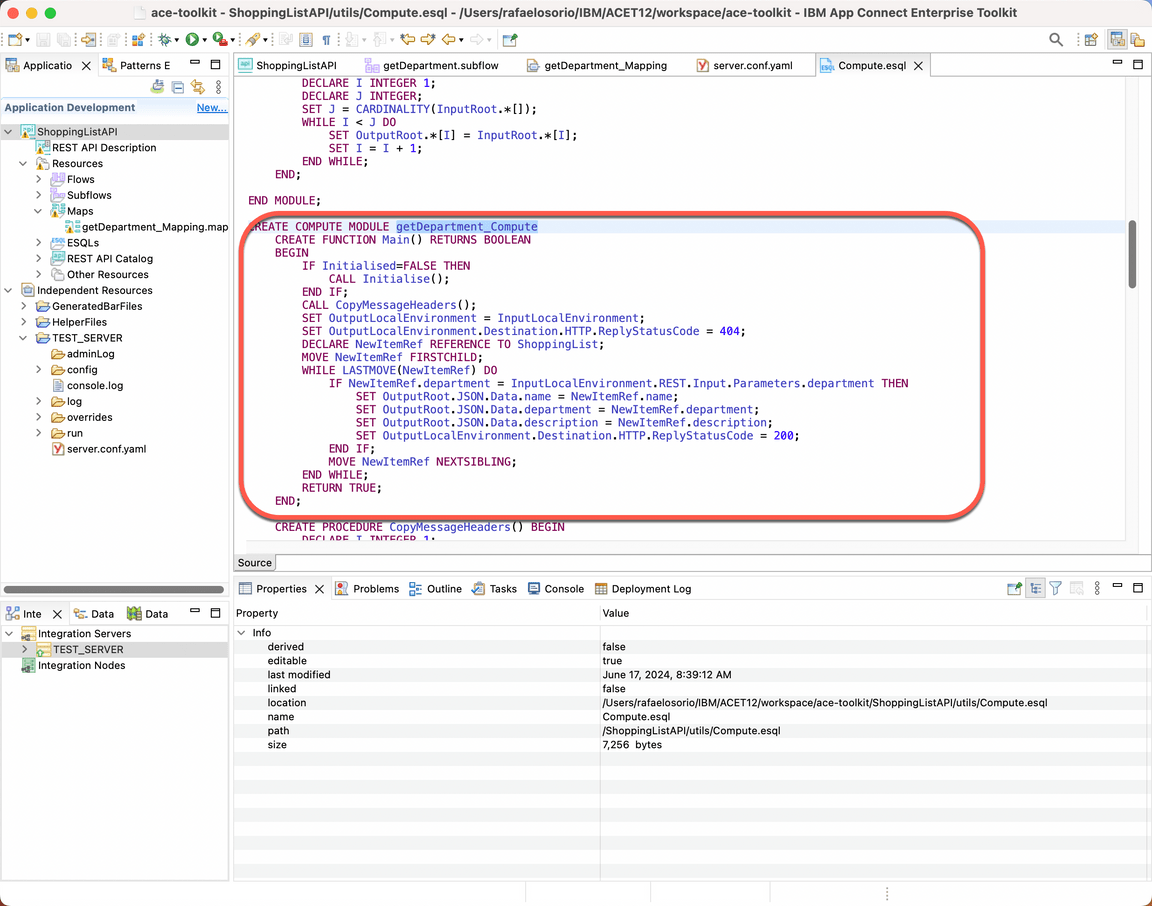
The ESQL code for each of your nodes is contained within a module in an ESQL file. Here they have a specific module for getDepartment operation. The module is simple; just select the Item where the Department value equals the Department parameter.
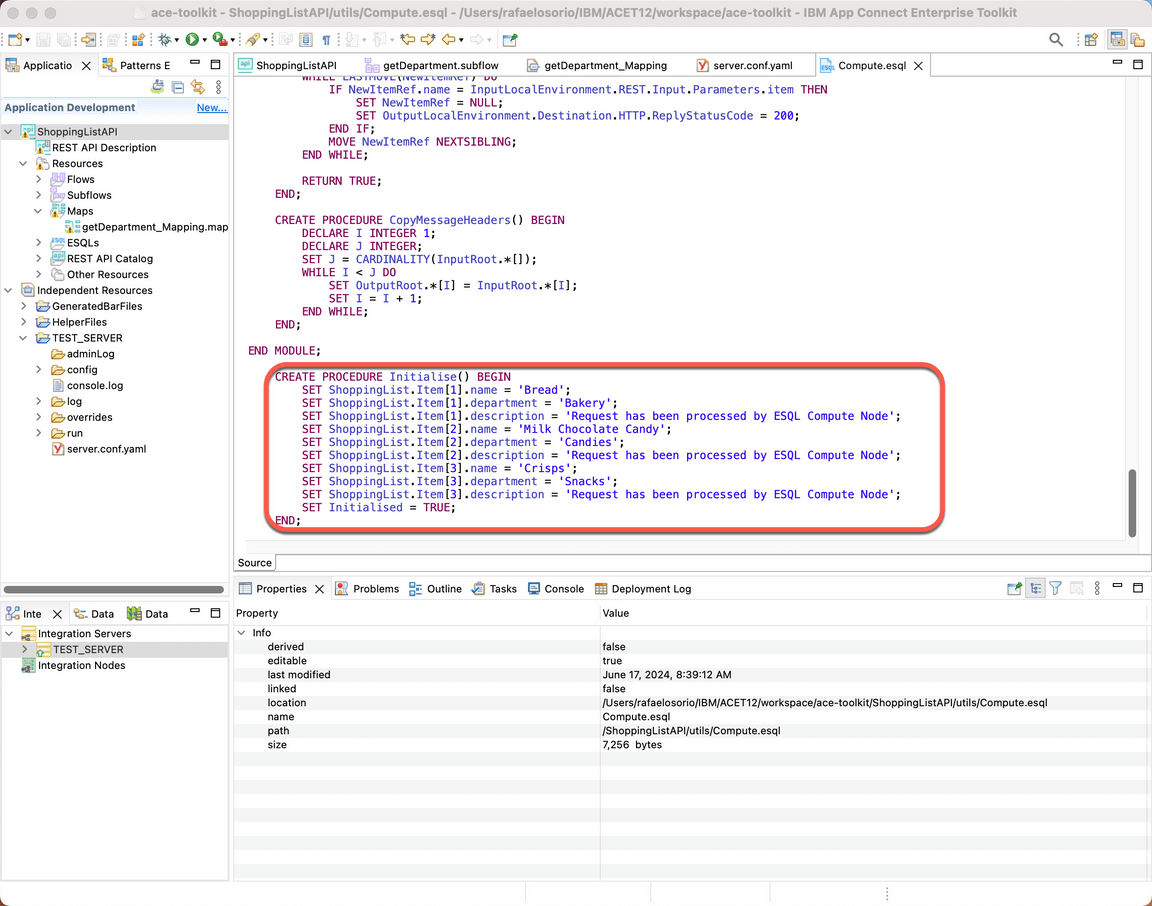
All three items are hardcoded and created in the Initialise procedure. In a real scenario, this data should be retrieved from the Products database or Product system.
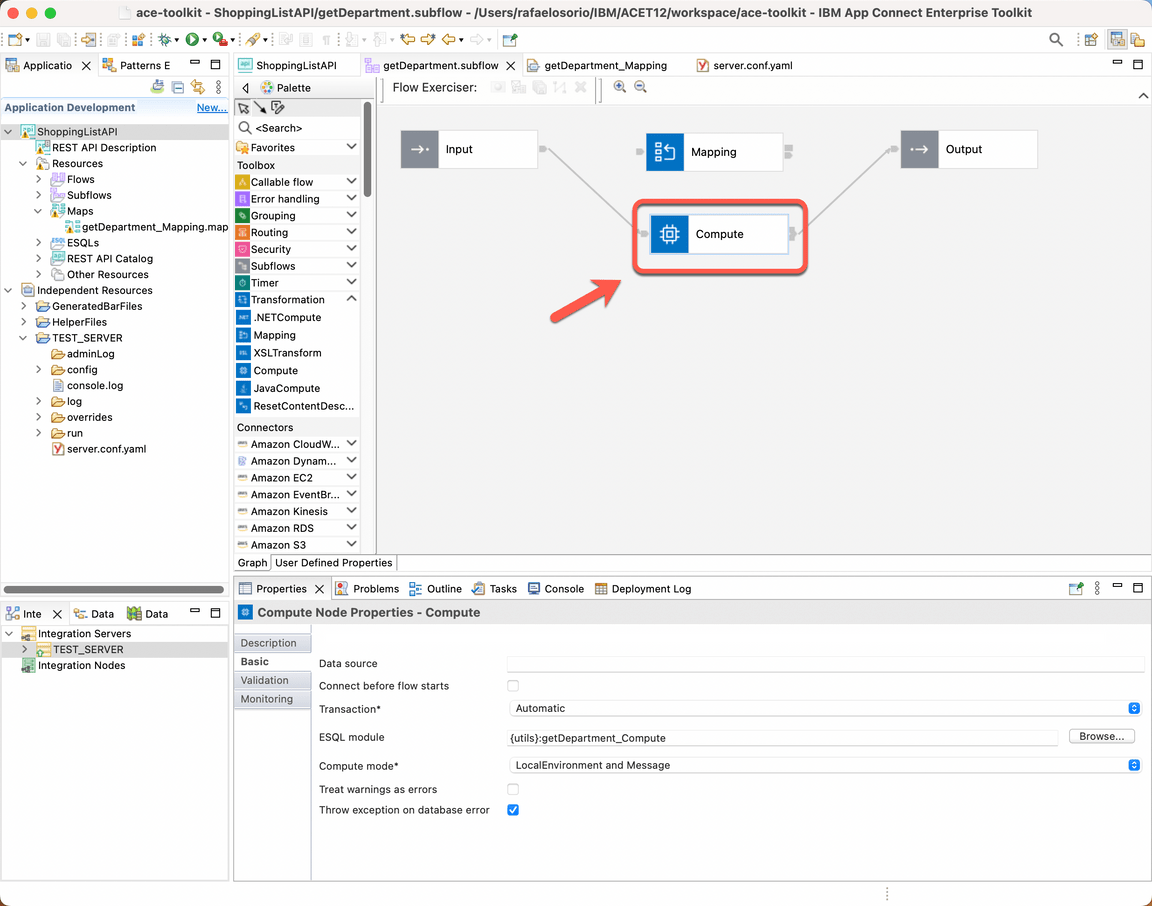
Action 7.5.1.
Double click on the Compute node, to see the ESQL file.
Action 7.5.2.
Show the getDepartment_Compute Module.
Action 7.5.3.
Scroll down and show the Initialise Procedure.
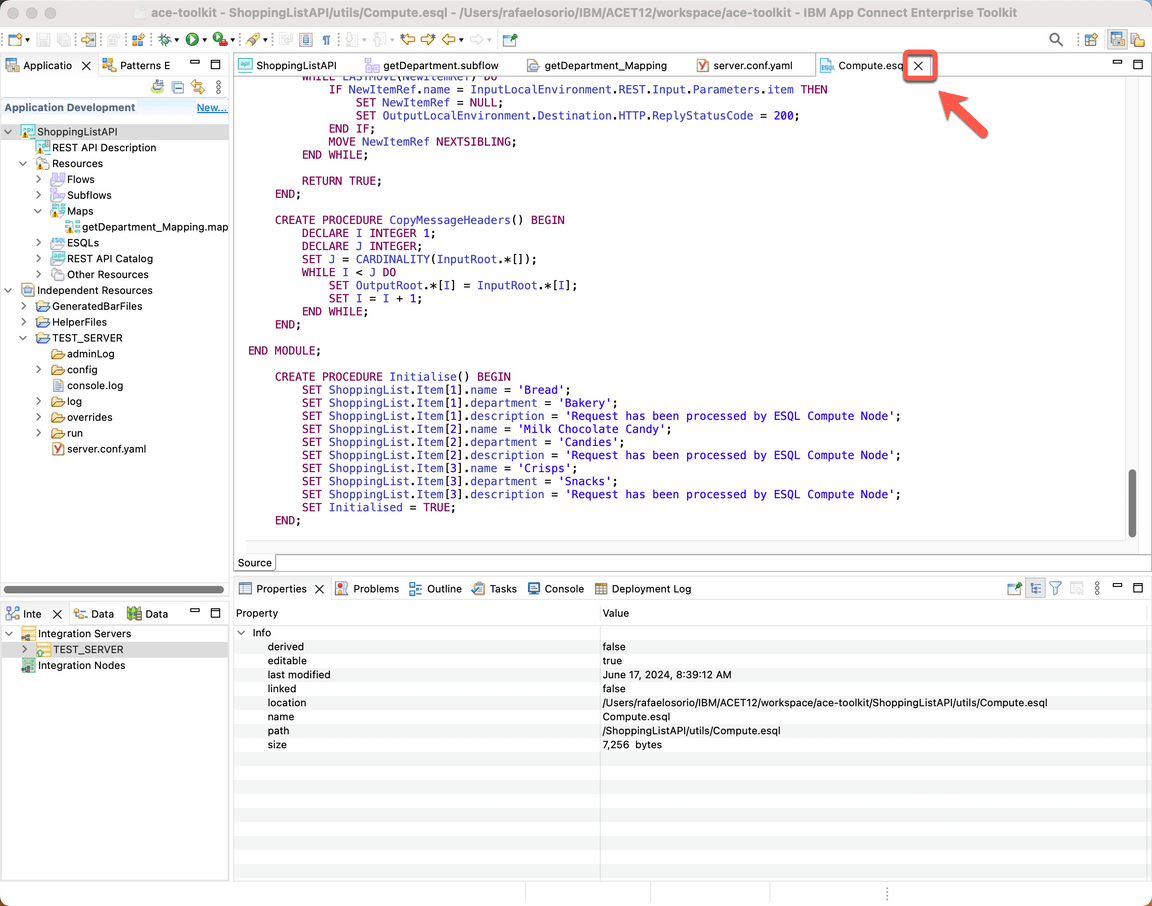
Action 7.5.4.
Close the ESQL file.
7.6. Test compute node
Narration
At this moment, the Focus Integration experts are ready to test the new API. They just need to redeploy the API and use the Web User Interface again to test it.
Now, they will test using the three available departments: Candies, Snacks and Bakery.
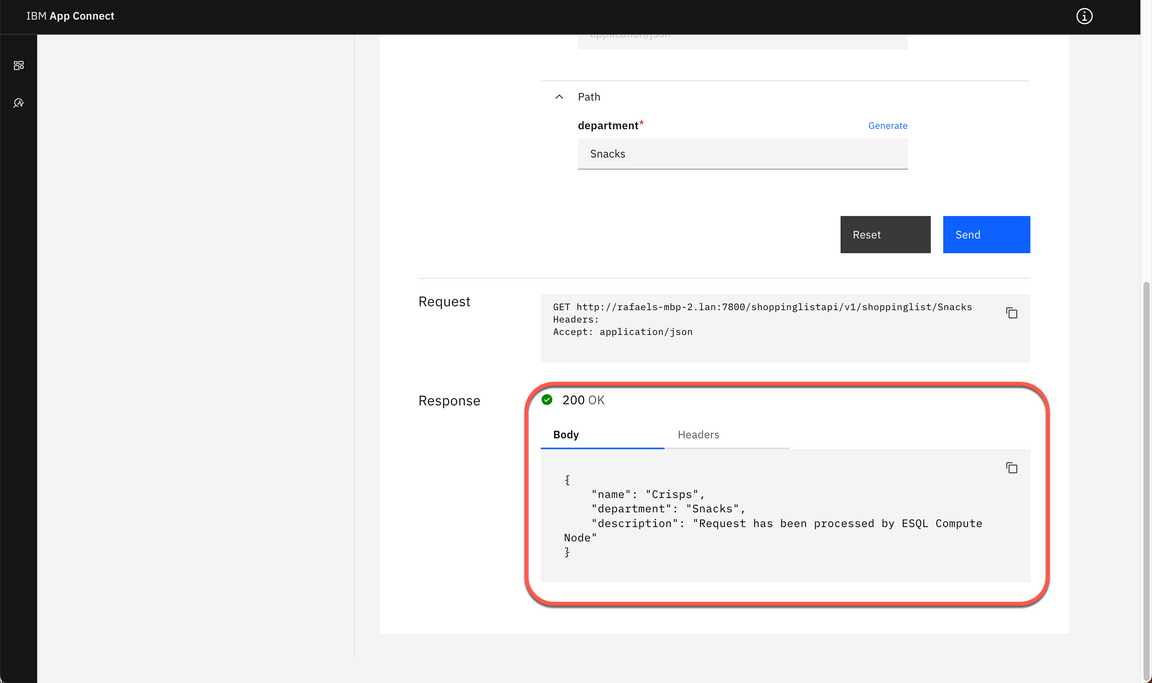
Great, the subflow was invoked and our compute transformation created a response with our hard coded values. The Focus team verified how simple it is to use ESQL query language to implement message transformations.
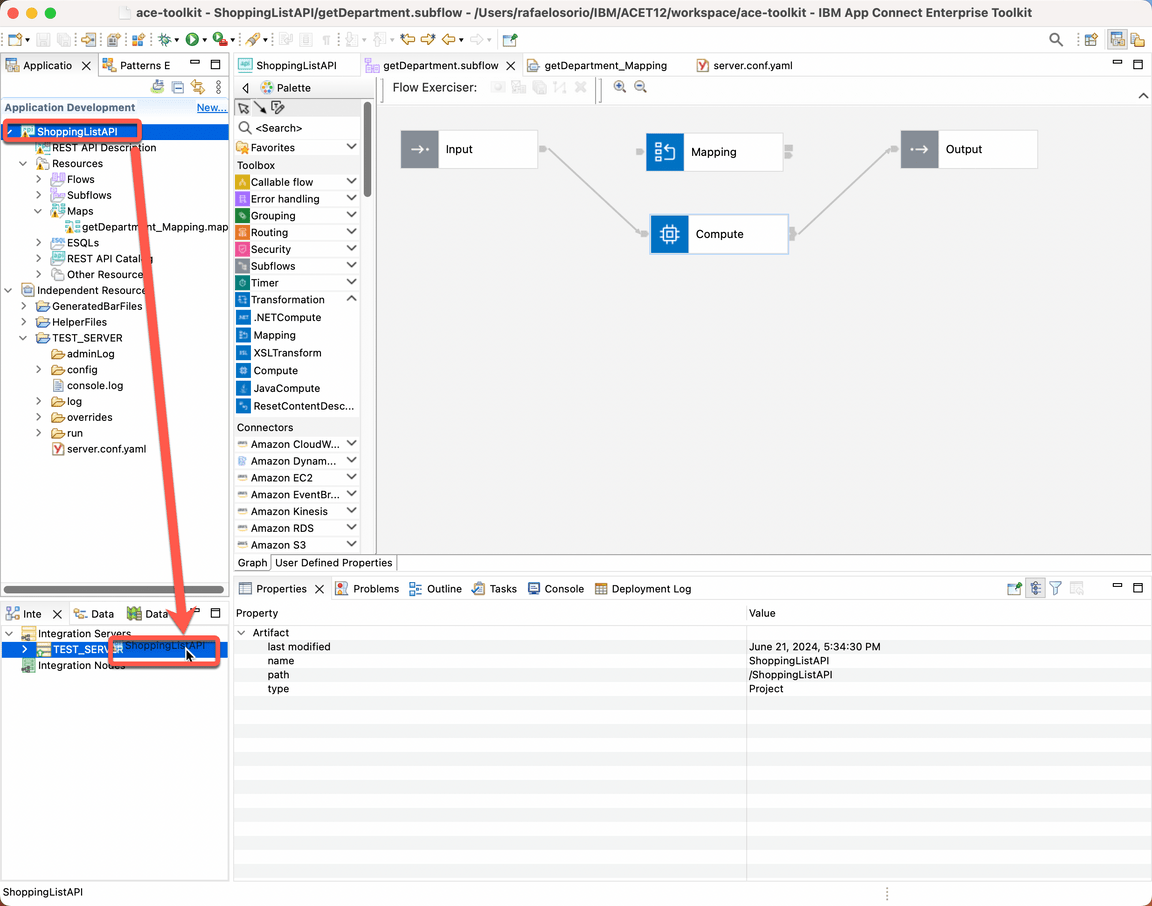
Action 7.6.1.
Re-deploy the REST API, by dragging and dropping the ShoppingListAPI again from the Application Development view on to the TEST_SERVER Integration Server.
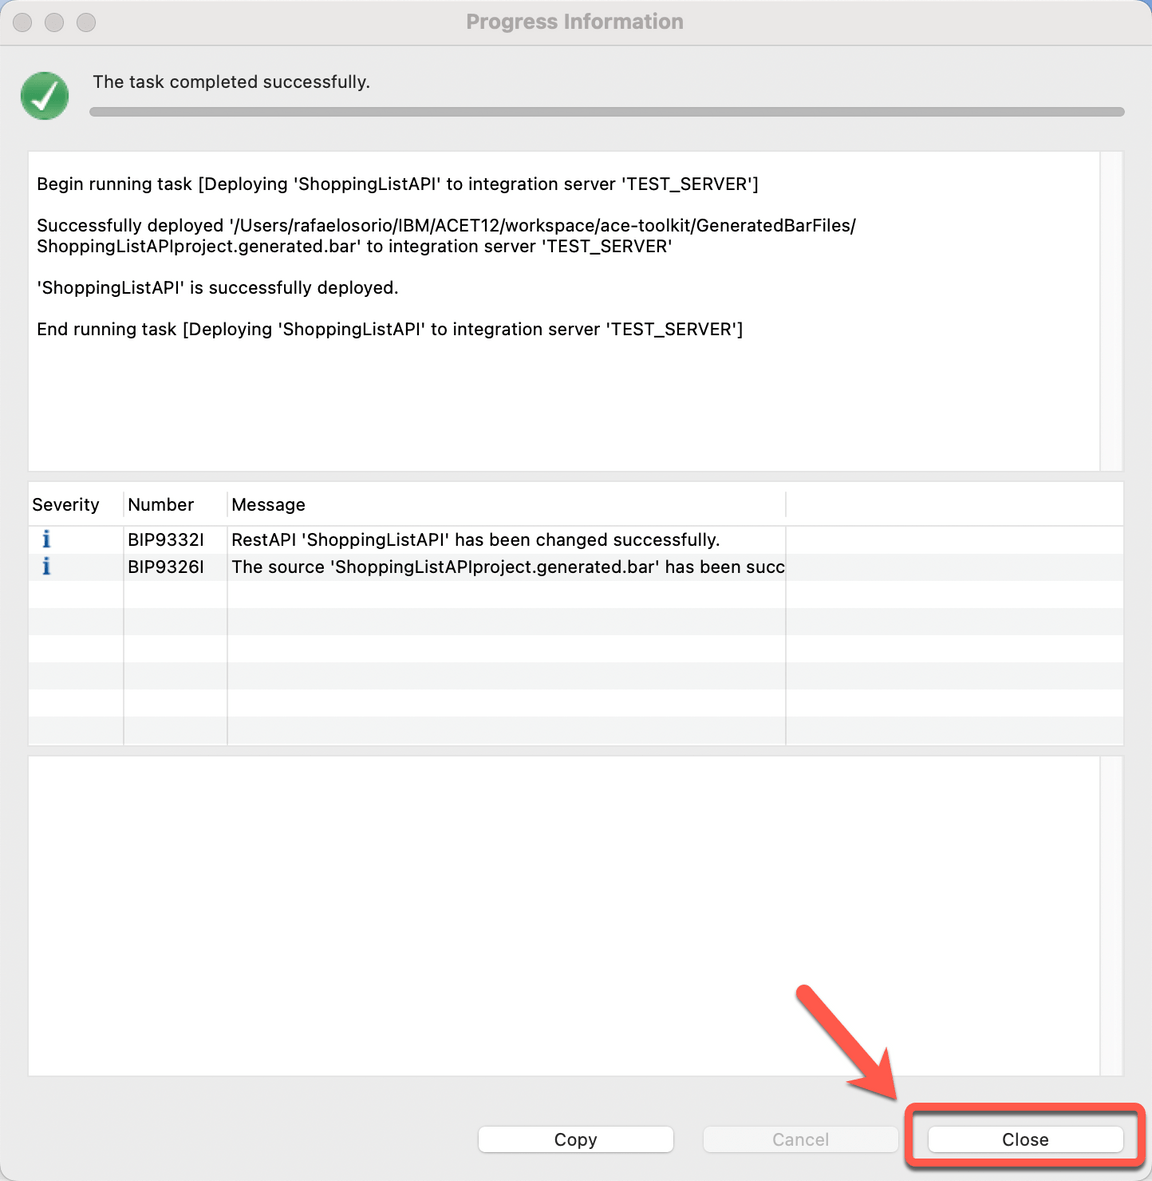
Action 7.6.2.
On the Progress Information dialog, click Close.
Action 7.6.3.
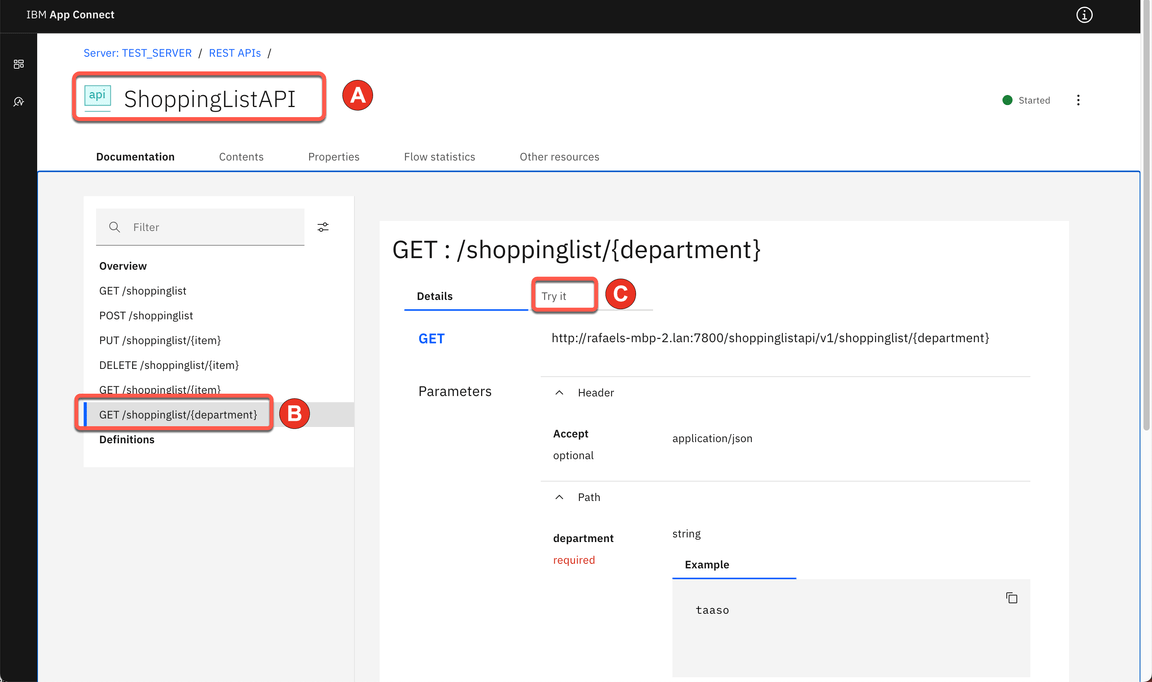
On your browser, refresh the Web User Interface page.
Action 7.6.4.
Open again the ShoppingListAPI (A), GET /shoppinglist/{department} (B), and Try it tab (C).
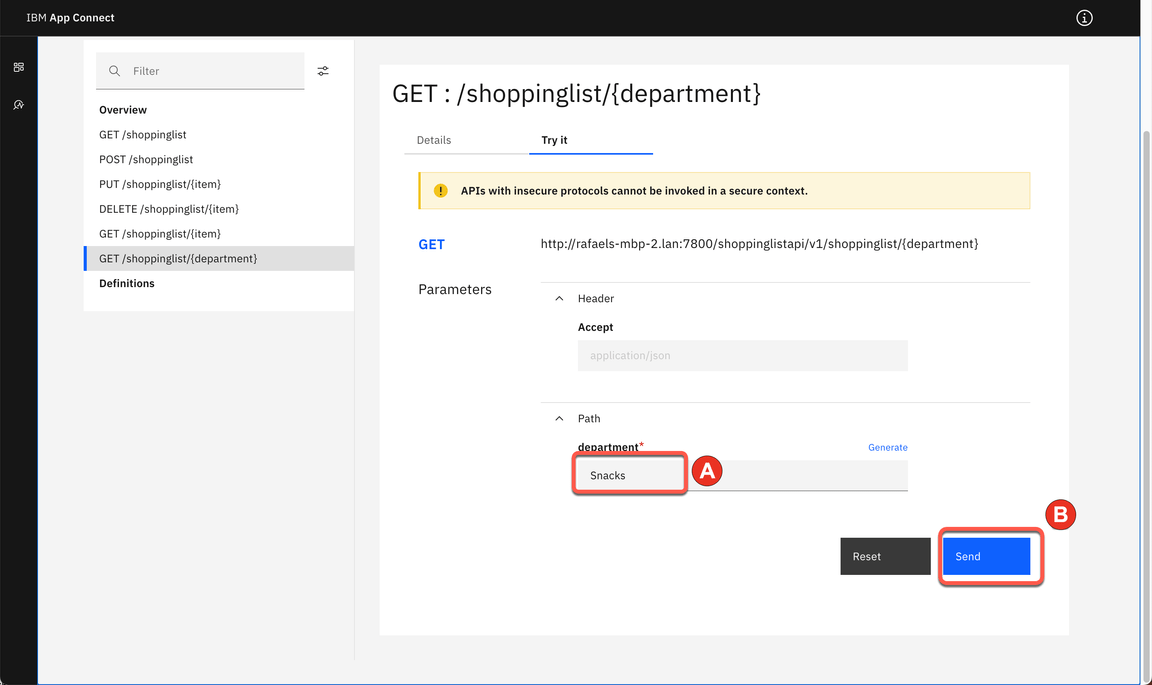
Action 7.6.5.
Enter a department name (it could be Candies, Snacks or Bakery) (A). Click Send (B).
Note: You are welcome to try any of the three departments or try a different one to see the 404 Not Found message.
Action 7.6.6.
Show the Response body.
8. Add Java transformation
8.1. Adding Java Compute node
Narration
Great, now the Focus Developers would like to see how to use Java code to tailor the behavior of their integration messages.
They want to learn how to use the JavaCompute node to examine the content of an input message, transform a message, and build new messages.
Because of this, they decided to explore the JavaCompute node.
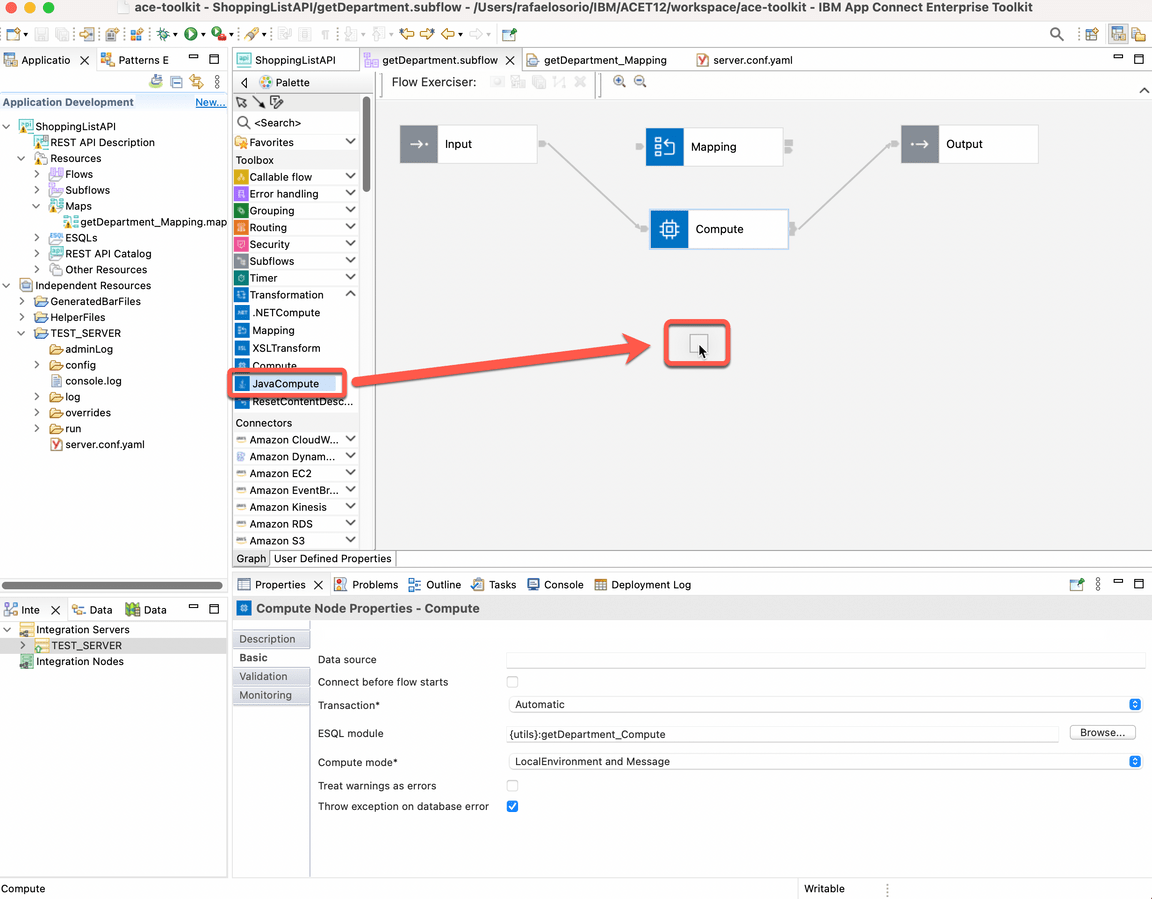
Action 8.1.1.
Back to the getDepartment.subflow, open again the Transformation menu and drag and drop a JavaCompute node.
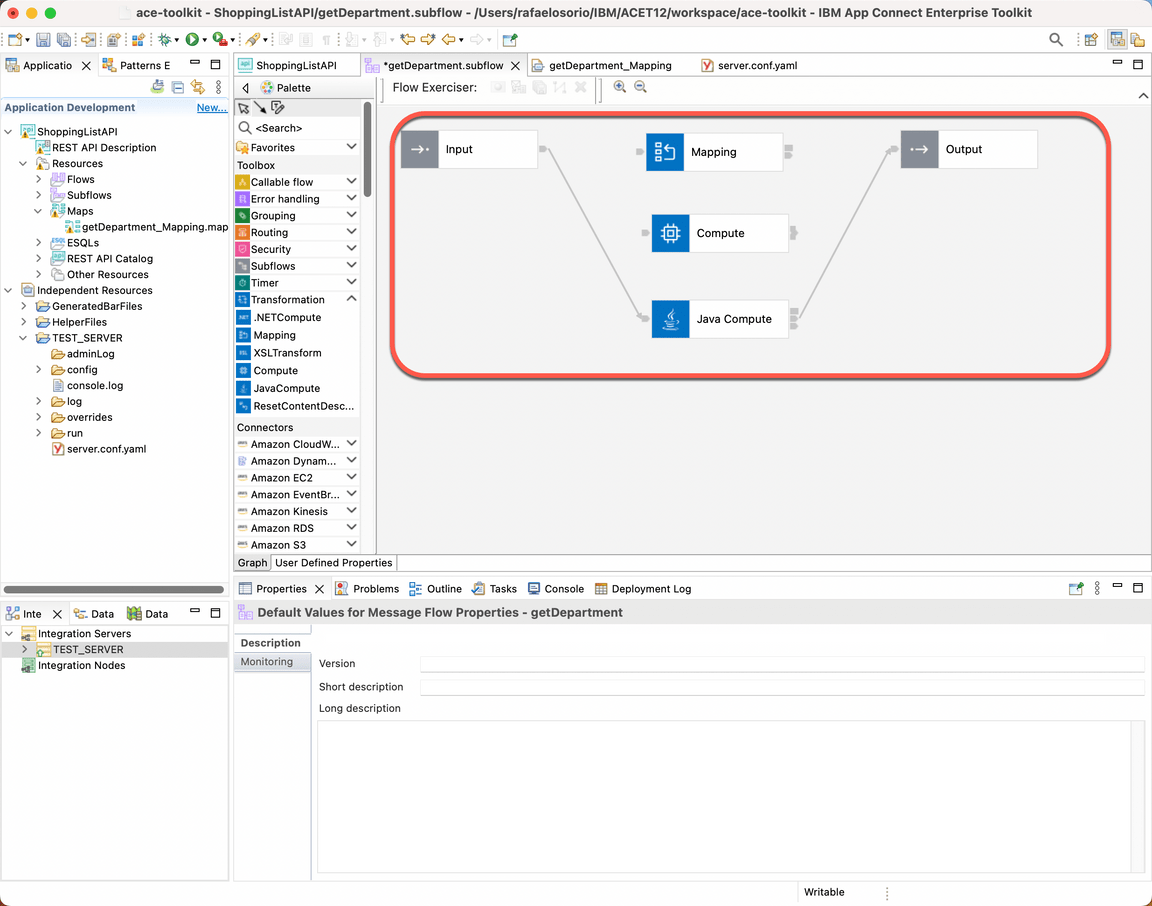
Action 8.1.2.
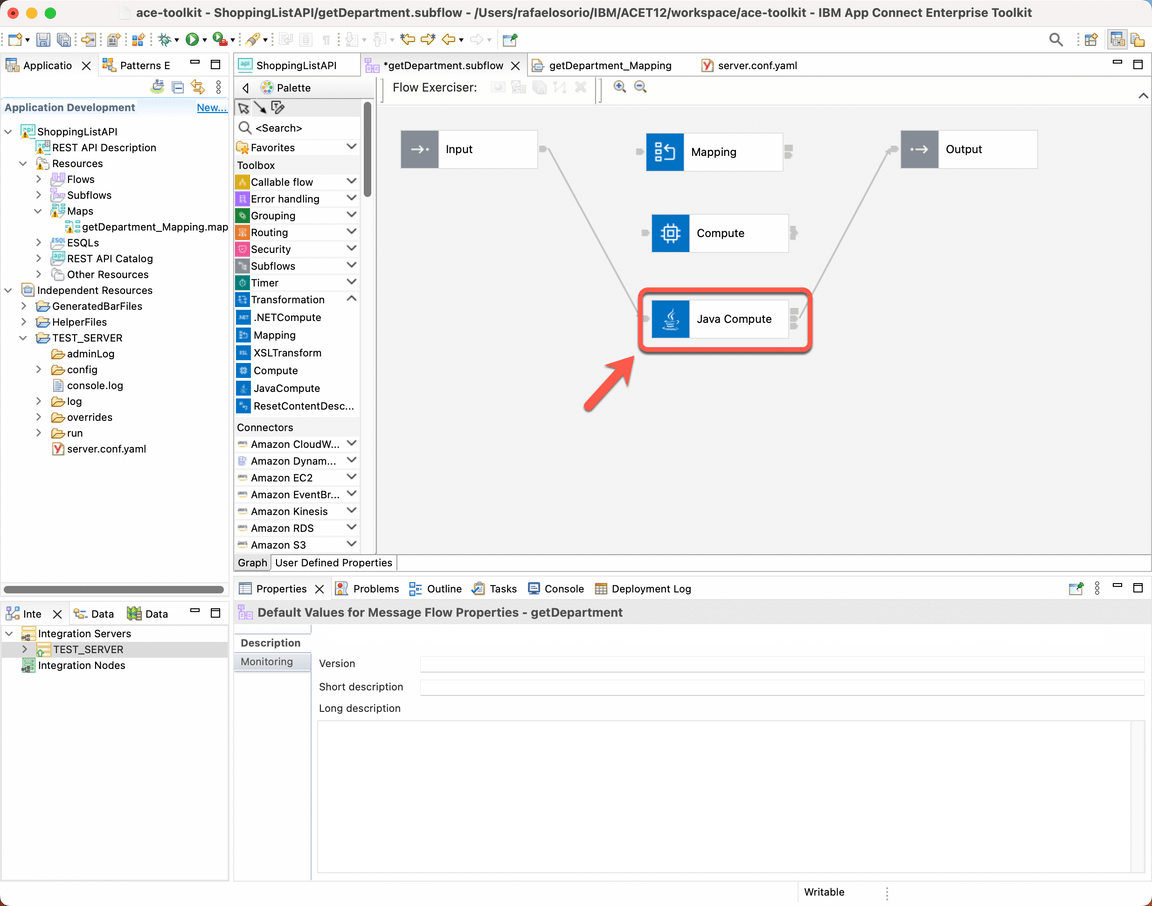
Readjust the connections of the Input and output node to connect to the Java Compute node (the out terminal of the Input node will be wired to the in terminal of the Java Compute node, and the out terminal of the Java Compute node will be wired to the in terminal of the Output node).
8.2. Create Java Compute node class
Narration
With the App Connect toolkit, they can use the same tool that they use to create Integration flow to create Java code. Alternatively, if they want to share Java classes across multiple solutions, they can store Java code in a shared library and refer to that library from one or more applications that contain message flows with JavaCompute nodes
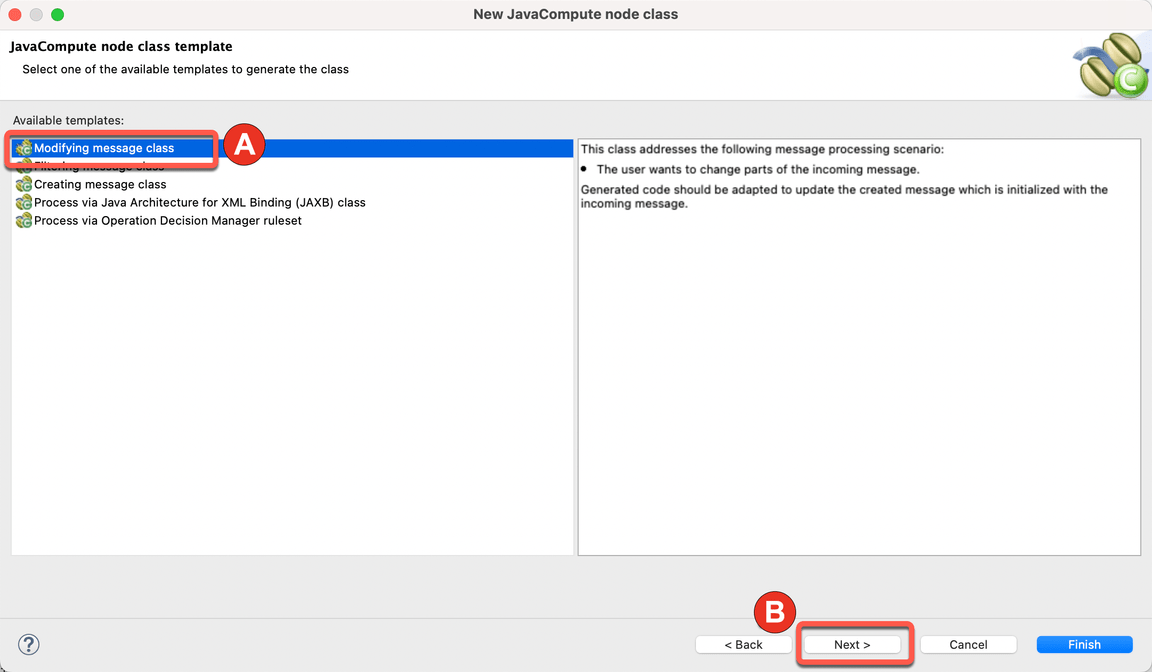
However, the developers decided to try the Java Compute node class wizard to create template code to accelerate the development process. They selected the Modifying message class template, and in few seconds, they have a skeleton java code to manipulate and transform the integration message.
Action 8.2.1.
Double click the Java Compute node.
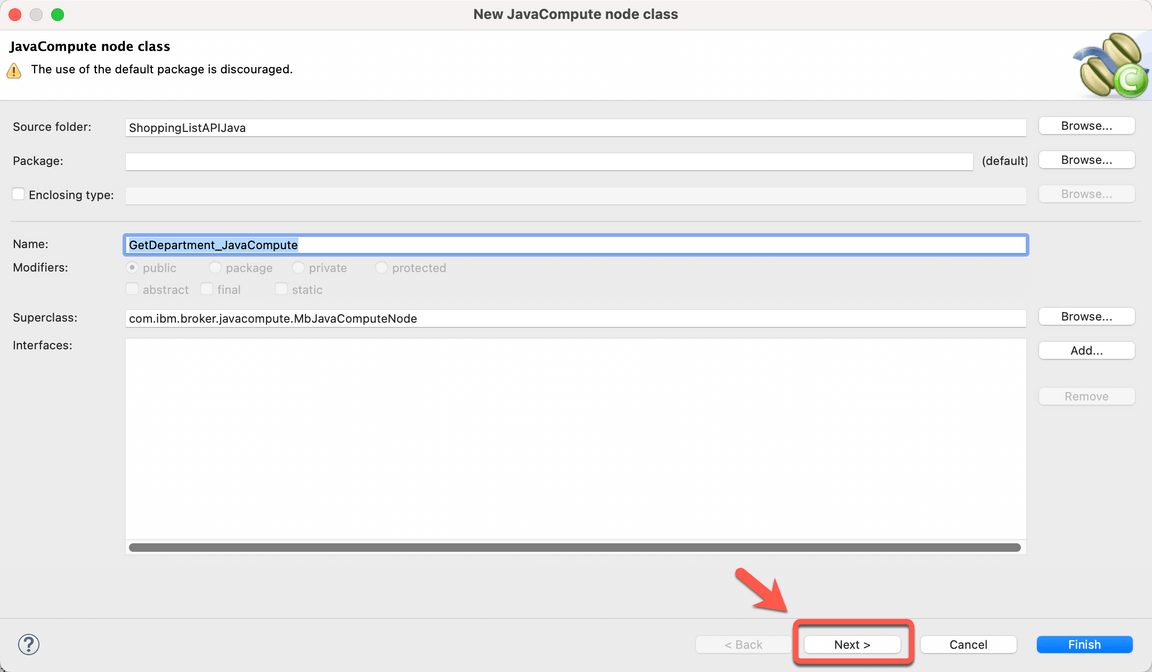
Action 8.2.2.
On the New JavaCompute node class dialog, accept the default values and click Next.
Action 8.2.3.
Select Modifying message class template (A) and click Next (B).
Action 8.2.4.
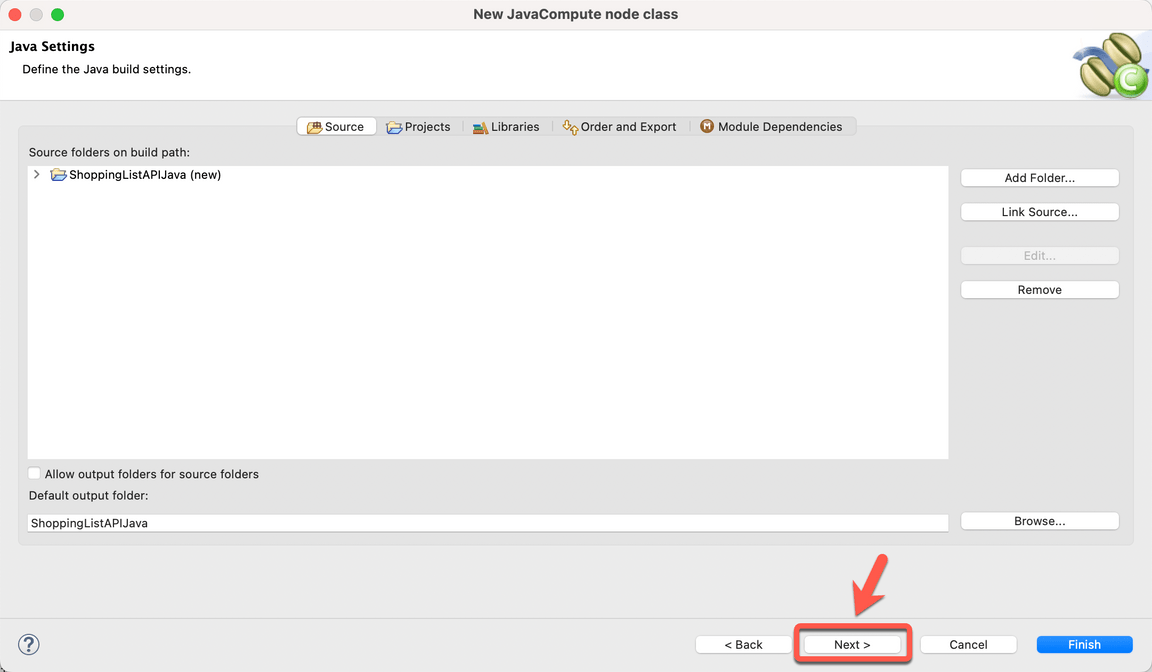
On the Java Settings view, accept the default values and click Next.
Action 8.2.5.
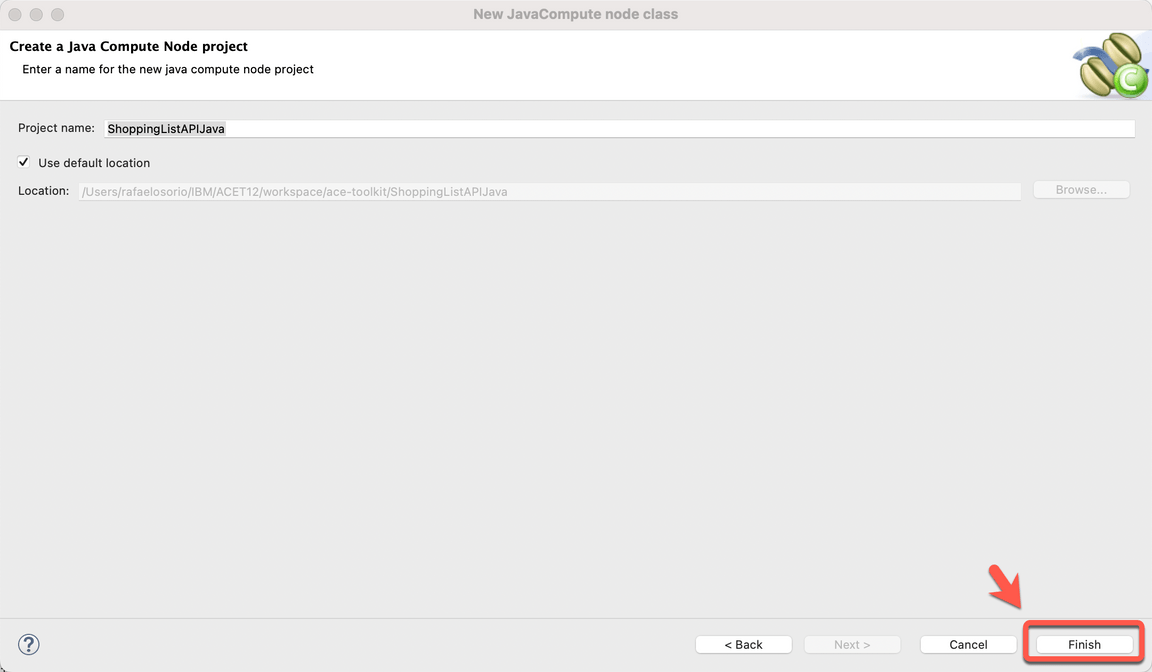
Accept the default Project name and click Finish.
8.3. Adding code
Narration
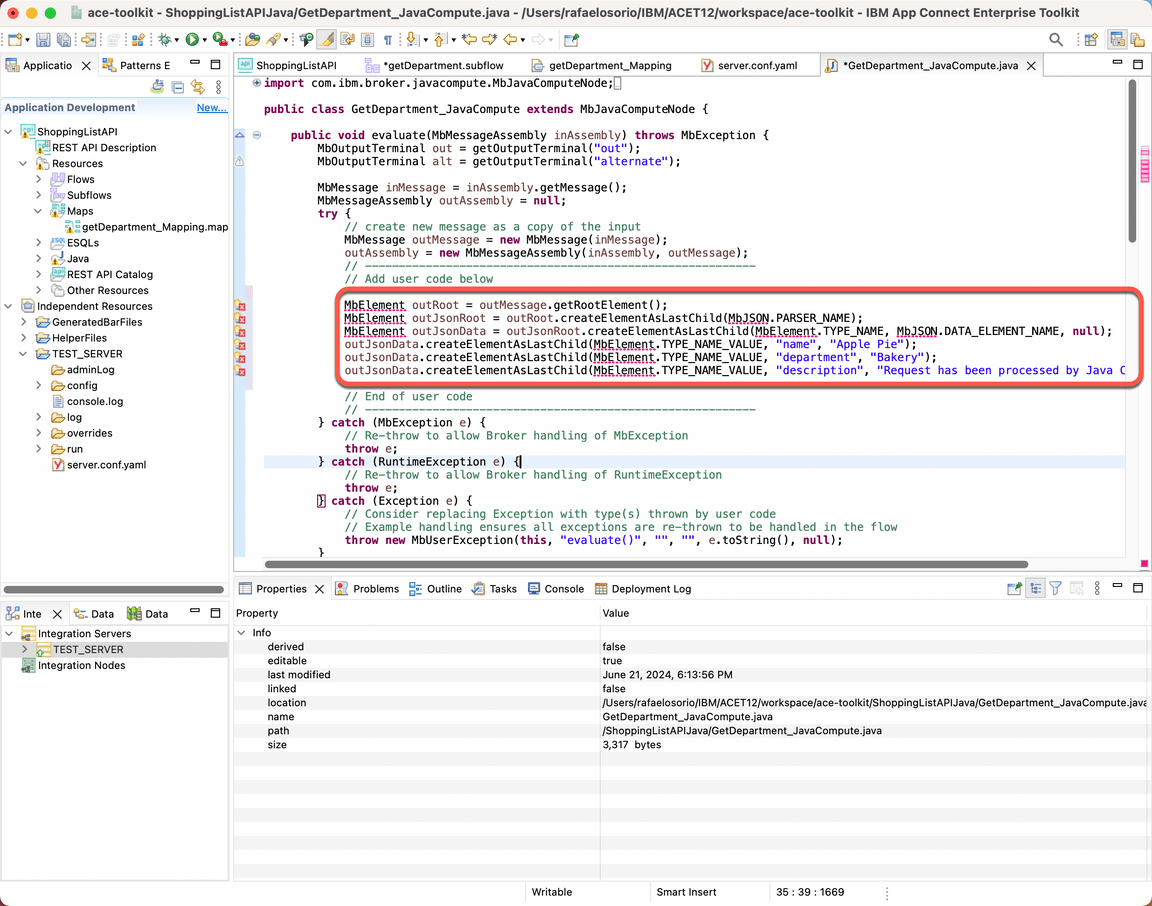
For this demo, they will only add a simple message code to create elements in the JSON message, for example add a new Apple Pie product item.
Action 8.3.1.
On the GetDepartment_JavaCompute class, copy and paste the code below, below the Add user code below comment.
MbElement outRoot = outMessage.getRootElement();MbElement outJsonRoot = outRoot.createElementAsLastChild(MbJSON.PARSER_NAME);MbElement outJsonData = outJsonRoot.createElementAsLastChild(MbElement.TYPE_NAME, MbJSON.DATA_ELEMENT_NAME, null);outJsonData.createElementAsLastChild(MbElement.TYPE_NAME_VALUE, "name", "Apple Pie");outJsonData.createElementAsLastChild(MbElement.TYPE_NAME_VALUE, "department", "Bakery");outJsonData.createElementAsLastChild(MbElement.TYPE_NAME_VALUE, "description", "Request has been processed by Java Compute Node.");
Action 8.3.2.
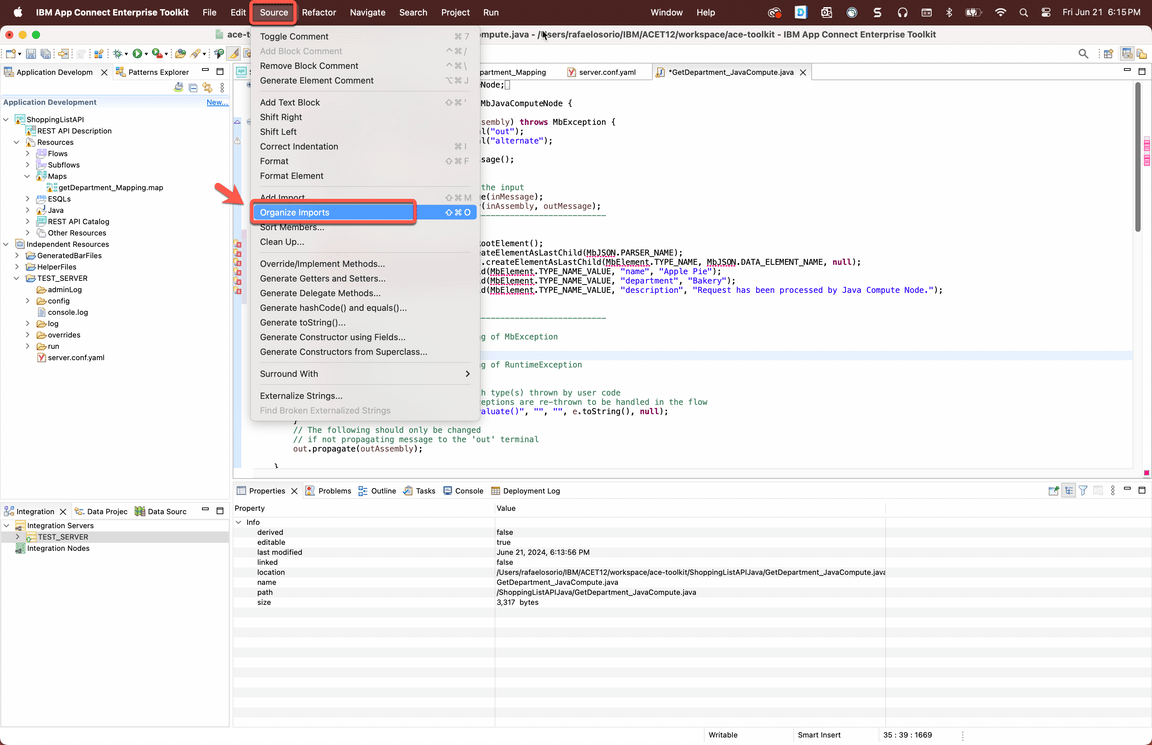
To solve the imports issue, click on Source > Organize Imports menu.
Action 8.3.3.
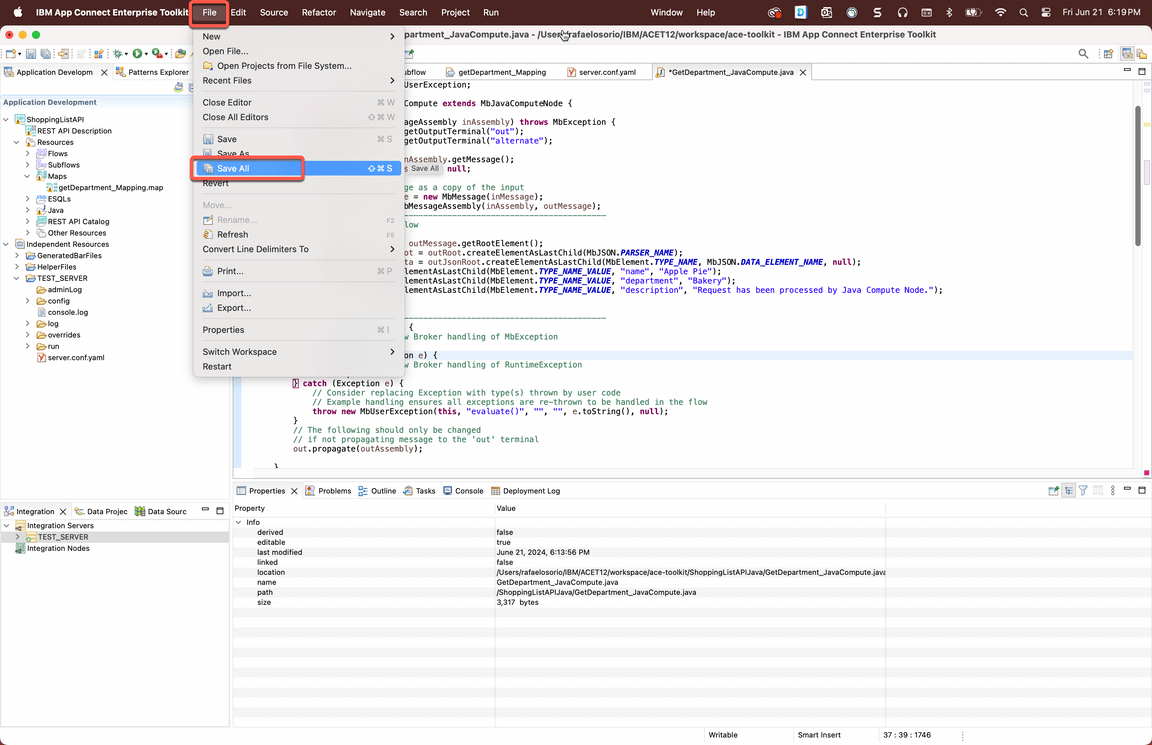
Click File > Save All.
Action 8.3.4.
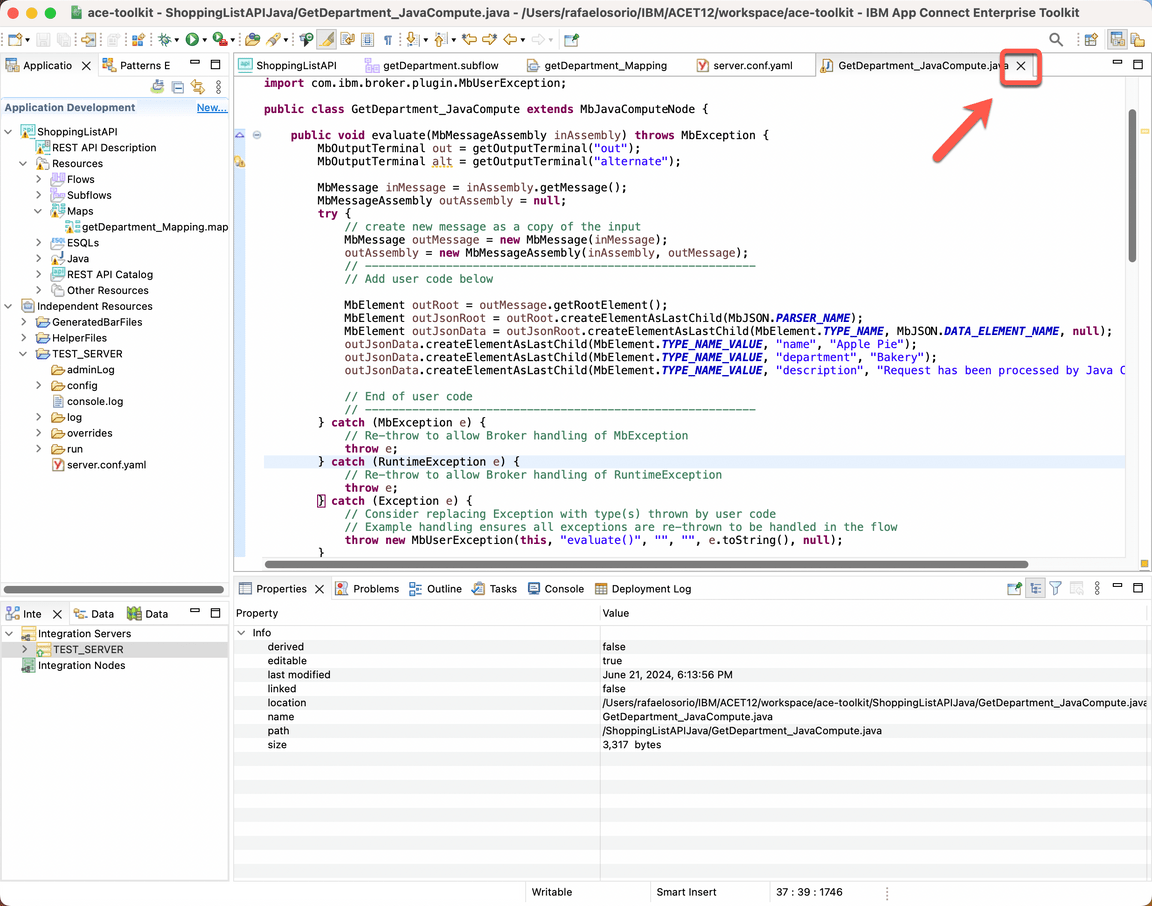
Close the Java class.
8.4. Test Java Compute node
Narration
At this moment, the Focus Integration experts are ready to test the new API using the JavaCompute node. They just need to redeploy the API and use the Web User Interface again to test it.
Now, they will test using the Bakery department only.
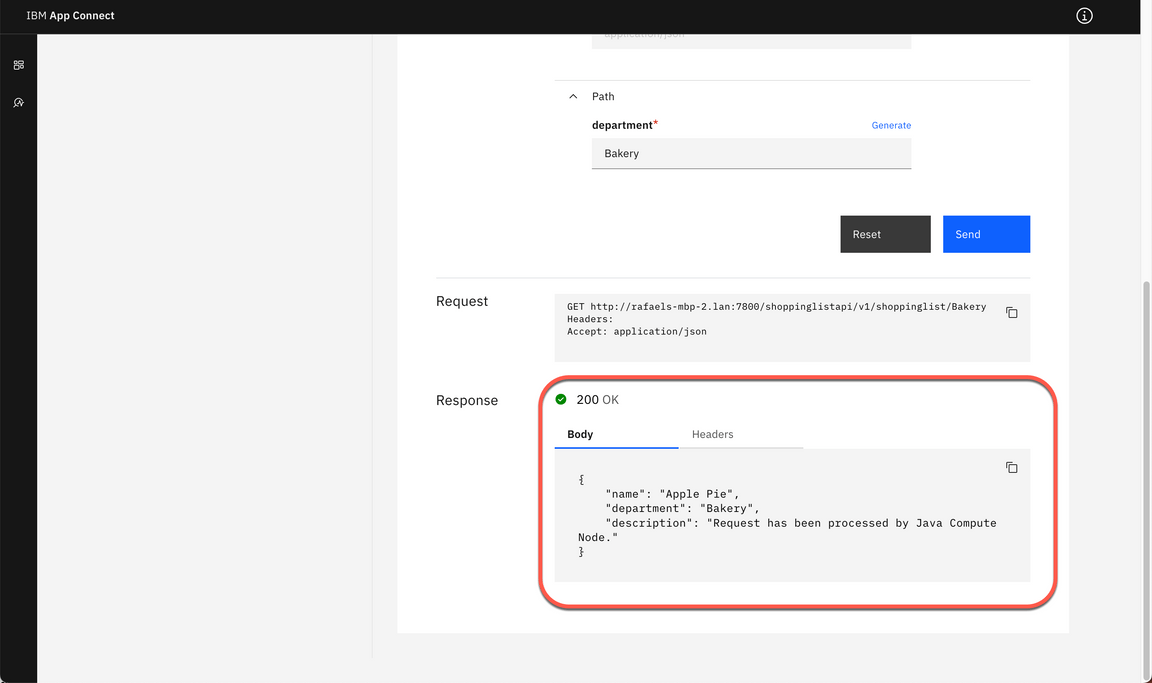
Great, the subflow was invoked and our java compute transformation created a response with our hard coded Apple Pie product. The Focus team verified how simple it is to use Java code to implement message transformation.
Action 8.4.1.
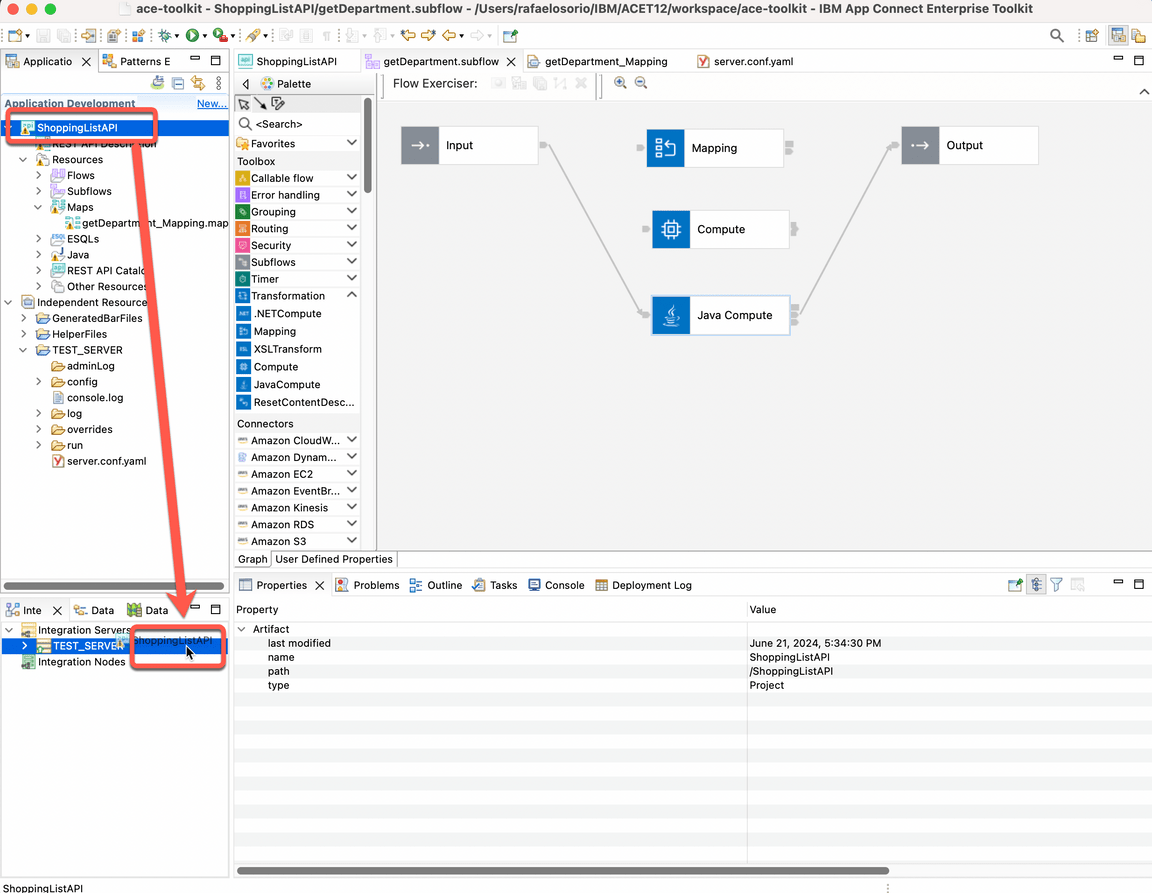
Re-deploy the REST API, by dragging and dropping the ShoppingListAPI again from the Application Development view on to the TEST_SERVER Integration Server.
Action 8.4.2.
On the Progress Information dialog, click Close.
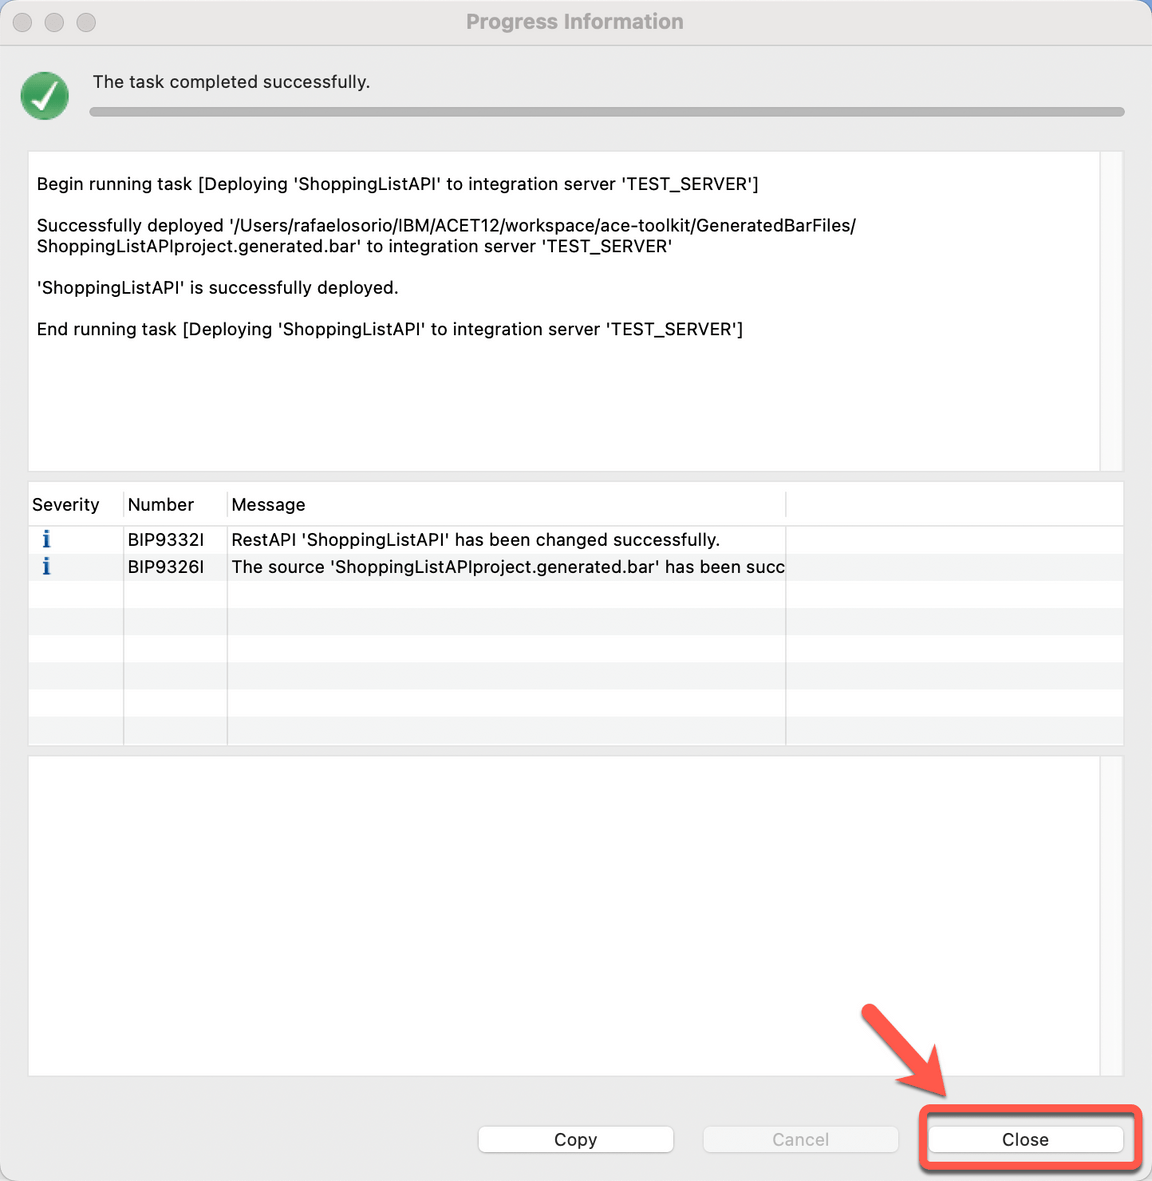
Action 8.4.3.
On your browser, refresh the Web User Interface page.
Action 8.4.4.
Open again the ShoppingListAPI (A), GET /shoppinglist/{department} (B), Try it tab (C).
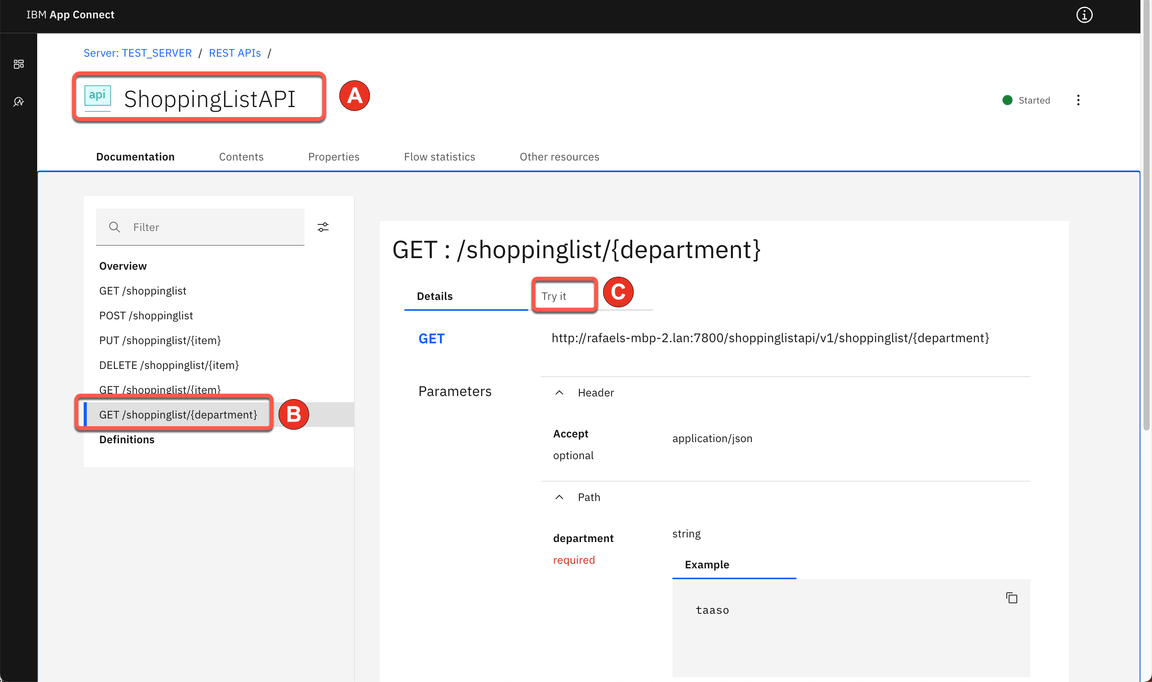
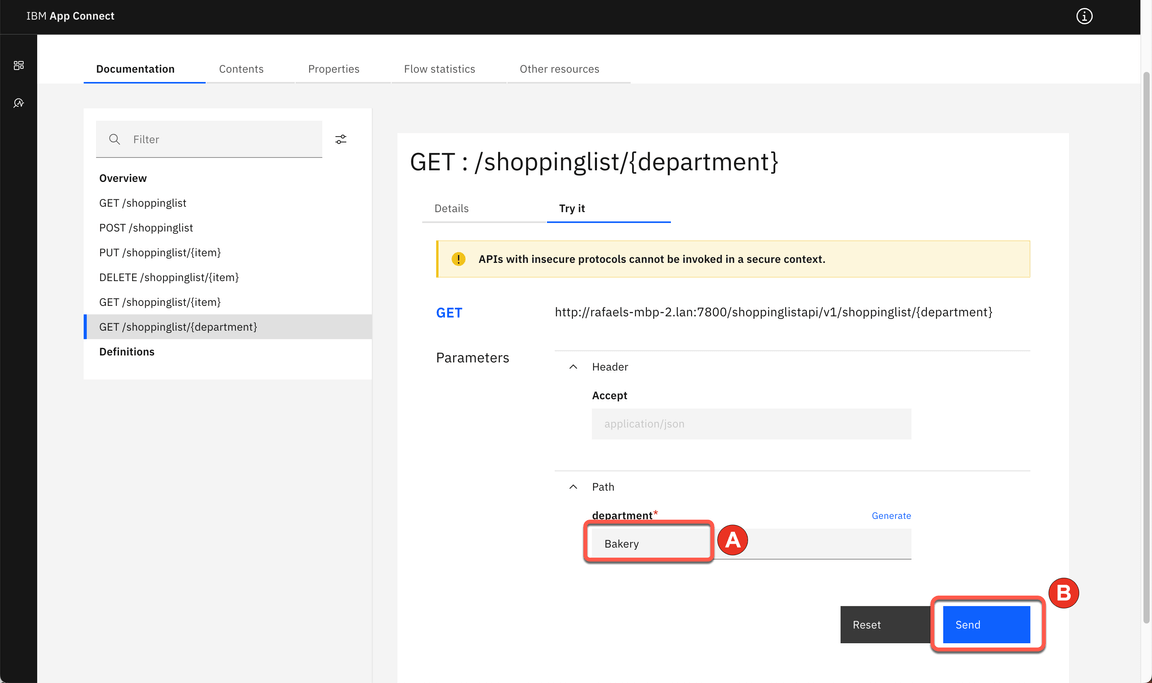
Action 8.4.5.
Enter Bakery as department name (A). Click Send (B).
Action 8.4.6
Show the Response body.
9. Add Route
9.1. Adding Route node
Narration
Finally, they want to see how they can route messages through different paths in a message flow, based on the content of the message using a Route node.
Focus Integration experts decided to add a route node to route messages through all different transformation nodes based on the department parameter. The idea is to redirect to Mapping node only messages to Candies department, redirect to Compute node only messages to Snacks department and redirect to Java node only messages to Bakery department.
Let’s see how to do it!
Action 9.1.1.
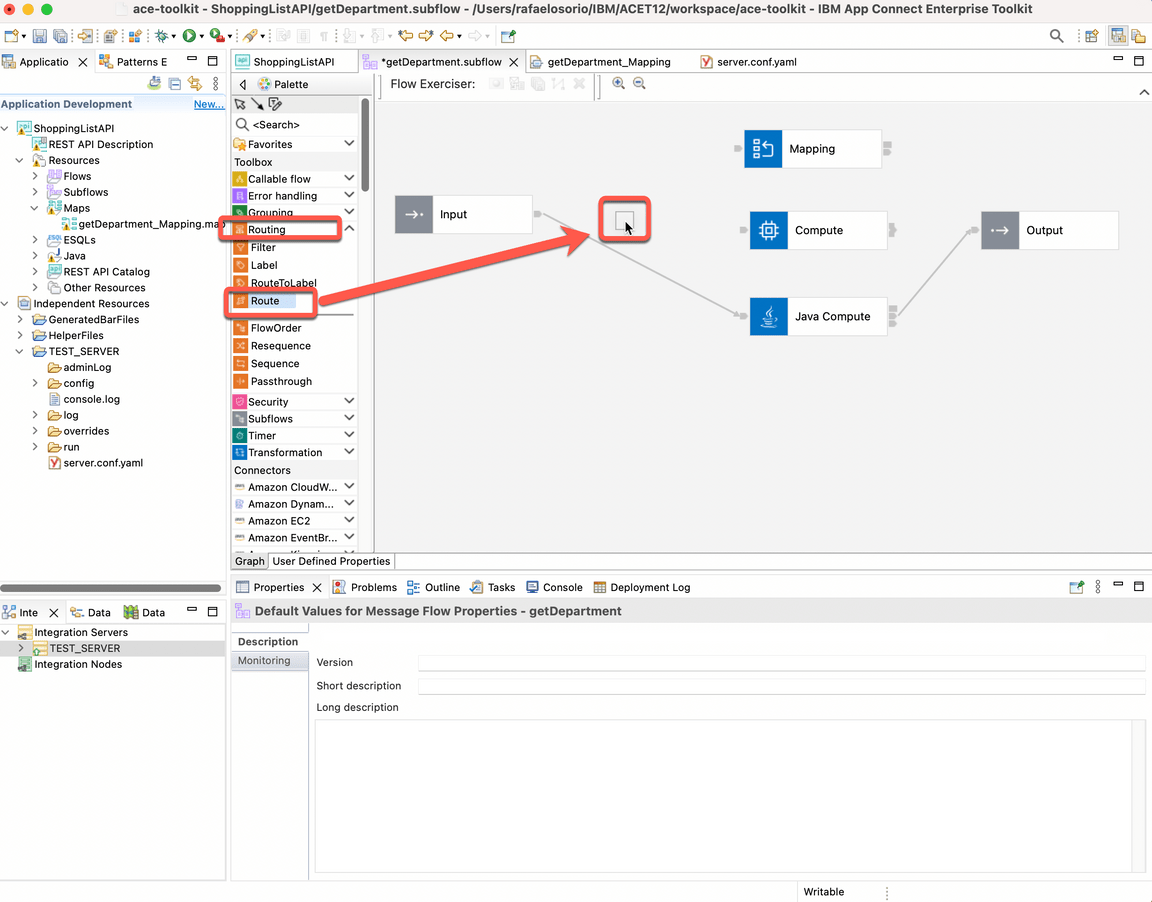
Back to the getDepartment subflow, open the Routing menu and drag and drop a Route node.
Action 9.1.2.
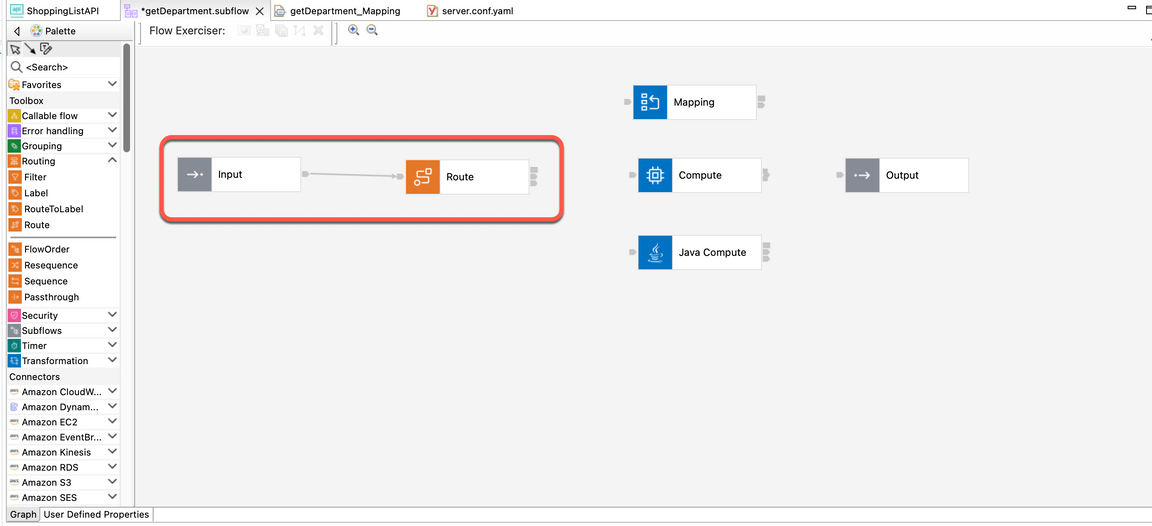
Delete all existing wiring and connect the Input node to the new Route node.
9.2. Renaming Match output terminal
Narration
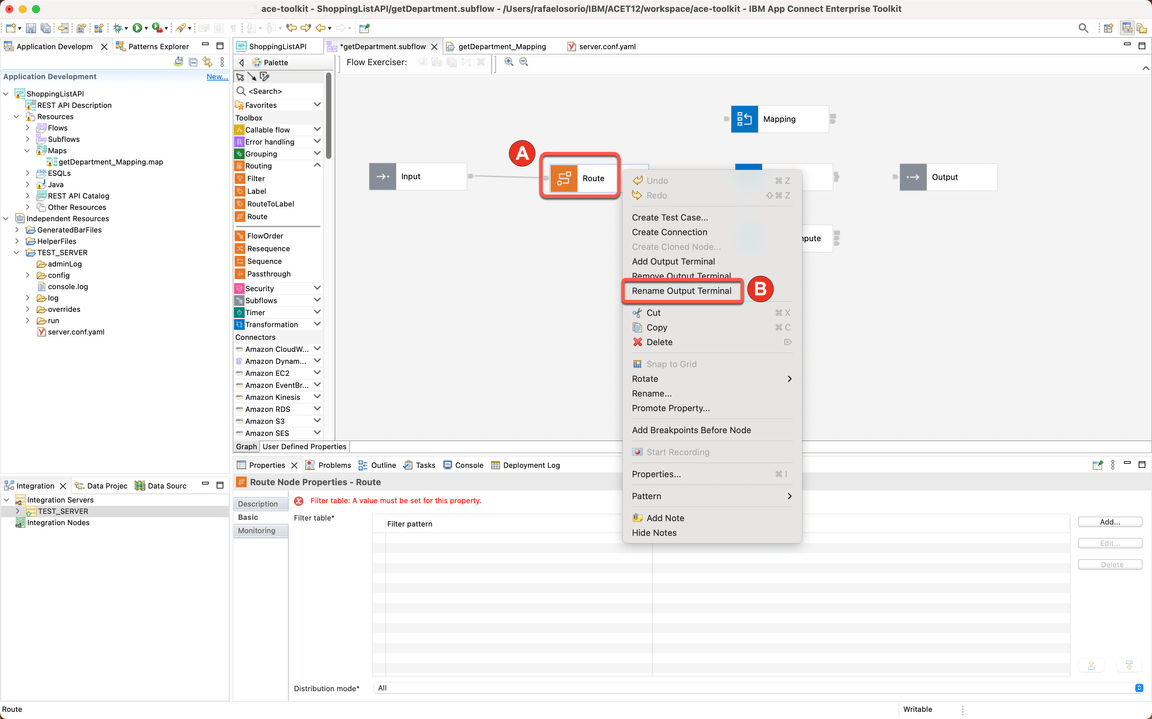
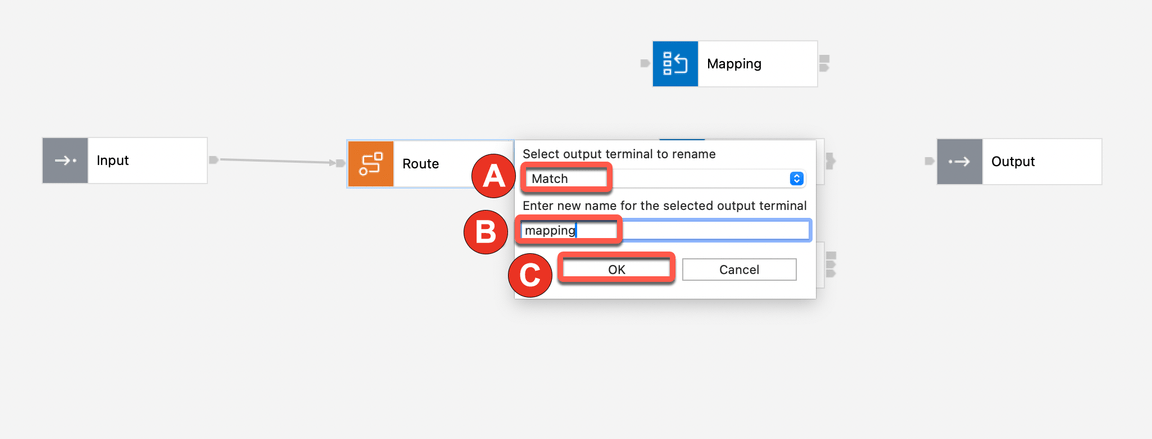
Initially, they need to rename the existing Match output terminal to mapping. And connect this terminal with the Mapping node.
Action 9.2.1.
Right click on Route node (A) and select Rename Output Terminal (B).
Action 9.2.2
On Select output terminal to rename field, select Match (A). In the Enter new name for the selected output terminal, enter mapping (B). Then click OK (C).
Action 9.2.3.
Wire the mapping output terminal from Route node to the in terminal of the Mapping node.

9.3. Creating new output terminal
Narration
Second, they need to create two more output terminals to the compute and java transformation nodes. Connect these terminals to the Compute and JavaCompute nodes.
Action 9.3.1.
Right click on Route node (A) and select Add Output Terminal (B).
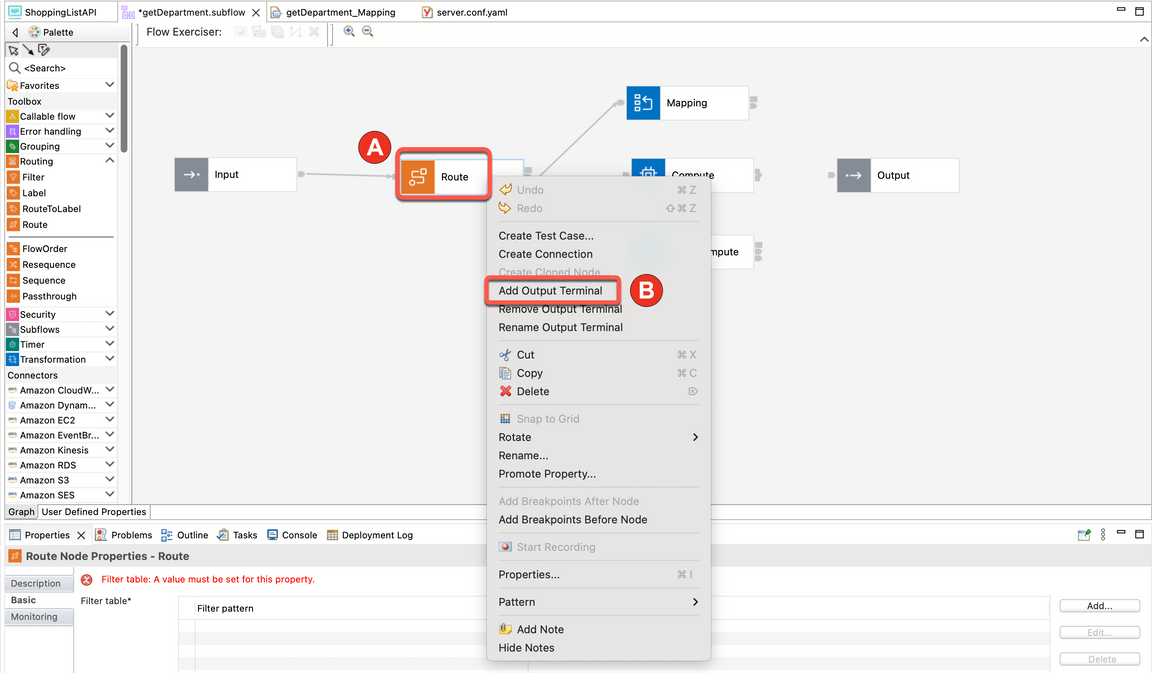
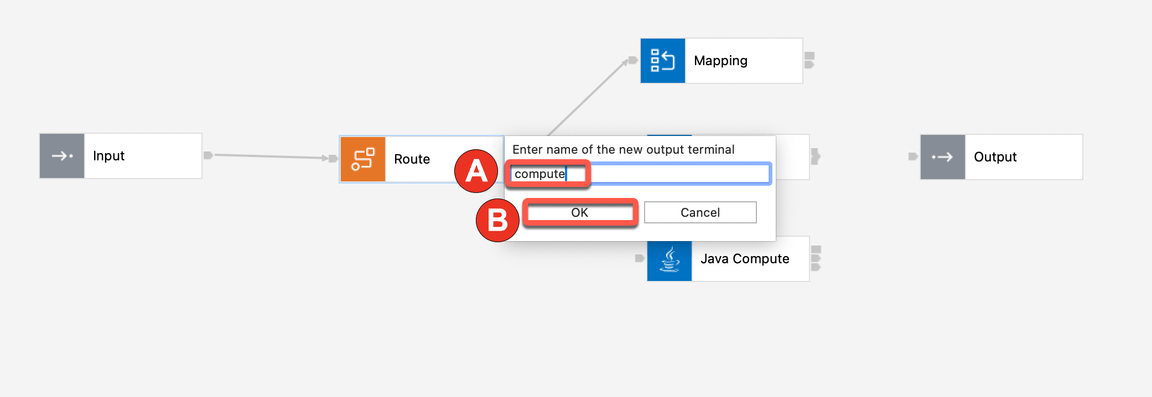
Action 9.3.2.
Enter compute as the name of the new output terminal (A) and click OK (B).
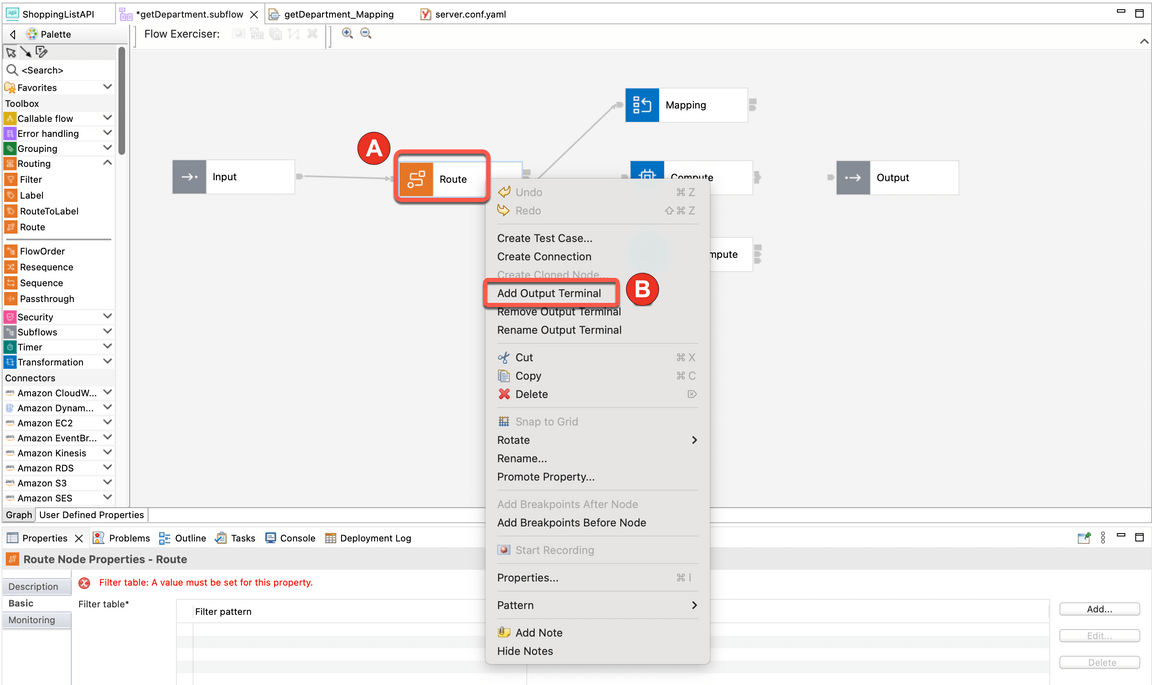
Action 9.3.3.
Repeat the same steps to create the java terminal: Right click on Route node (A) and select Add Output Terminal (B).
Action 9.3.4.
Enter java as the name of the new output terminal (A) and click OK (B).

Action 9.3.5.
Wire the compute output terminal from Route node to the in terminal of the Compute node.
Note: if you click the output terminals from Route, you will see a dialog to select the terminal that you want to wire.

Action 9.3.6.
Repeat the same steps to wire the java output terminal from Route node to the in terminal of the Java Compute node.
Note: if you click the output terminals from Route, you will see a dialog to select the terminal that you want to wire.

9.4. Adding filter patterns
Narration
Great! Now, they are ready to define the filter table. The Route node uses XPath expressions to control processing.
Focus developers define the three XPath expressions, one for each transformation node. The filter table map the XPath with the specific output terminal. The XPath is checking the department parameter value for each department.
Action 9.4.1.
Click on the Route node.

Action 9.4.2.
On the Filter table, click Add button.
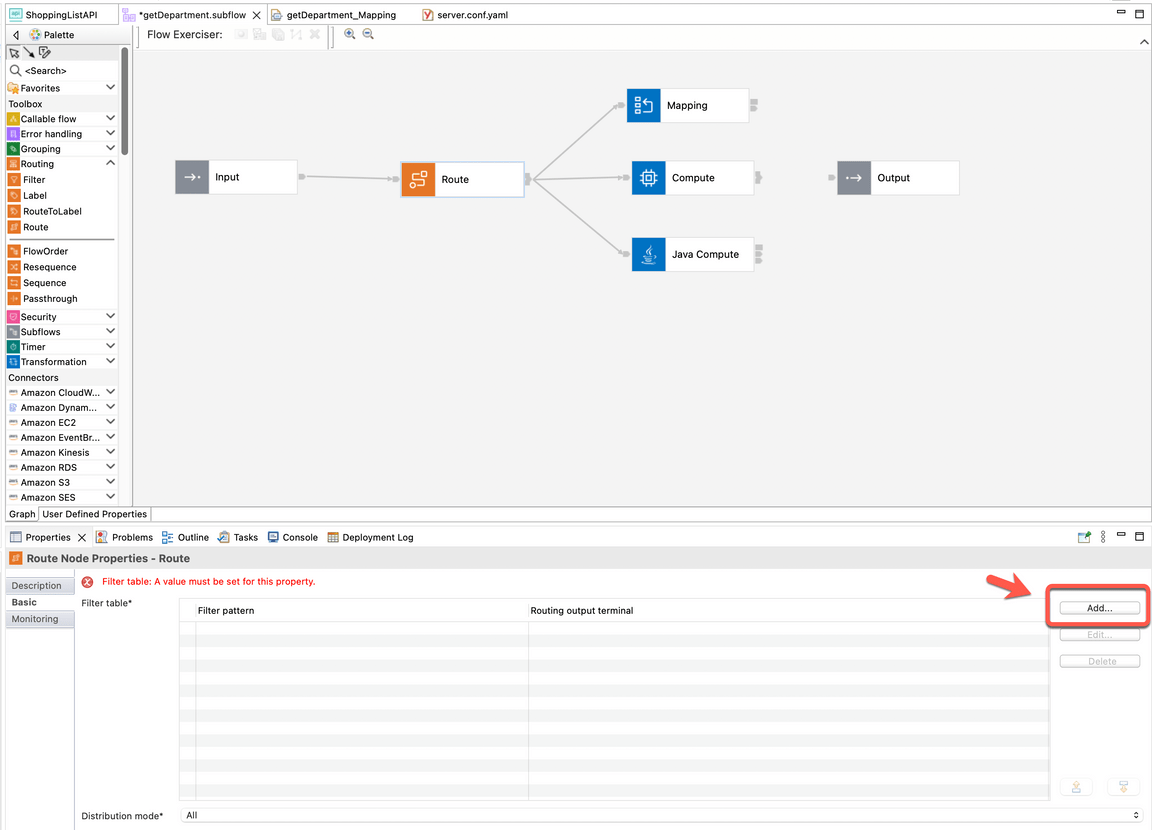
Action 9.4.3.
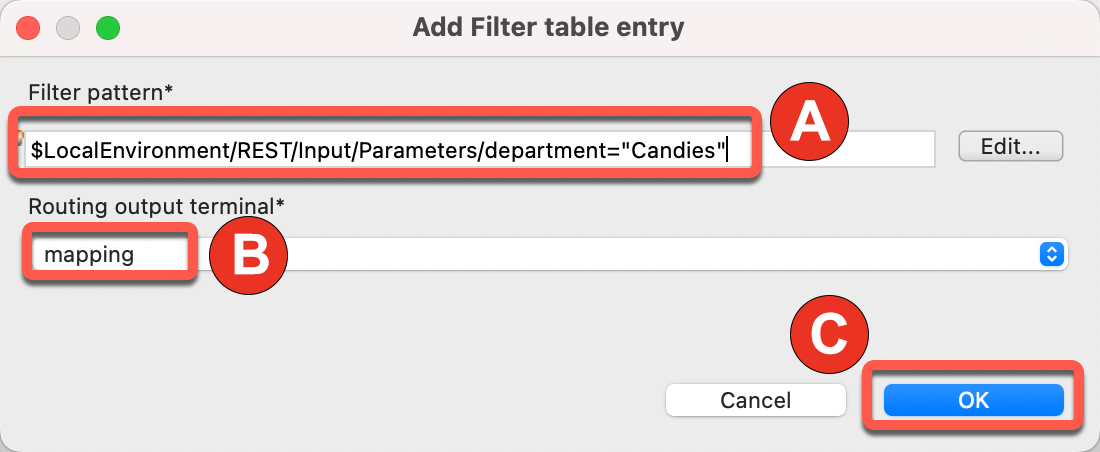
Enter $LocalEnvironment/REST/Input/Parameters/department=“Candies” in the Filter pattern field (A) and select mapping as the Routing output terminal (B). Then click OK (C).
Note: During the copy and paste you should have some issues with “ “, because of that, we recommend typing the “ “ again in the Filter pattern field.
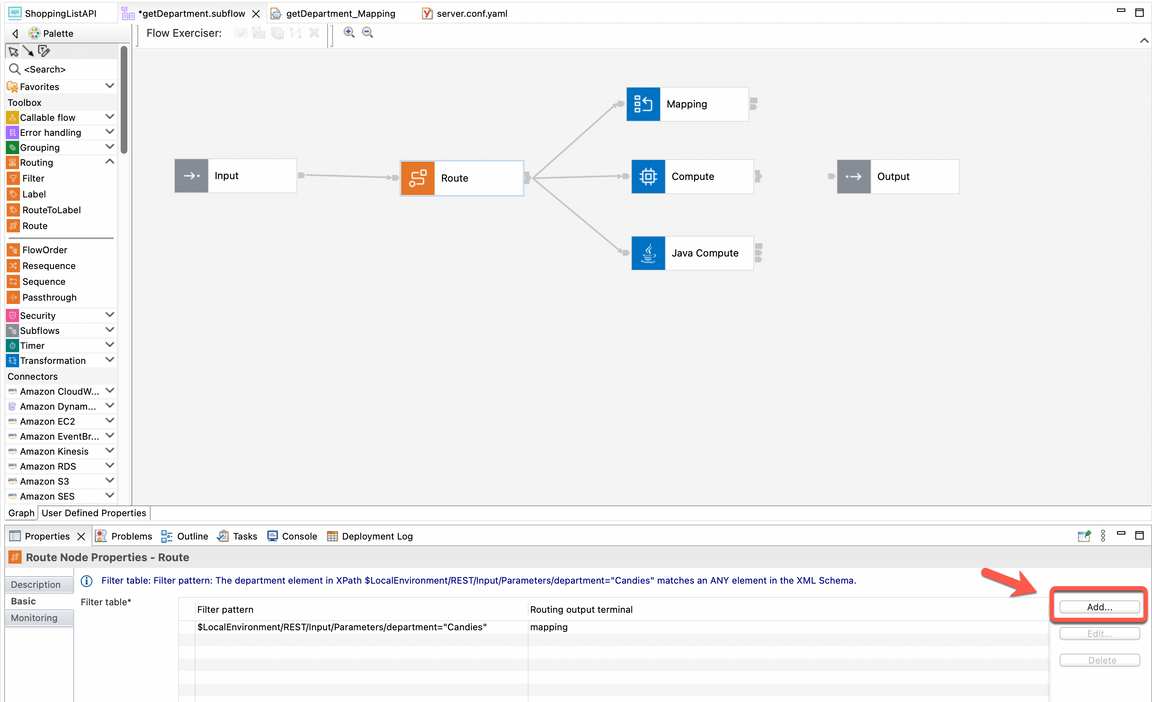
Action 9.4.4.
Click Add button again.
Action 9.4.5.
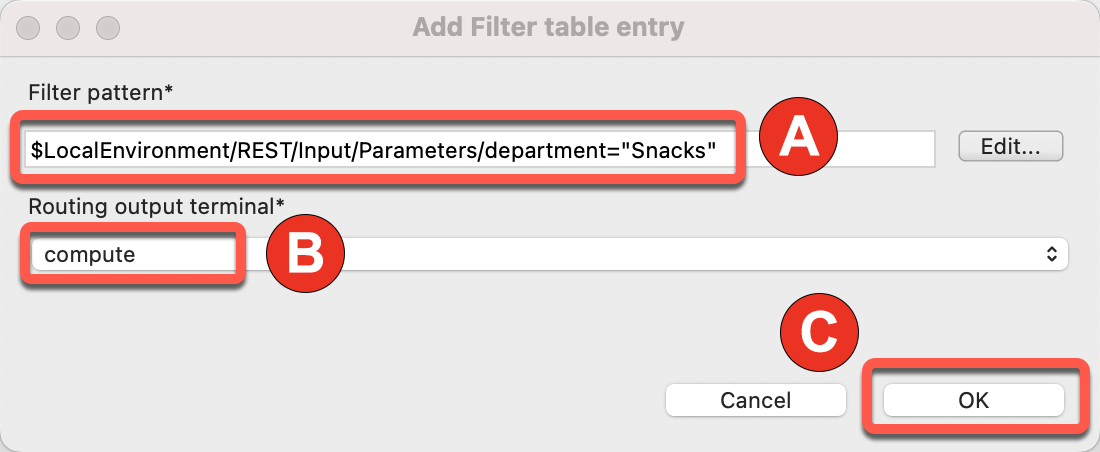
Enter $LocalEnvironment/REST/Input/Parameters/department=“Snacks” in the Filter pattern field (A) and select compute as the Routing output terminal (B). Then click OK (C).
Note: During the copy and paste you should have some issues with “ “, because of that, we recommend typing the “ “ again in the Filter pattern field.
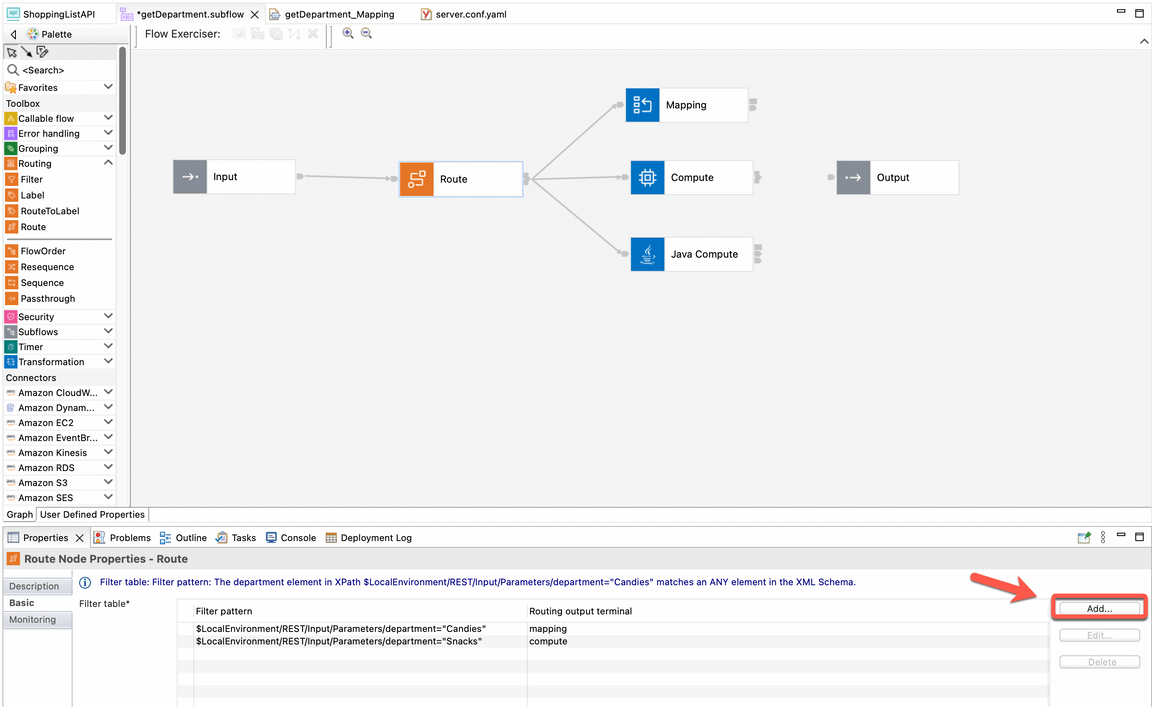
Action 9.4.6.
Click Add button again.
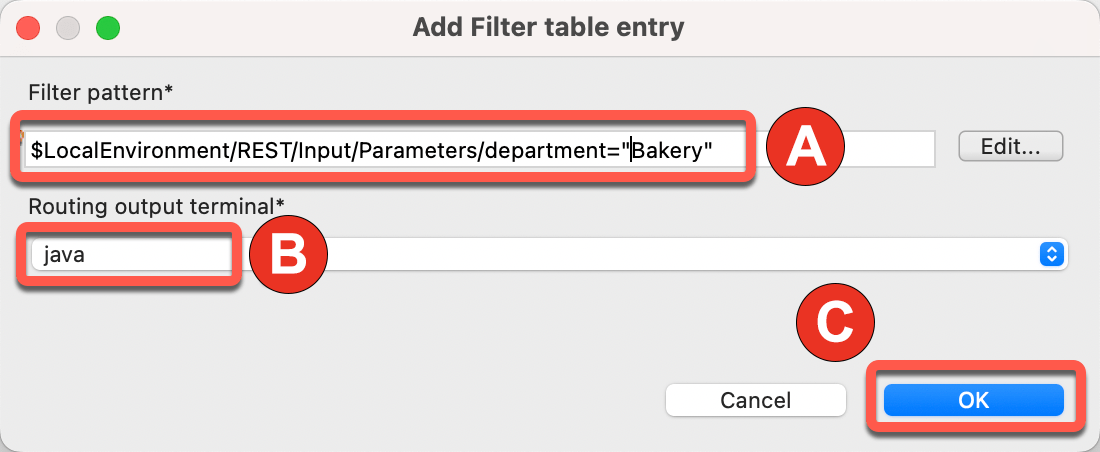
Action 9.4.7.
Enter $LocalEnvironment/REST/Input/Parameters/department=“Bakery” in the Filter pattern field (A) and select java as the Routing output terminal (B). Then click OK (C).
Note: During the copy and paste you should have some issues with “ “, because of that, we recommend typing the “ “ again in the Filter pattern field.
9.5. Connecting nodes
Narration
Finally, the Focus team connects all the nodes to finalize the flow.
Action 9.5.1.
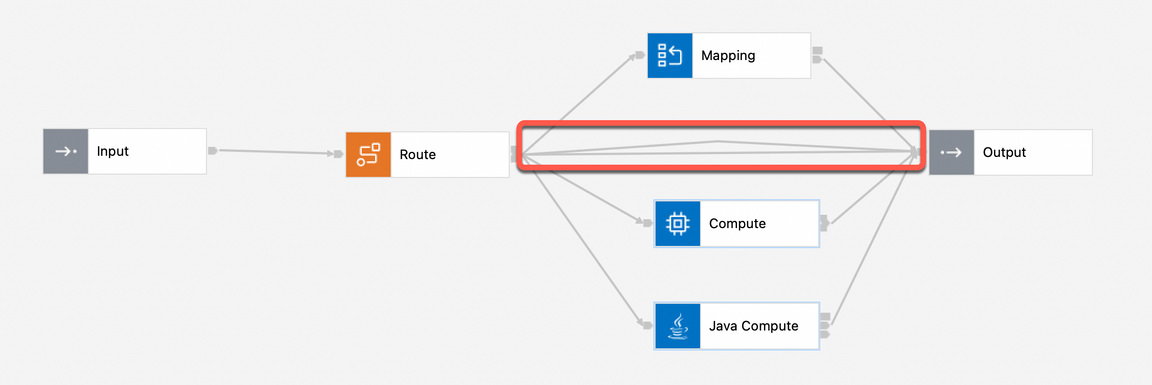
Wire the out terminal of Mapping, Compute and Java Compute nodes to the in terminal of the Output node.

Action 9.5.2.
Wire the default and failure terminal of Route node to the in terminal of the Output node.
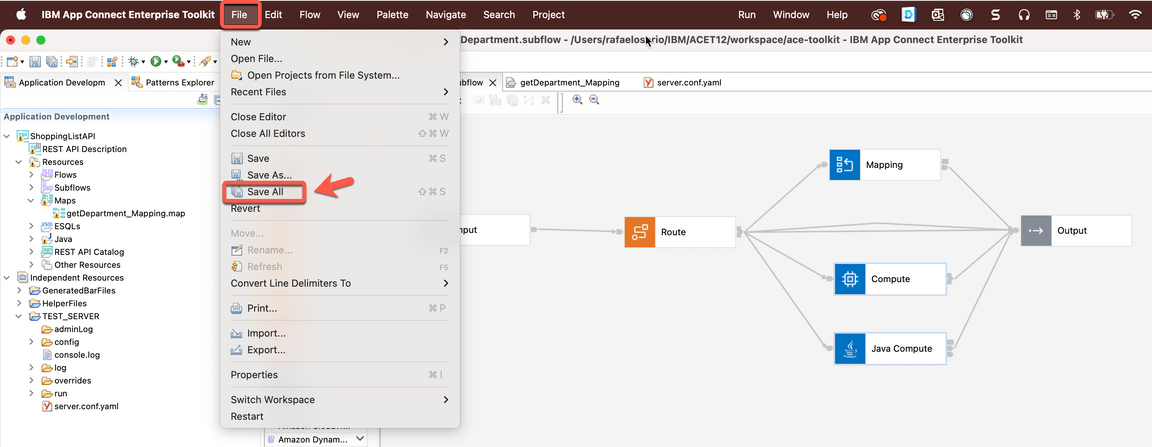
Action 9.5.3.
Click File > Save All.
9.6. Test Route node
Narration
At this stage, the Focus Integration experts are ready to test the new API using the route node. They just need to redeploy the API and use the Web User Interface again to test it.
Now, they will test using all three departments: Candies, Bakery and Snacks.
Great, the subflow was invoked and the message is routed through all different transformation nodes based on the department parameter.
Action 9.6.1.
Re-deploy the REST API, by dragging and dropping the ShoppingListAPI again from the Application Development view on to the TEST_SERVER Integration Server.
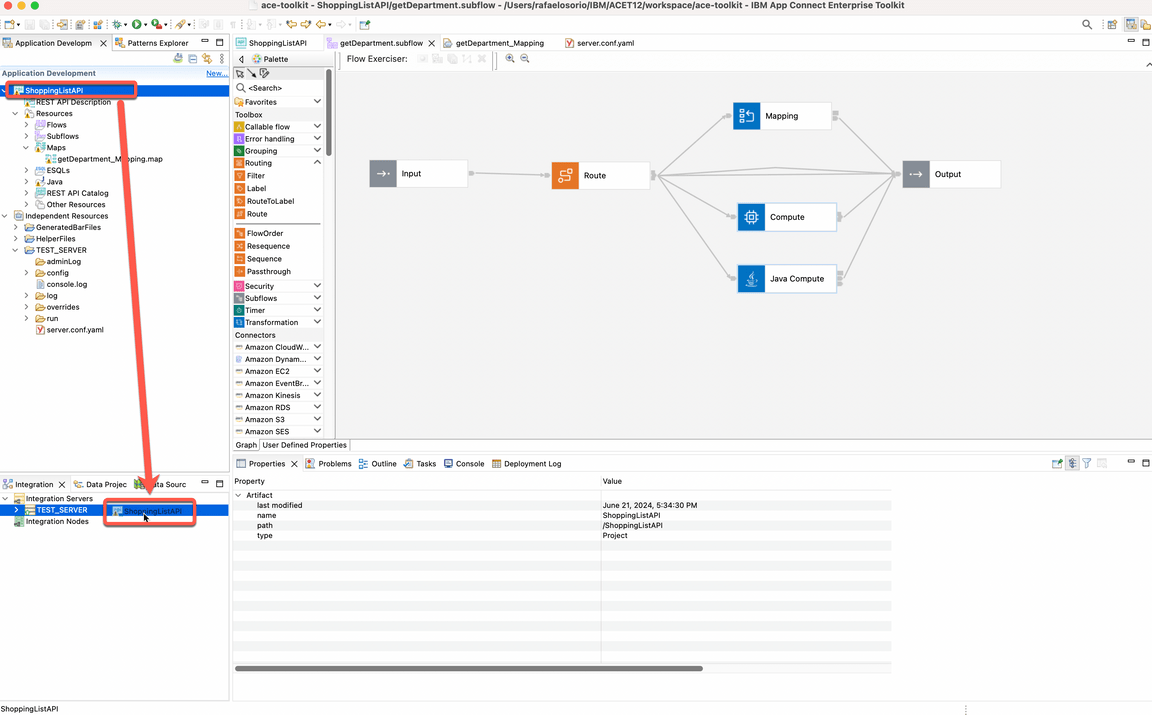
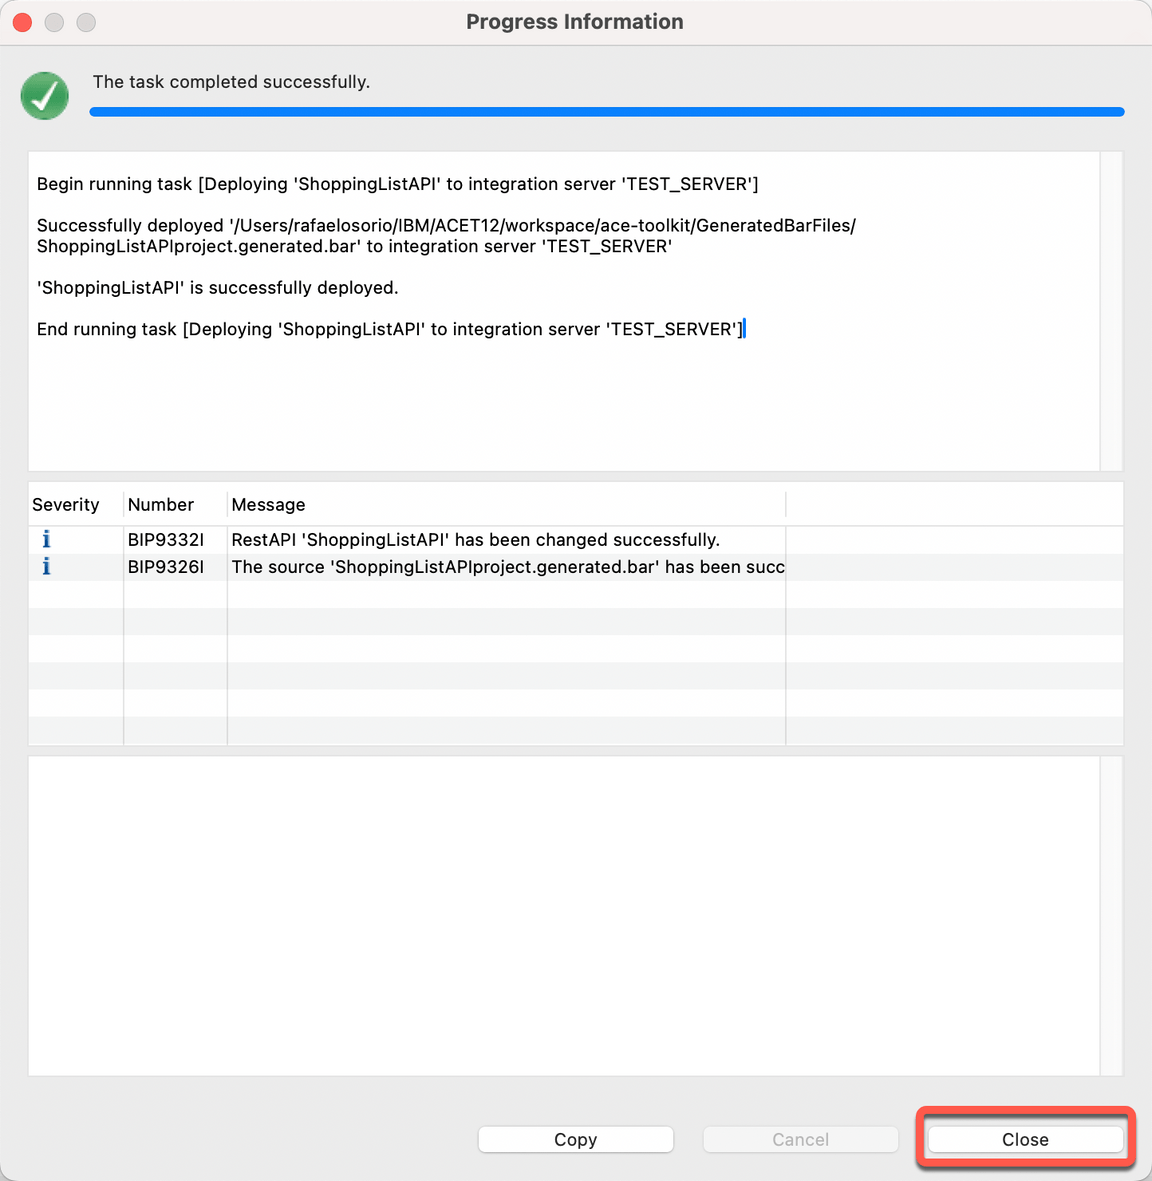
Action 9.6.2.
On the Progress Information dialog, click Close.
Action 9.6.3.
On your browser, refresh the Web User Interface page.
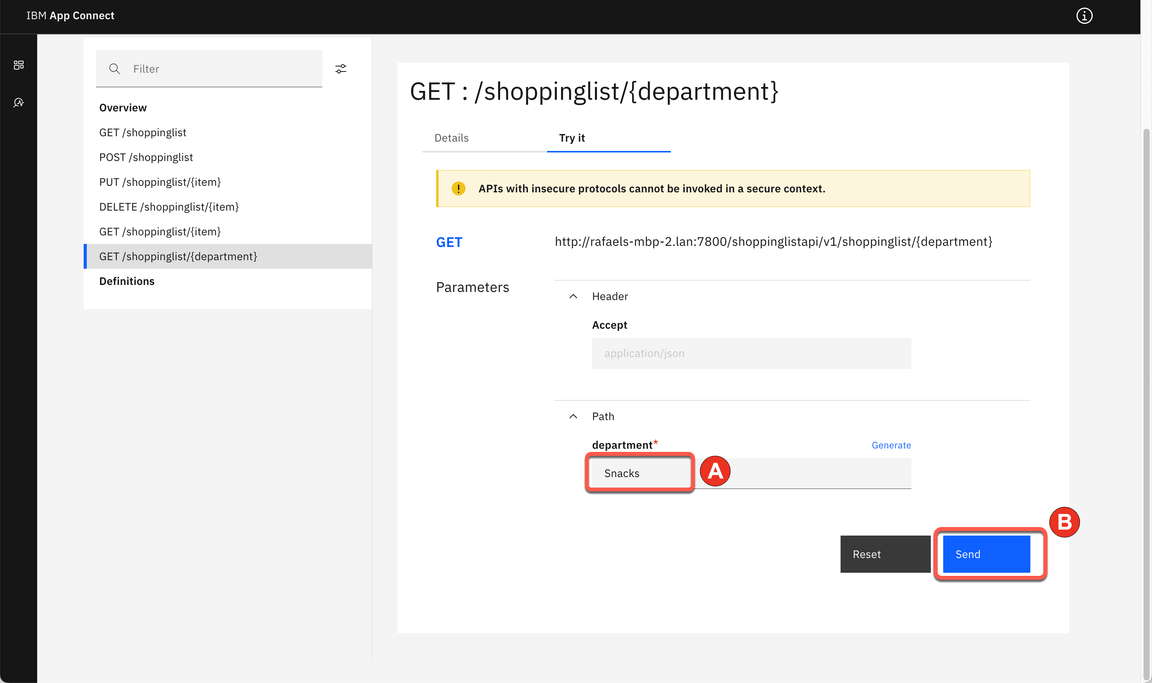
Action 9.6.4.
Open again the ShoppingListAPI (A), GET /shoppinglist/{department} (B), Try it tab (C).

Action 9.6.5.
Enter Candies (or Bakery, or Snacks) as department name (A). Click Send (B).
Note: You are welcome to try any of the three departments.
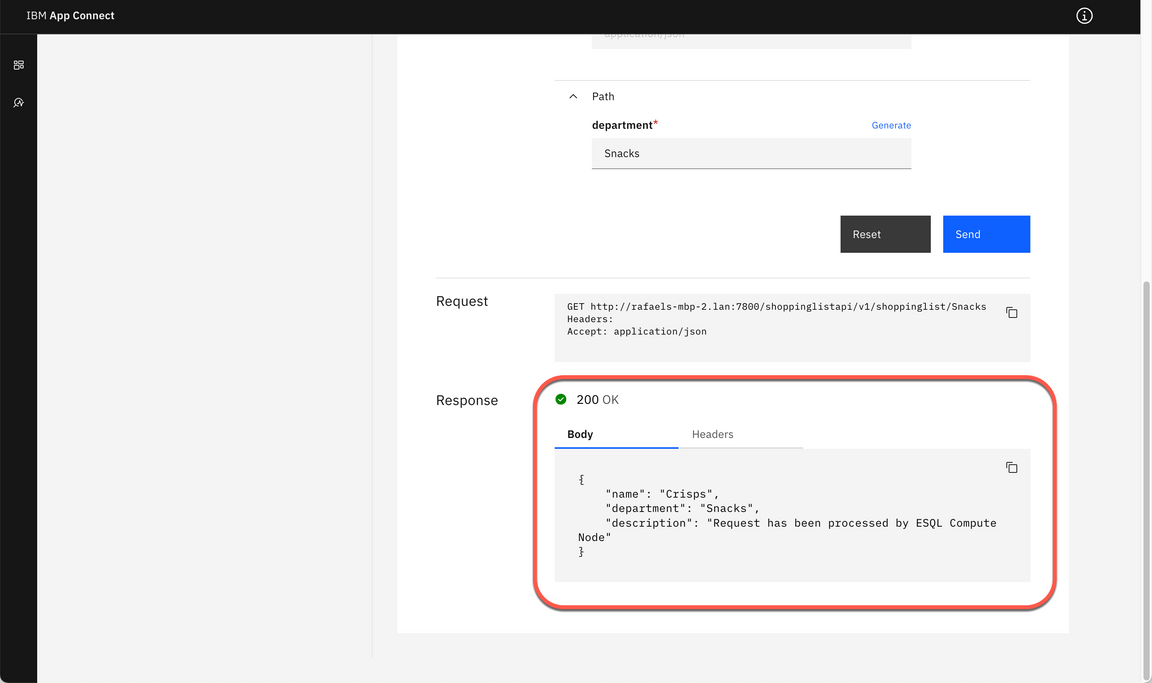
Action 9.6.6.
Show the Response body and show that each department is processed by different Transformation node (show the description field).
10. Test on App Connect Enterprise
10.1. Exporting BAR File
Narration
At this stage, the Focus team is ready to deploy their Integration flow in an App Connect Server. They just need to generate a BAR (broker archive) file. The App Connect Enterprise server uses BAR files to save compiled message flows, libraries, and other elements critical to the Integration flow.
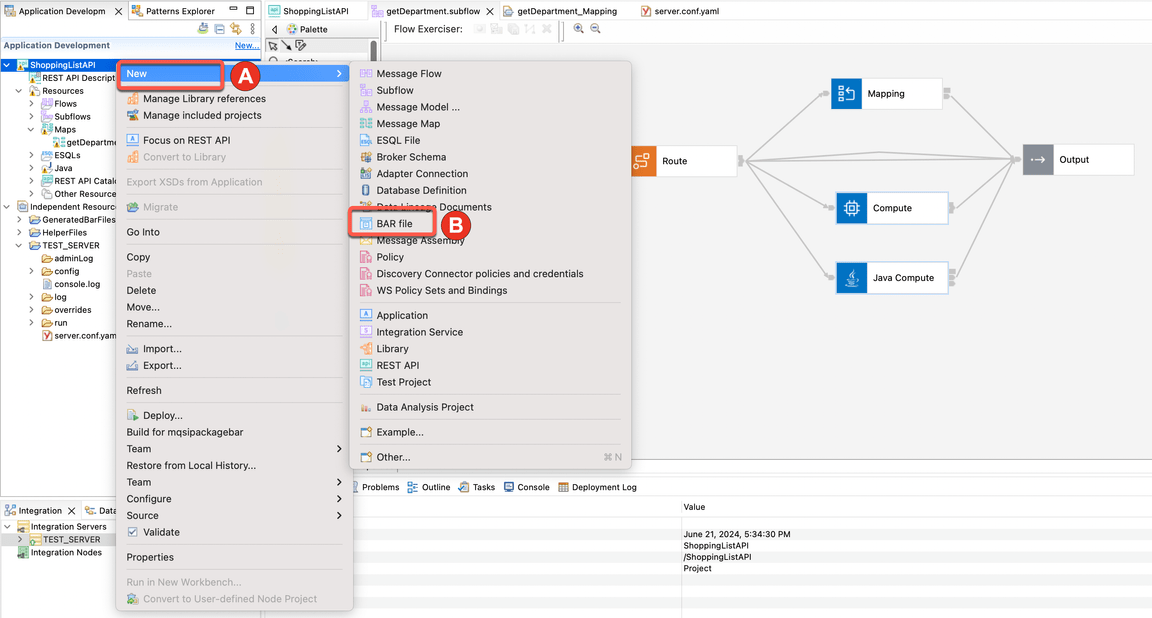
Action 10.1.1.
Right click the ShoppingListAPI (A) and choose New > BAR file (B).
Action 10.1.2.
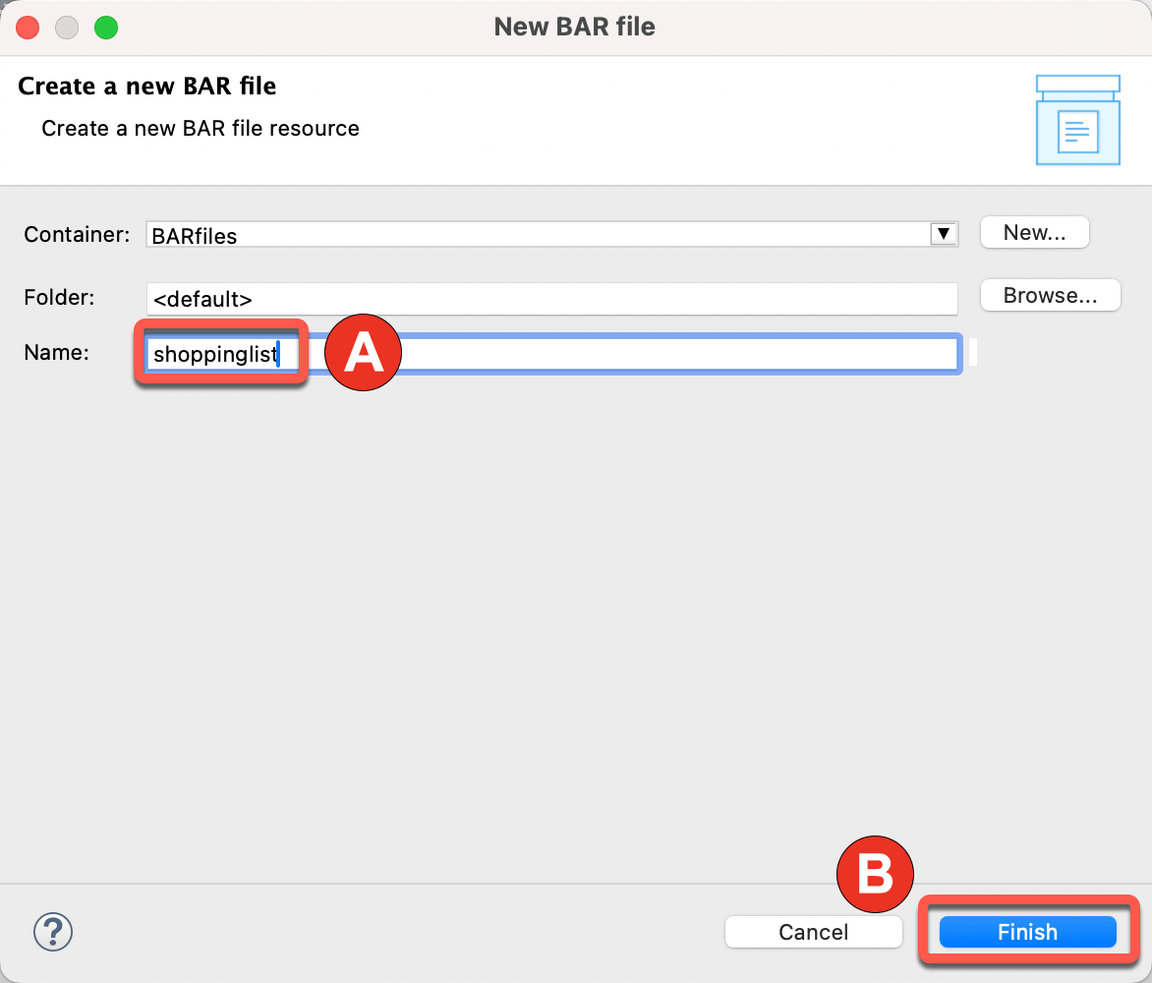
On the New Bar file dialog, type shoppinglist as the bar file name (A) and click Finish (B).
Action 10.1.3.
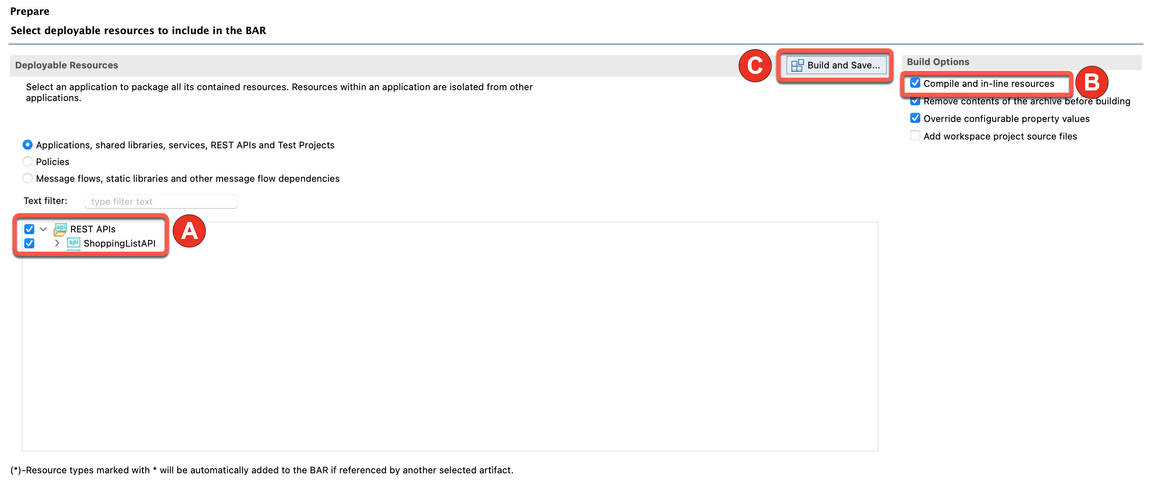
On the Prepare screen, mark the REST APIs checkbox (A). Check Compile and in-line resources (B). Click Build and Save (C).
Action 10.1.4.
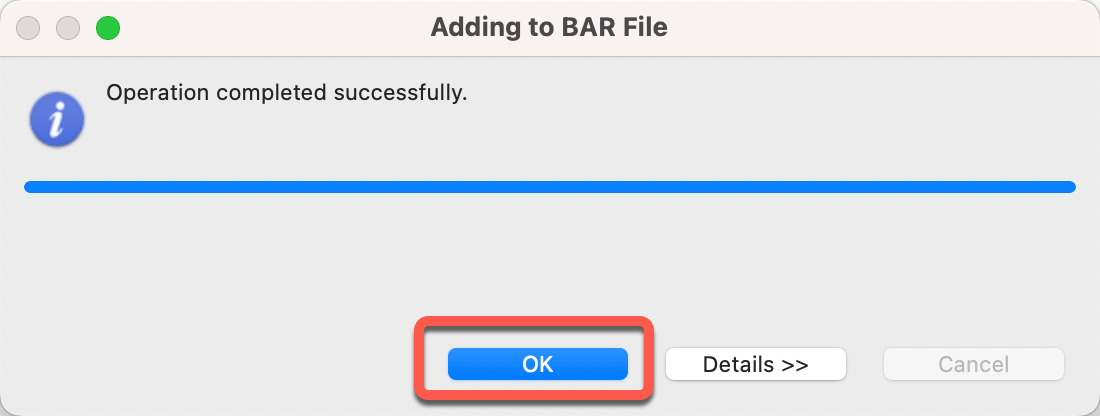
Now, a popup window displays Operation completed successfully. Click OK.
10.2. Accessing App Connect Enterprise environment
Narration
IBM App Connect is an industry-leading integration solution that connects any of your applications and data, no matter where they reside. With hundreds of prebuilt connectors and customizable templates, App Connect helps users of all skill levels rapidly connect Software as a Service (SaaS) applications and build integration flows.
For this demo, Focus Corp is using a trial account of IBM App Connect Enterprise as a Service on AWS.
Action 10.2.1.
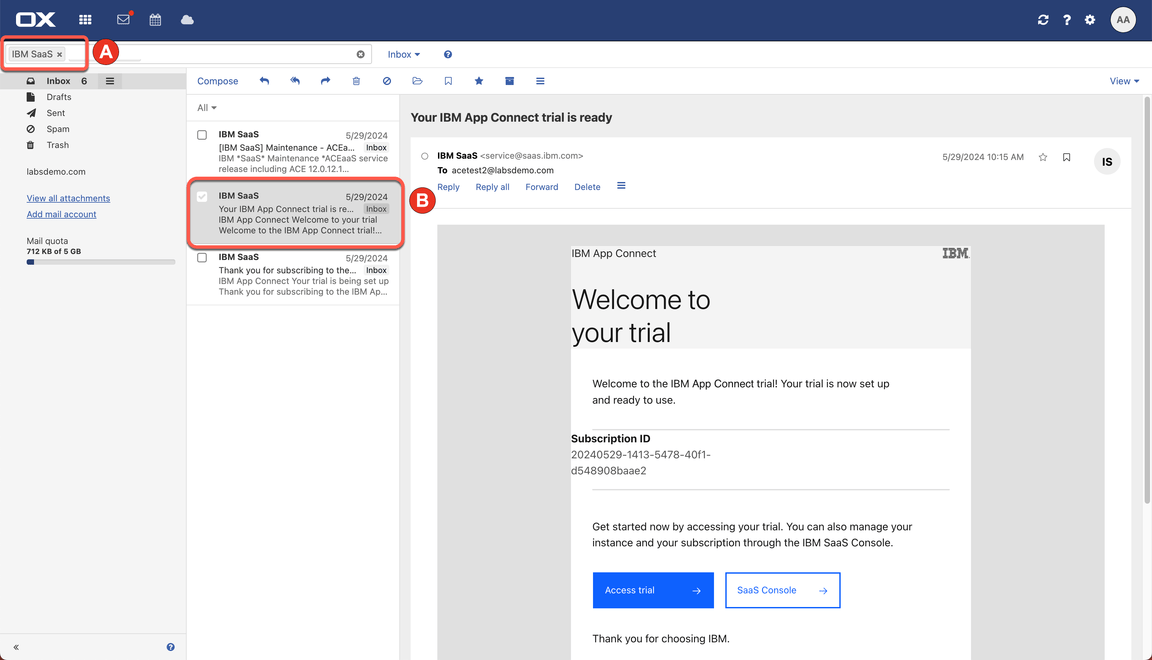
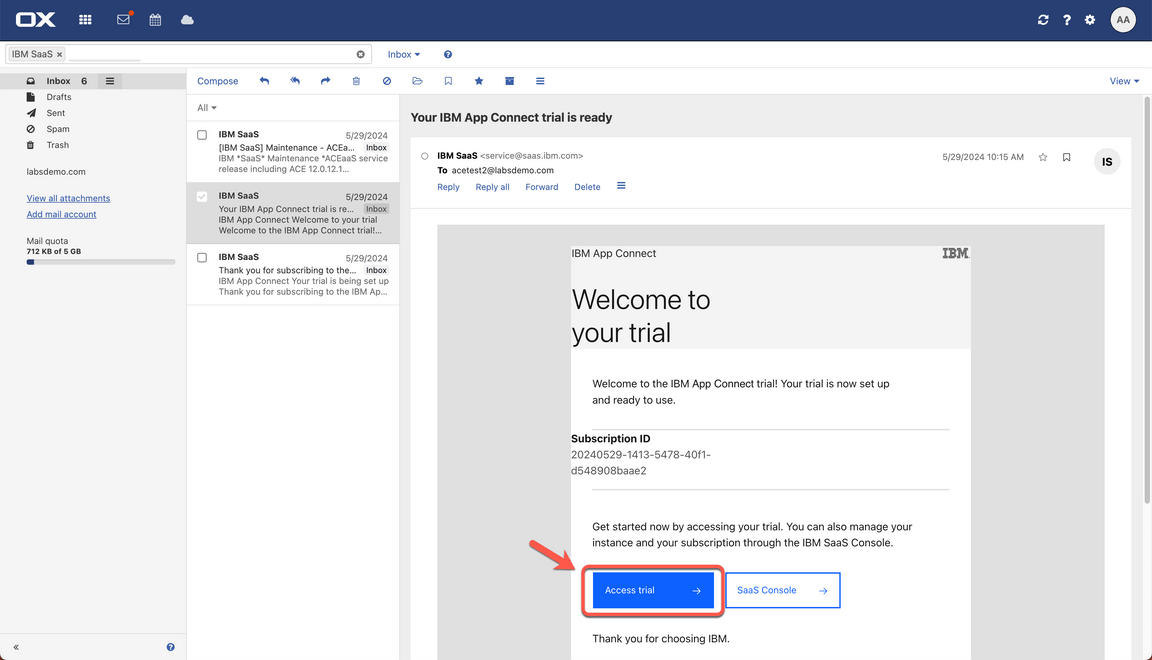
In your email inbox (that you used to create the App Connect trial account), search for IBM SaaS (A), open the ”Your IBM App Connect trial is ready” email (B).
Action 10.2.2.
Now, click the Access trial button.
Action 10.2.3.
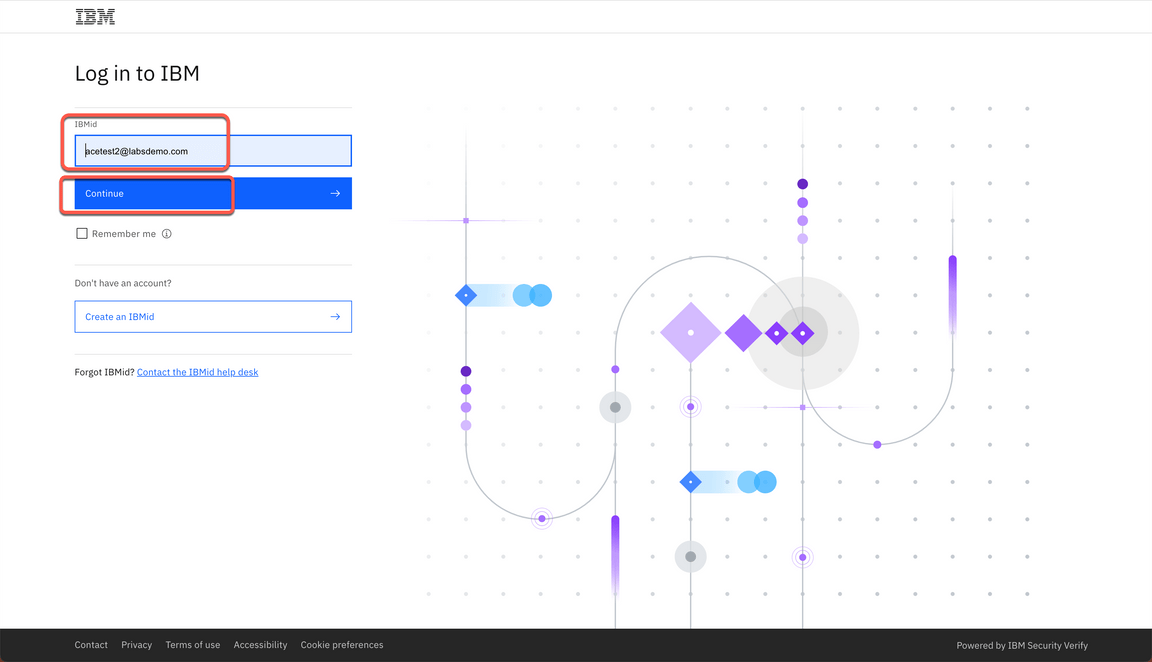
Log in with your App Connect username and password.
Action 10.2.4
Use the Instance switcher to change to the Dashboard instance.
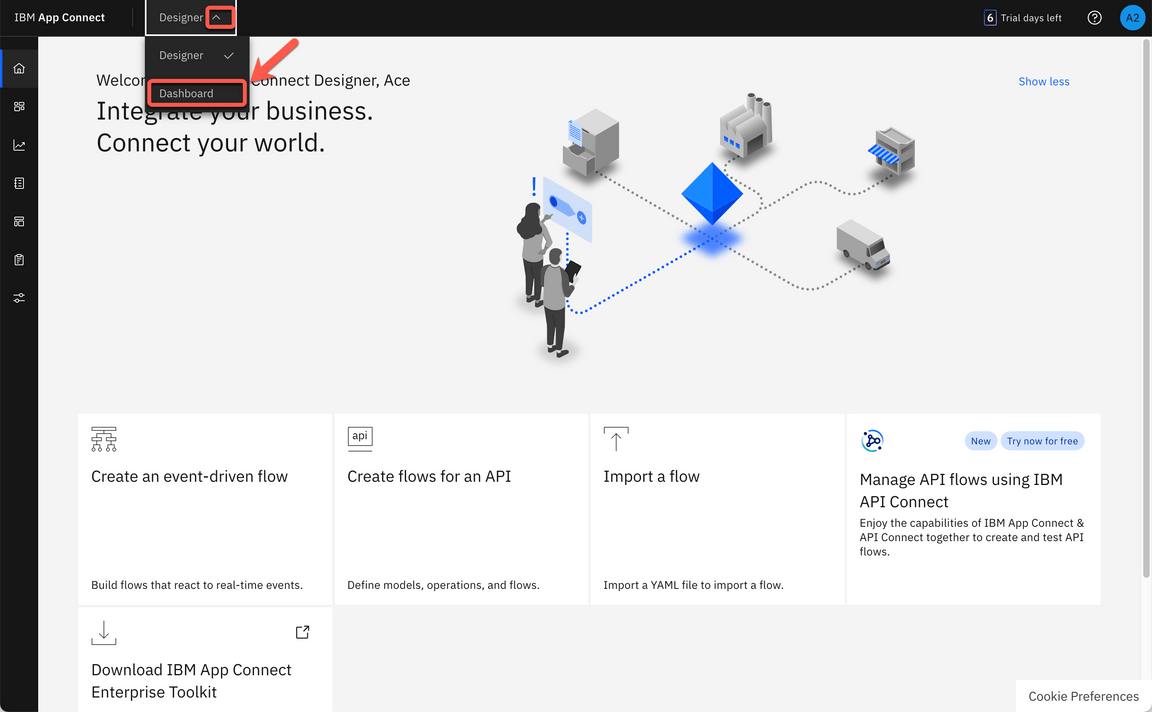
10.3. Creating Integration server
Narration
Focus integration experts begin in the IBM App Connect Dashboard. Here they can administer integration servers and integration runtimes, which are deployed from the BAR files mentioned earlier. They want to deploy the Integration flow defined in the previous steps.
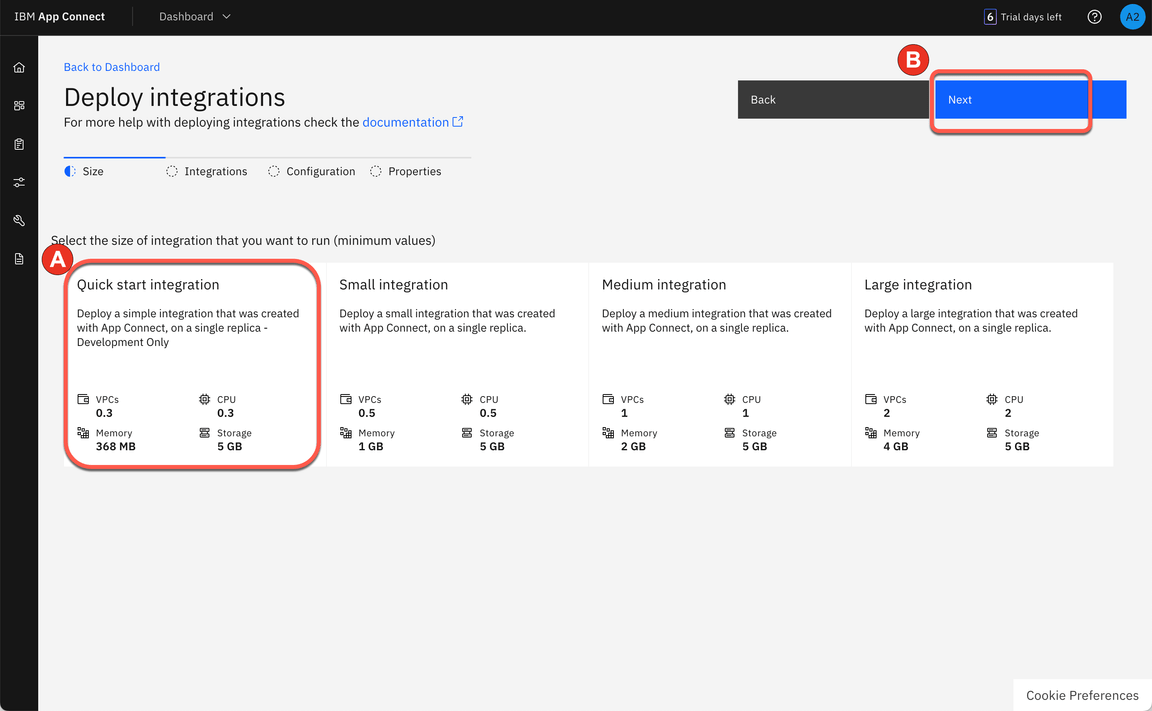
Because they need to deploy a simple integration, let’s select with the Quick start integration type.
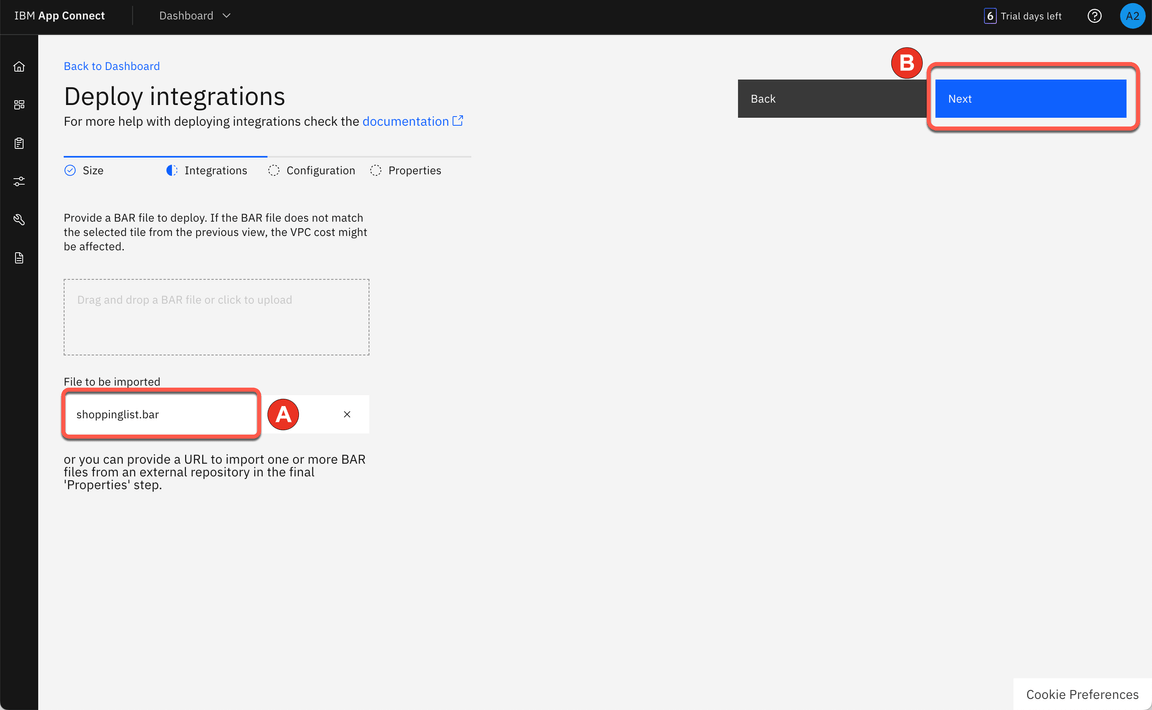
Now they need to provide the BAR file. The BAR file contains all the resources that are needed to deploy an integration. The BAR file parameters will expose both the integration and its operations.
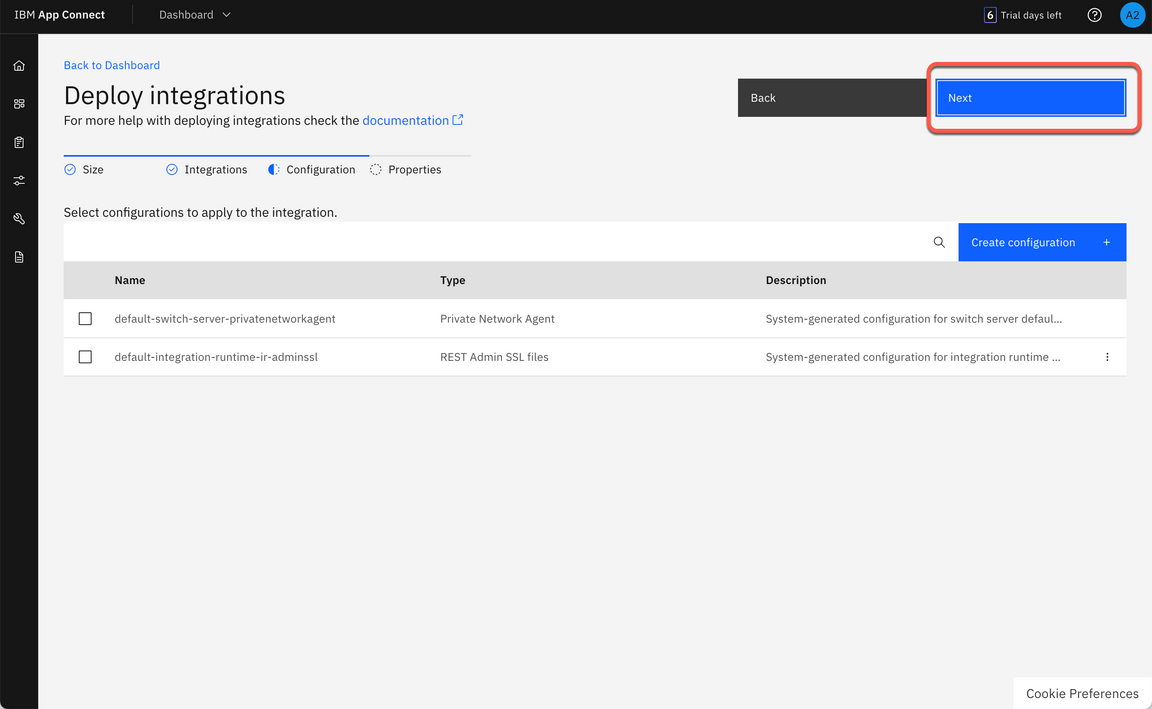
They can use the Configuration component to apply any customizations to the integration server when they deploy it. For their scenario, they don’t need to use the configuration package.
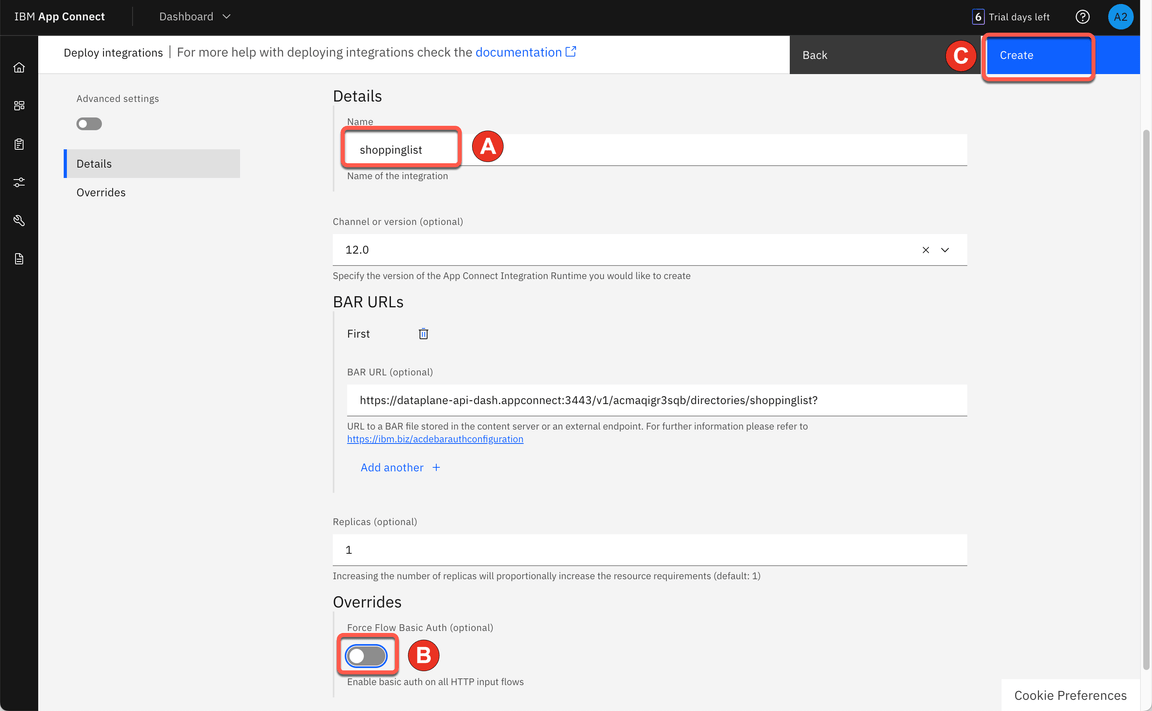
Now, they need to define a name for their Integration server, for example shoppinglist.
That is it! After few minutes their server should be ready with their integration flow.
Action 10.3.1.
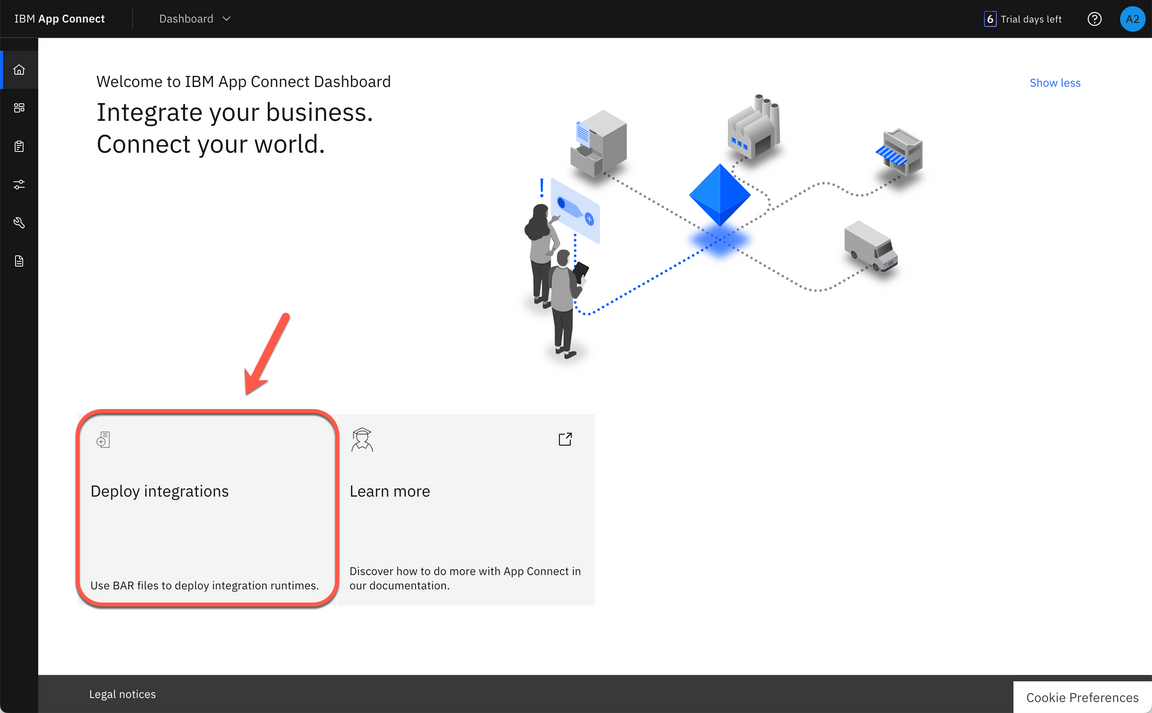
Click Deploy integrations.
Action 10.3.2.
Select Quick start integration option (A) and click Next (B).
Action 10.3.3.
Click to upload your BAR File. And select the shoppinglist.bar (A) file (it is in your workspace folder in a Bar Files directory). And click Next (B).
Action 10.3.4.
You don’t need any Integration configuration, click Next.
Action 10.3.5.
Enter the Integration Server name as shoppinglist (A). Disable the option to Force Flow Basic Auth (B). Then click Create (C).
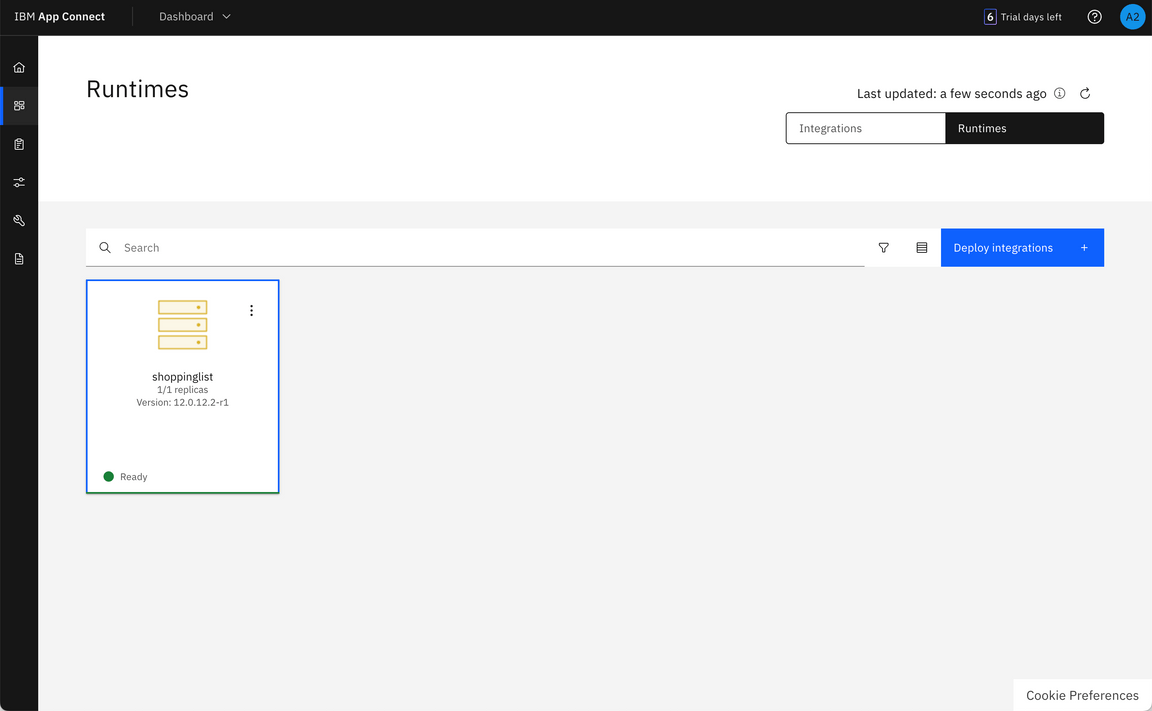
Action 10.3.6.
The deployment process takes up to 5 minutes, refresh the browser to see the BAR file deployed and started.
10.4. Testing the API
Narration
To finalize, the Focus Integration experts would like to test the new API in the App Connect Enterprise environment. They just need to open the Integration server and the API.
Now, using the Try it capability, they will test using all three departments: Candies, Bakery and Snacks.
Great, the subflow was invoked and the message is routed through all different transformation nodes based on the department parameter.
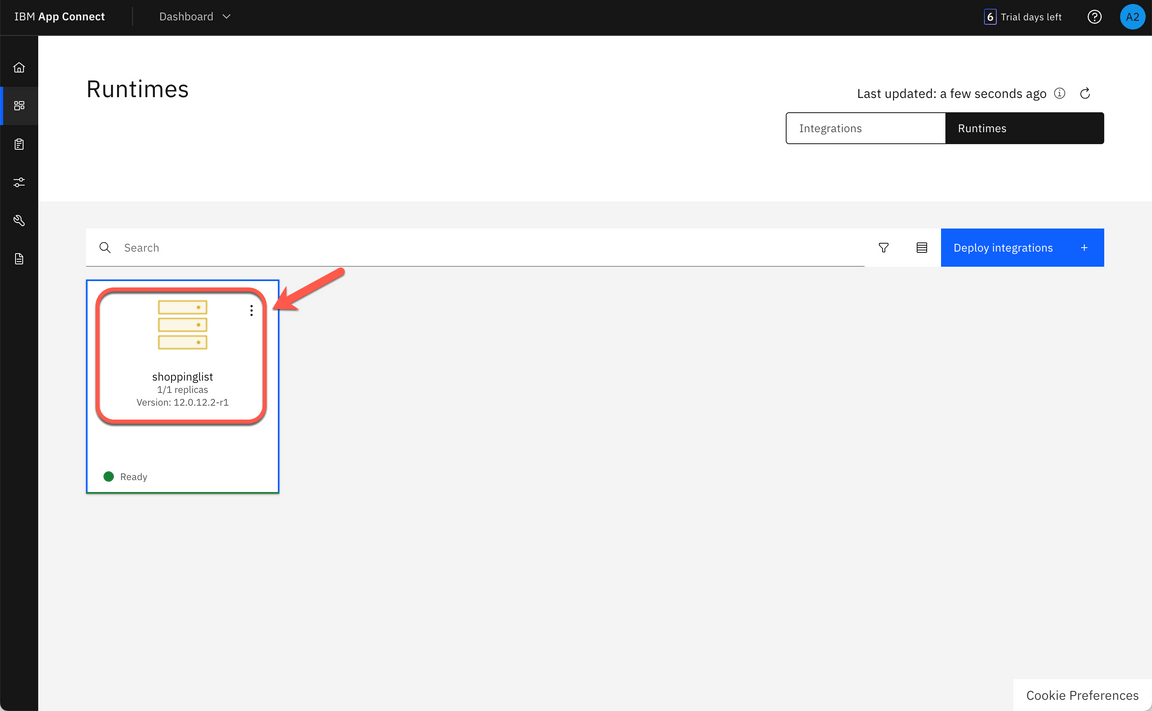
Action 10.4.1.
Click the shoppinglist server icon.
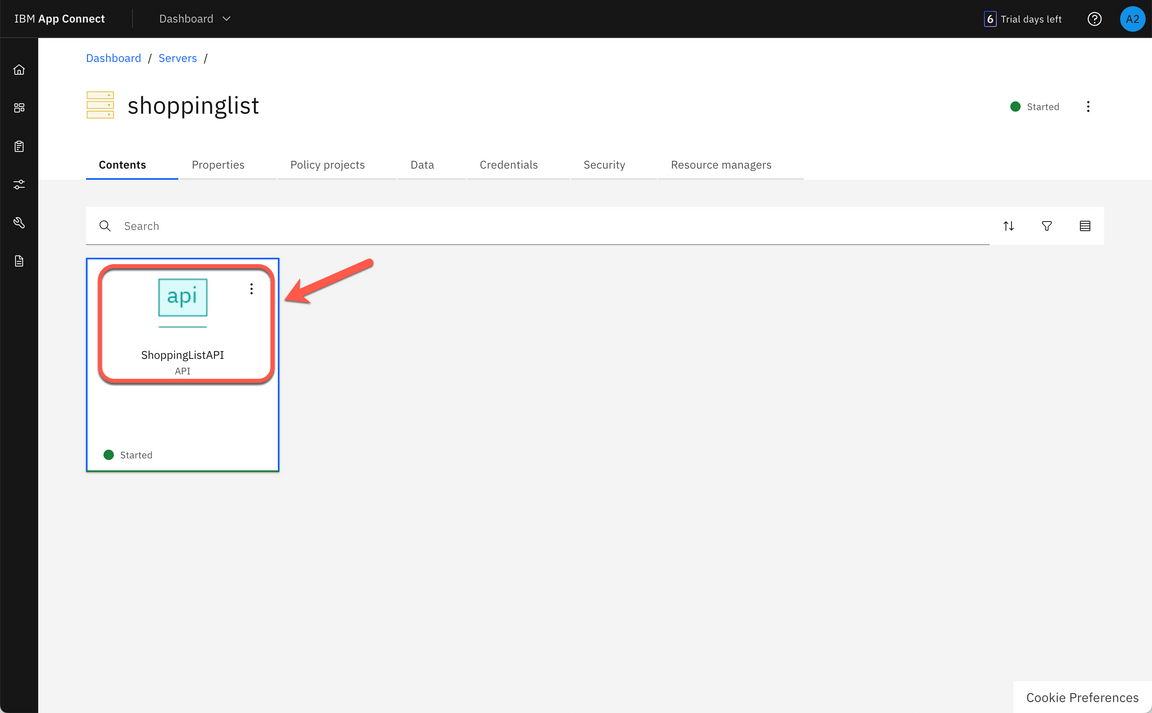
Action 10.4.2.
Click the ShoppingListAPI icon.
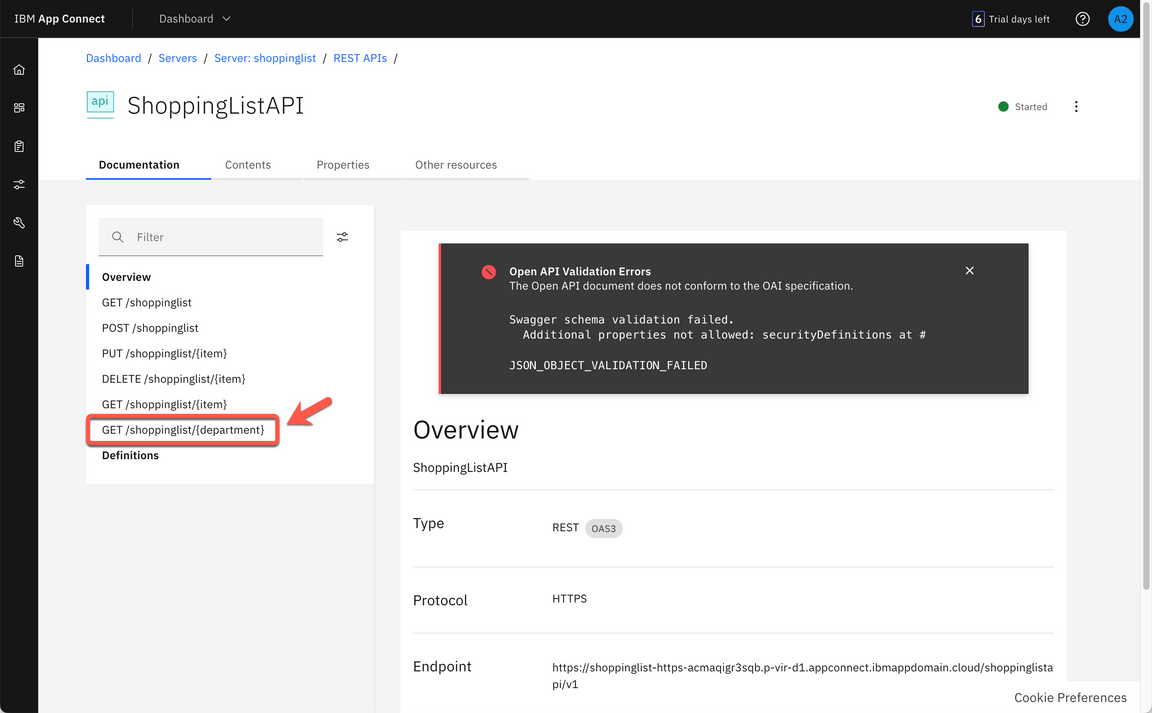
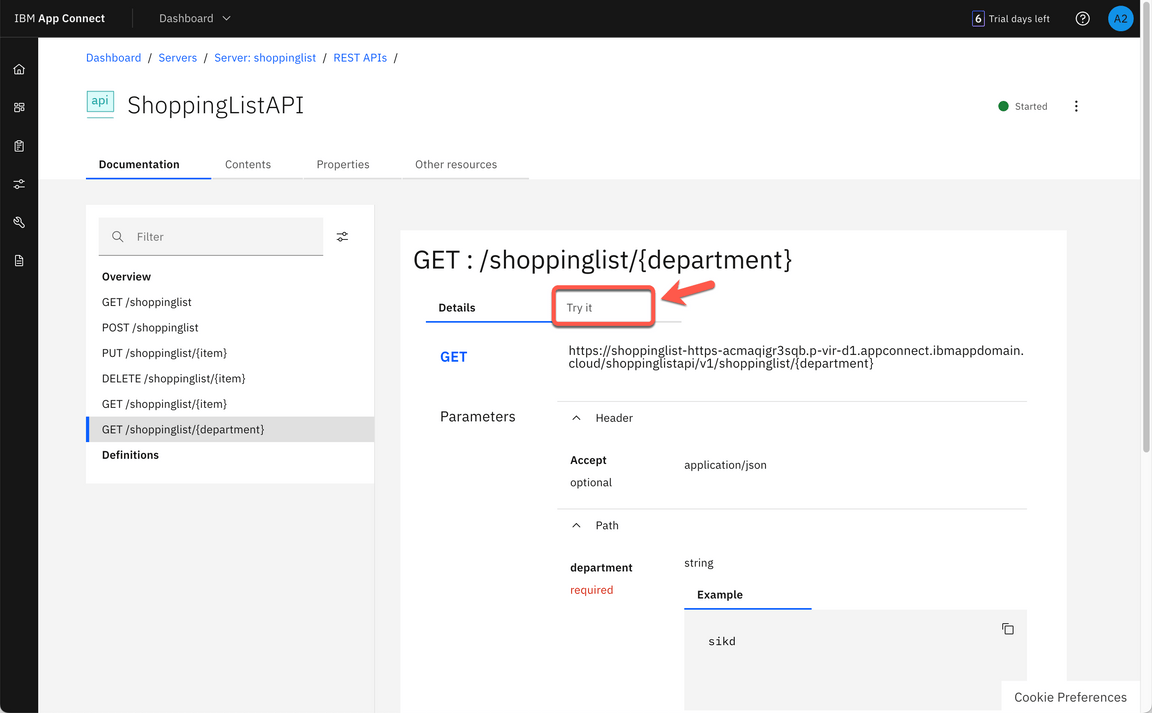
Action 10.4.3.
Ignore the Open API Validation errors. Click on GET /shoppinglist/{department},
Action 10.4.4.
Open the Try it tab.
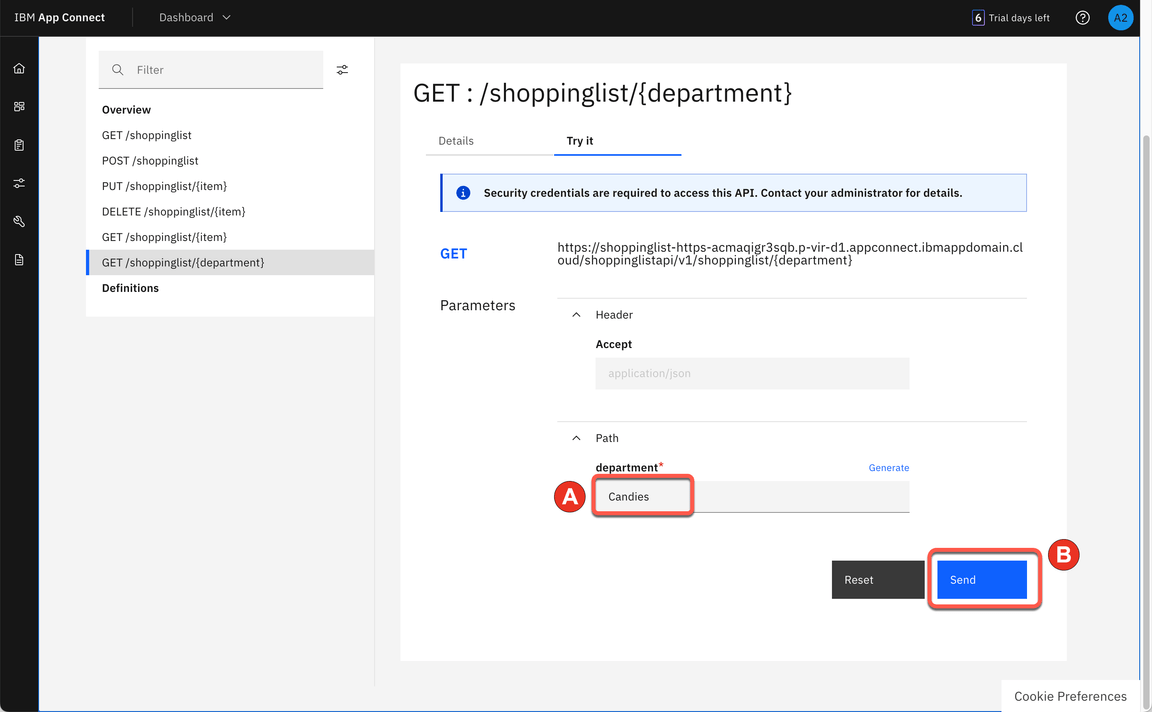
Action 10.4.5.
Enter Candies (or Bakery, or Snacks) as department name (A). Click Send (B).
Note: You are welcome to try any of the three departments.
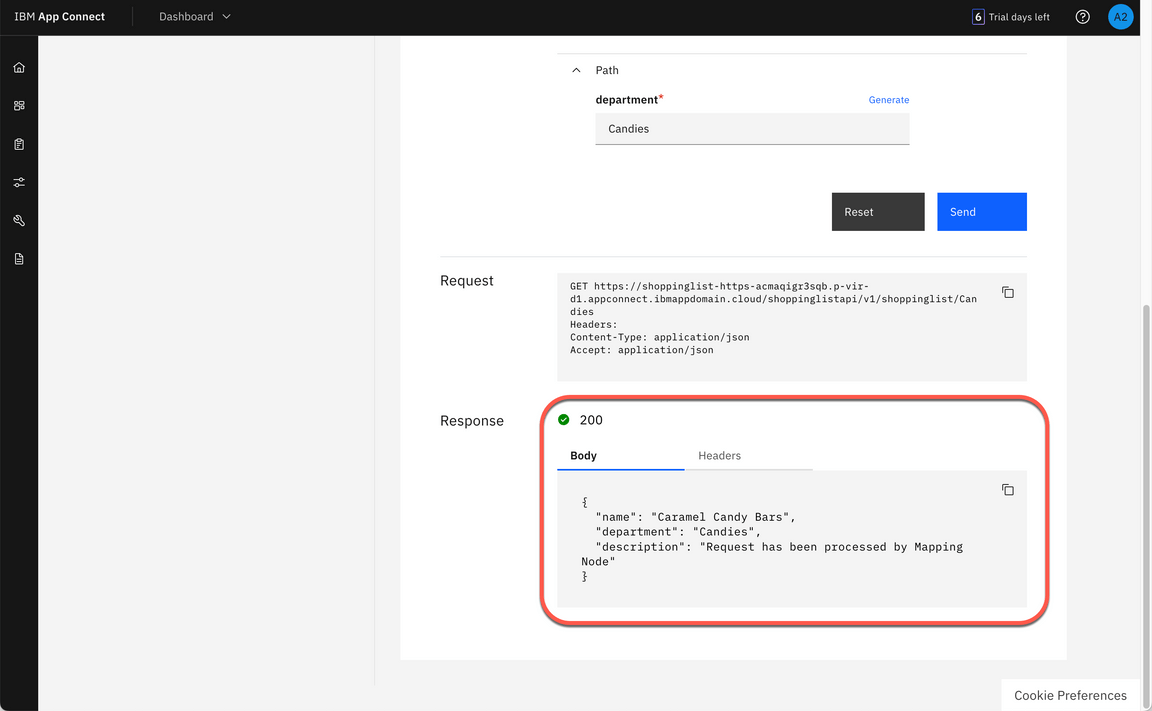
Action 10.4.6.
Show the Response body and show that each department is processed by different Transformation node (show the description field).
Summary
Let’s summarize what Focus developers have done today. In this demo they:
- Created Rest API using the App Connect Toolkit
- Created new API operation using the OpenAPI editor
- Implemented mapping transformation using the Mapping node
- Implemented compute transformation using ESQL query language and Compute node
- Implemented java transformation using Java code and JavaCompute node
- Implemented messaging routing using Route node
- Deployed and tested the Integration flow on IBM App Connect Enterprise as a Service on AWS
In this demo, Focus Integration experts learned how to build complex, multi-style integrations with support for multiple programming languages and fully integrated with source and pipeline management tools using the IBM App Connect toolkit.
Thank you for attending today’s presentation.
