APIC GraphQL Demo
Introduction
The rising adoption of hybrid cloud has resulted in data stored everywhere – in different types of data stores likes data warehouses, lakes, and lakehouses, as well as across different clouds and on-premises environments. APIs serve as the essential connector between different data sources and applications, which means that businesses are relying on and creating more APIs than ever before to get the data they need power their applications and experiences.
GraphQL has rapidly become a go-to query language for companies to interact with their data and is emerging as a new standard for APIs, layering upon the investments in REST APIs and data systems. While GraphQL APIs are significantly easier for the application teams to consume, they can represent a challenge to the API Provider teams tasked with building them. We believe that APIs built declaratively are simply better leading to first implementation with fewer lines of clean code, faster time to deploy, and APIs with built-in performance, cost, and reliability optimizations.
Focus Corporation, a hypothetical retail company engaged with IBM, is highly motivated to derive more revenue from first-time customers to their online storefronts. The Focus development team decided to invest in GraphQL as a new standard for APIs. GraphQL is a query language for APIs that gives an application client greater control over what data it retrieves in an API request when compared with a REST API request.
Focus’ developers would like to explore an easier way for developers to build GraphQL APIs, consuming data stored everywhere. While GraphQL APIs are significantly easier for the application teams to consume, they can represent a challenge to the API teams tasked with building them, securing them, socializing them, and managing them. To ease the process of building these APIs, they would like to explore a way to create GraphQL APIs using a declarative approach for federated access to data.
Focus’ team requested a demo to learn how to move from zero to enterprise in the GraphQL API domain. In the following demo, Focus’ developers will learn how to use API Connect Essentials (StepZen) to create a federated GraphQL API by pulling data from disparate sources (REST API and MySQL). After that they will use IBM API Connect to create a GraphQL API proxy definition that proxies a backend GraphQL server from API Connect Essentials and define rate limiting controls that reflect the amount of data that is returned from the server. In this demo, Focus will see how to CREATE, MANAGE, SECURE and SOCIALIZE their GraphQL APIs using the IBM API Connect solution.
(Demo Slides here)
1 - Setup API Connect Essentials (StepZen)
1.1 - Access APIC Essentials
Narration
API Connect Essentials enables developers to easily build and deploy a single GraphQL API that gets the data they need from multiple backends. The API Connect Essentials CLI is the primary tool for creating, uploading, deploying, and testing their GraphQL APIs. The CLI enables Focus’ developers to manage their API Connect Essentials schemas, configurations, and endpoints. The CLI also comes with a built-in Schema Explorer that enables them to explore and test the API.
Focus’ developers already installed the API Connect Essentials CLI. Next, they need to get the details about their account. For this demo, they are using a free StepZen account.
Action 1.1.1
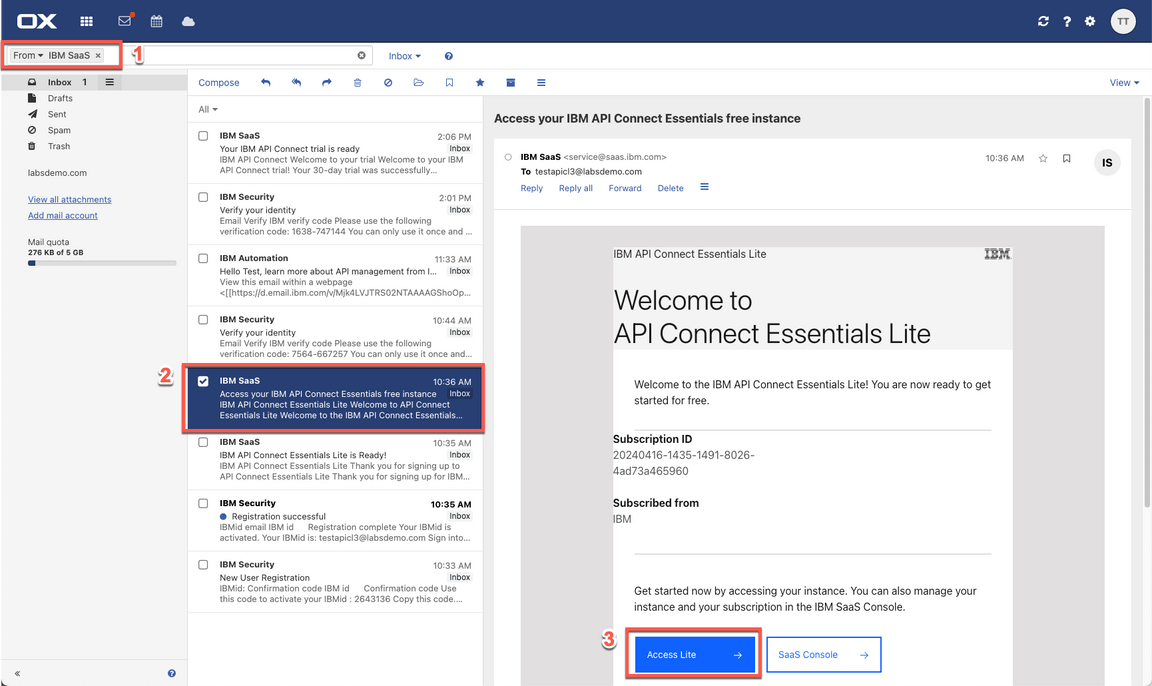
In your email inbox (that you used to create the API Connect Essentials free account), search for IBM SaaS (1), open the ”Access your IBM API Connect Essentials free instance” email (2). Then click Access Lite (3).
Action 1.1.2
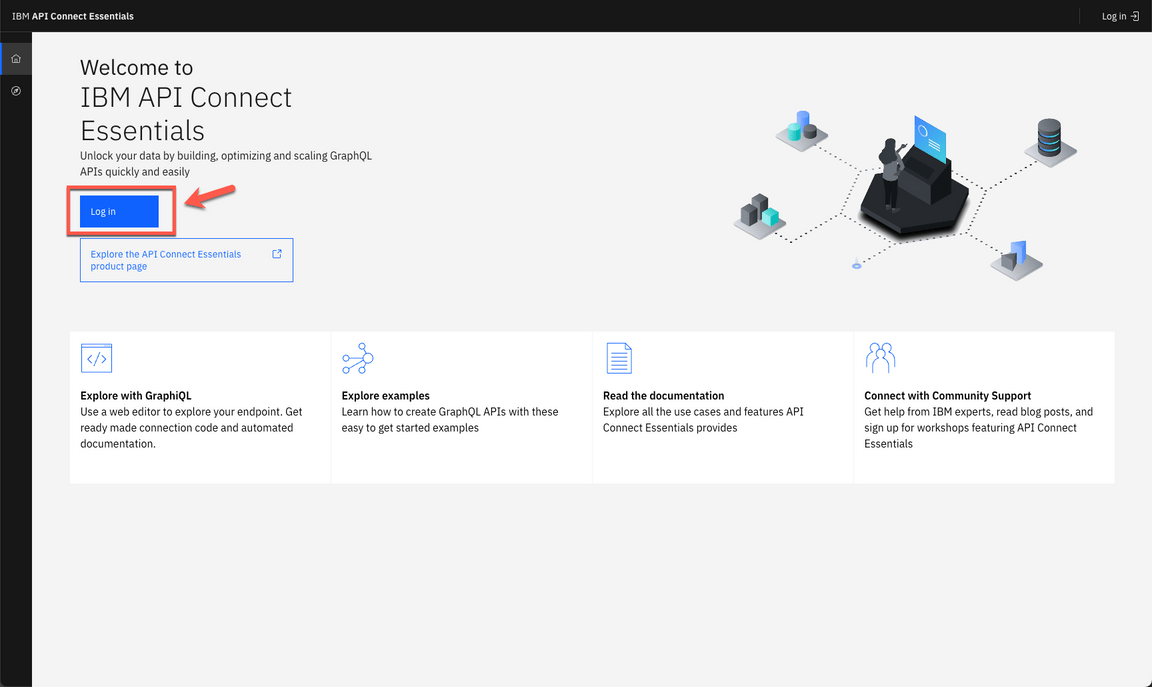
Click the Log in button.
Action 1.1.3
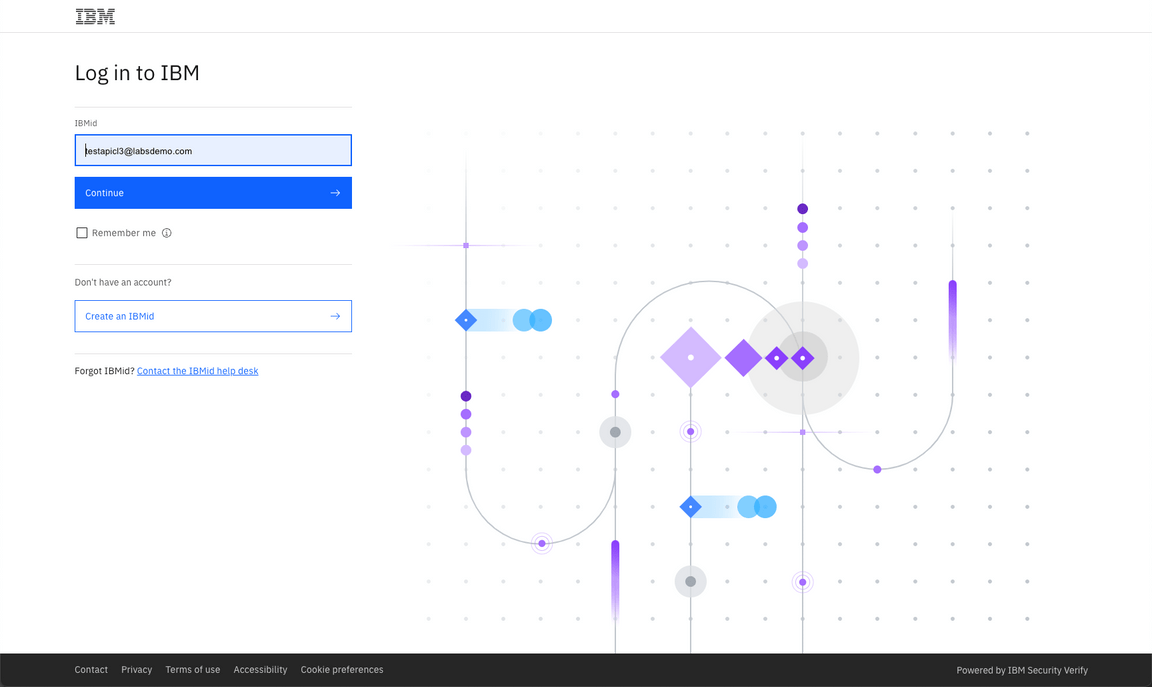
Log in with your username and password.
1.2 - Get your Account details
Narration
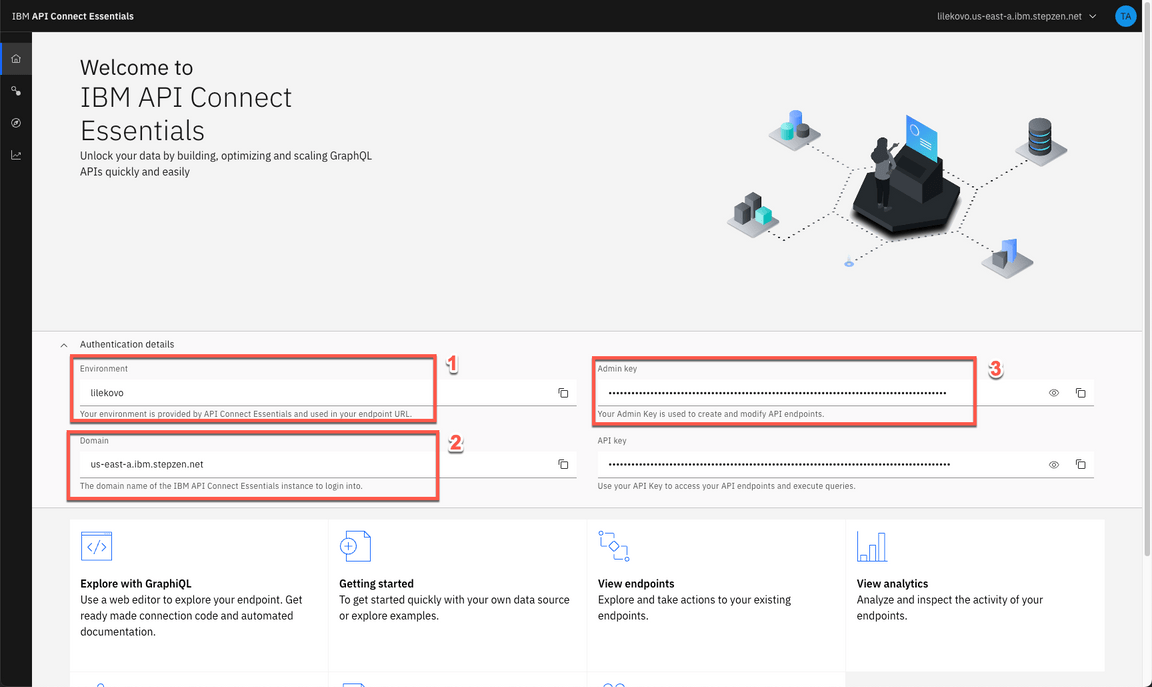
To get the details about Focus’ account, first they need to navigate to the API Connect Essentials Dashboard. On this page, under the “Authentication details” twisty, they will find their environment name, the domain, and the two keys they need for API authentication.
Action 1.2.1
On the API Connect Essentials Dashboard page, scroll down to see the Authentication details section. Copy the Environment name (1), the Domain (2) and Admin Key (3). You will use them in the next step.
1.3 - APIC Essentials CLI log in
Narration
To run APIC Essentials in the cloud, the developers can connect the CLI to their account to get a private and secure endpoint or use APIC Essentials with a public account. After installing the CLI, they are able to connect it to their account using the login CLI command.
Action 1.3.1
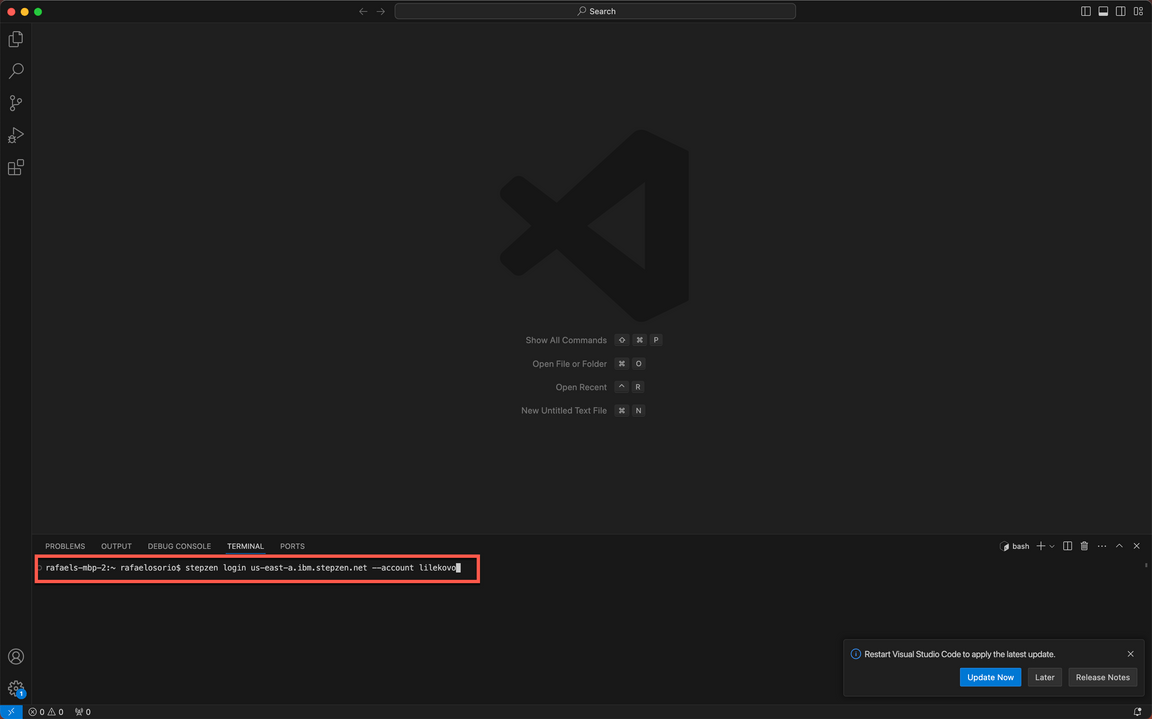
Using the Visual Studio Code terminal window, execute the command below to log in with API Connect Essentials CLI, replace [your_environment] with the environment value (1), and [your_domain] with the domain value (2) from the Account details page.
stepzen login [your_domain] -a [your_environment]
Action 1.3.2
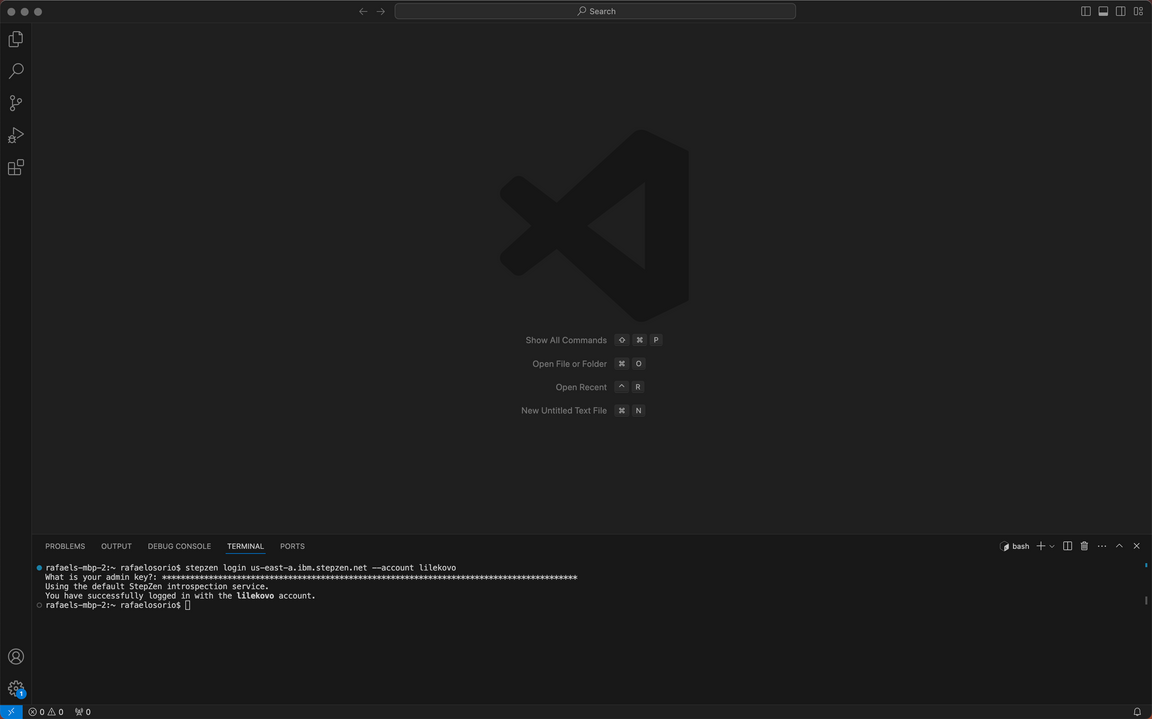
Now, you need to enter your Admin Key. Copy and paste the Admin Key value (3) from the Authentication details section.
2 - Build a GraphQL API from a REST API
2.1 - Create your API directory
Narration
Using API Connect Essentials, Focus’ developers can create a GraphQL API for backends with REST interfaces in minutes.
There are two ways to create a GraphQL API with StepZen when they have a REST backend:
- Use the command-line interface (CLI) command stepzen import curl to specify an existing REST endpoint - StepZen introspects the endpoint and auto-generates a GraphQL schema for you.
- Write the schema code in a .graphql GraphQL Schema Definition Language (SDL) file. Use the powerful GraphQL directive @rest to connect the REST endpoint, and with just a few lines of code, they have a working schema.
In this module, Focus’ developers will learn how to use the stepzen import curl command on an existing REST API. This command sends a curl request to API Connect Essentials and parses the GraphQL types from the JSON response. Before the developers build their GraphQL API, they need to create a new directory.
Action 2.1.1
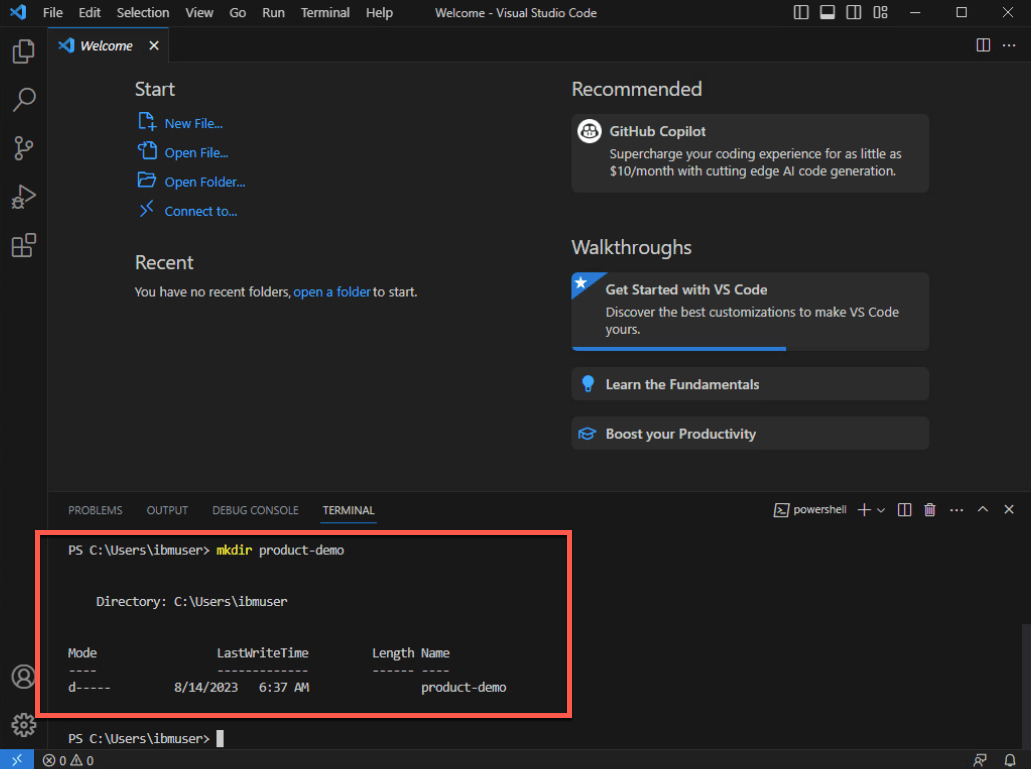
On the Visual Studio Code Terminal, execute the command below to create a new directory.
mkdir product-demo
Action 2.1.2
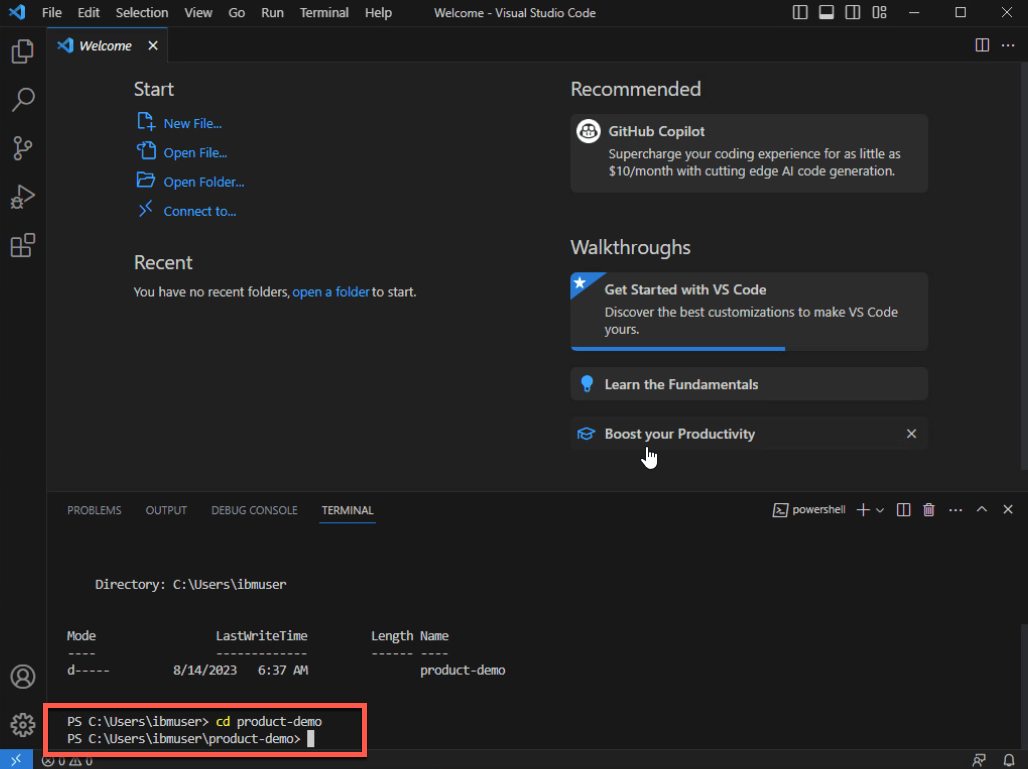
Change to the new directory.
cd product-demo
2.2 - Initialize the APIC Essentials workspace
Narration
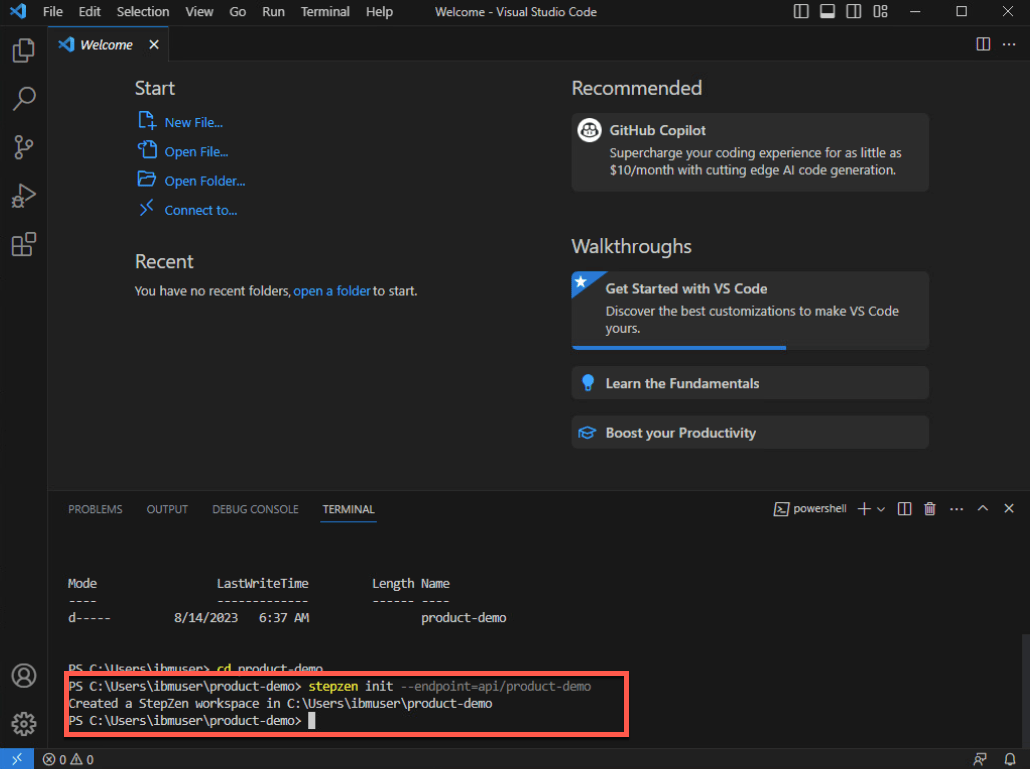
With the directory created, Focus’ developers need to initialize the API Connect Essentials workspace in their working directory. They use the CLI init command to do it.
Action 2.2.1
On the Visual Studio Code Terminal, execute the command below.
stepzen init --endpoint=api/product-demo
2.3 - Introspects the REST endpoint
Narration
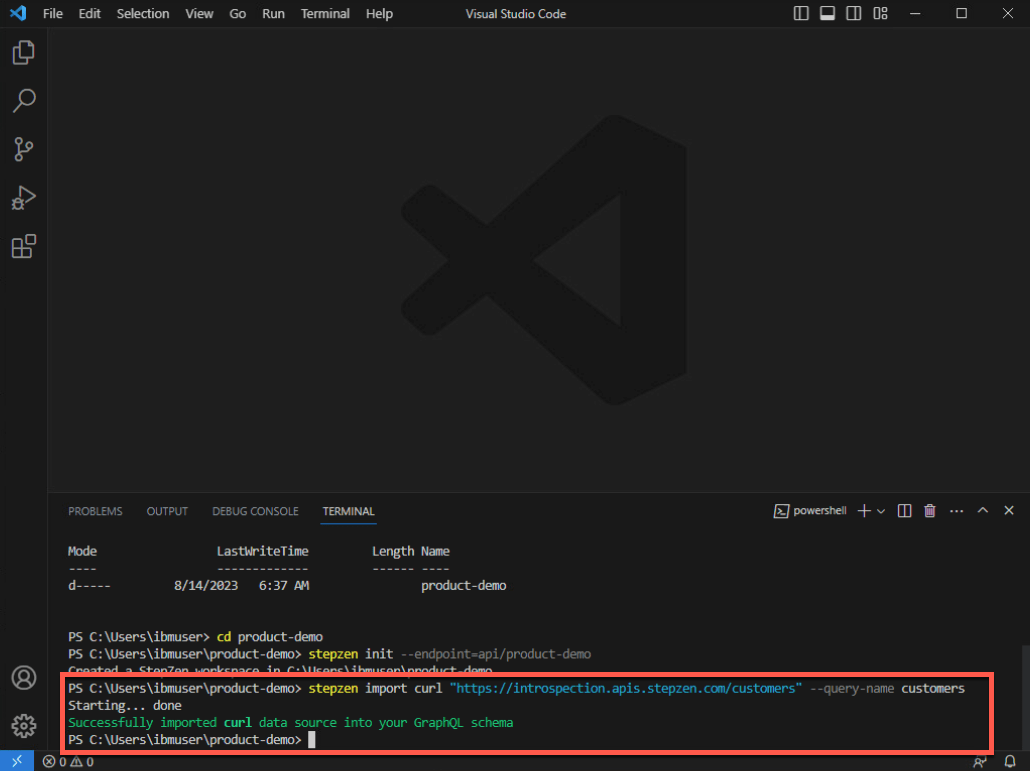
An amazing feature of API Connect Essentials is the capability to introspect the REST endpoint and auto-generate a GraphQL schema for Focus’ team. Using this option, the Focus’ developers are using a REST API provided by their legacy CRM system with their CUSTOMERS information and creating a new GraphQL API.
Action 2.3.1
On the Visual Studio Code Terminal, execute the command below.
stepzen import curl "https://introspection.apis.stepzen.com/customers" --query-name "customers"
2.4 - Explore GraphQL schema
Narration
Their first GraphQL API was created. Now, it is time to explore the graphQL schema! First, they need to open their project folder and open the index.graphql file in the curl folder. Here, the developers have all the schema of their customers REST API. Before, they deploy the GraphQL, they would like to import another REST endpoint.
Action 2.4.1
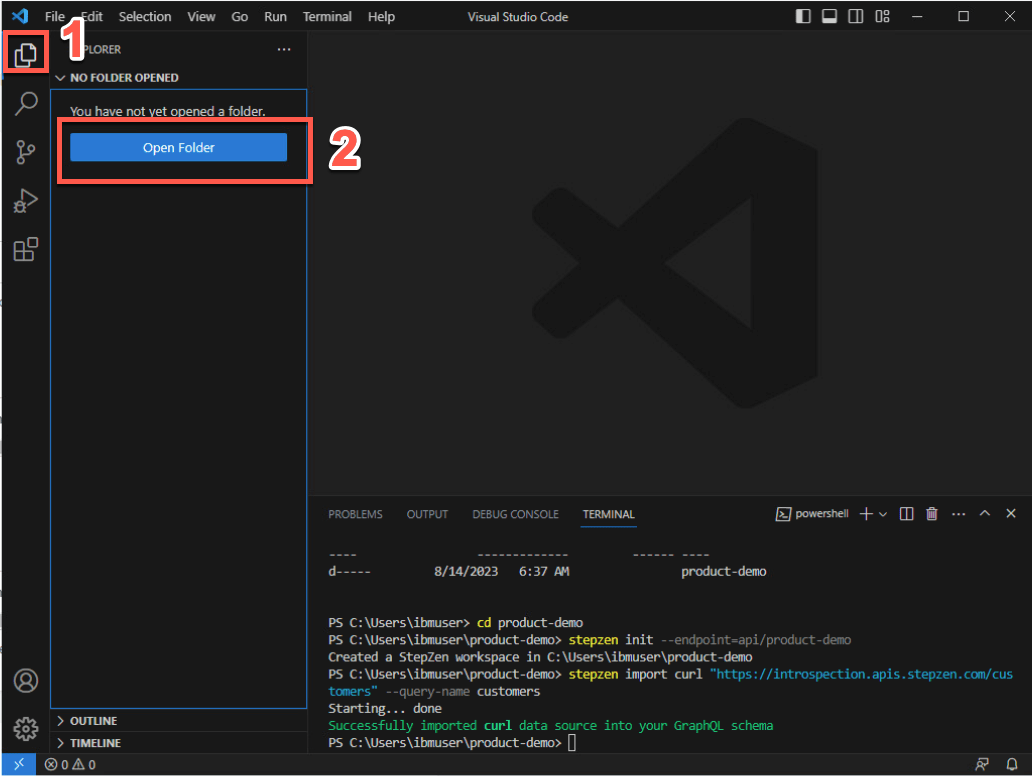
In Visual Studio Code, click on Explorer icon (1) and click Open Folder (2).
Action 2.4.2
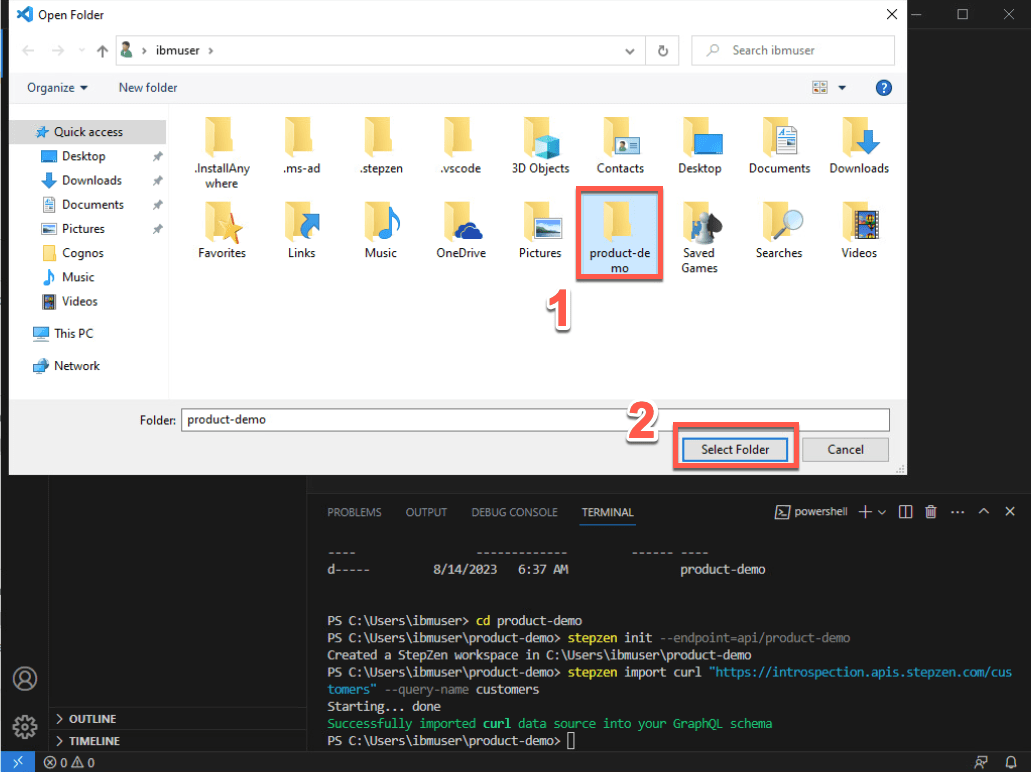
Select the new created product-demo folder (1) and click Select Folder (2).
Action 2.4.3
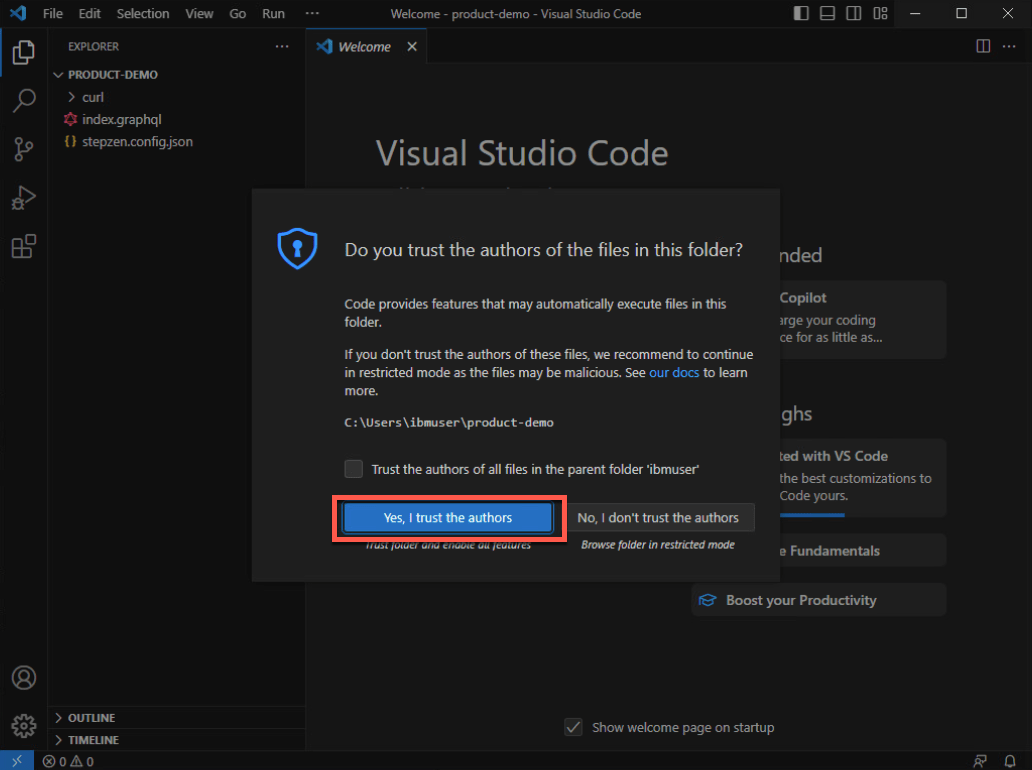
If necessary, click Yes, I trust the authors button.
Action 2.4.4
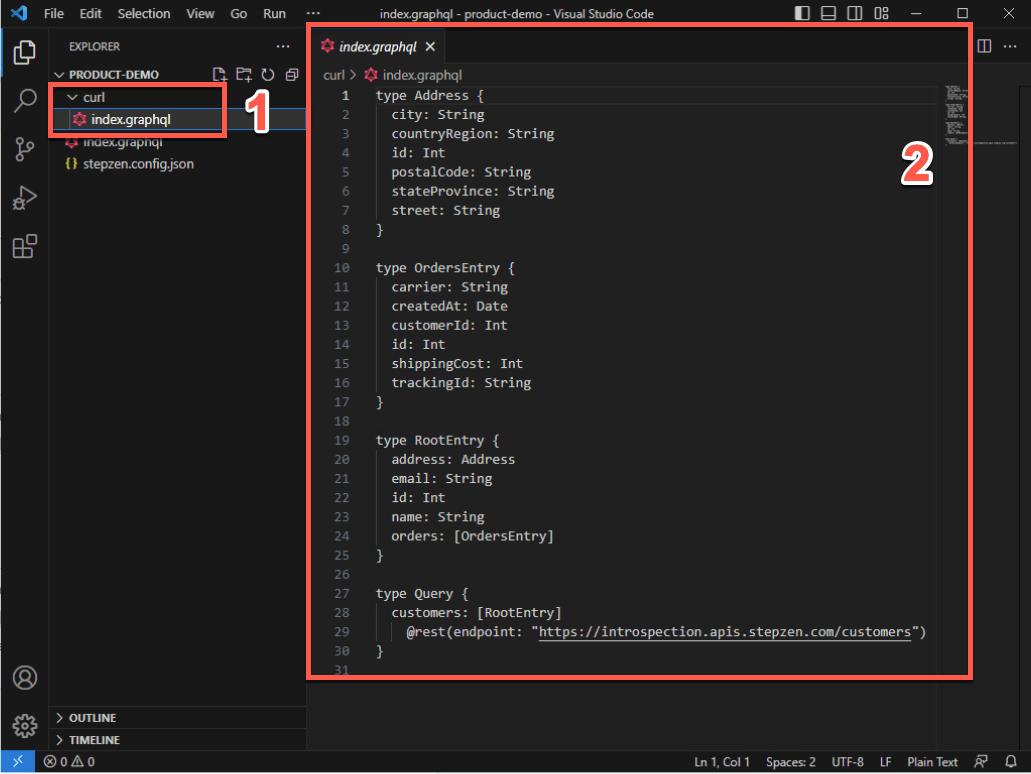
To see the GraphQL schema, open the curl folder and select the index.graphql file (1). You are welcome to explore and check the .graphQL file (2).
Action 2.4.5
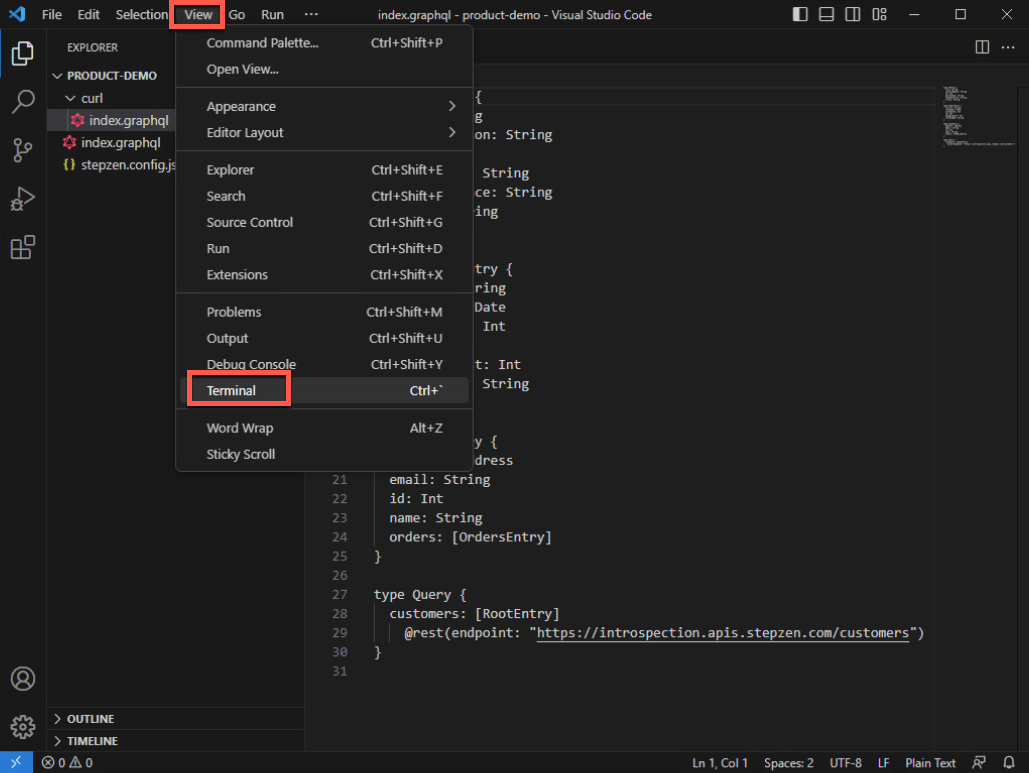
If necessary, click View > Terminal to see the terminal window again.
3 - Adding a new REST API in the GraphQL API
3.1 - Import a new REST API
Narration
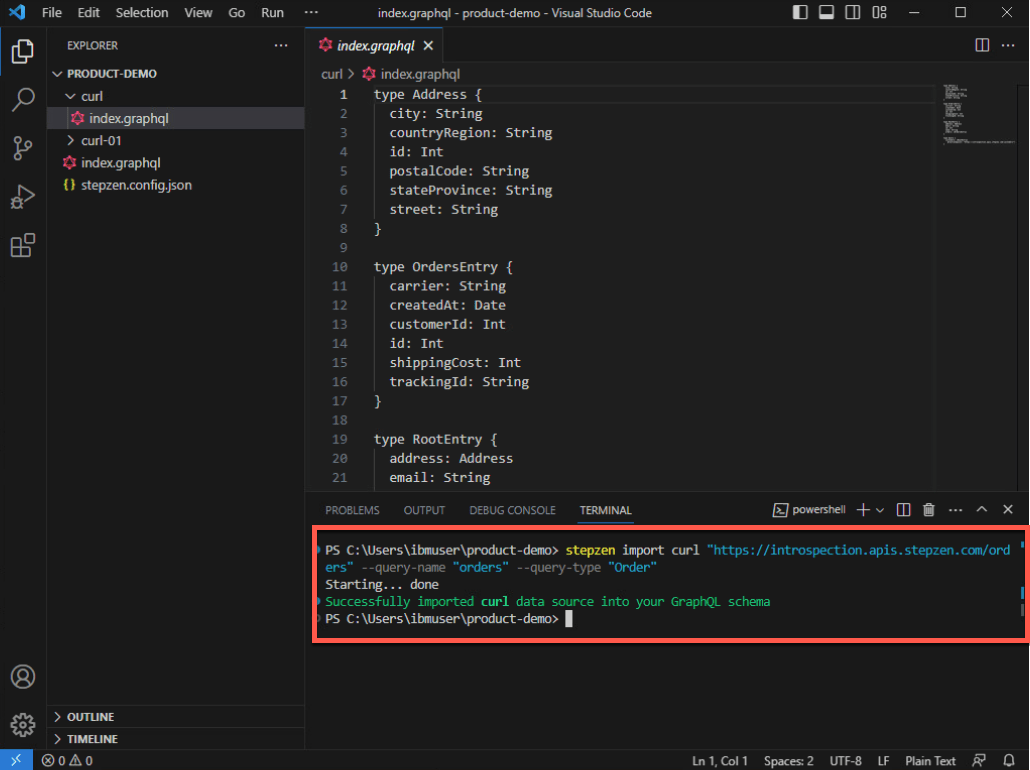
Focus’ developers will now improve their GraphQL API by adding another REST API from their CRM about ORDERS. To do it, they just need to run the import command again with a different REST URL.
Action 3.1.1
On Visual Studio Code Terminal, execute the command below to import another REST API.
stepzen import curl "https://introspection.apis.stepzen.com/orders" --query-name "orders" --query-type "Order"
3.2 - Explore the schema
Narration
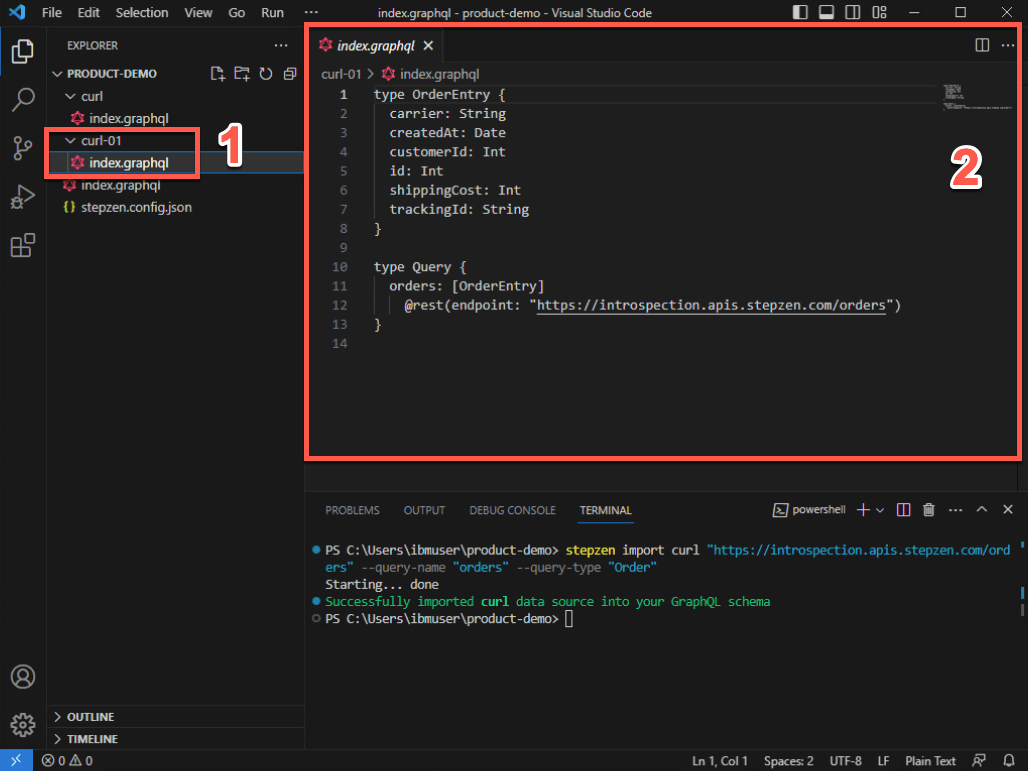
To check the new graphQL schema, the developers just need to open the curl-01 folder and open the new index.graphql file. Here they can see the schema of the orders API.
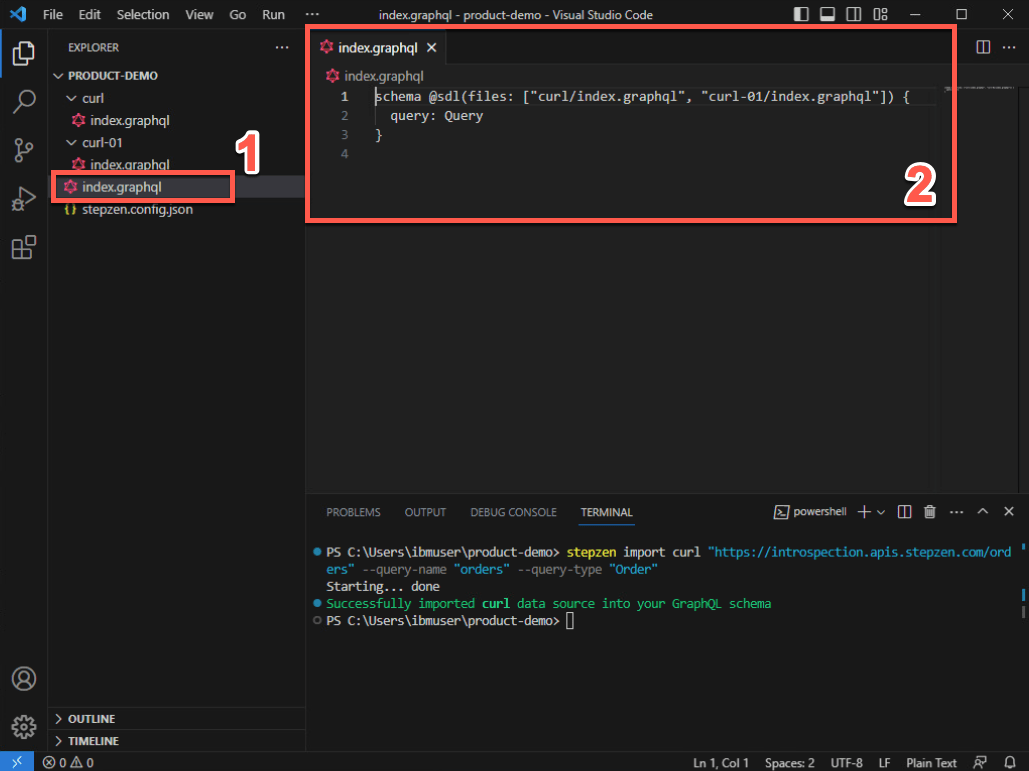
This third schema in the product-demo folder is aggregating the other two schemas of the two different REST APIs.
Action 3.2.1
Open the curl-01 folder and open the new index.graphql file (1). You are welcome to explore the new schema (2).
Action 3.2.2
Open the third schema, the index.graphql file in the product-demo folder (1) and check this schema is referencing the other two schemas (2).
3.3 - Start the endpoint
Narration
API Connect Essentials can be deployed and run as a managed service on API Connect Essentials’s cloud, on a virtual private cloud, or in an on premise data center. Whatever Focus’ choice of deployment, StepZen helps them to build clean, declarative, consistent APIs and run them at scale with built-in optimizations.
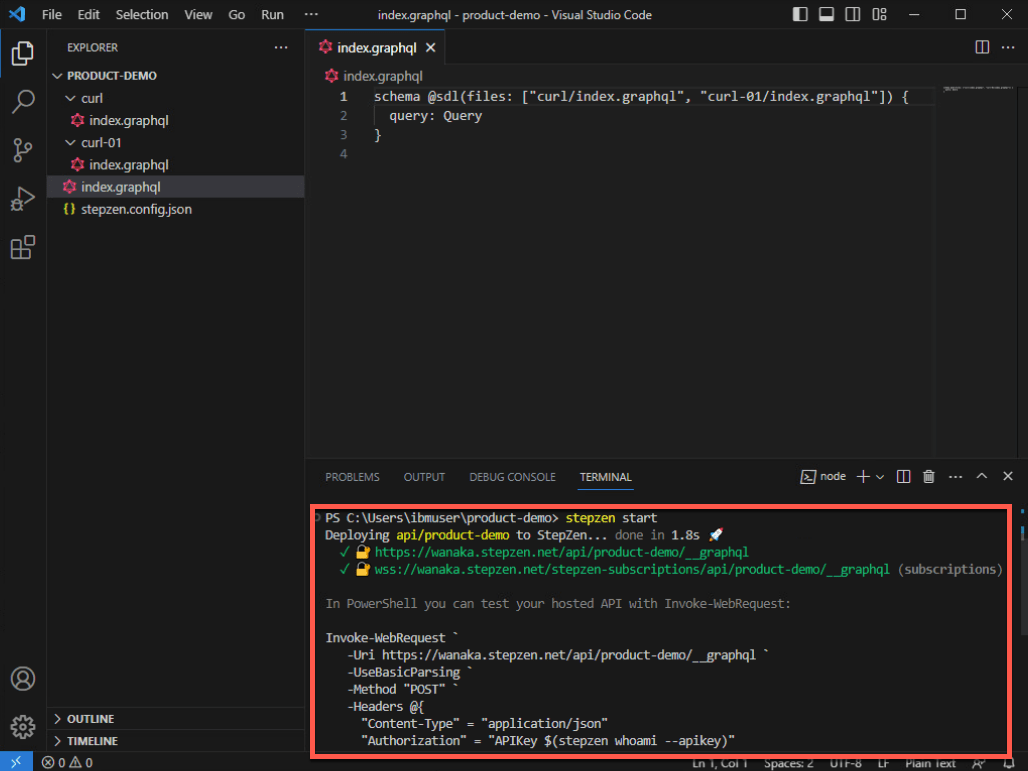
To Deploy and run their endpoint, from command line, the Focus’ developers will run the stepzen start command.
This command does three things:
- Deploys the code in the current directory (or the directory provided via the --dir flag) to the specified endpoint on StepZen.
- Watches the directory for changes and automatically deploys them to the endpoint specified.
- Shares a URL with StepZen's Schema Explorer that enables the developers to test their API by exploring the queries and types available and querying the API running on StepZen.
The API Connect Essentials dashboard provides a playground for testing Focus’ GraphQL API. Next, they will explore their GraphQL API.
Action 3.3.1
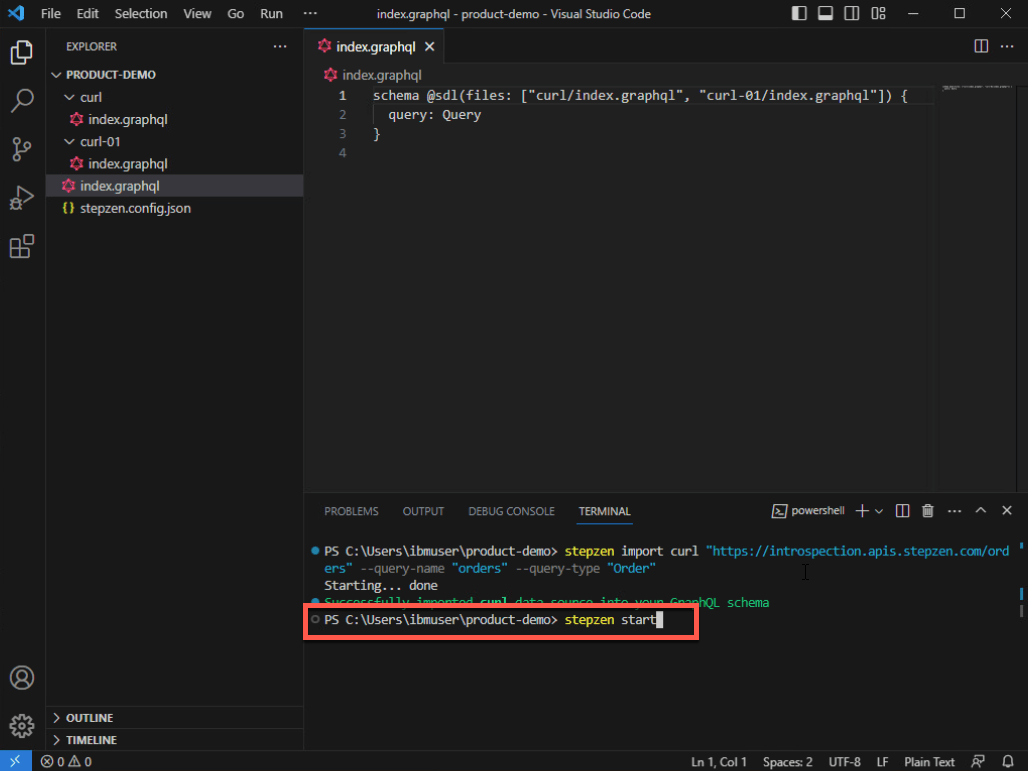
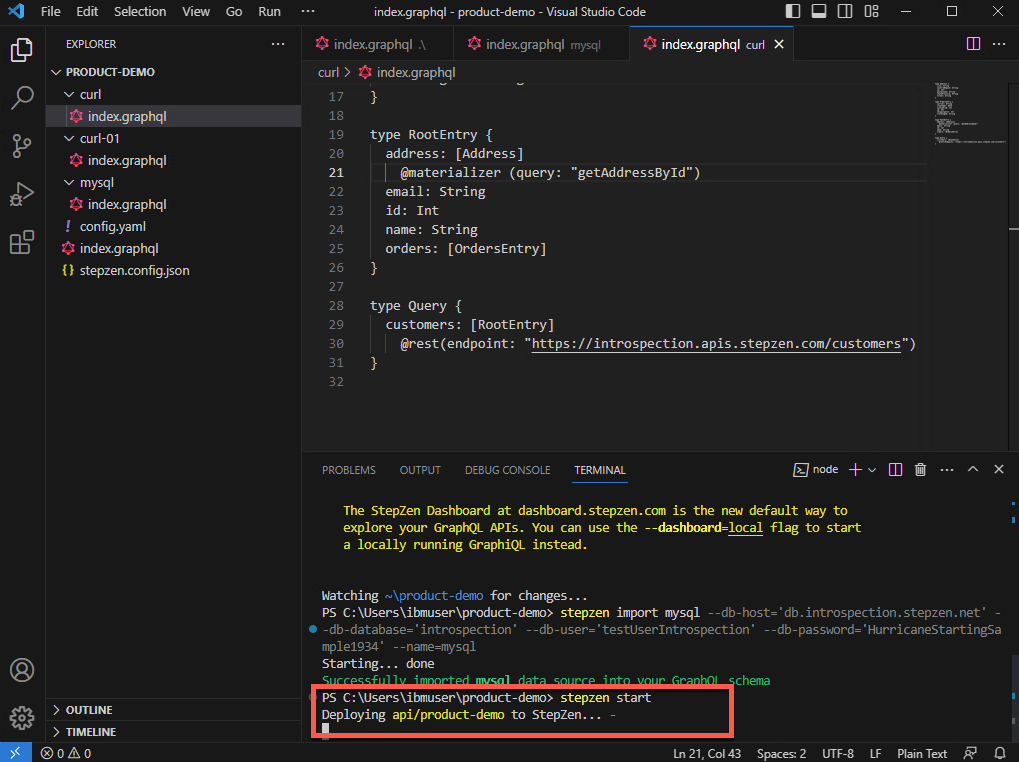
On the Visual Studio Code terminal, run the command below to initialize your endpoint.
stepzen start
Action 3.3.2
Show the stepzen start command return.
Action 3.3.3
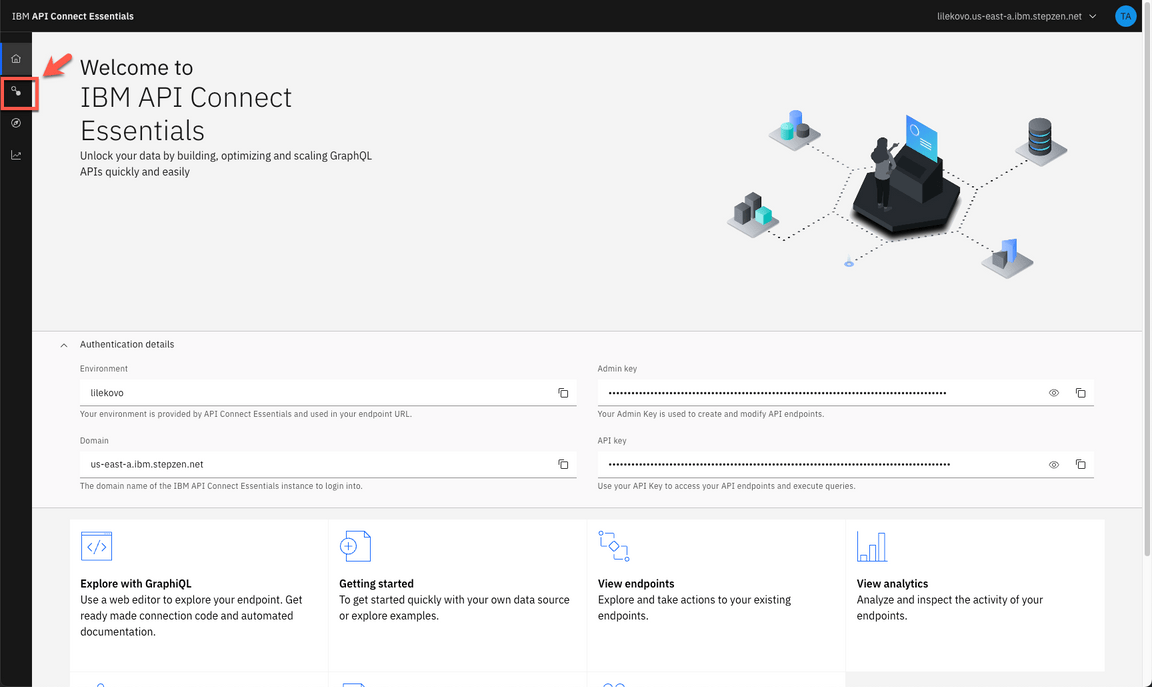
Back to the APIC Essentials page, open the Endpoint page.
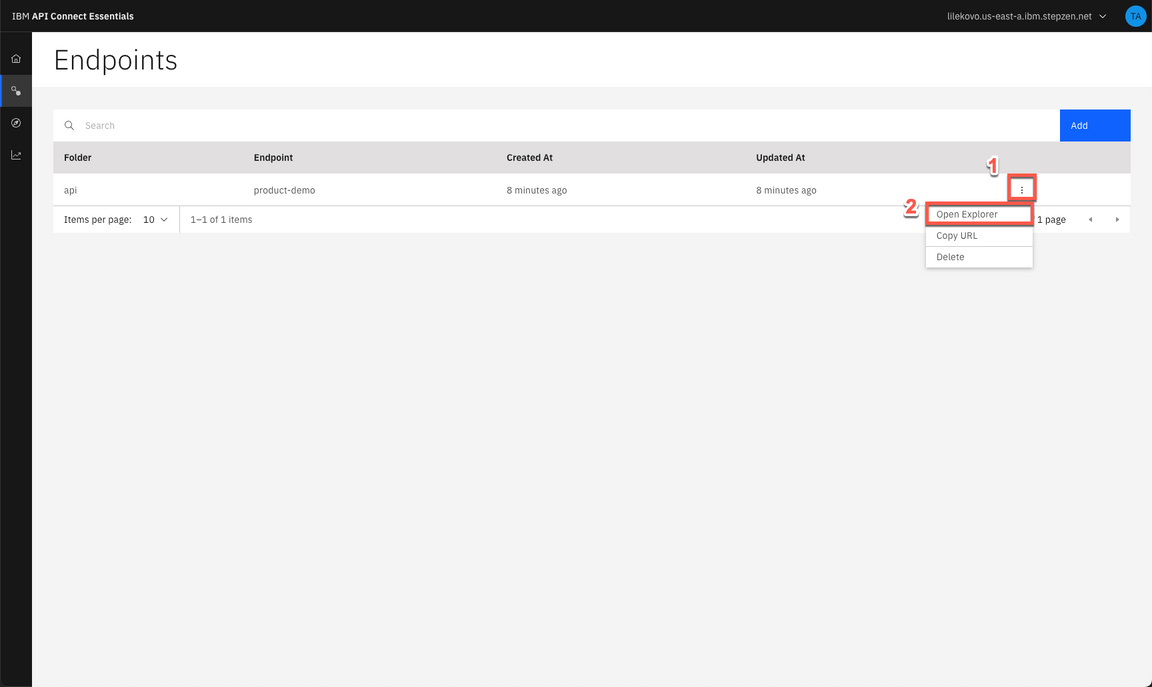
Action 3.3.4
Click on Actions menu (1) and select Open Explorer (2).
3.4 - Test the endpoint
Narration
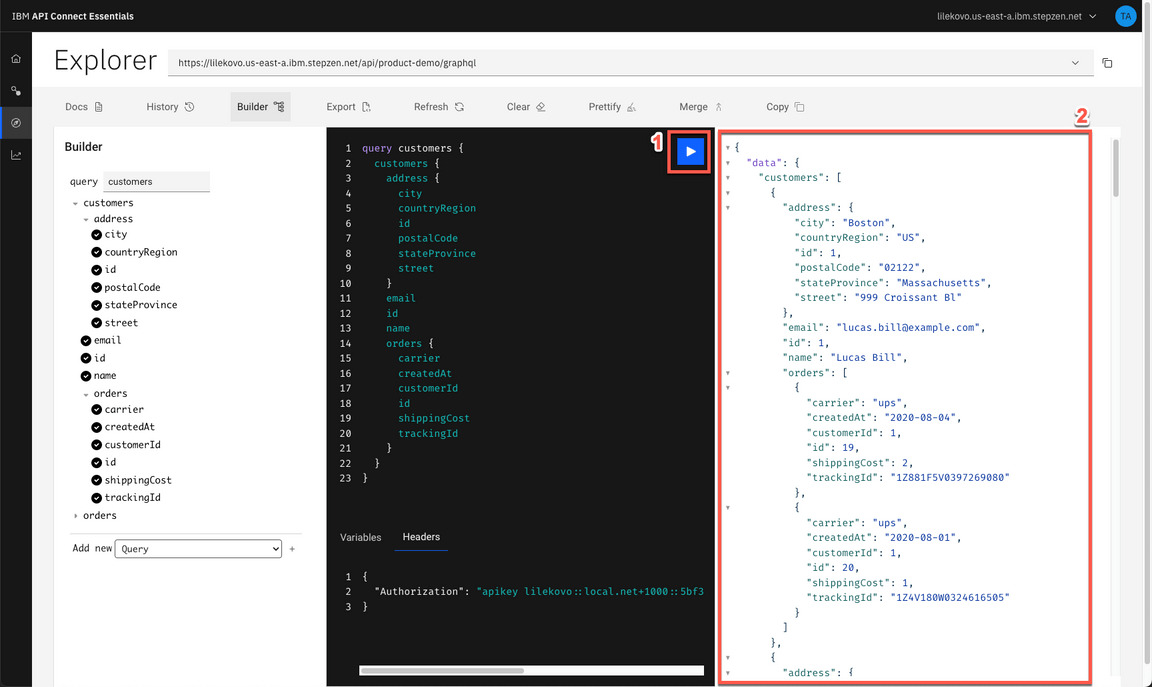
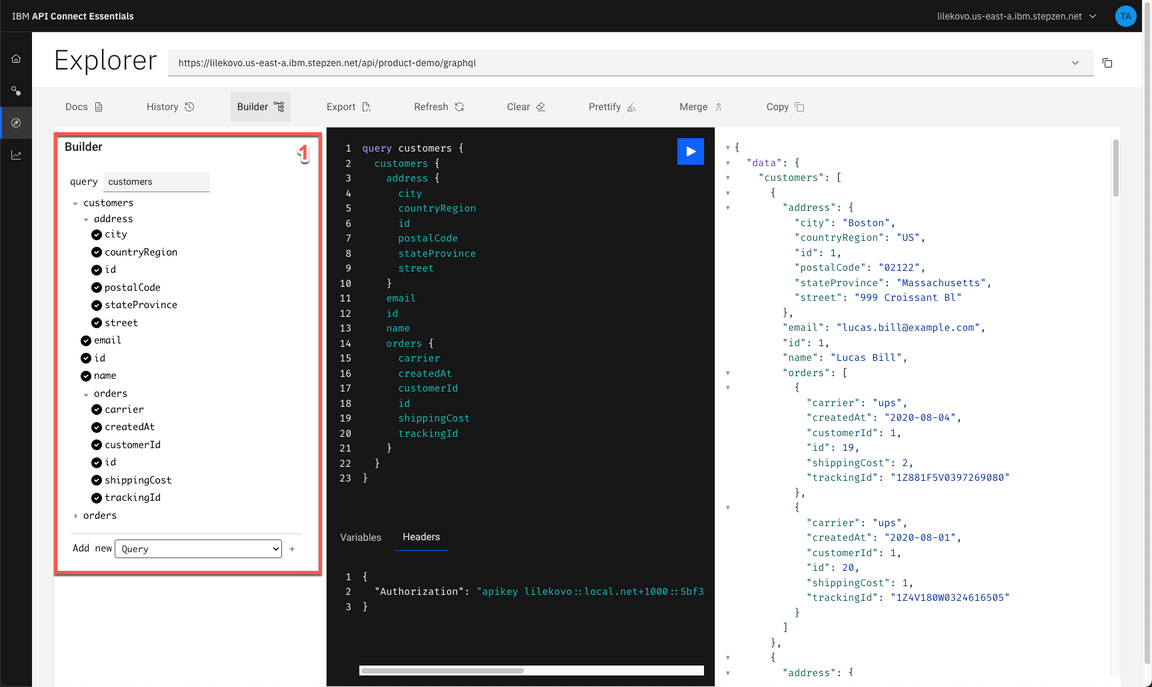
The APIC Essentials Explorer provides a playground for testing the GraphQL API. In the Explorer, Focus’ developers can play with different queries, for example they can try the orders query. Another possibility is to run a customer query, with some custom fields. Remember, with this GraphQL API, they are consuming data from two different REST APIs. If they want, they can do that with APIs from different types of data sources as well.
Action 3.4.1
Go ahead and click Execute Query button (1) to test the customers query. Check the result data (2).
Action 3.4.2
You are welcome to play with the Builder section (1), to create queries with different values.
4 - Autogenerate GraphQL Schemas from MySQL Database
4.1 - Import MySQL schema
Narration
At this stage, the Focus team decided to create a GraphQL API with a SQL database backend.
There are two ways to create your GraphQL API with API Connect Essentials when you have a SQL database backend.
- Use the command-line interface (CLI) command stepzen import [mysql OR postgresql] to specify their database. API Connect Essentials introspects it and auto-generates a GraphQL schema for you.
- Write the schema code in a .graphql GraphQL Schema Definition Language (SDL) file. Use the GraphQL directive @dbquery to connect the database, and with just a few lines of code, they have a working schema.
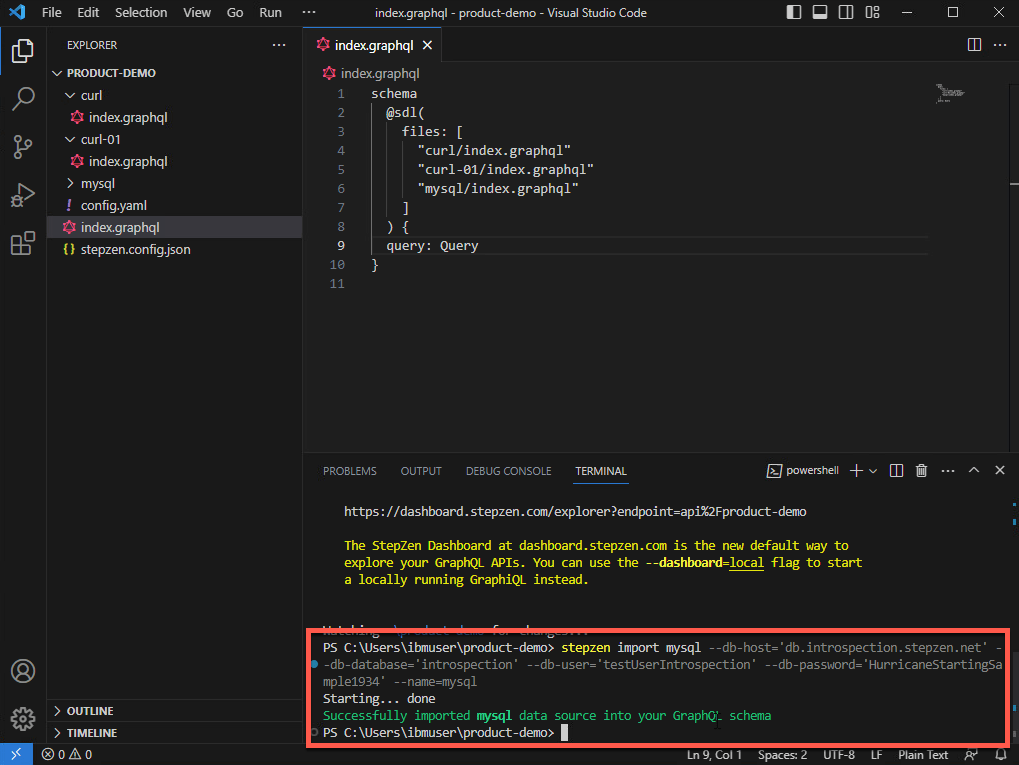
Focus’ team decided to use the stepzen import mysql command. Focus’s Database team provided all the details of the MySQL database. The developers use the API Connect Essentials CLI command to import the database schema to a GraphQL API.
Action 4.1.1
On the Visual Studio Code terminal, cancel the current execution (CTRL+C). And execute the command below to create a GraphQL API that connects data from a database backend.
stepzen import mysql --db-host='db.introspection.stepzen.net' --db-database='introspection' --db-user='testUserIntrospection' --db-password='HurricaneStartingSample1934' --name=mysql
4.2 - Explore MySQL schema
Narration
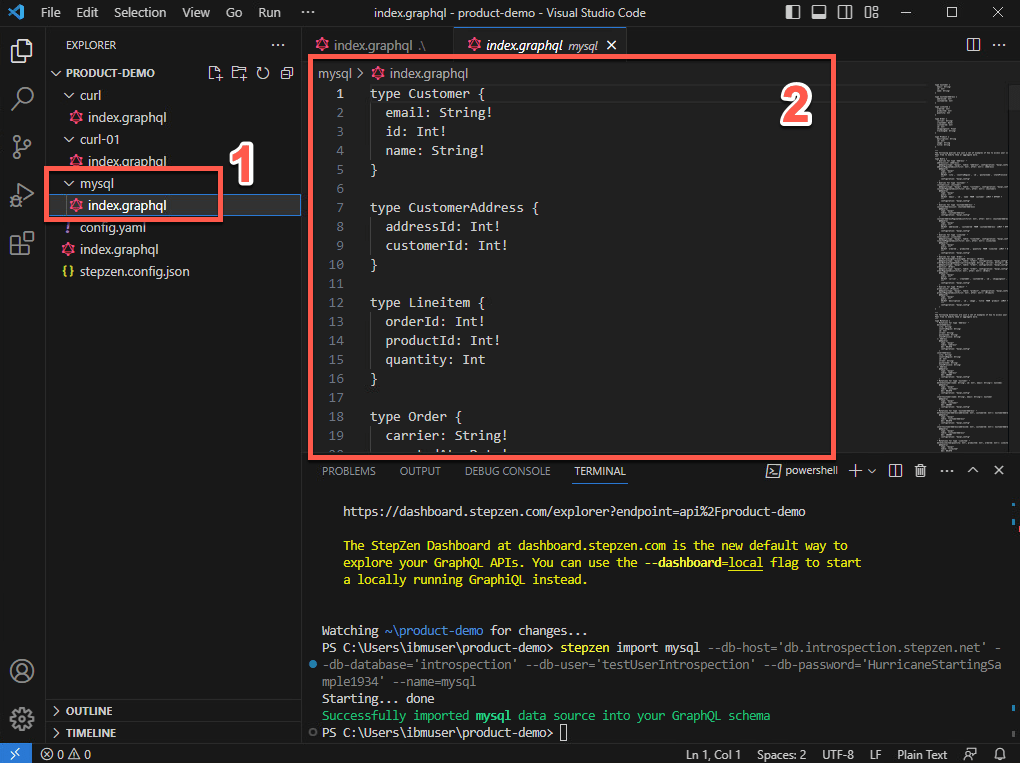
To check the new graphQL schema, they just need to open the mysql folder and open the new index.graphql file. Here they have their database schema from MySQL.
Now, they are invoking two REST APIs and one MySQL database query in their GraphQL API.
Action 4.2.1
In VSCode, open the mysql folder and open the new index.graphql file (1). You are welcome to explore the new schema (2).
5 - Creating a composition of building blocks using @materializer
5.1 - Create the getAddressById query
Narration
In many organizations, APIs are built around organizations or domains. For example, a B2C retail business might have customer APIs, e-commerce APIs, marketing APIs, and so on. These APIs are typically built by semi-independent teams, and usually have some common lightweight structures (like authentication, documentation, etc.), but otherwise are constructed independently. And they might appear in the same portal for the API consumer, but there is nothing that connects them.
Because GraphQL APIs are designed to “stitch” data together, GraphQL represents an opportunity to Focus’ team to connect APIs easil even those built by independent teams. GraphQL federation is a critical element of a GraphQL architecture. Federation is about assembling the work of independent teams into one, or possibly a few, uber GraphQL APIs. Focus’ developers would like to see how to do it!
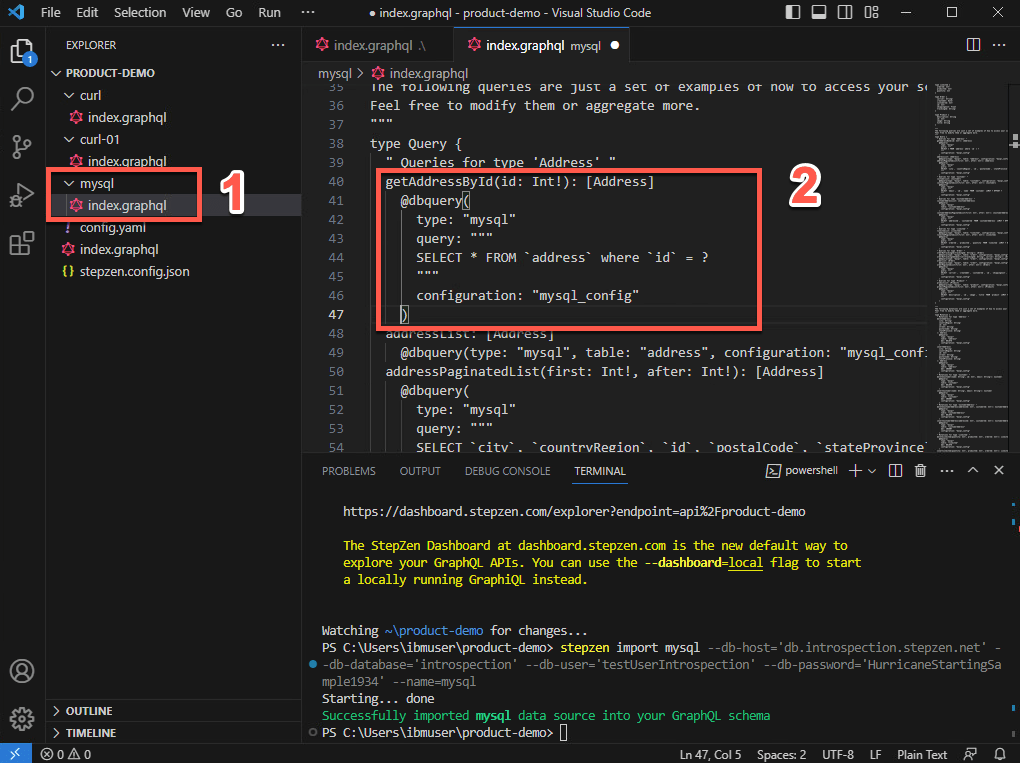
First, they need to create a query to getAddressById in their MySQL database.
Action 5.1.1
On the index.graphql from mysql folder (1), scroll down to see the ‘type Query’ declaration. Below the sentence ”Queries for type ‘Address’”, include the query code below (2).
getAddressById(id: Int!): [Address]@dbquery(type: "mysql"query: """SELECT * FROM `address` where `id` = ?"""configuration: "mysql_config")
This code is defining a getAddressById query to select the address from the MySQL database.
Action 5.1.2
Save the file (File > Save or CTRL+S).
5.2 - Create a composition with @materializer
Narration
At this stage, they have multiple subgraphs. They would like to explore the scenario of link types across subgraphs with @materializer.
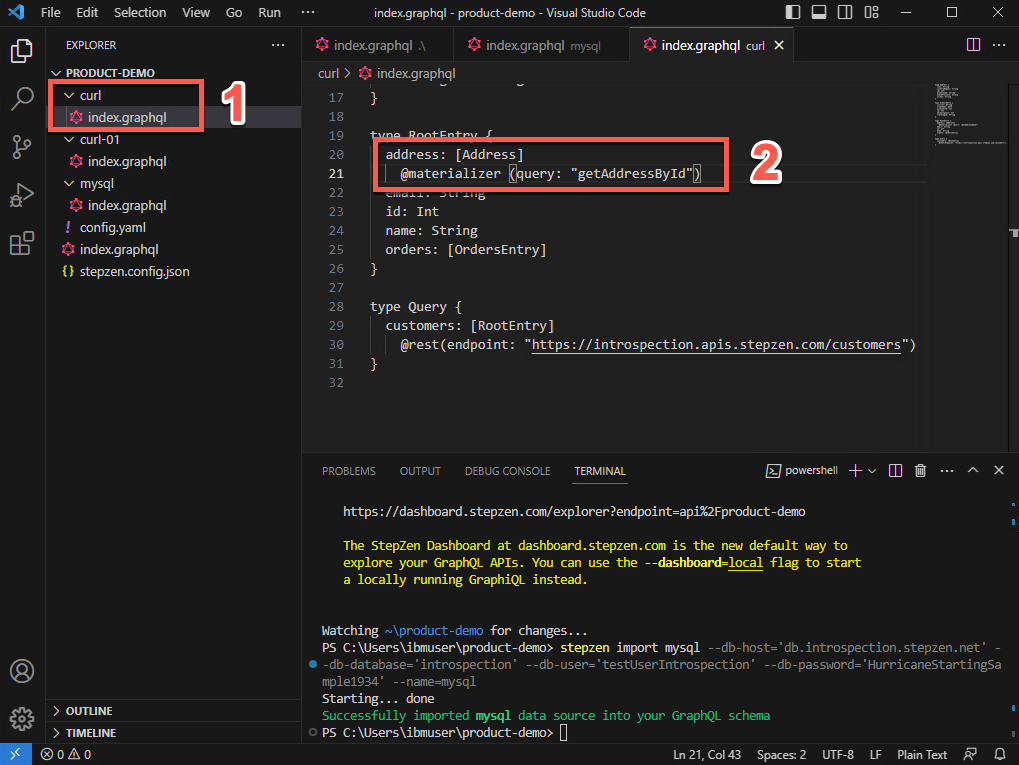
Focus’ team just needs to change the address field to use the getAddressById query that they have just created. With that, they can easily link these two subgraphs with @materializer.
Action 5.2.1
Open the index.graphql file from the curl folder (1), this is the schema from the customers REST API. Scroll down to see the ‘type RootEntry’ section. By now, the address is coming from the REST API endpoint. Let’s change it to get this value from MySQL database. Replace the current address type definition (address: Address) for the code below (2).
address: [Address]@materializer (query: "getAddressById")
Action 5.2.2
Save the file (File > Save or CTRL+S).
5.3 - Test the composition
Narration
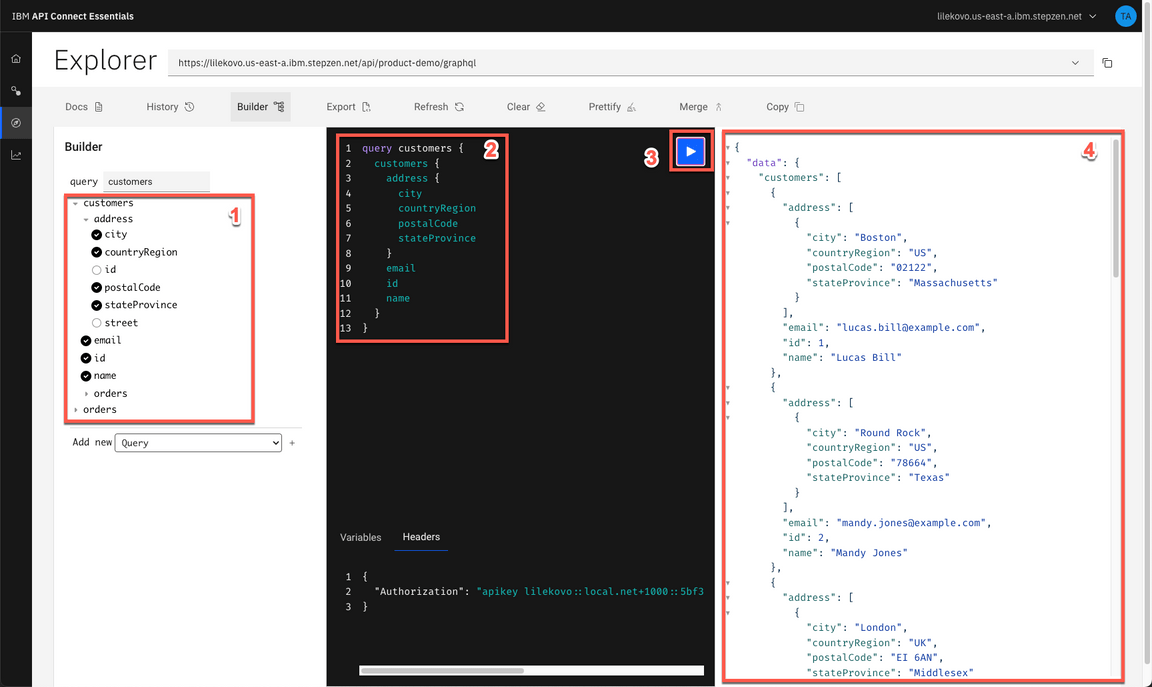
Focus’ developers are ready to deploy their new API. Now they can test the new API, by creating a customers query including address attributes.
Finally, here is the response, including data from the REST API and the MySQL database at the same time.
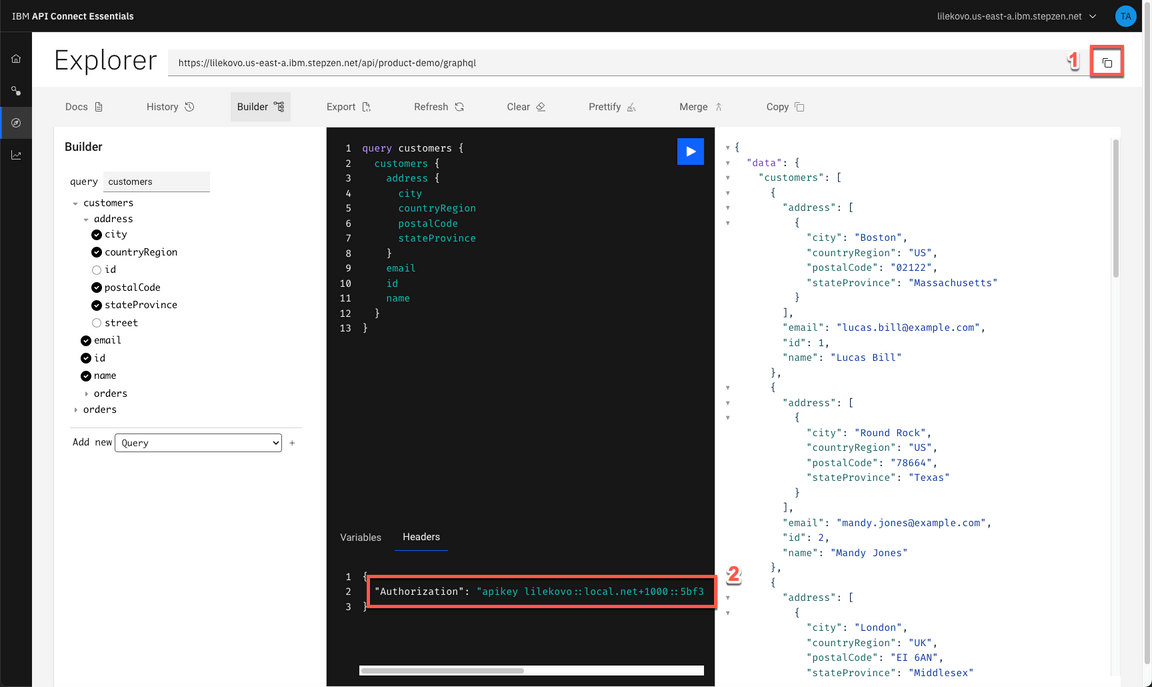
Before the developers move to the API Connections part, to see how to manage, secure and socialize this API, they need to take a copy of their API endpoint and the Authorization header. They will use this information later to invoke this API.
One important point to highlight here is about how API Connect Essentials controls access to GraphQL schemas and endpoints.
As Focus’ team build out their GraphQL APIs, they will want to add access control mechanisms to prevent unauthorized use of these endpoints. API Connect Essentials supports two different solutions for this problem.
- API Keys: they can use API keys to control access to the entire endpoint. API keys are the default access control mechanism.
- Field Policies: they can use Field policies to control access to specific entry point fields on the endpoint. Field policies provide fine-grained access control to their GraphQL API, using a model similar to attribute-based access control.
API Connect Essentials provides two different types of API keys for use with an account: Admin Keys and API Keys. Admin keys provide administrative-level access to their account and should only be used at development time. API keys provide more limited access to their account and should be used for production.
In this demo, for simplification purpose, Focus’ developers will use the Admin Keys to access their API. In a real environment, they should use API Keys or Field Policies to improve their API’s security.
Action 5.3.1
On the Visual Studio Code terminal, execute the command below.
stepzen start
Action 5.3.2
Back to the browser, refresh the API Connect Essentials Explorer page.
Action 5.3.3
On the APIC Essentials Explorer page, use the Builder section (1), to create a customers query including address attributes (2). Execute the query again (3) and check the result data is coming from Rest and MySQL database (4).
Action 5.3.4
Take a copy of your API endpoint (1) and the Authorization header (2).
6 - Create a GraphQL Proxy API in APIC
6.1 - Access the APIC Environment
Narration
Great, Focus’ team created their GraphQL API using a declarative approach. However, the developer’s team still needs a comprehensive API solution and strategy to manage these new GraphQL APIs from a unified and centrally visible solution.
They are looking for an integrated API management offering, with capabilities and tooling for all phases of the API lifecycle. Key steps of the API lifecycle include create, secure, manage, socialize, and analyze the APIs.
IBM API Connect is a full lifecycle API management solution that uses an intuitive experience to help consistently create, manage, secure, socialize and monetize APIs, which promotes digital transformation on premises and across clouds. This means Focus can power digital apps and spur innovation in real-time. IBM API Connect is also available as-a-Service as a highly scalable, fully managed API management platform on Amazon Web Services (AWS).
The Focus developers would like to explore how IBM API Connect will support them to manage their GraphQL APIs. For this demo, they are using a trial account of IBM APIC on AWS.
Action 6.1.1
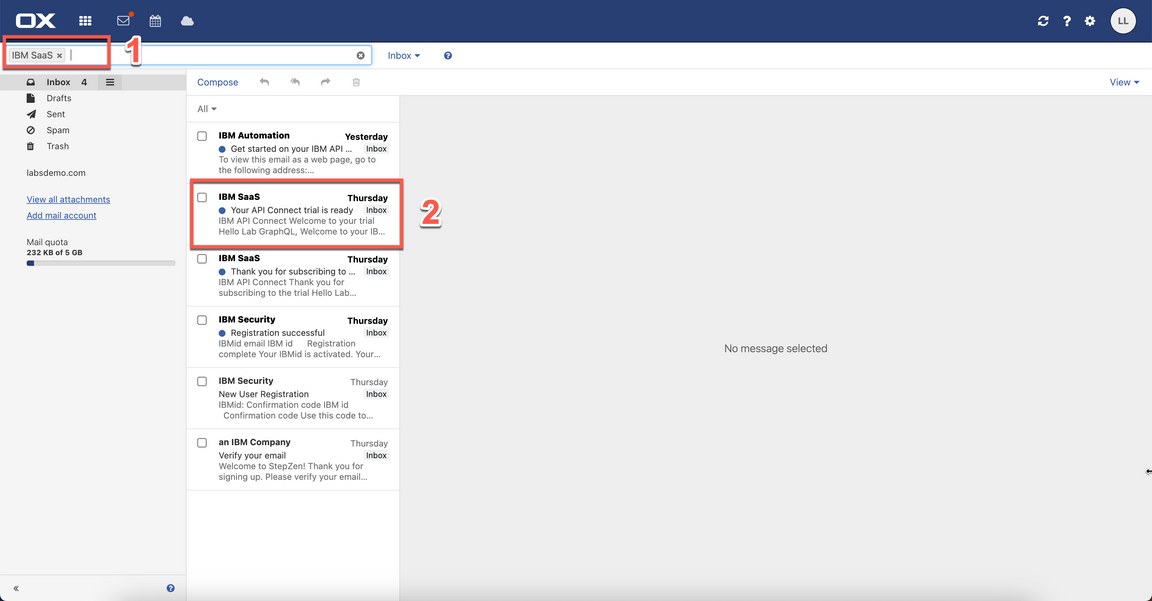
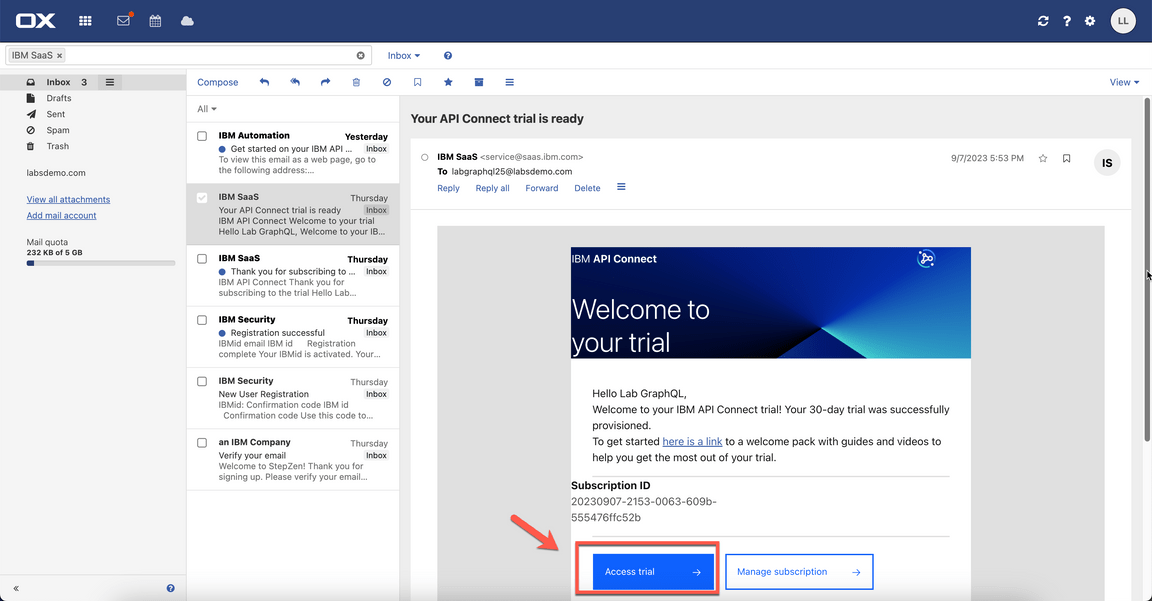
In your email inbox (that you used to create the APIC trial account), search for IBM SaaS (1), open the ”Your API Connect trial is ready” email (2).
Action 6.1.2
Now, click Access trial button.
Action 6.1.3
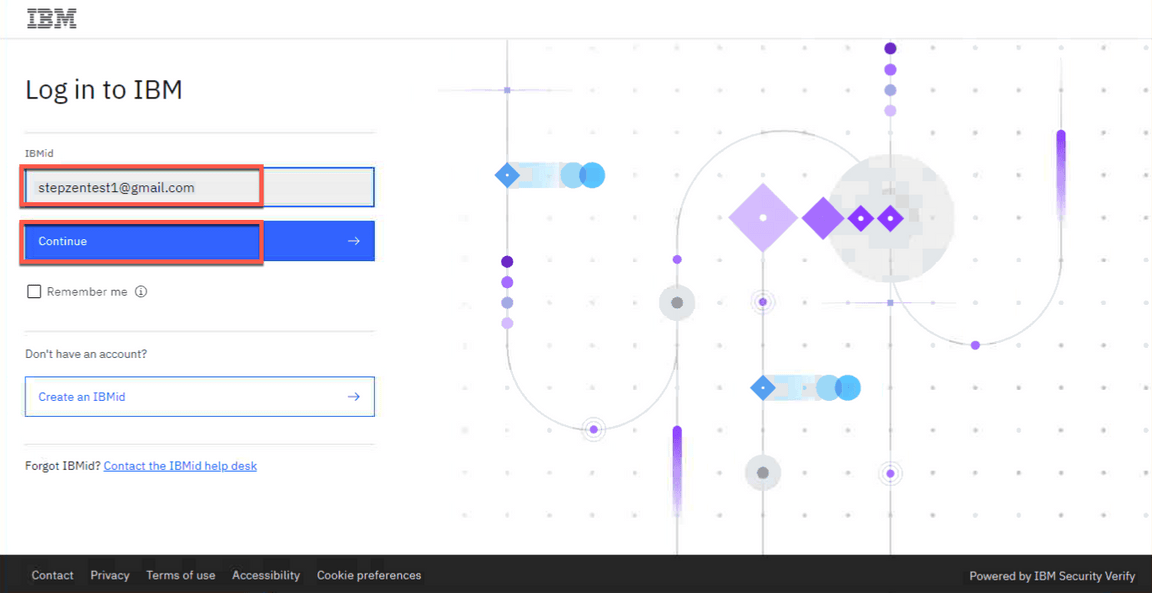
Log in with your APIC user and password.
6.2 - Create a new API from existing GraphQL service
Narration
Here, the developers are on their API Connect Enterprise as a Service environment. API Connect Enterprise as a Service is a cloud-based edition of IBM API Connect. Using API Connect Enterprise as a Service enables them to work in the cloud to create, manage, secure, and socialize APIs using the latest features, innovation, and industry standards for full API lifecycle management.
API Connect Enterprise as a Service uses software-as-a-service as a delivery model. With this model, API Connect is hosted on Amazon Web Services and is managed by IBM. Focus Corporation pays for using the software without worrying about owning and maintaining the underlying infrastructure. With API Connect Enterprise as a Service, they pay for usage through their AWS bill.
IBM API Connect enables them to create a GraphQL API proxy definition that proxies a backend GraphQL server. API Connect extends the GraphQL standard by providing, in a GraphQL API definition, the ability to configure a range of settings that are used to calculate the complexity of a GraphQL request and an associated cost that counts towards the rate limit.
Action 6.2.1
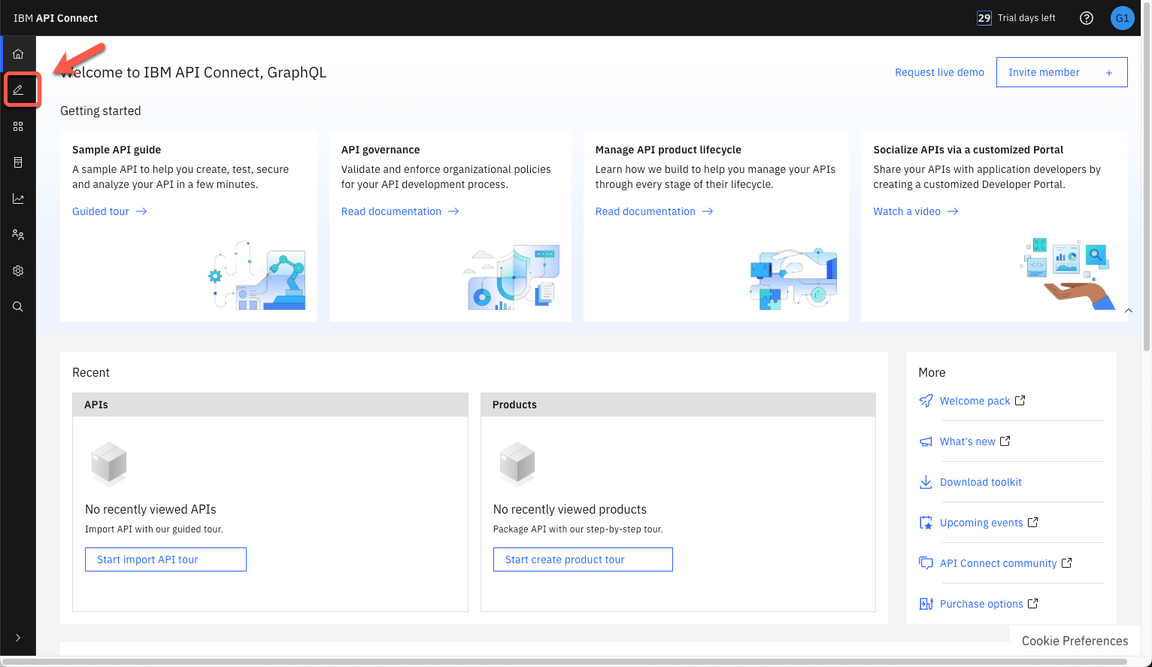
Click on the Develop menu.
Action 6.2.2
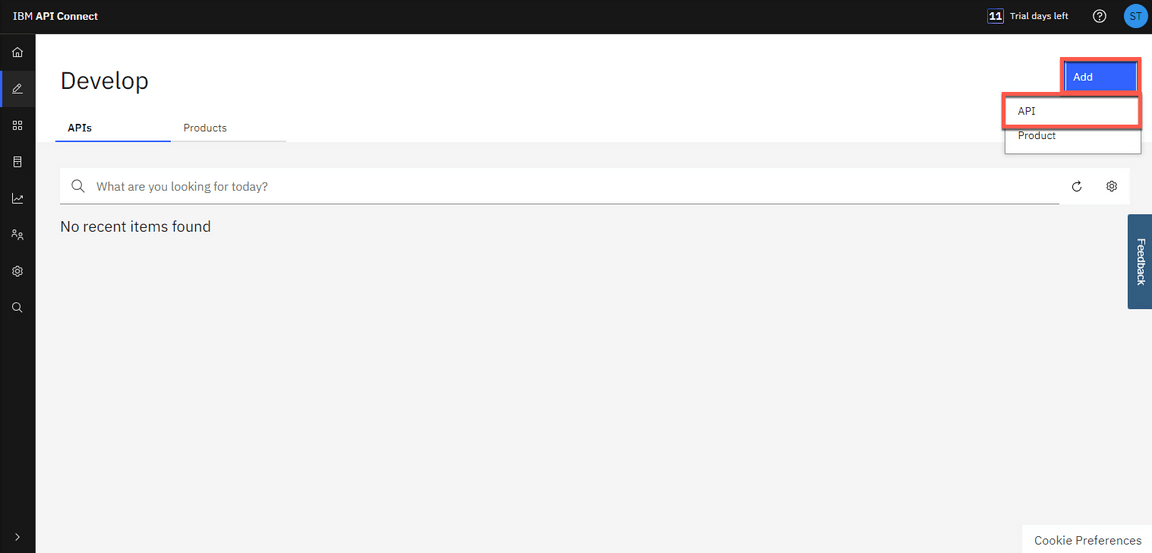
Then click Add->API.
Action 6.2.3
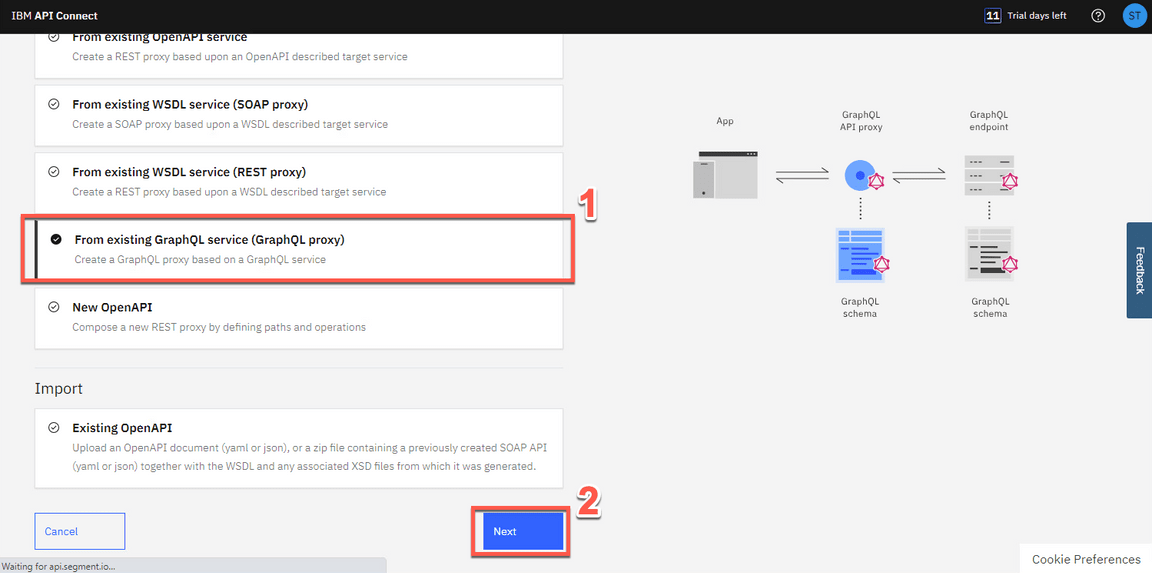
Select From Existing GraphQL service (GraphQL proxy) (1). Then click Next (2).
6.3 - Add the details of your GraphQL service
Narration
Now, Focus’ developers need to add details from their GraphQL API created with API Connect Essentials. Pointing to an existing GraphQL server, API Connect introspects the service and automatically creates a GraphQL proxy service.
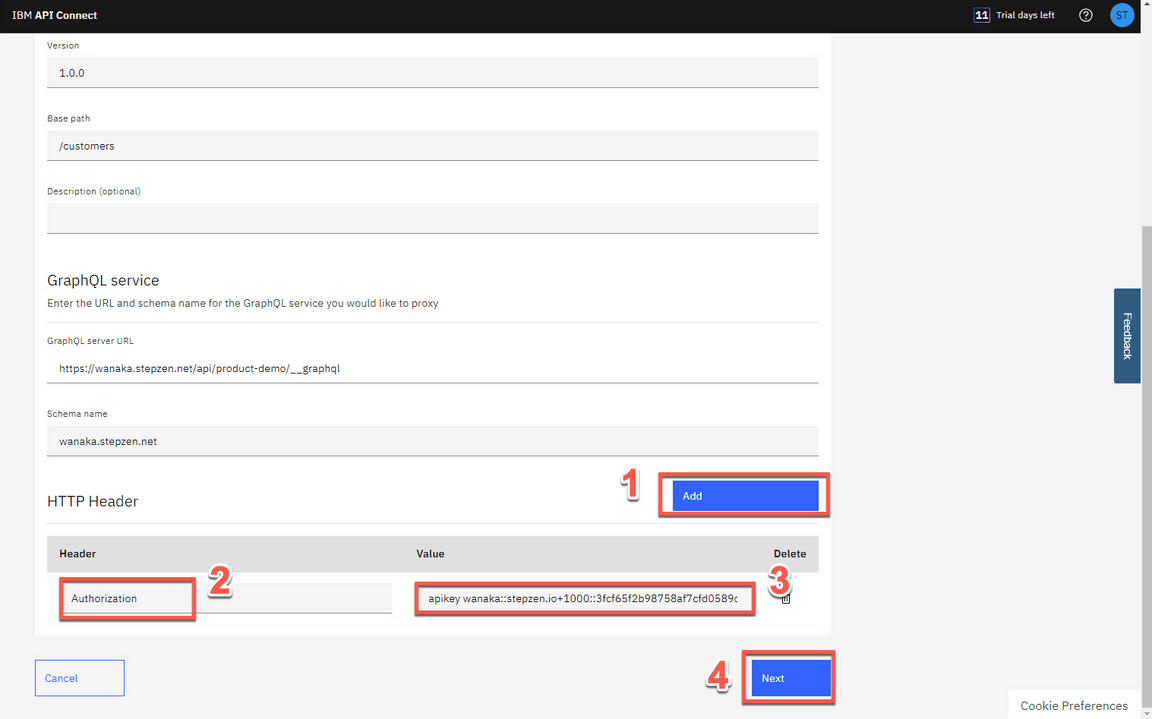
As described earlier in this demo, the API Connect Essentials API is using an API Key approach to control access to the entire endpoint. Because of that, Focus developers need to include the API Key in the Authorization Header section of the HTTP Header.
The schema validator reports warning and errors if found. For now, the developers ignore the schema warning. They will fix this warning in later steps.
Great! Focus’ developers successfully created a GraphQL proxy API using IBM API Connect.
Action 6.3.1
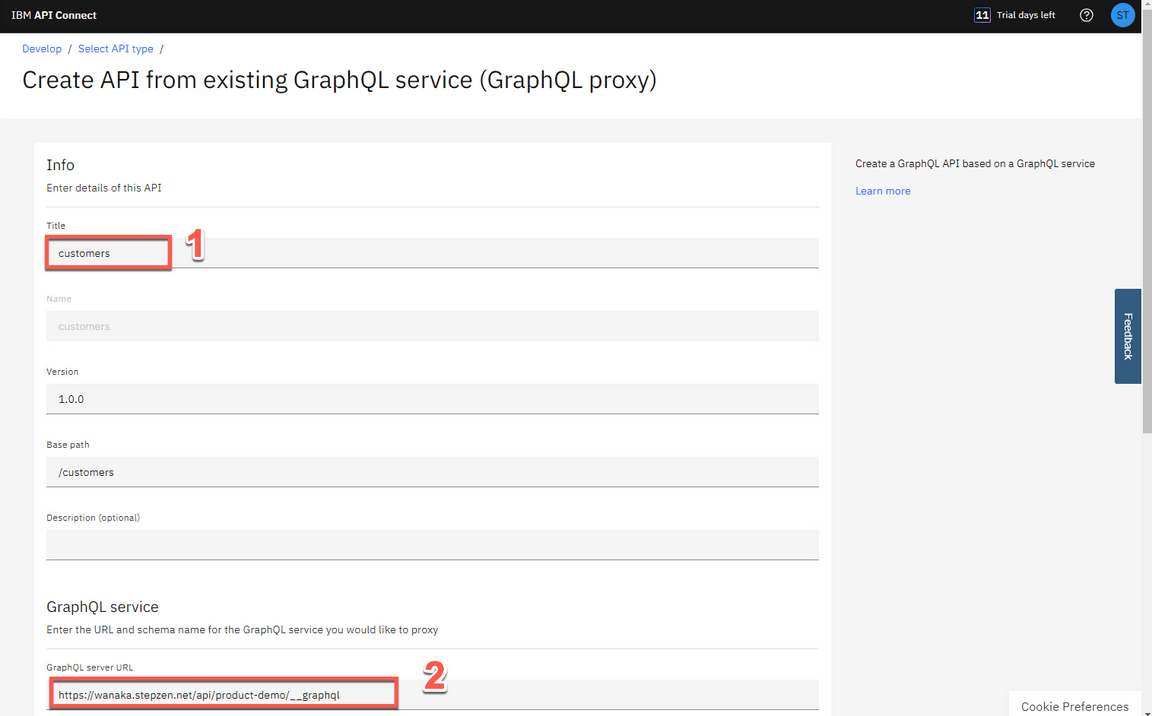
Enter the following values:
Title: customers (1)
GraphQL server URL: [Your API URL copied from StepZen Dashboard] (for example: https://akhirzaman.us-east-a.ibm.stepzen.net/api/product-demo/graphql) (2)
Action 6.3.2
In the HTTP Header section, click Add (1) to enter Authorization (2) as Header and paste the API Key value that you copied from the API Connect Essentials Dashboard Headers section as Value (3). Then click Next (4).
Action 6.3.3
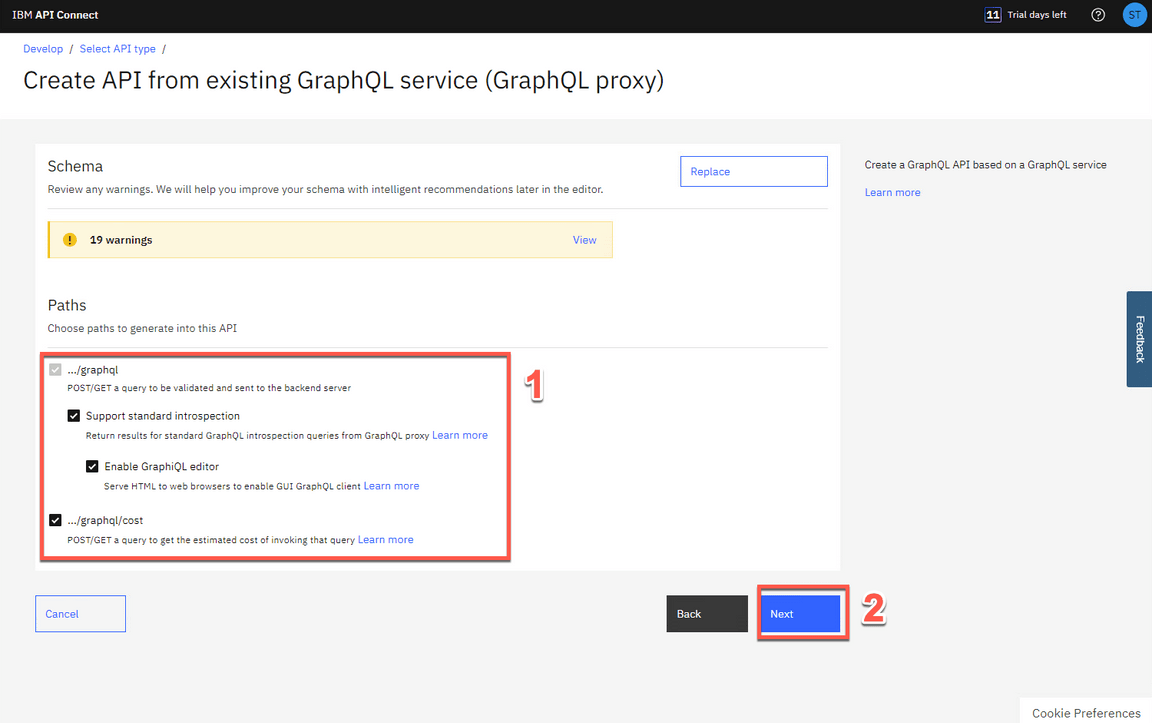
In the Paths section, select all the available endpoints (1), then click Next (2).
Action 6.3.4
Keep both Secure using Client ID and CORS checked (1) and click Next (2).
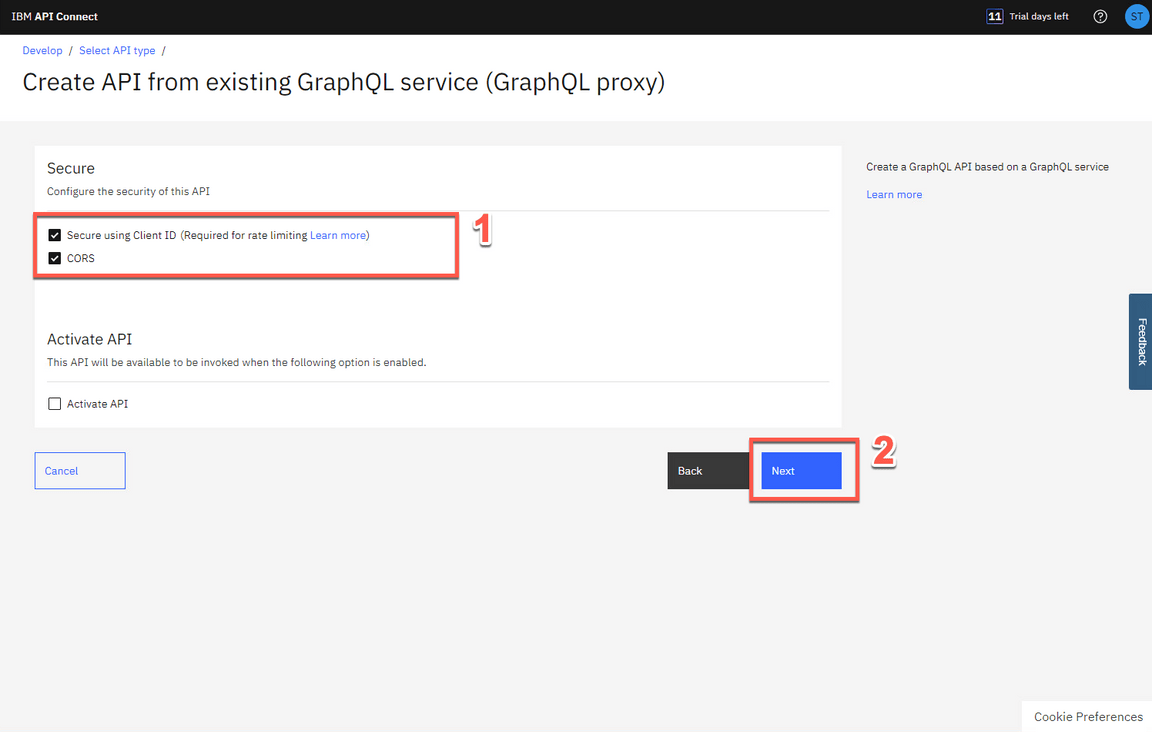
Action 6.3.5
Great! API Connect successfully created a GraphQL proxy API.
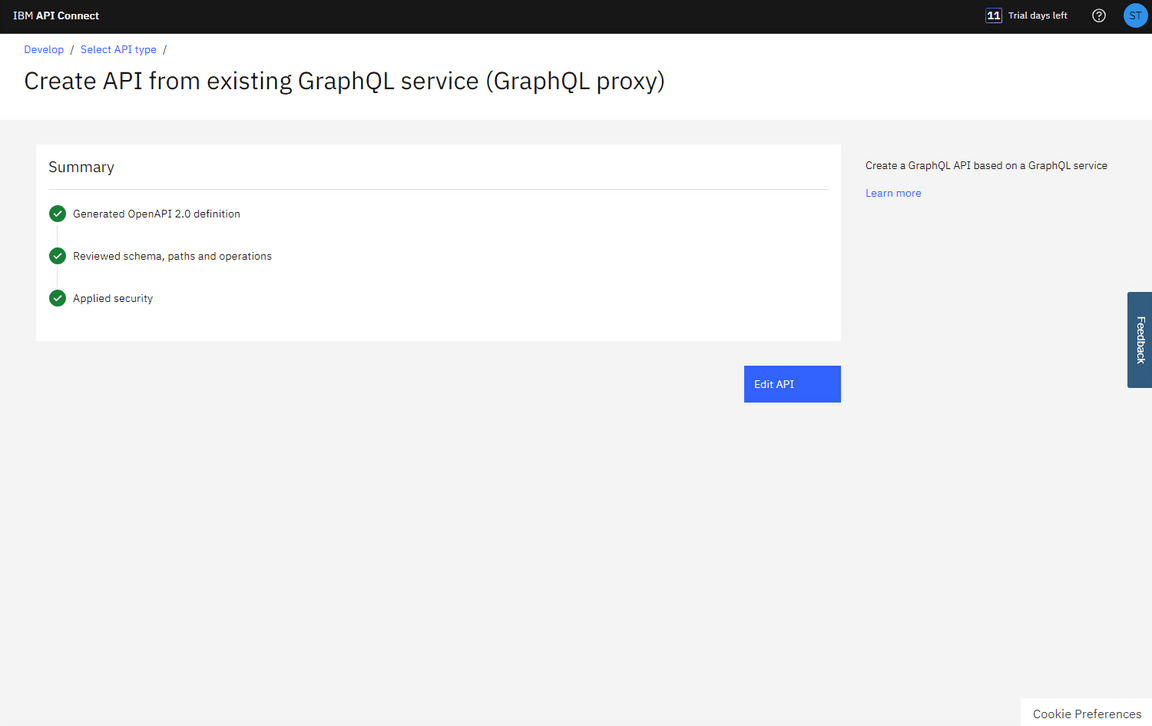
7 - Edit and Test the GraphQL Proxy API
7.1 - Edit API
Narration
Next, the developers would like to edit the API to view more details on the proxy flow.
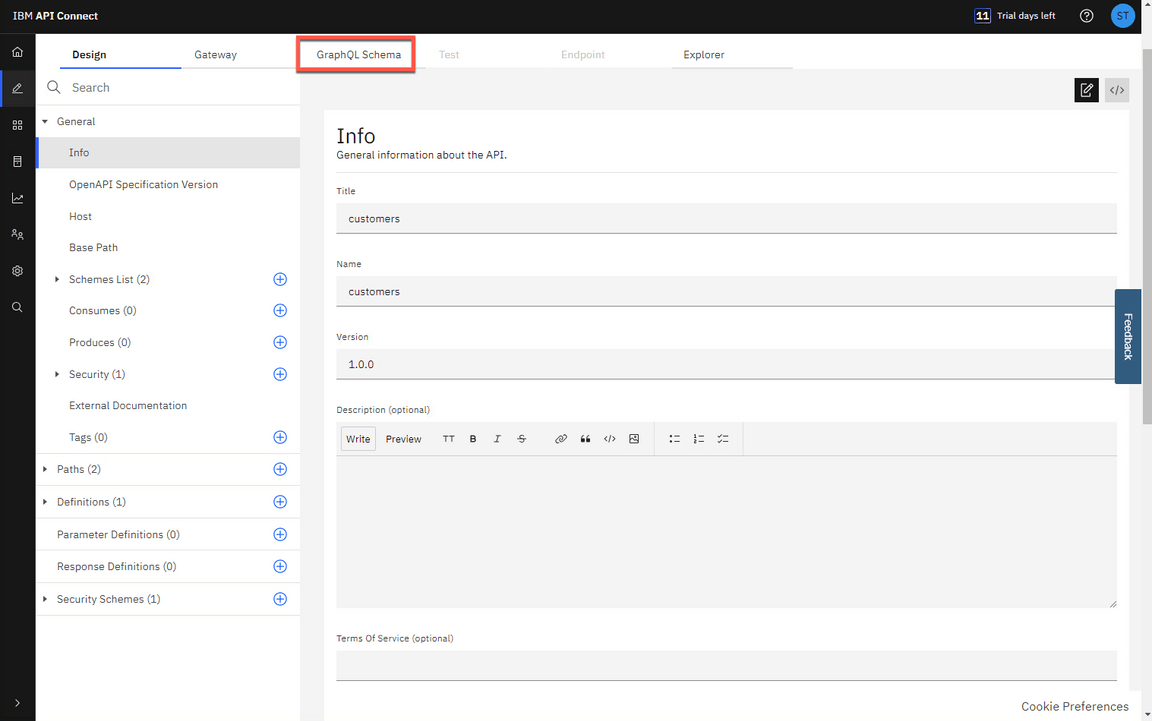
GraphQL APIs are structured the same as REST APIs with some additional options. Just like REST APIs, developers are able to add security schemas, paths and definitions from the left menu bar. They can also view the Gateway, Test and Explorer tabs similar to REST APIs. They will notice a new tab for GraphQL APIs.
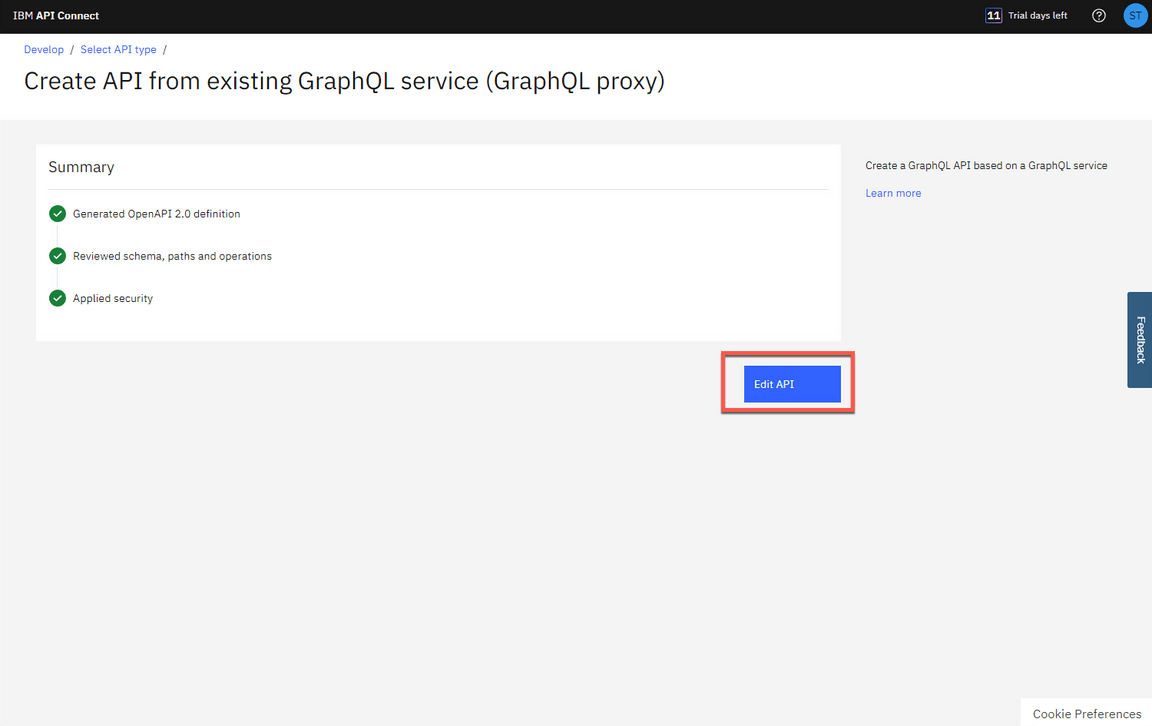
Action 7.1.1
Click Edit API to continue.
Action 7.1.2
Click the GraphQL Schema tab to view the schema.
7.2 - Apply suggestions
Narration
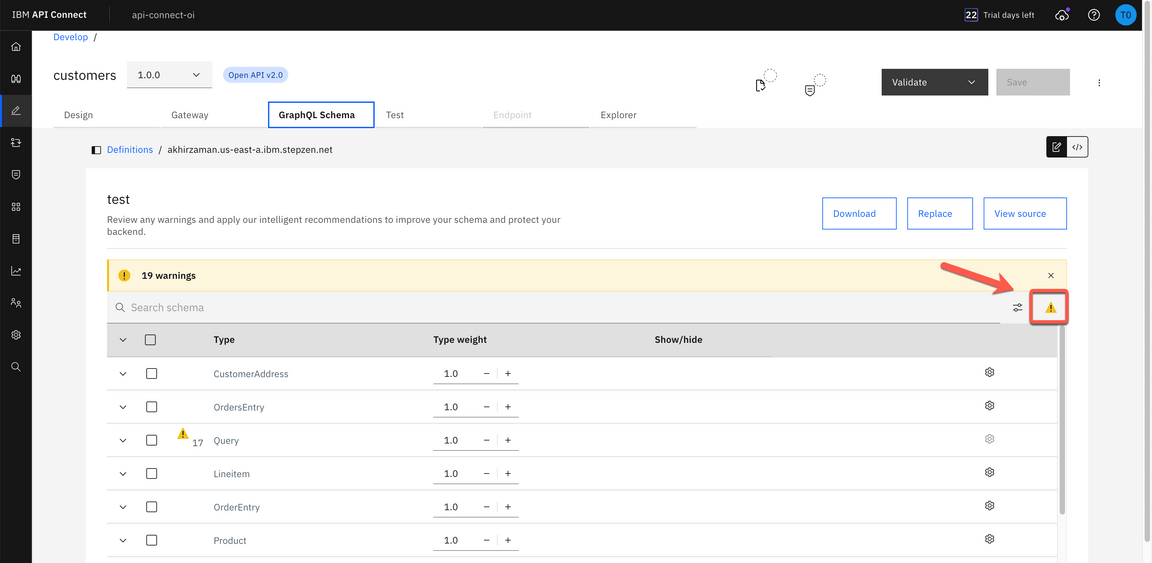
The GraphQL Schema tab displays Type for every type in your GraphQL schema, and Type Weight information for the cost or expense of each type. The weighting factor is used when calculating the type cost for a request to the GraphQL API. For example, a field that requires extensive CPU or memory use on the server to retrieve its value would be given a higher cost.
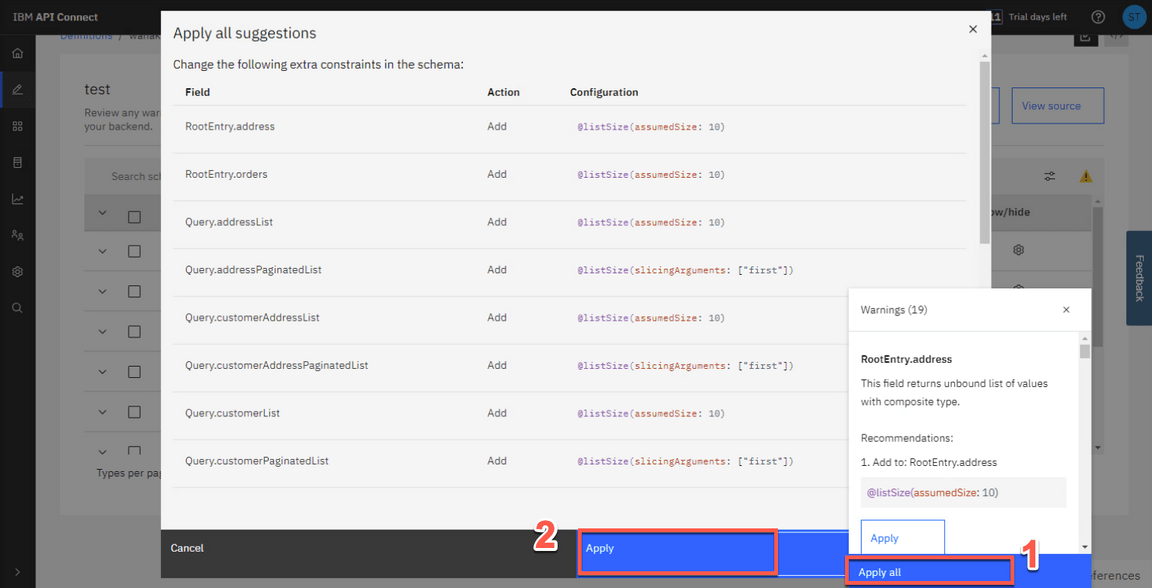
In addition to the warning details, the Warning window gives an option to fix the warning by applying the limits. While this Artificial Intelligence is often very accurate, for a real scenario it is important to carefully examine the results and only accept them when they are accurate, since this affects the security of your application.
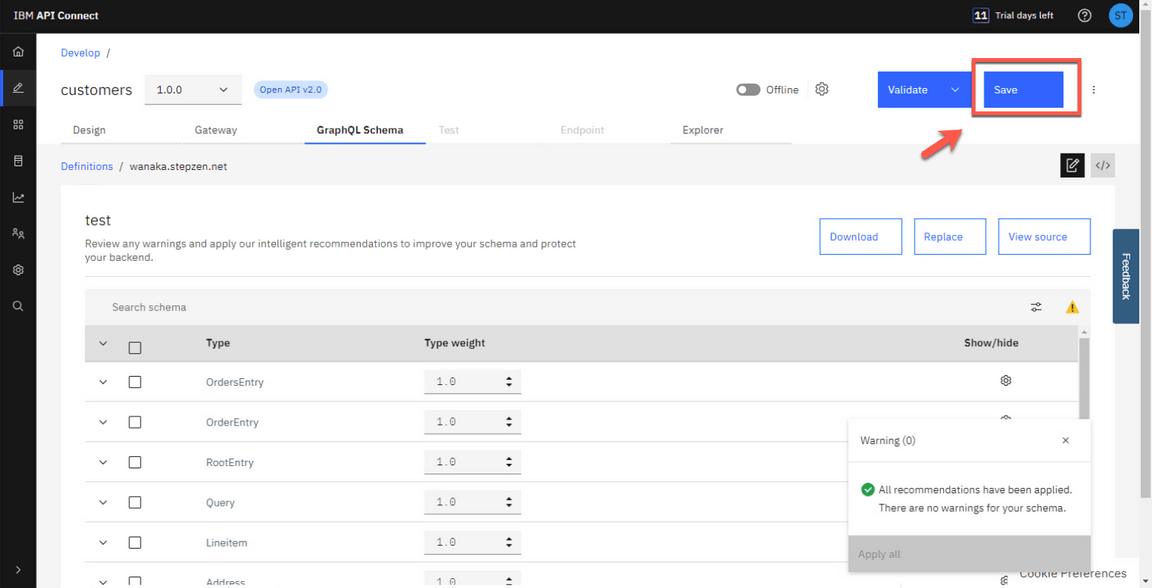
After applying the recommendations, the warning message is removed.
Action 7.2.1
Click the Warning icon.
Action 7.2.2
In our case, click Apply all (1), then click Apply (2).
Action 7.2.3
Click Save to save the API definition.
7.3 - Edit Gateway Flow
Narration
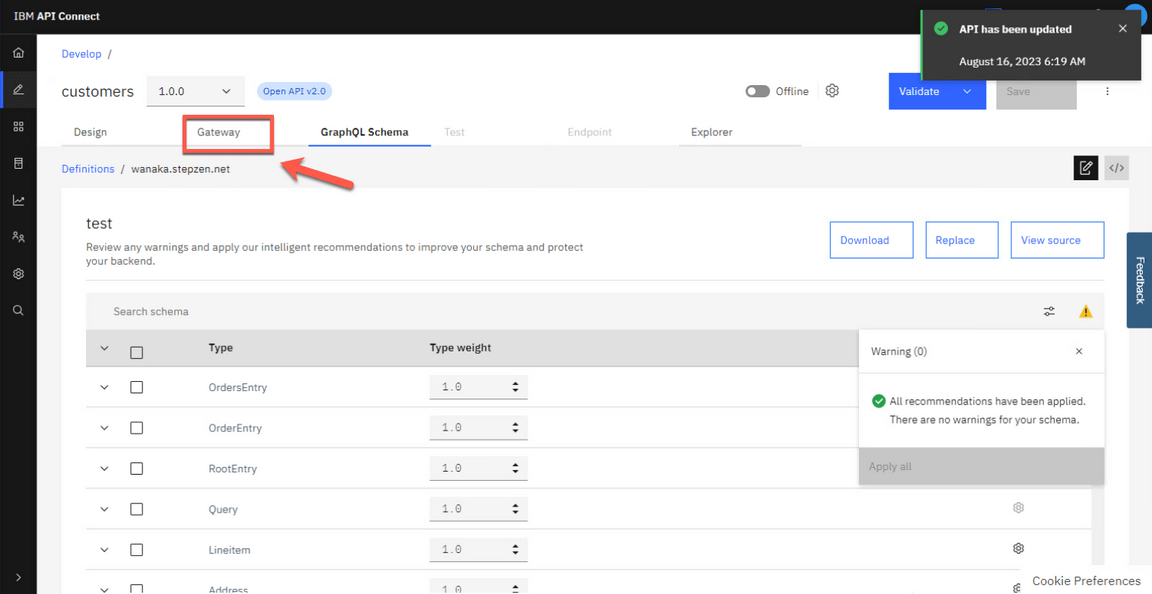
It is time to explore the Gateway view. The flow is automatically created as part of the initial API creation. The developers may apply additional logic by dragging and dropping items from the palette to the canvas. Focus’ developers will do a small change to allow Authorization header propagation.
Here they can add the Authorization header in the allowlist.
Action 7.3.1
Open the Gateway view.
Action 7.3.2
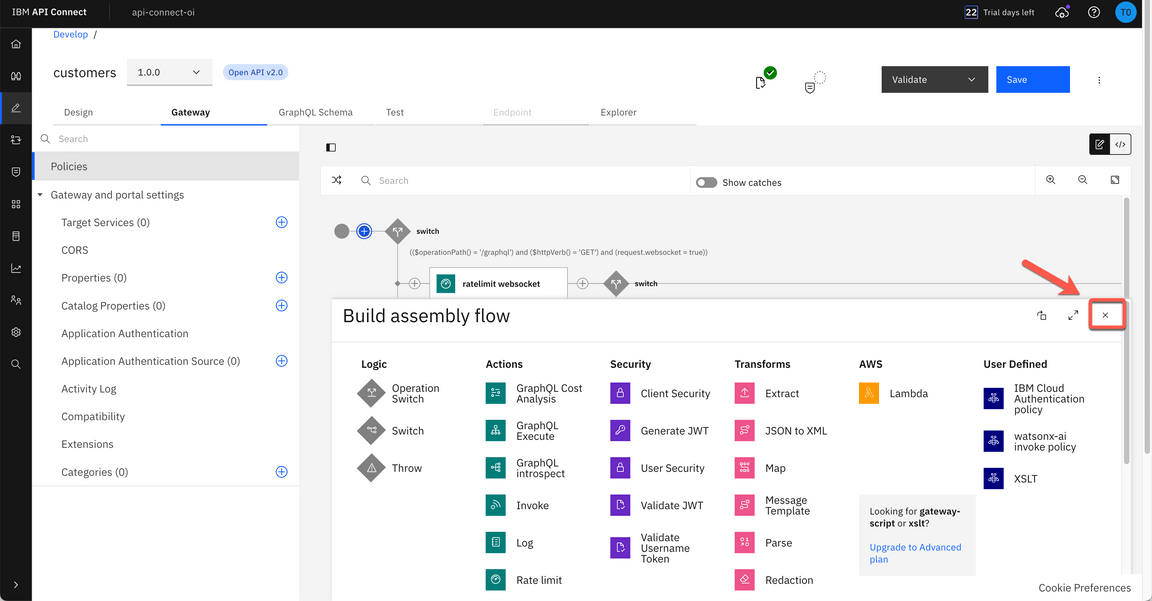
If necessary, close the Build assembly flow.
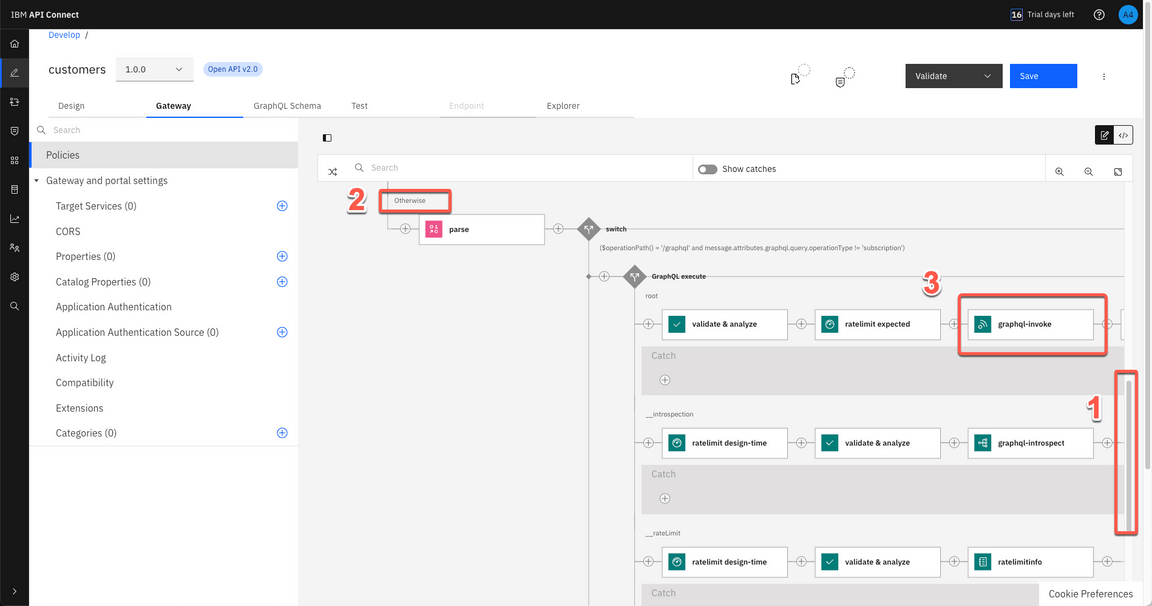
Action 7.3.3
Scroll down the flow (1) and on the Otherwise ramification (2), you should see a graphql-invoke node, click on it to edit (3).
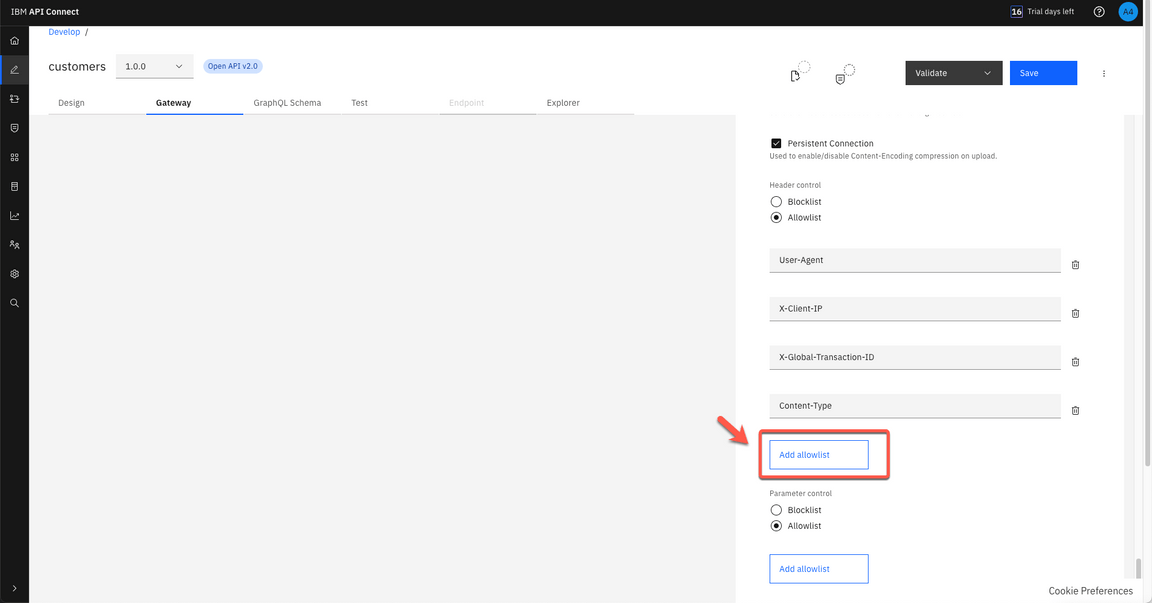
Action 7.3.4
On the graphql-invoke node definition, scroll down to see the Header control section. Click on Add allowlist to add a new header in the list.
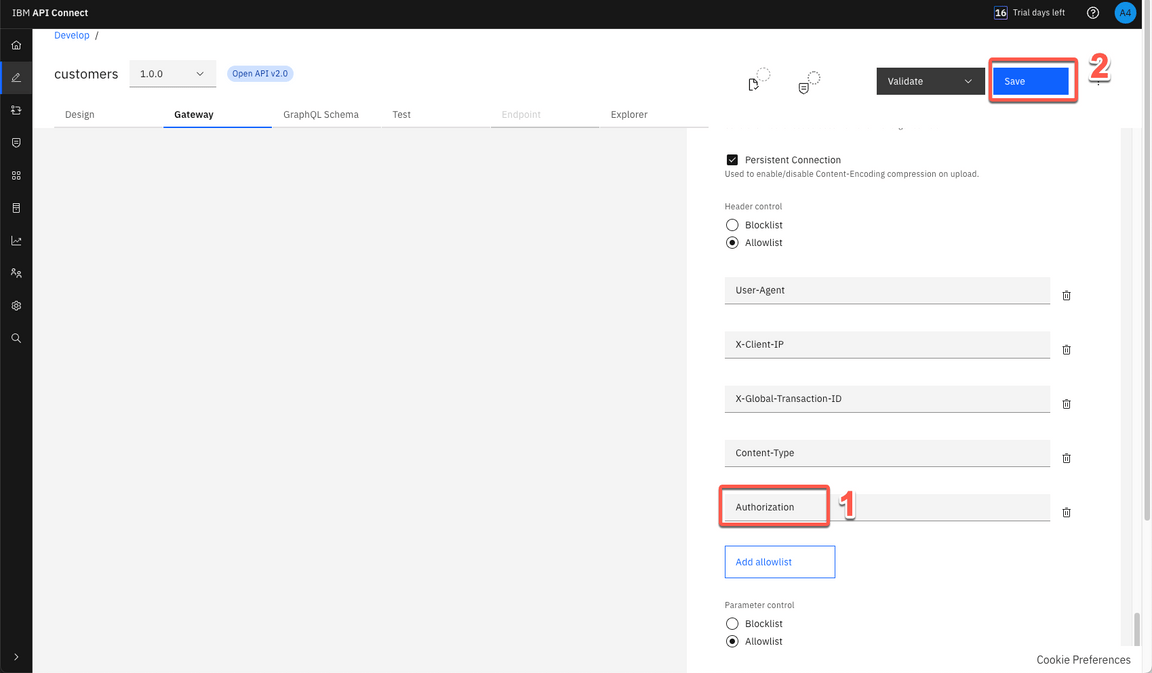
Action 7.3.4
Enter Authorization as the new header allowed (1) and click Save button (2). This means that we will send the Authorization header on to the backend.
7.4 - Test the API
Narration
At this stage, they are ready to test the Proxy API. To publish the API, first they need to set their API to online.
After successfully publishing the API to the API Gateway, additional tabs appear on the screen. It is time to explore the Test tab.
The Test page also includes a GraphQL Editor. Here Focus’ developers can include their customers query. If necessary, they can use the Prettify option to improve the visualization of the GraphQL query.
Next, they need to include the Authorization header in the Parameters tab.
Every time that they invoke their API, they need to pass their API Key as the Authorization header. For now, they will include it in their test.
On the Trace section, they should see a HTTP Status: 200 and in the Response data, they can see the data returned from their GraphQL API.
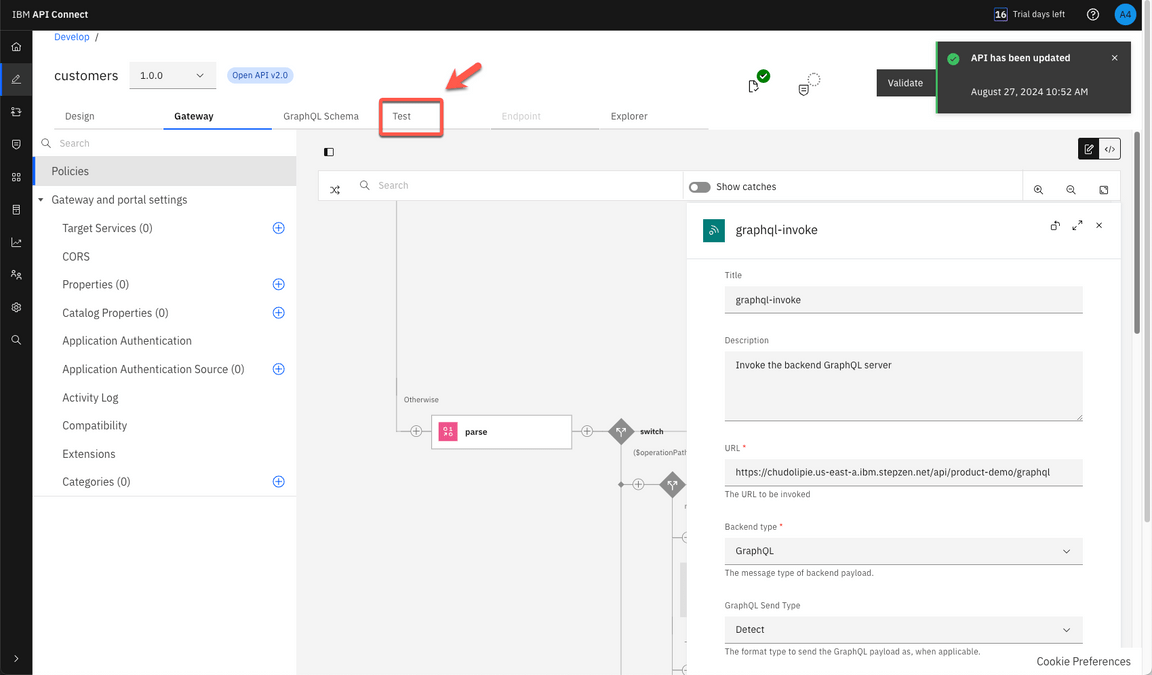
Action 7.4.1
Open the Test tab .
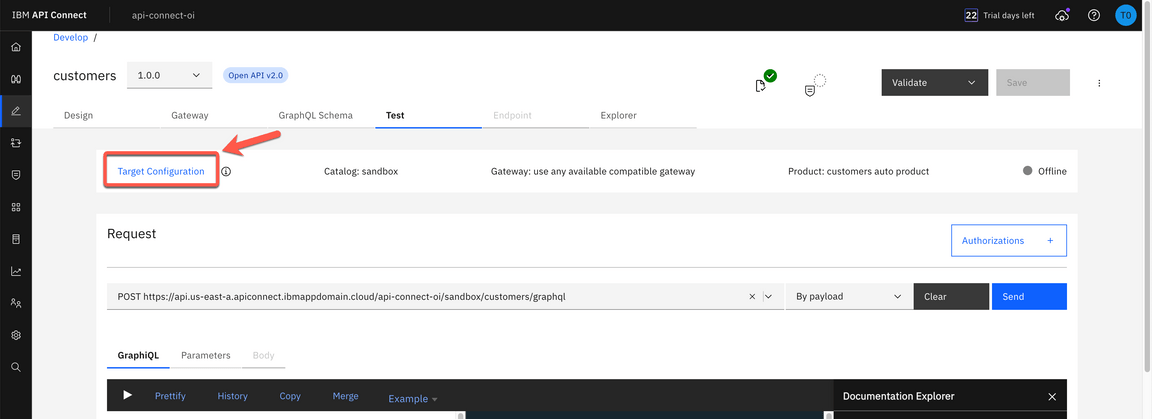
Action 7.4.2
Click on Target Configuration link.
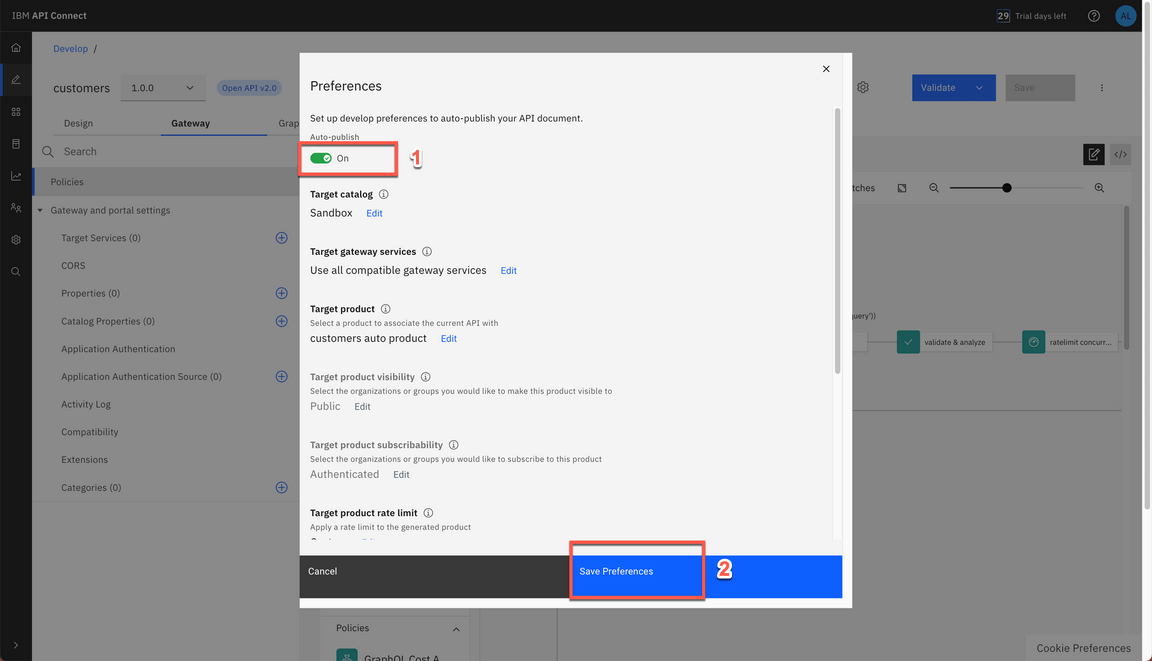
Action 7.4.3
Toggle the Auto-publish button from off to on.
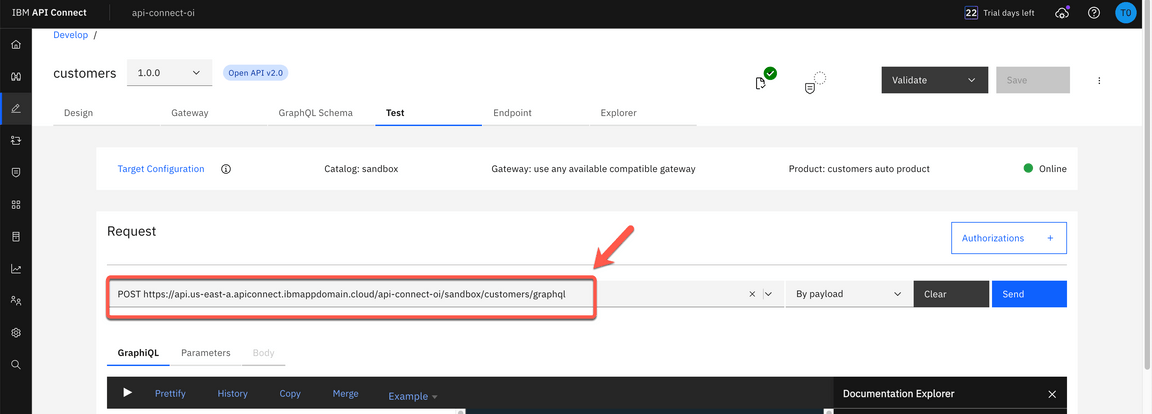
Action 7.4.4
Record (copy and paste) the API Gateway URL of your API to a notepad for reference later.
Action 7.4.5
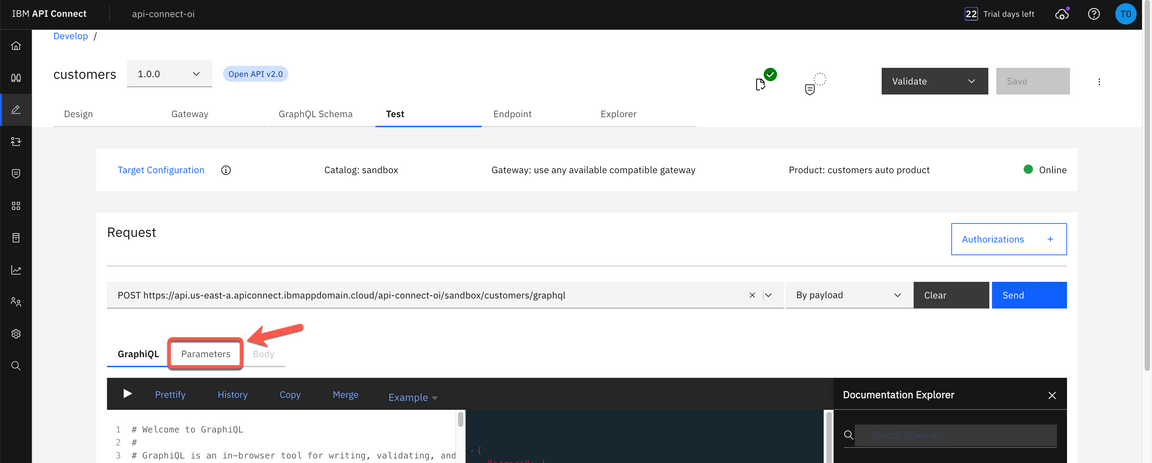
Open the Parameters tab.
Action 7.4.6
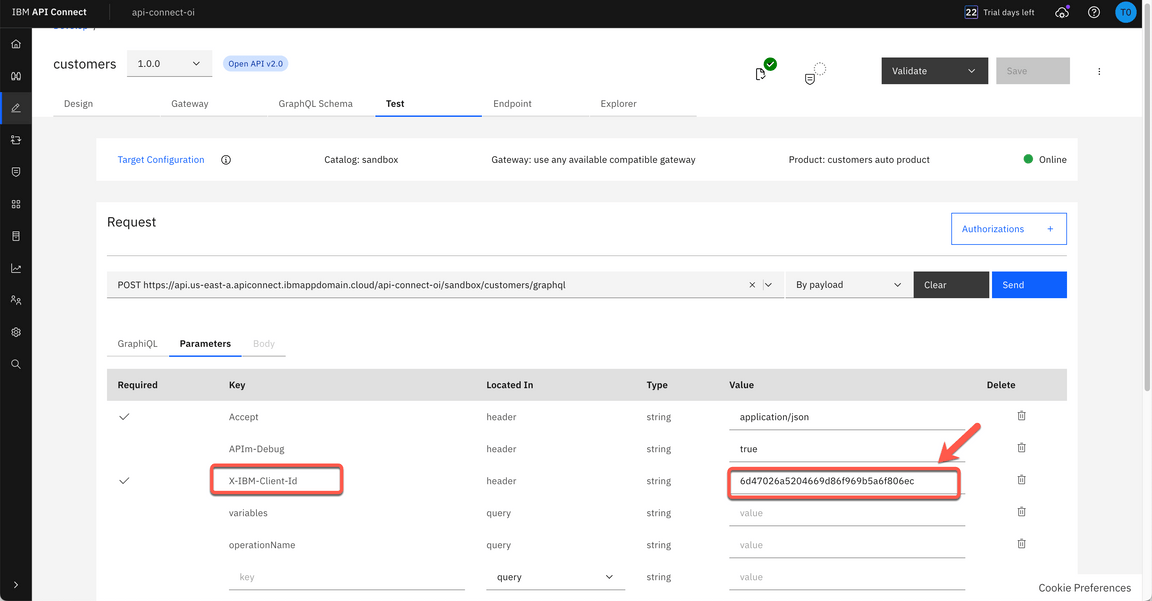
Record the X-IBM-Client-id to a notepad for reference later.
Action 7.4.7
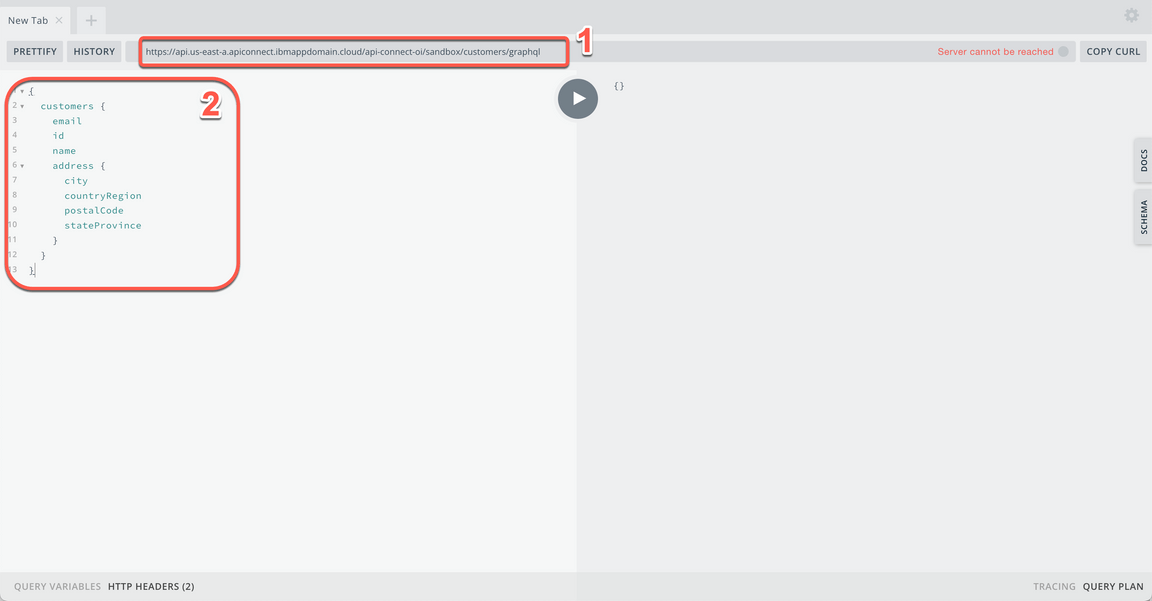
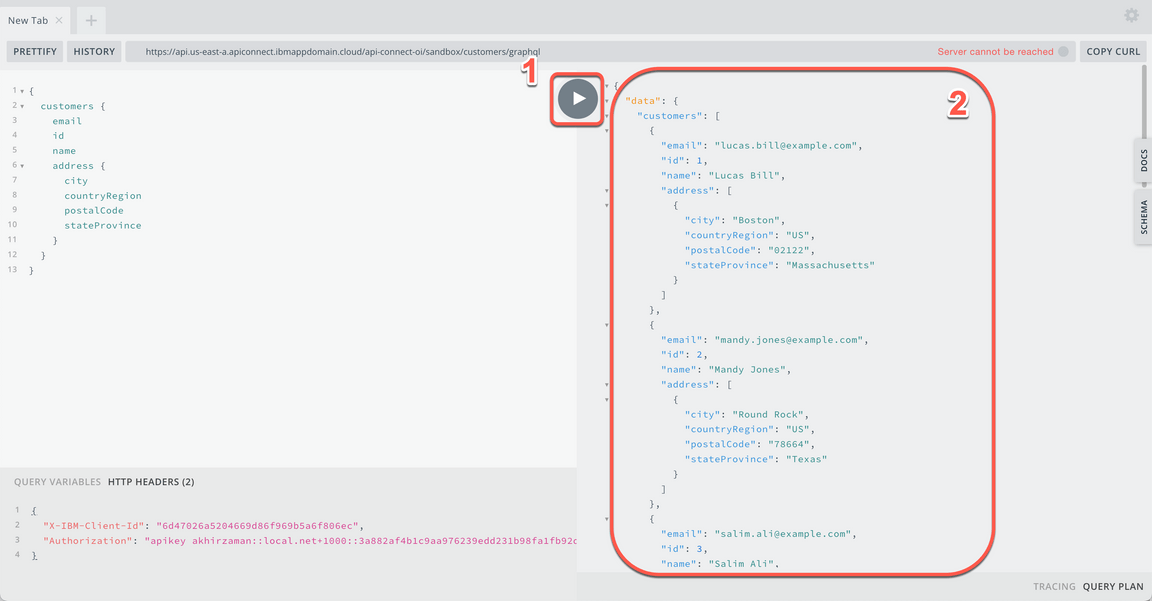
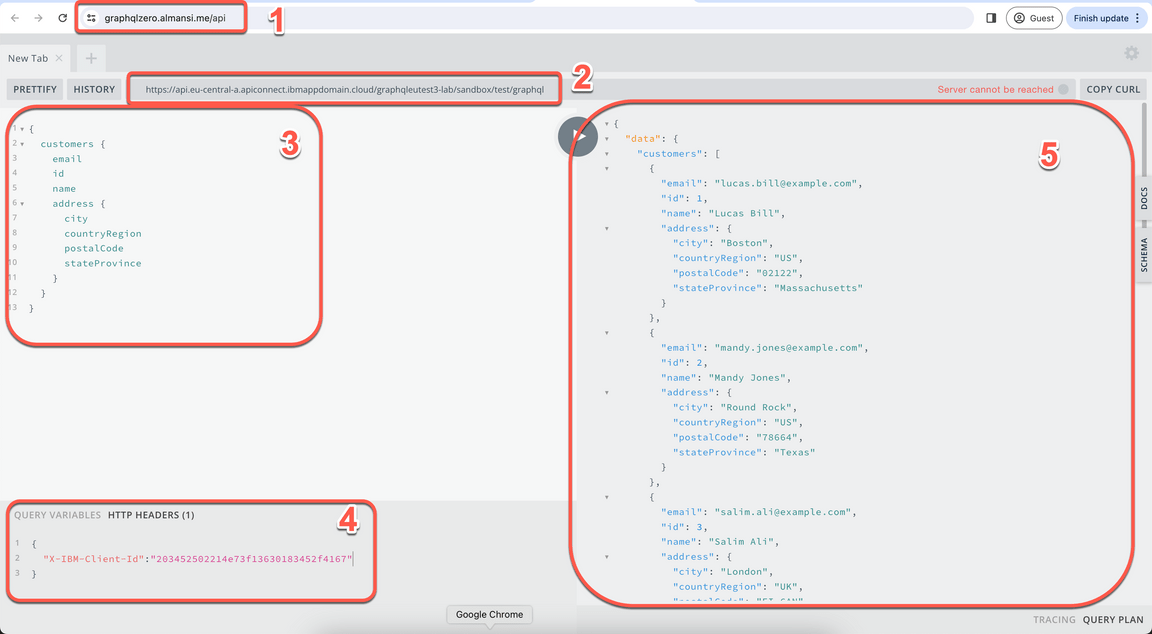
GraphQLZero is a free, online GraphQL API that you can use to get fake data from a real backend while testing or prototyping your app. You will use the GraphQLZero API Playground to test your API. Open the GraphQLZero API Playground. Paste the API Gateway URL of your API (1), and enter the Graphql query below (2).
{customers {idnameaddress {citycountryRegionpostalCode
Action 7.4.8
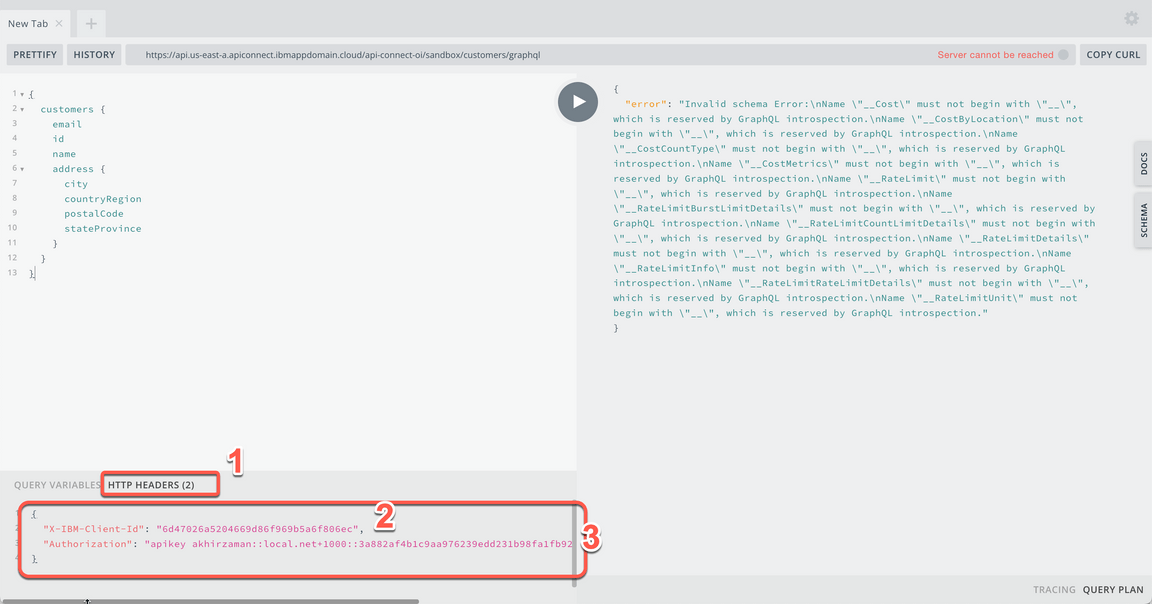
Open the HTTP Header section (1), and paste the JSON below. Replace <my-x-ibm-client-id> with the value of X-IBM-Client-Id (2) that you copied from APIC parameters tab and replace <my-authorization-header> with the value that you copied from API Connect Essentials Dashboard Headers (3).
{"*X-IBM-Client-Id":"<my-x-ibm-client-id>","Authorization":"<my-authorization-header>"}
Action 7.4.9
Now click on the Play button (1) to see the graphQL returned data (2).
7.5 - Add the authorization header
Narration
That is really good! But the Focus team decided to simplify it. They decided to hardcode the Authorization header parameter in their GraphQL API Proxy flow.
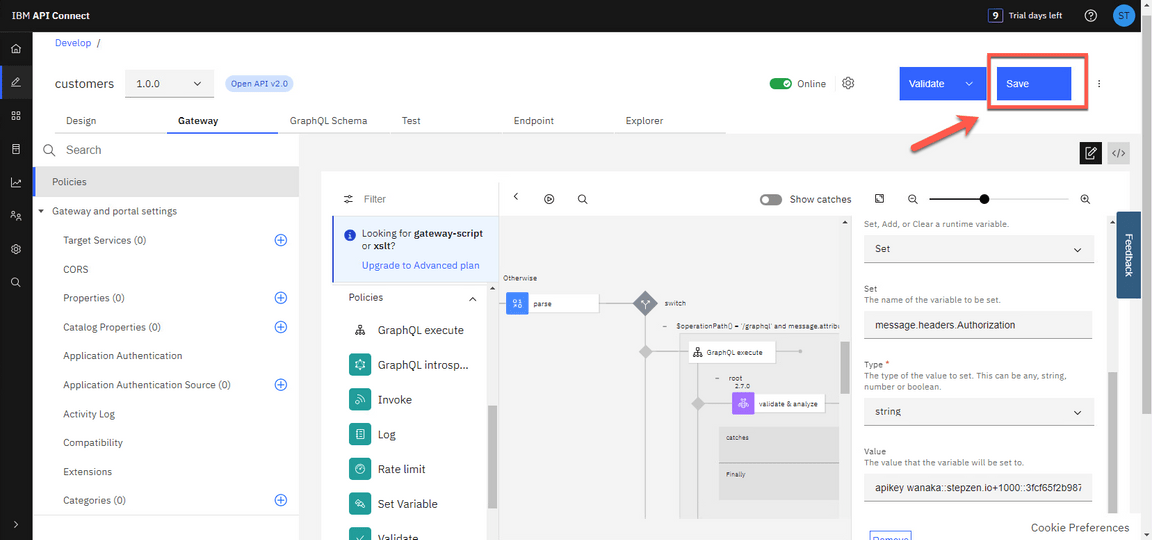
To do it, they will add a set variable node before the graphql-invoke. This node will add the authorization header in their message with the value that they copied from the API Connect Essentials Dashboard.
Action 7.5.1
Open the Gateway tab again.
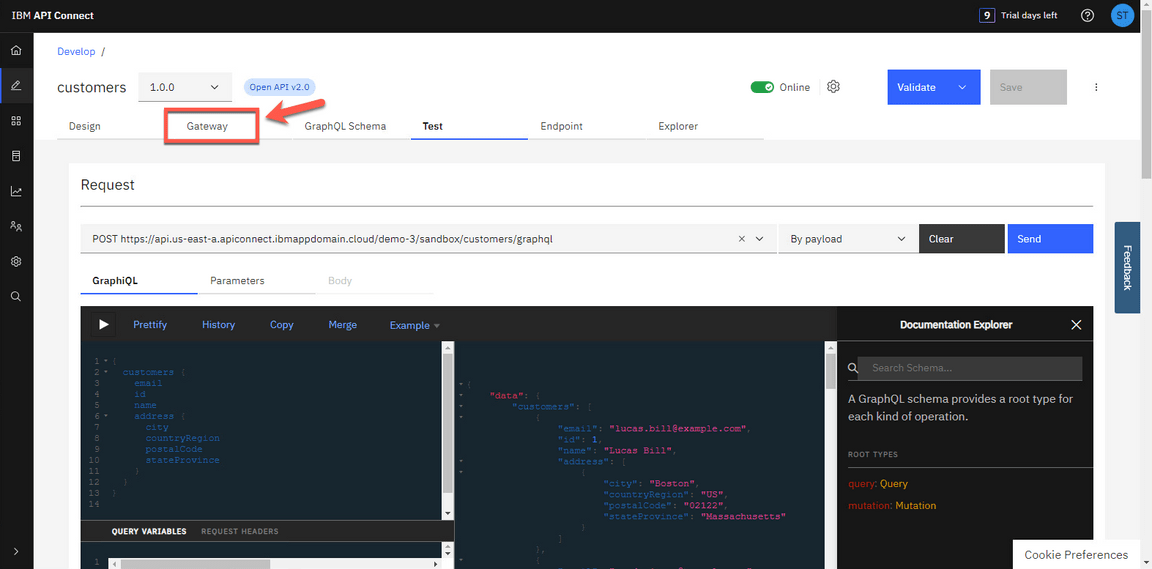
Action 7.5.2
Close the Build assembly flow dialog again.
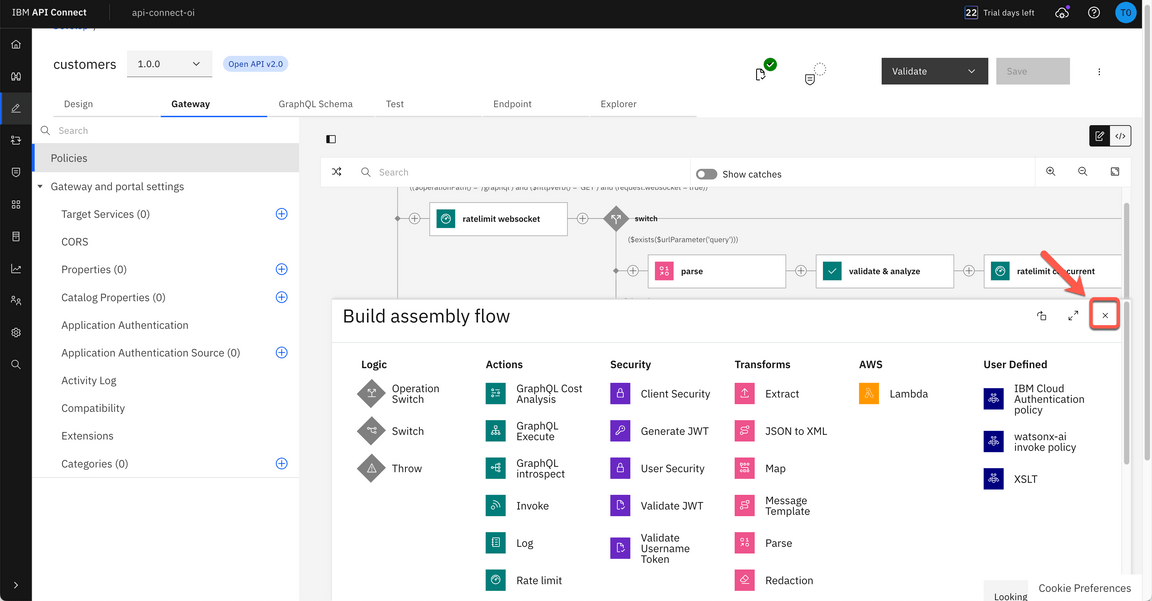
Action 7.5.3
On the Otherwise (1) which starts with a Parse, click the Add node button (plus icon) between the “ratelimit expected” node and the “graphql-invoke” node (2).
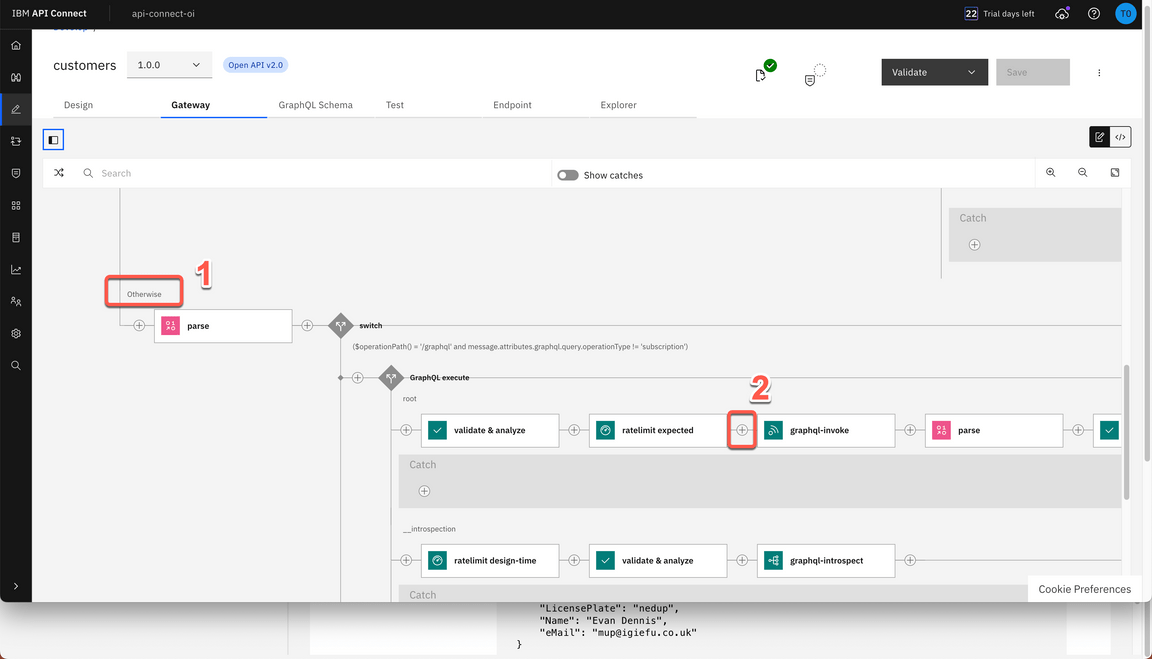
Action 7.5.4
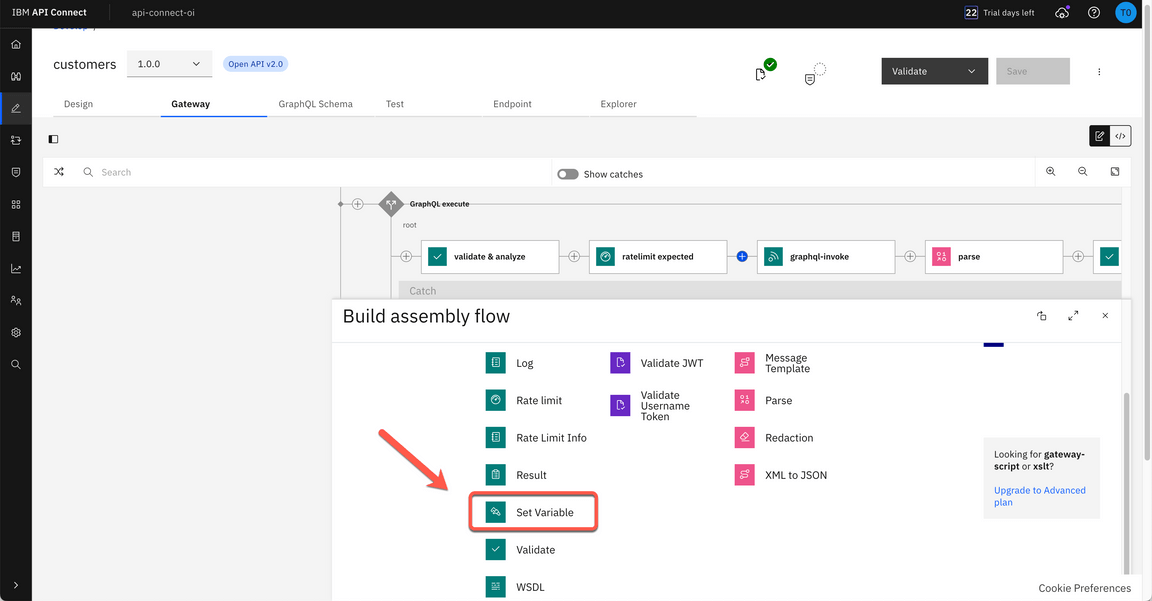
On the Build Assembly flow dialog, scroll down and select the Set Variable node on the Actions section.
Action 7.5.5
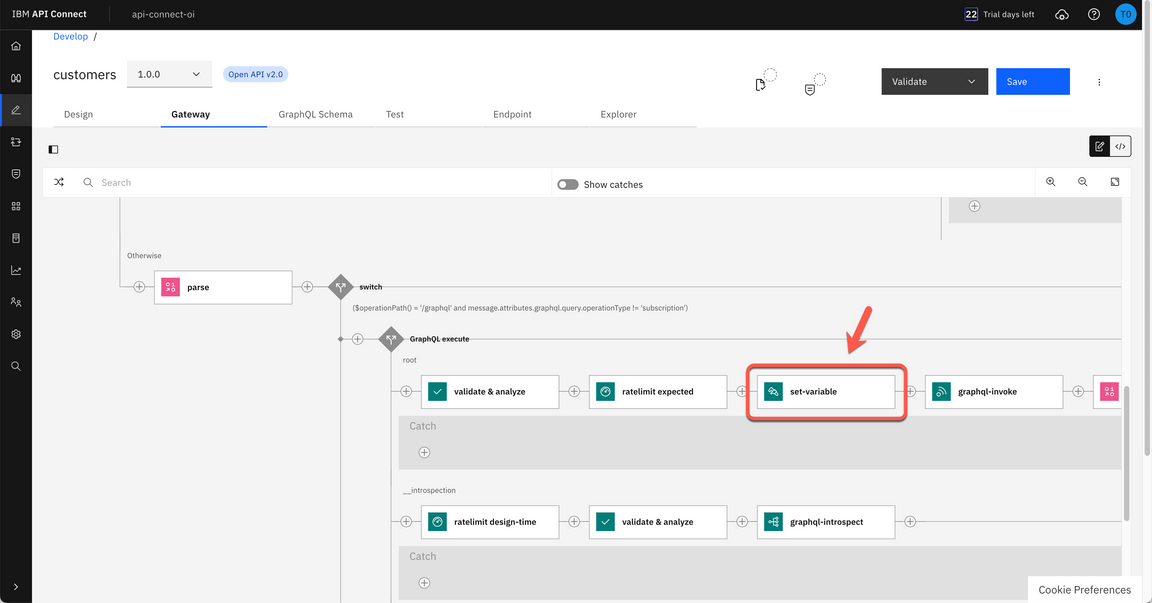
Click on the new set-variable node to edit it.
Action 7.5.6
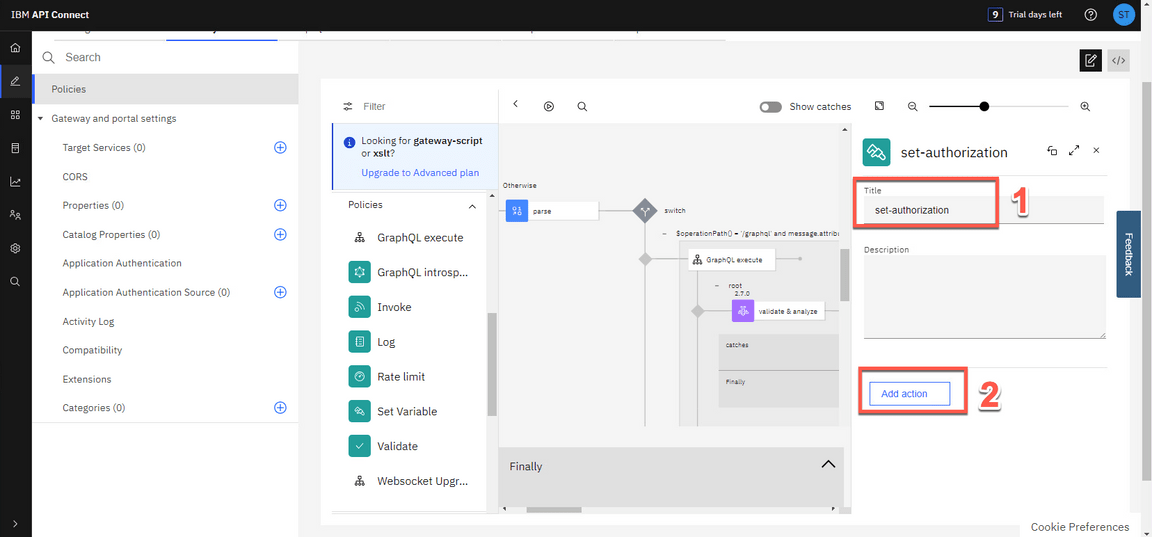
Enter set-authorization as Title (1) and click Add action (2).
Action 7.5.7
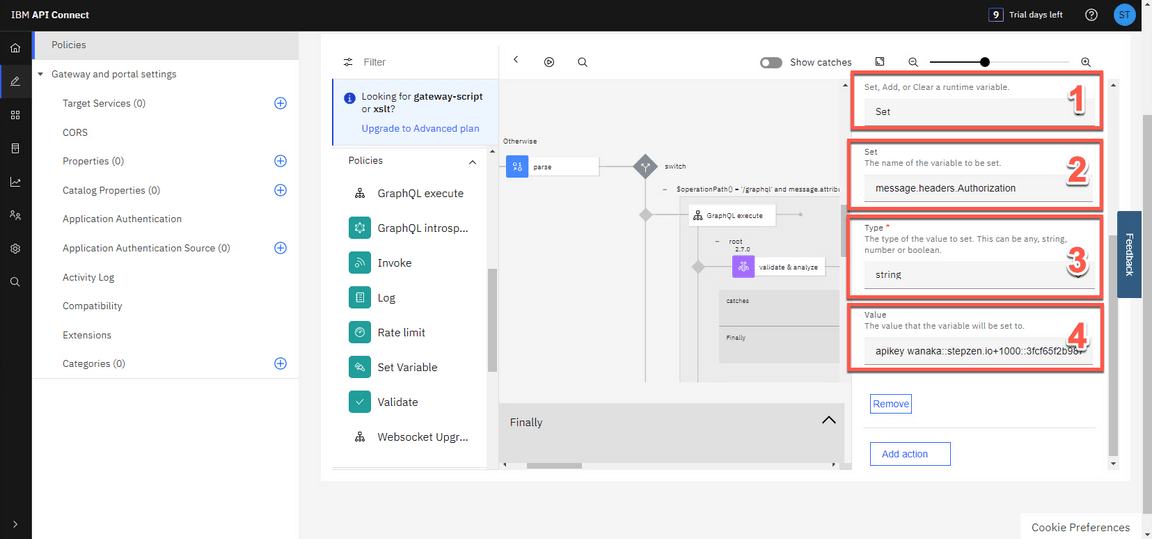
Keep Set (1) as the type of the action. On the Set field, enter message.headers.Authorization (2) as the name of the variable to be set. Select String (3) as type of the value to set. And in the Value field, paste the API Key value that you copied from the StepZen Dashboard Headers (4).
Action 7.5.8
Then click Save.
7.6 - Test the new header
Narration
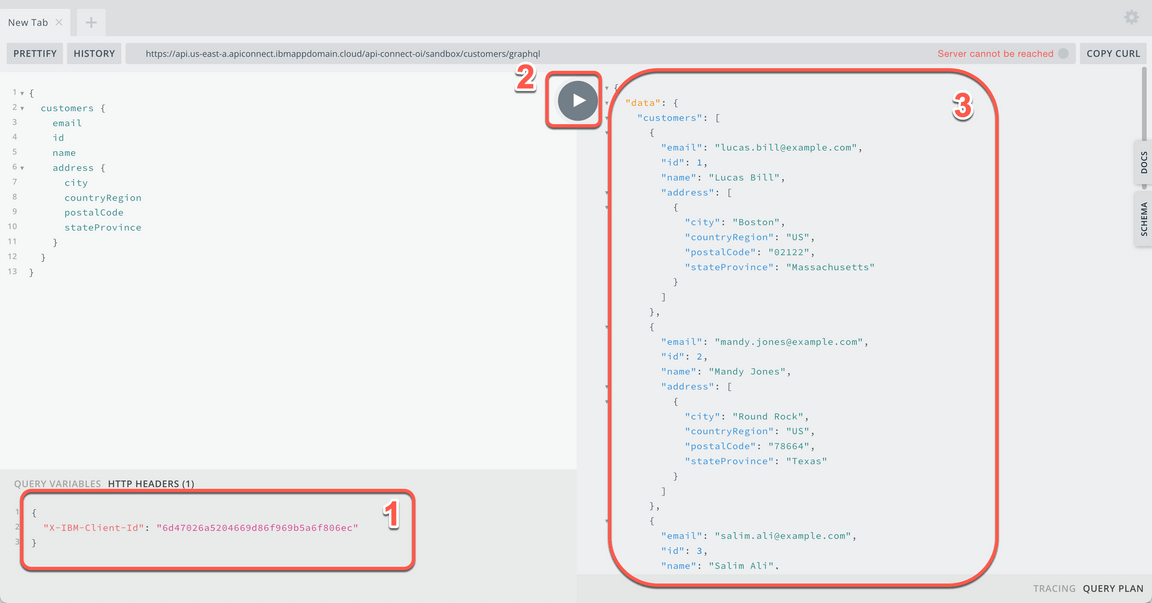
It’s finally time to test the hard work of Focus’ Development team. Now, they will test their API again, this time without passing the Authorization token.
Great! Now their GraphQL Proxy is running and available to be used.
Action 7.6.1
You can keep using the external GraphQL playground to test your API, but now in the HTTP Header section, remove the Authorization header parameter (1). Then click on the Play button (2) to see the graphQL returned data (3).
Action 7.6.2
Show the result. You are welcome to change the GraphQL query to test more scenarios.
Action 7.6.3
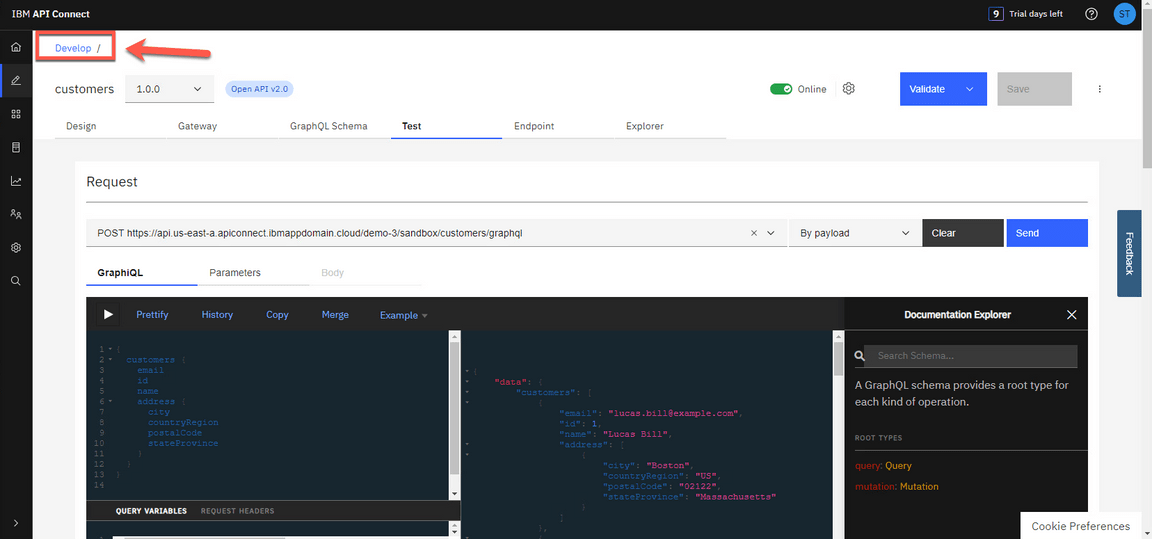
Back to the APIC page, on the breadcrumbs, return to the Develop page.
8 - Create a Product and apply GraphQL Rate Limits
8.1 - Add new Product
Narration
Having successfully tested their GraphQL Proxy API, Focus’ team is ready to package their APIs using products for publishing to consumers. Products are packages that contain both the APIs and the accompanying plans. The providers use plans to control access to APIs and to manage API usage. Plans can use differing rate limits to provide different levels of service to API consumers. Focus Corporation can have multiple plans for different consumers. For example, they can add approval steps for consumers when they sign up, or they can allocate the plans as a provider.
Based on that, Focus’ team decided to create a product from scratch. After including the basic information about the product, they can define the default plan.
The Default Plan contains traditional rate limiting options, but in the next steps, they will be able to list and define the GraphQL rate limits.
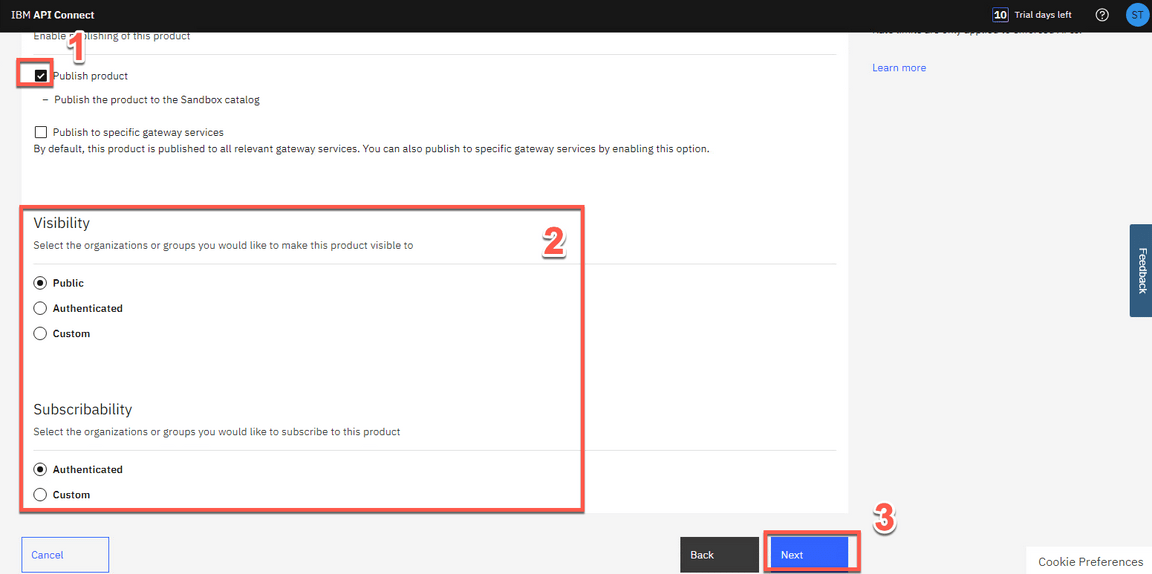
Next, they publish the product to the Sandbox catalog and accept the default for Visibility and Subscribability.
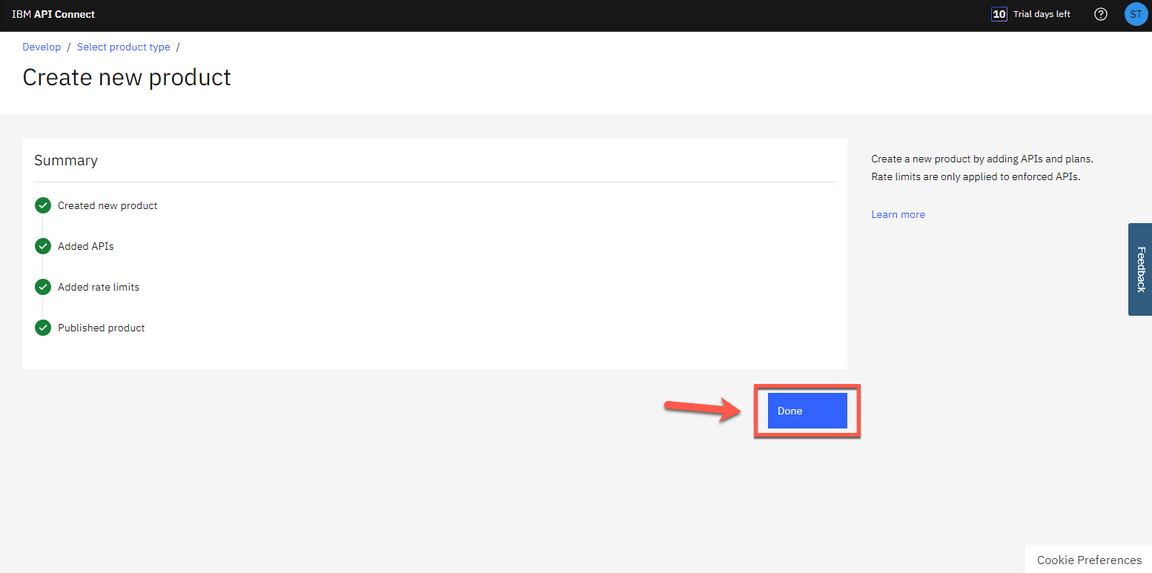
Great! Focus Corporation has a new API product.
Action 8.1.1
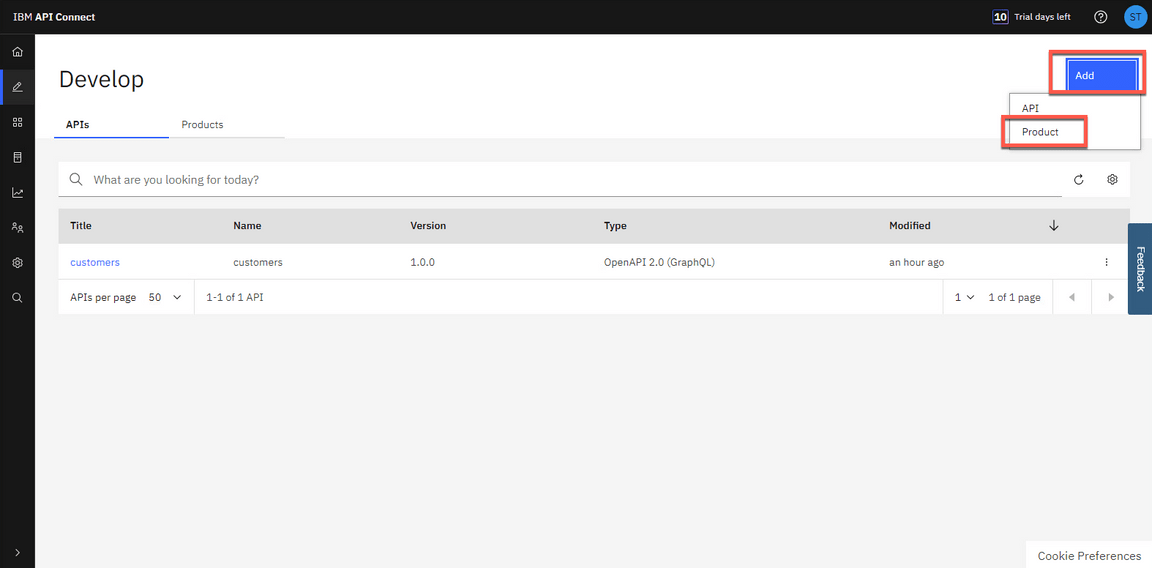
Click Add->Product.
Action 8.1.2
Select New product (1) and click Next (2).
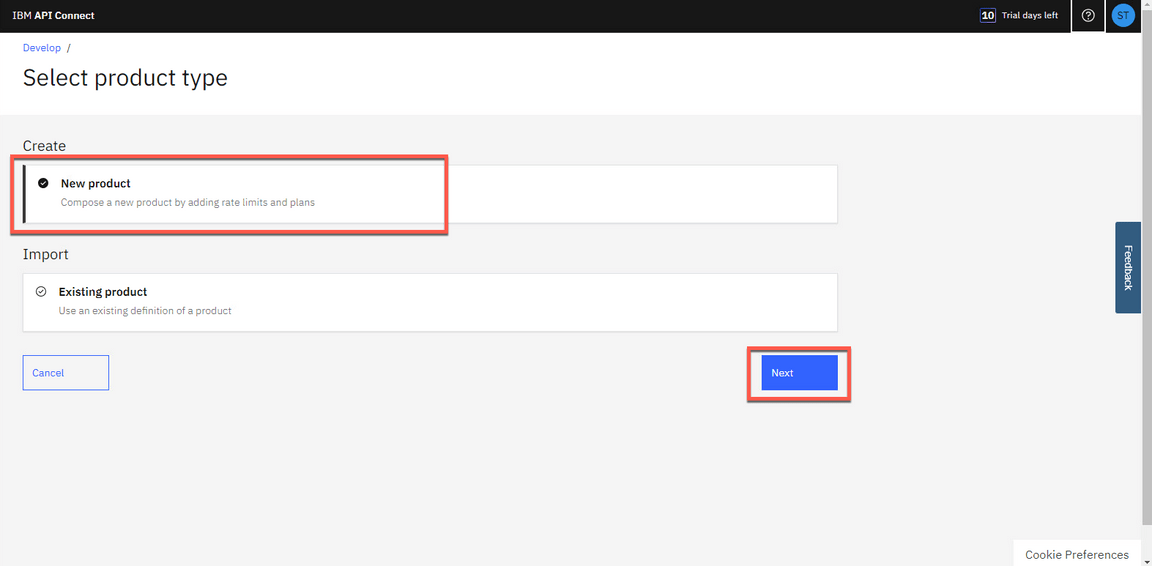
Action 8.1.3
Name the product as Customers Product (1) and click Next (2).
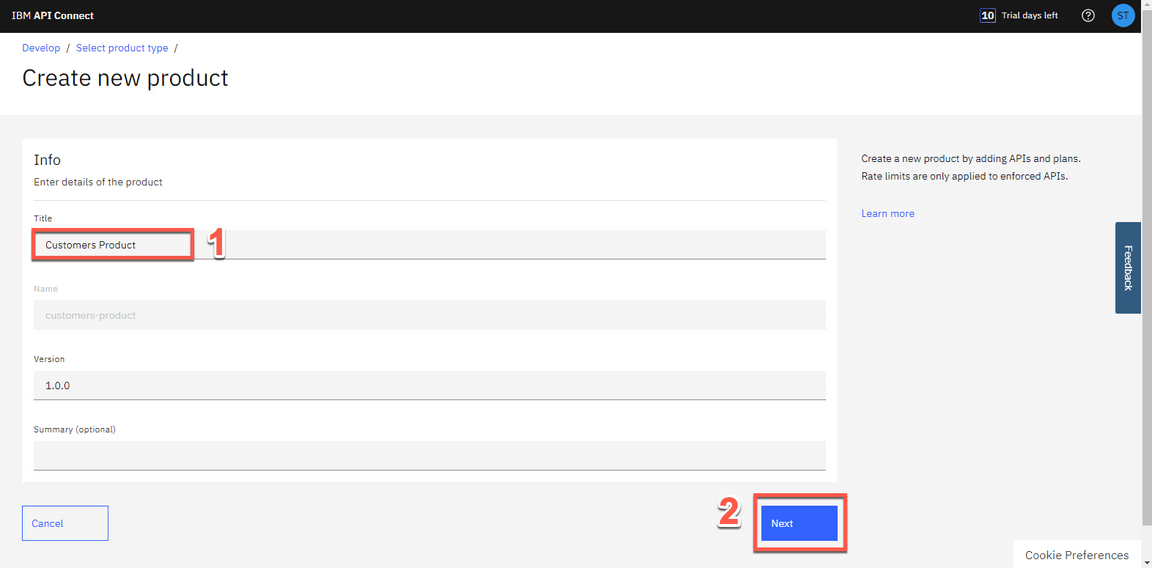
Action 8.1.4
Add Customers API to the product by selecting customers (1). Then click Next (2).
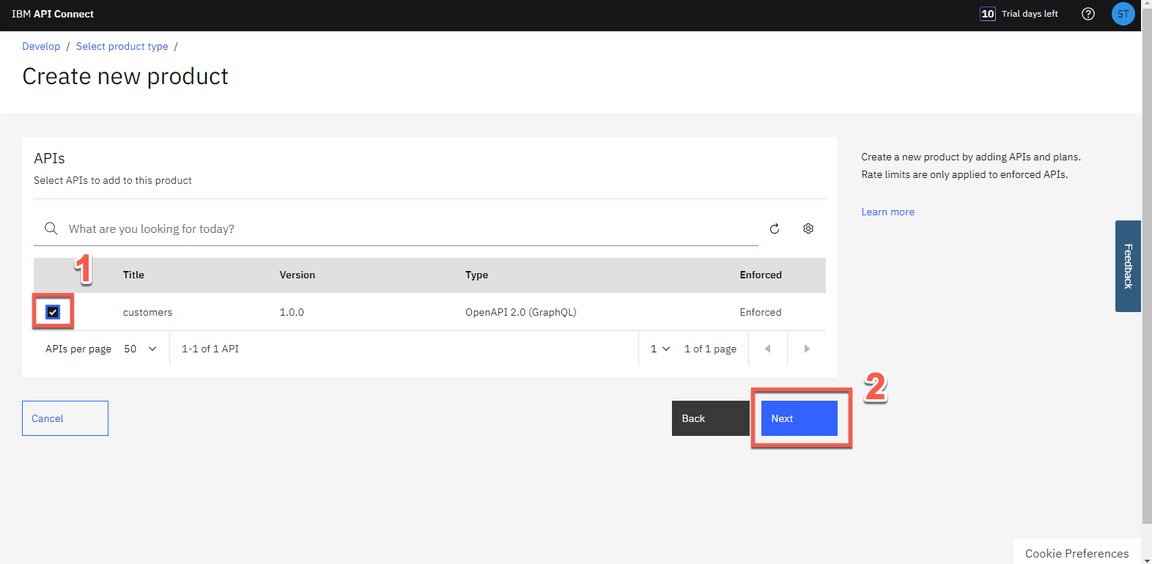
Action 8.1.5
For now, just click Next.
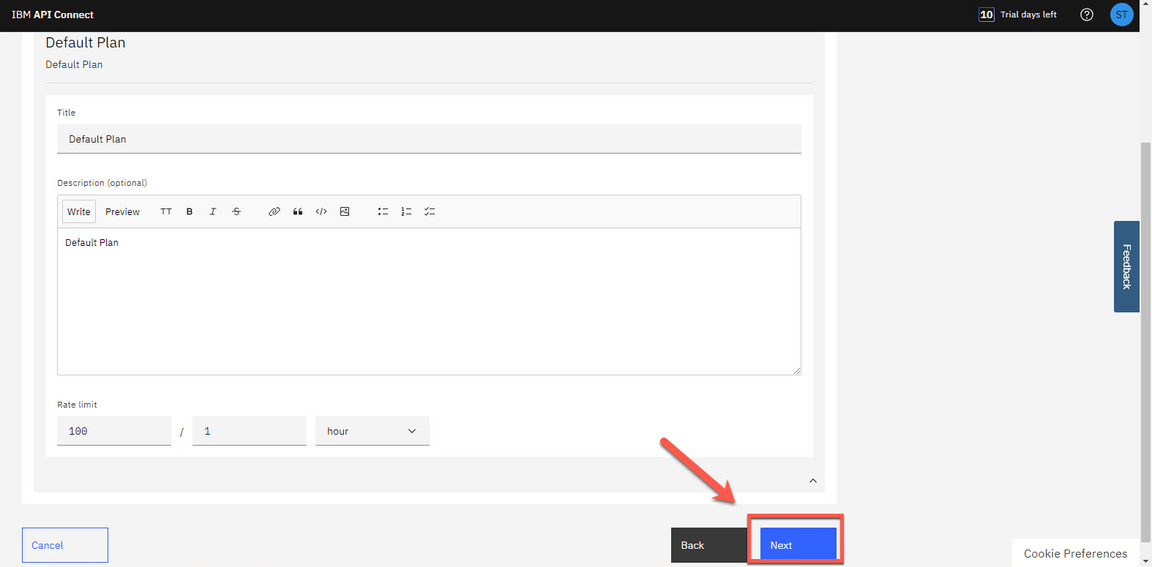
Action 8.1.6
Publish the Product to the Sandbox Catalog by selecting Publish product (1). Accept the default for Visibility and Subscribability (2) and click Next (3).
Action 8.1.7
Click Done.
8.2 - Review the Plans
Narration
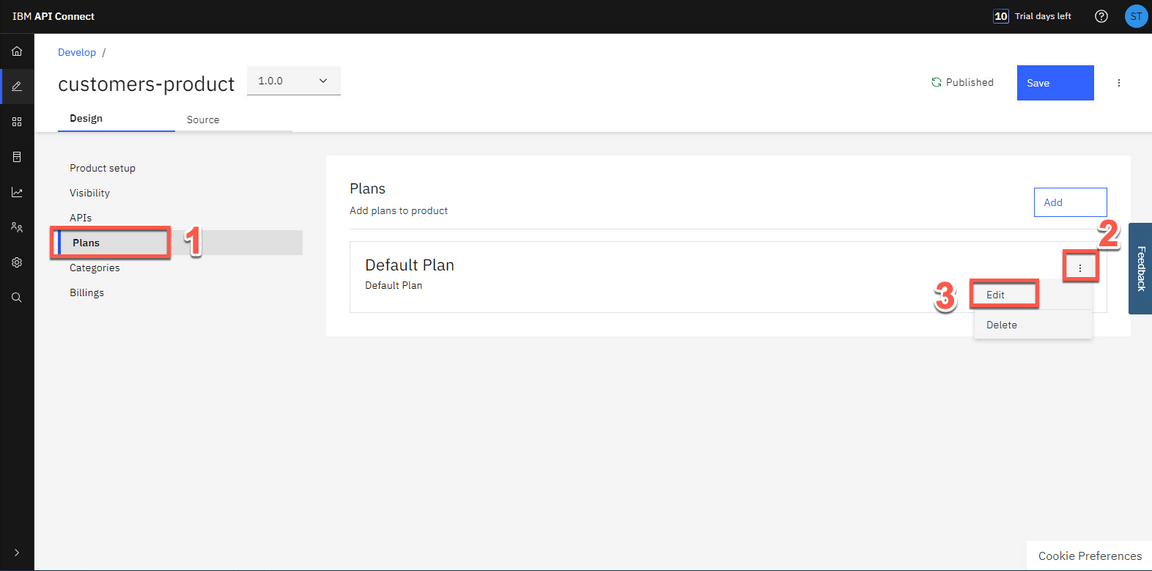
At this moment, Focus’ team has successfully created a new plan. They want to review the plan to check the GraphQL rate limits.
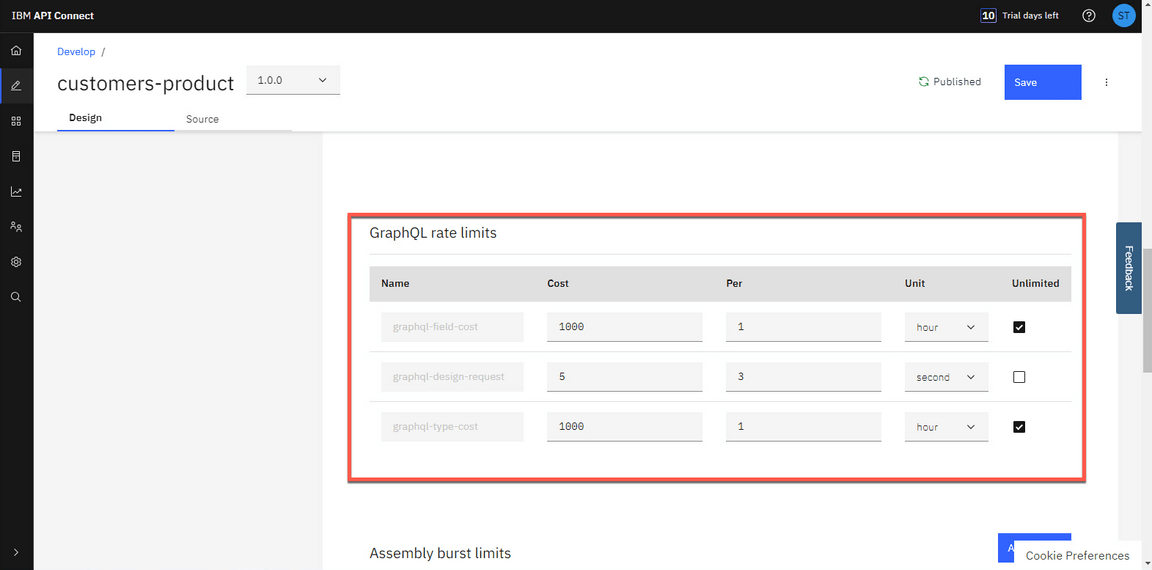
In the Plan page, they are able to adjust GraphQL cost parameters, including costs per field or type. They can set a limit or make it unlimited.
Action 8.2.1
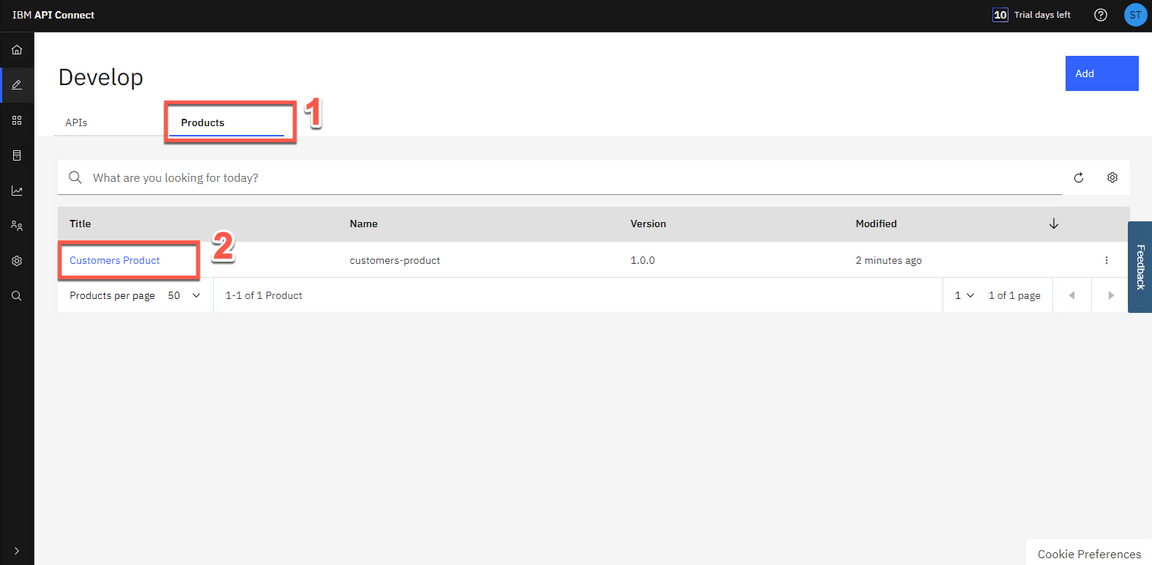
Back to the Develop view, open Products tab (1) and click on Customers Product (2).
Action 8.2.2
Open the Plans section (1), and on the Default Plan, open the context menu (2) and select Edit (3).
Action 8.2.3
Show the GraphQL rate limits section.
Action 8.2.4
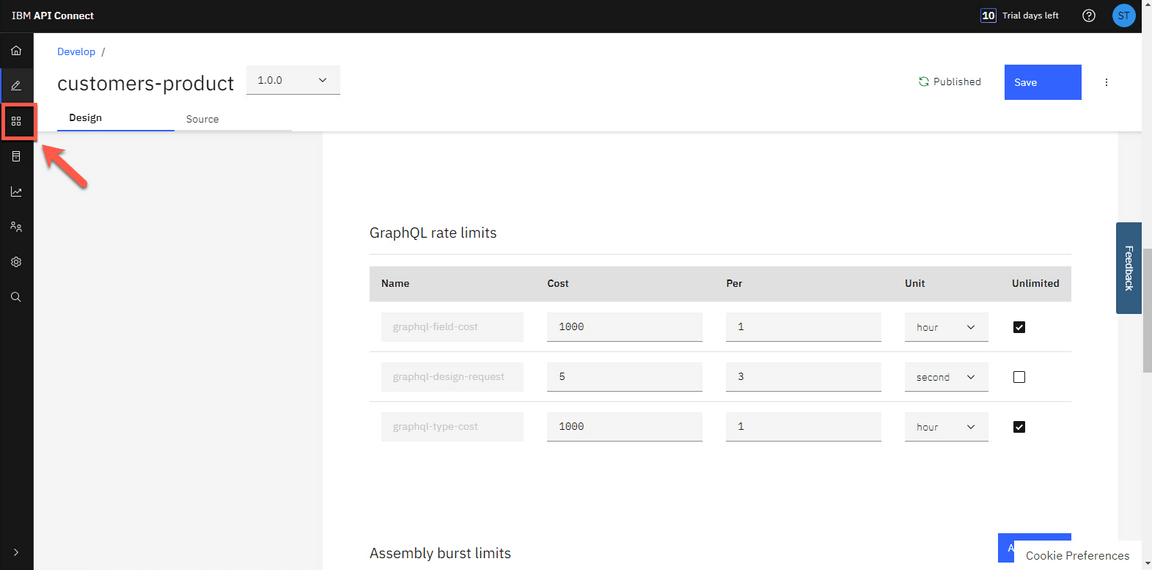
On the left menu, click Manage icon to manage our Sandbox catalog.
9 - Socialize your API
9.1 - Access the Developer Portal
Narration
Now it is time to publish Focus new API. To do it, the developers need to make sure that their API consumers can discover it and use it. The Developer Portal will allow customers to view the APIs, sign up and subscribe to plans in a self-service manner, test the APIs, download the OpenAPI - Swagger documents and more.
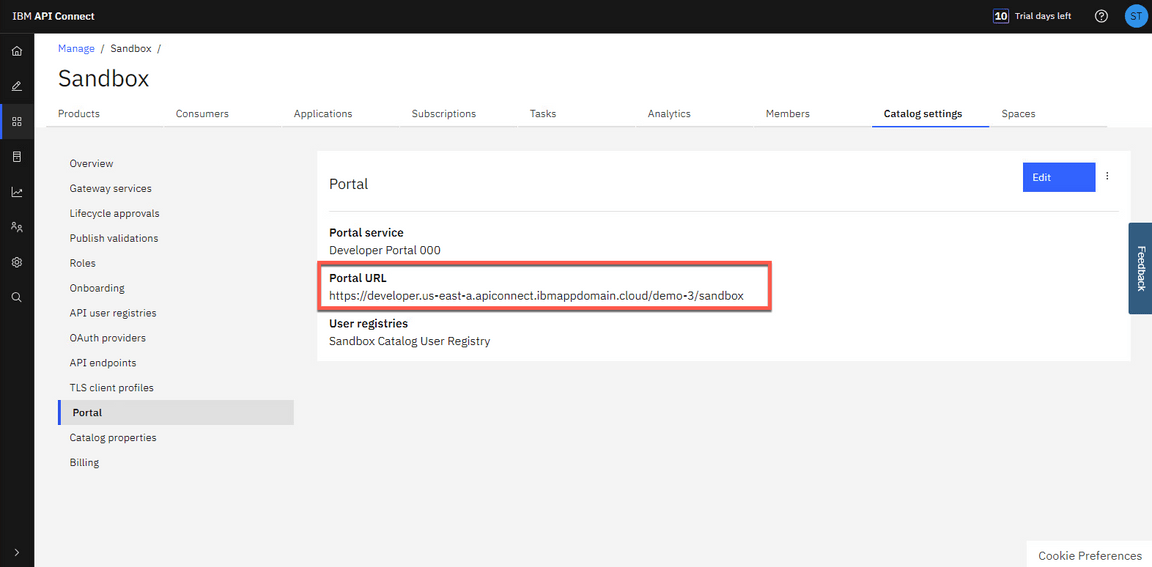
To access the Developer Portal, first they need to get their Portal URL and open it.
Action 9.1.1
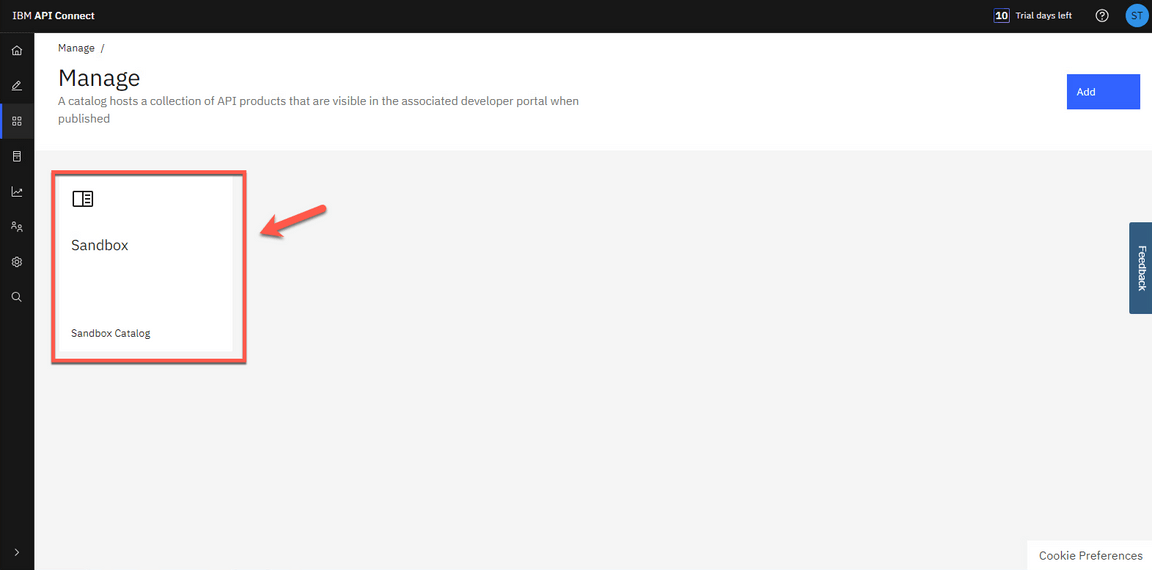
On Manage page, open the Sandbox catalog.
Action 9.1.2
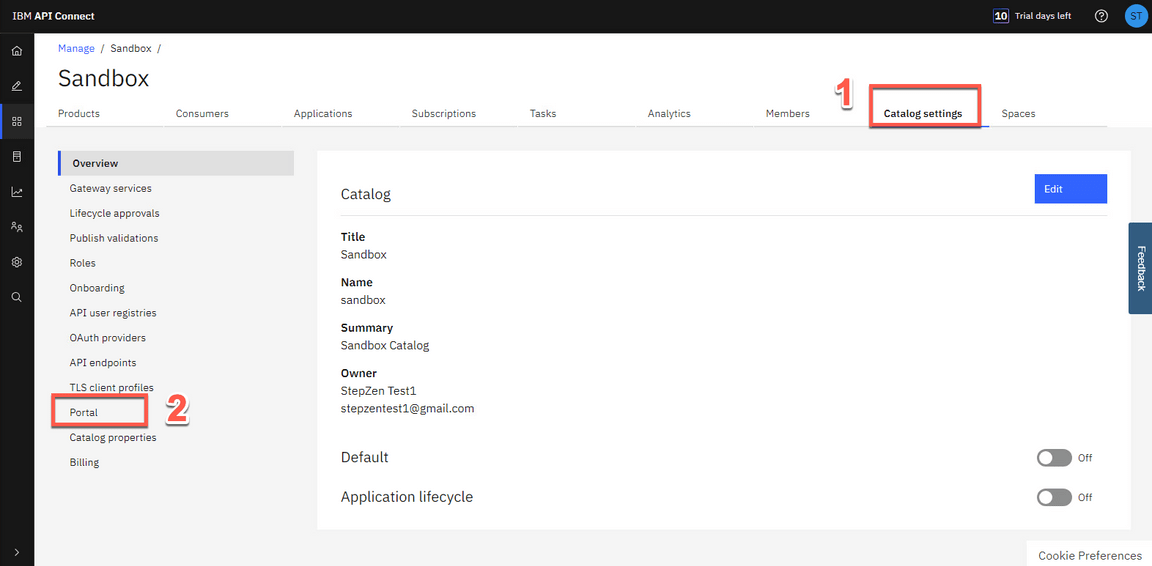
Click Catalog settings (1) and open the Portal tab (2).
Action 9.1.3
Here you have your Portal URL. Copy it, and open it in a new browser tab.
9.2 - Register a Developer Account
Narration
Focus’ Developer Portal is their public-facing website and therefore it is highly flexible and customizable. In this demo they are using the default design.
Focus’ team will share this Developer Portal with their Developer ecosystem, other developers that want to consume Focus’ APIs to create new applications. Focus’ team calls them API Consumers.
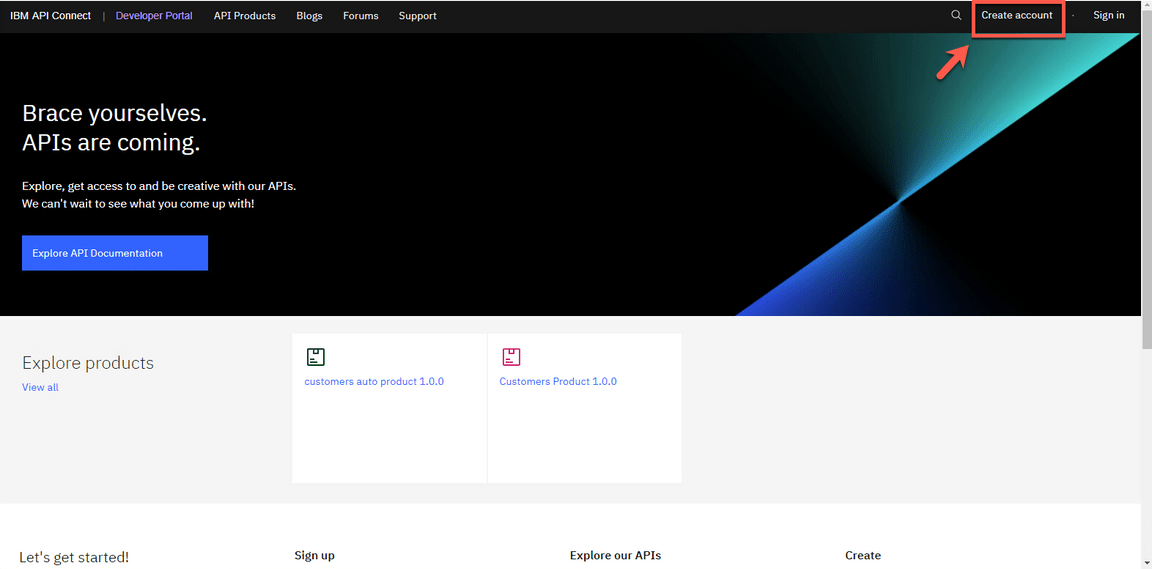
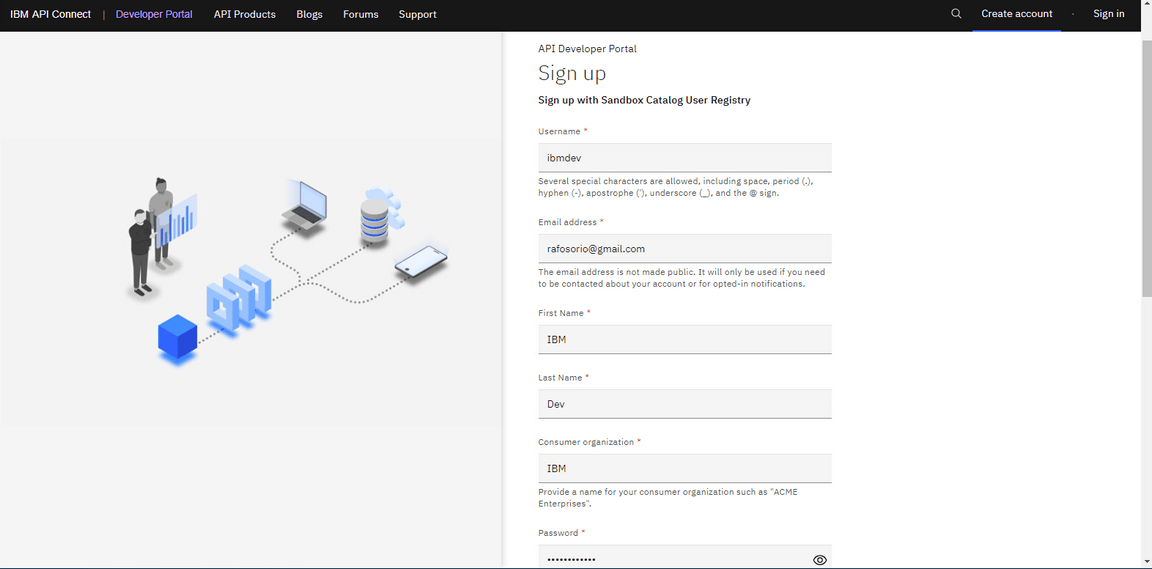
These consumers need to create an account to access the developer portal. It is a self-service process.
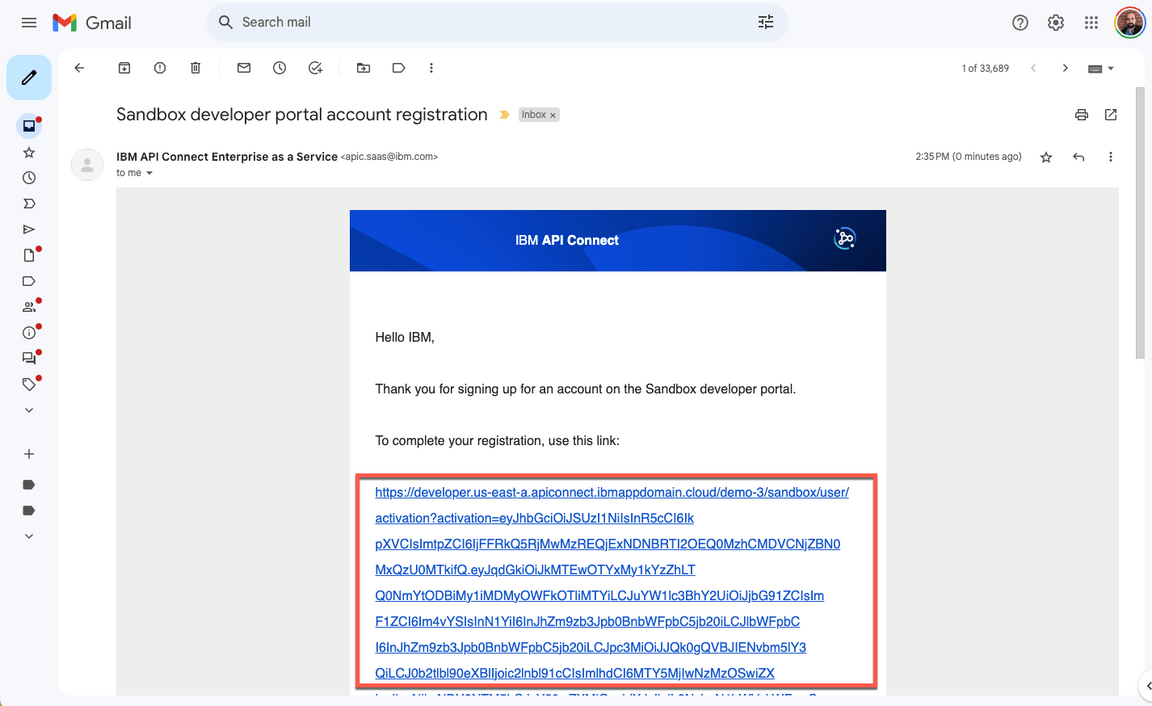
After validating their account, the consumers are ready to log in!
Action 9.2.1
Click Create account to create a new developer account.
Action 9.2.2
Complete the registration form, go ahead and use any personal email. Take note of the username (not email) and password. You will need them later to log in to the Developer Portal.
Action 9.2.3
You will receive an email to activate your new developer account. Click on the link to validate the registration.
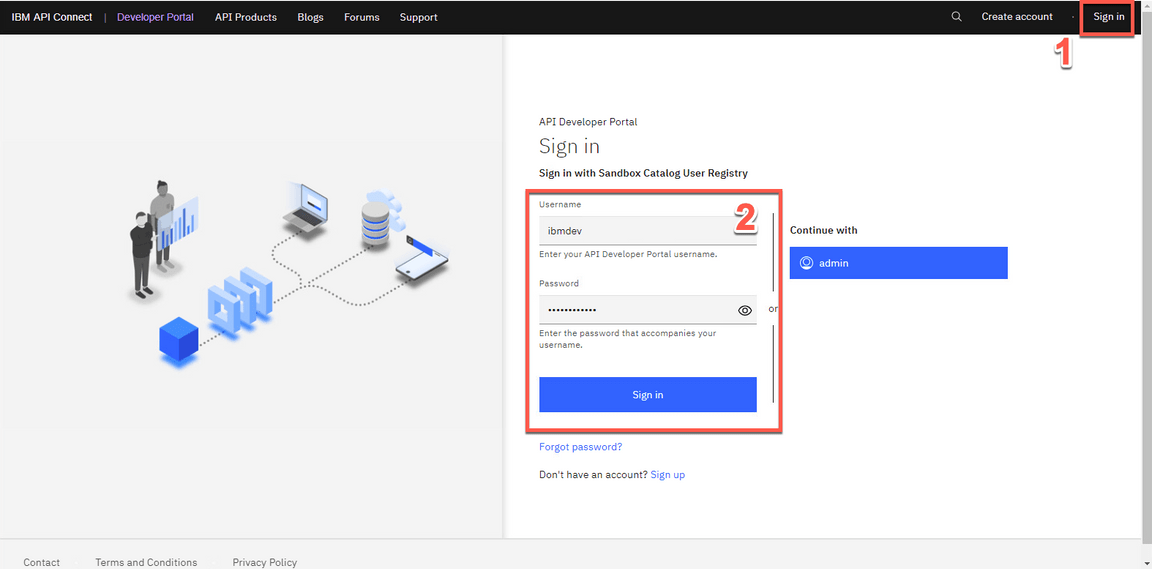
Action 9.2.4
Sign in (1) to the Developer Portal using your developer’s username and password (2).
9.3 - Create a new Application
Narration
Note that all of these next steps are simulating what Focus’ API Consumers, their end-user customer, will do to find, test, and use the Focus API.
Developer Portal displays all the products that are currently published. In Focus’ case, no Apps are created yet. As a consumer/developer, they are going to create a new application in the portal. This will give them an API key, allowing them to call Focus’ APIs.
They have not subscribed to any APIs yet, so they need to do it now. Next, they need to select the Customers Product 1.0. After that, they can see the plans available. In this case, only the Default plan. Now, they just need to select the app that Focus’ team created earlier and confirm their subscription. And done - they are subscribed to the Focus API, and they are ready to use it!
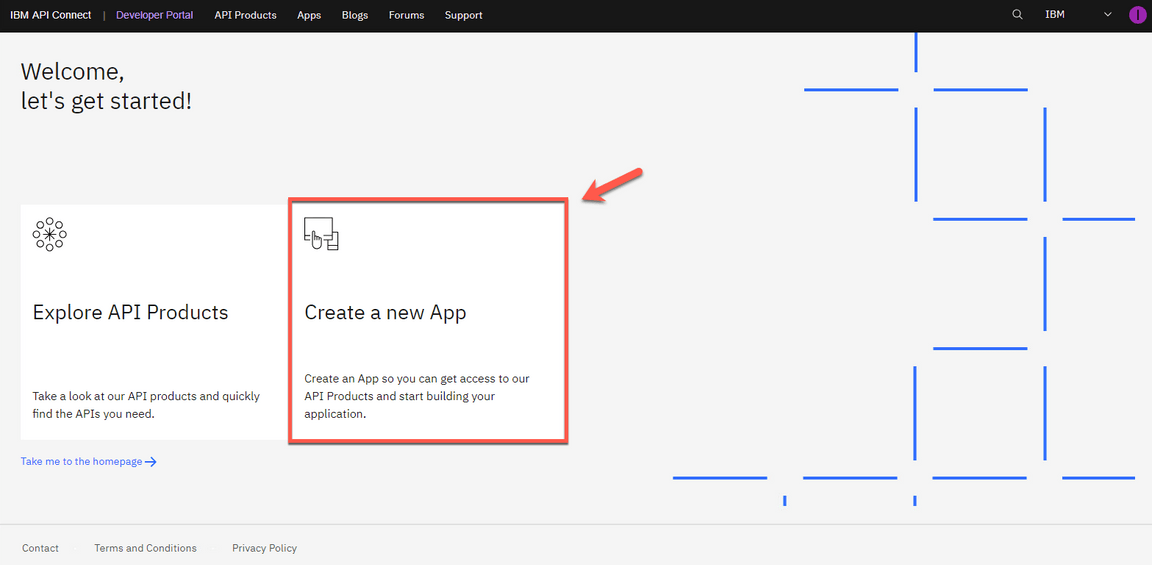
Action 9.3.1
Click Create a new App.
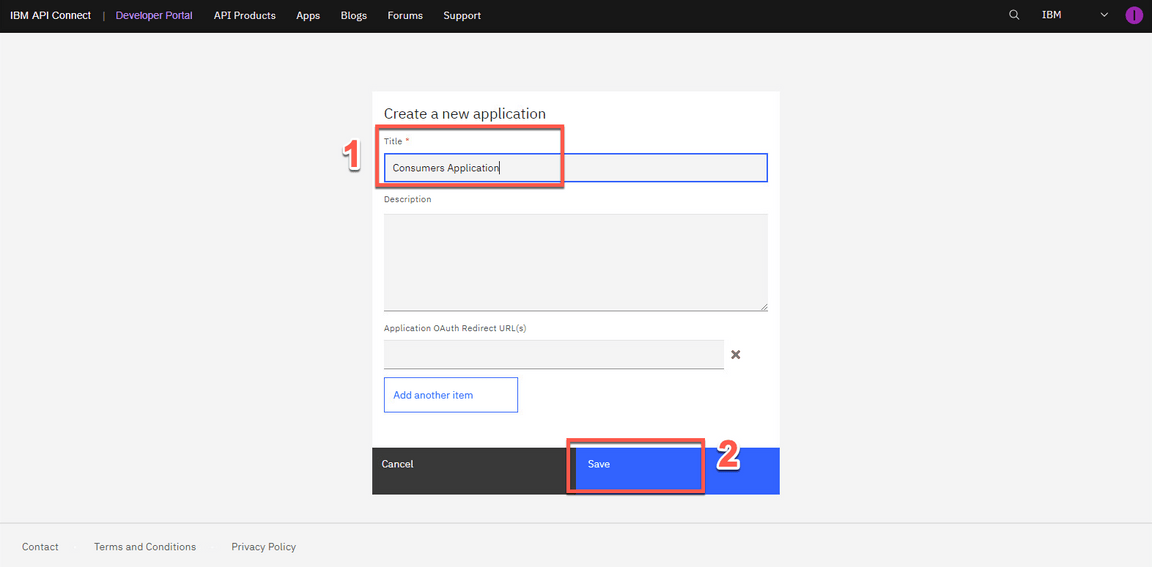
Action 9.3.2
Enter Consumers Application as the App Title (1). Click Save (2).
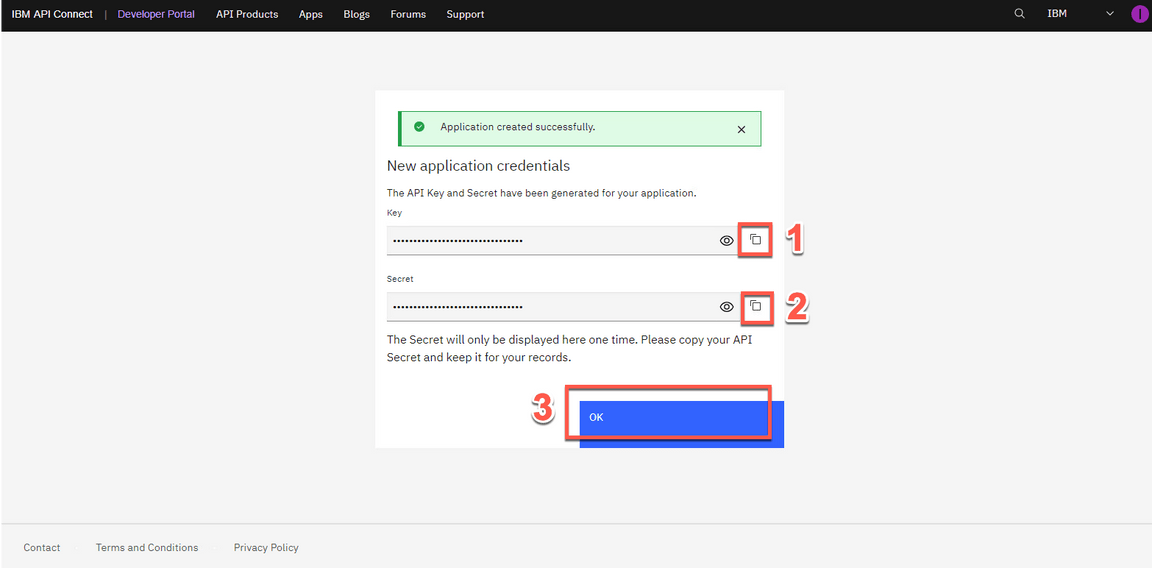
Action 9.3.3
On the Credentials dialog box, copy the API Key (1), copy the API Secret (2), then click OK (3).
Action 9.3.4
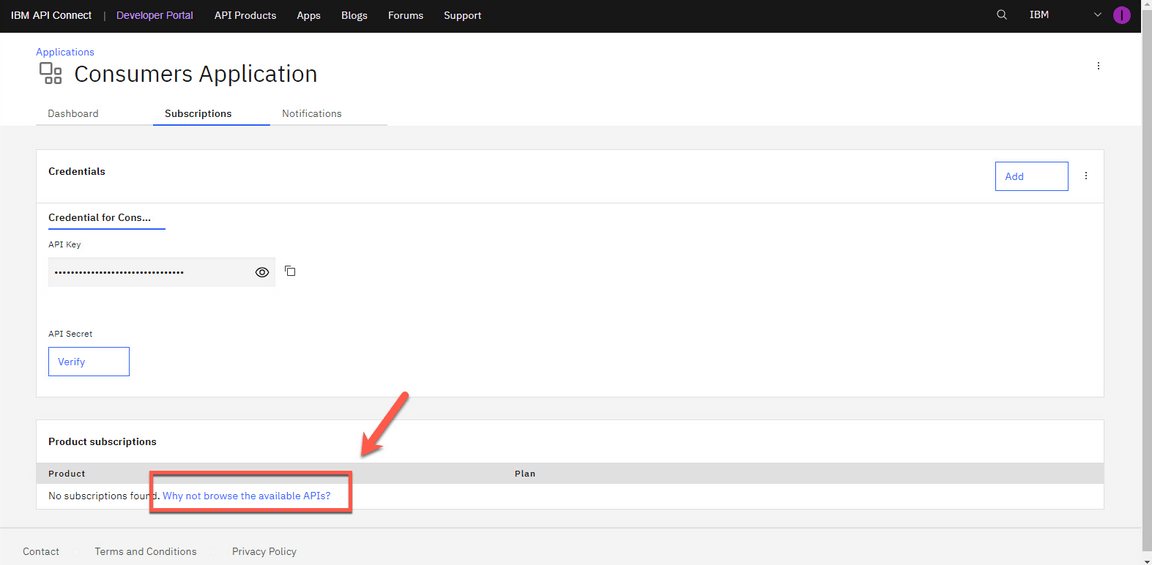
Click on Why not browse the available APIs? link.
Action 9.3.5
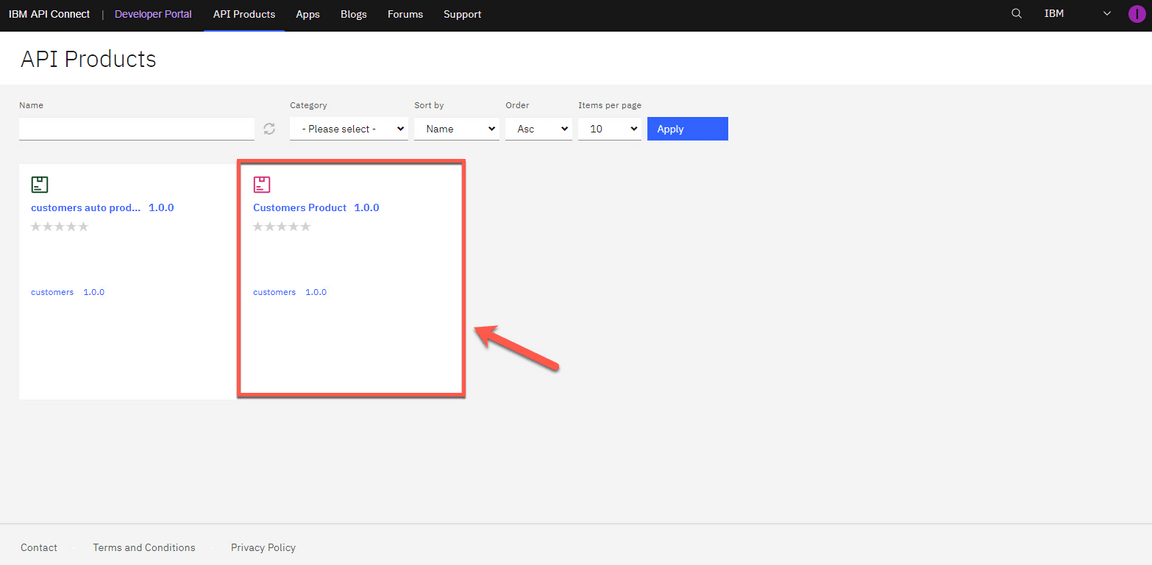
Click on Customers Product 1.0.0.
Action 9.3.6
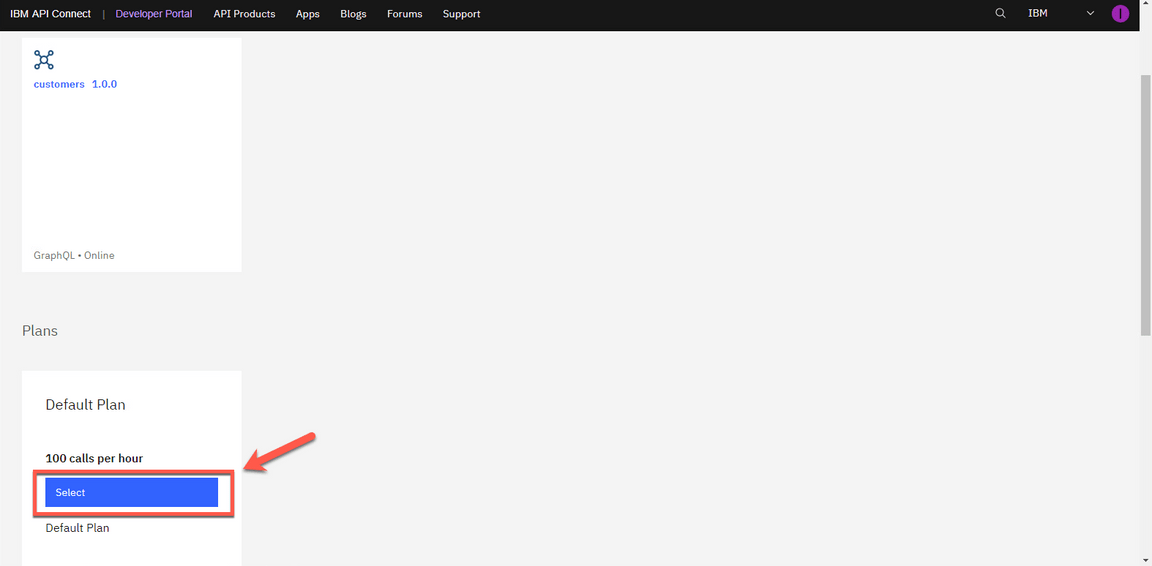
In the Default Plan section, click Select.
Action 9.3.7
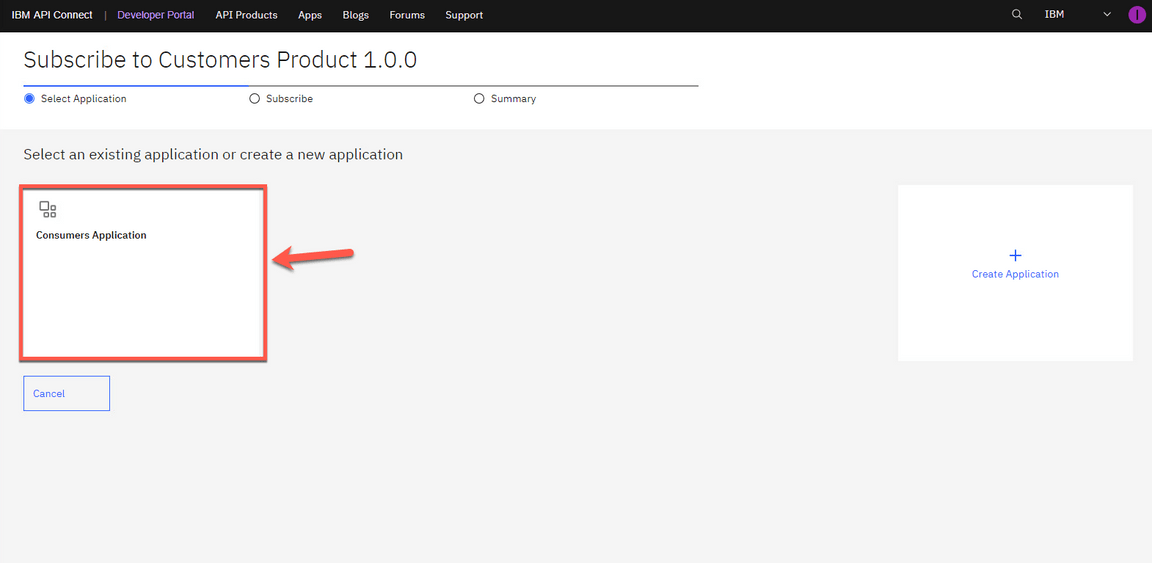
Select the Consumers Application.
Action 9.3.8
Confirm the subscription by clicking Next.
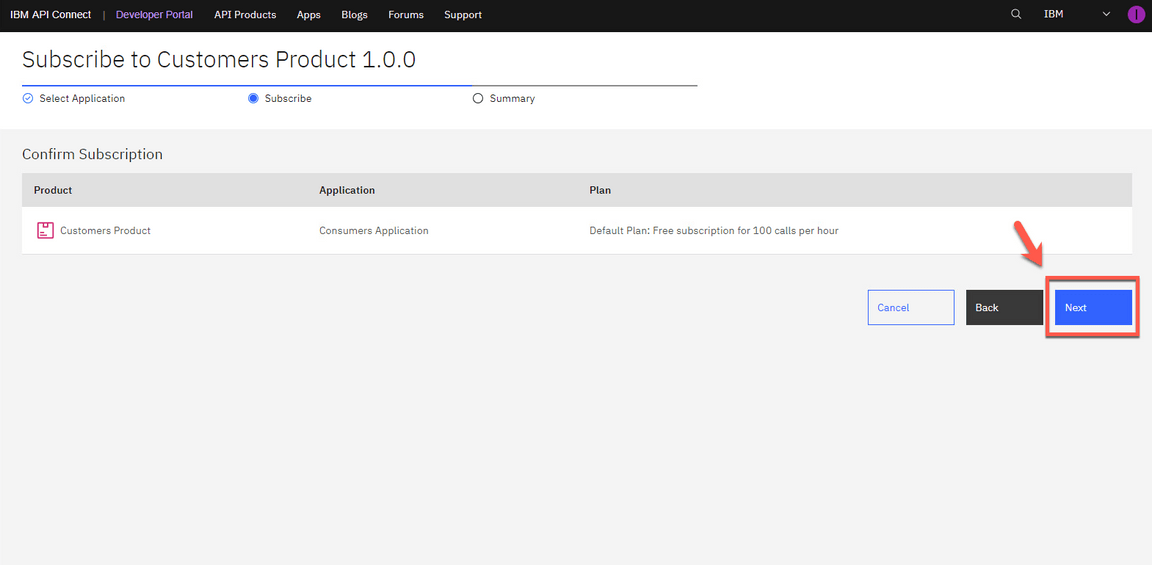
Action 9.3.9
Click Done.
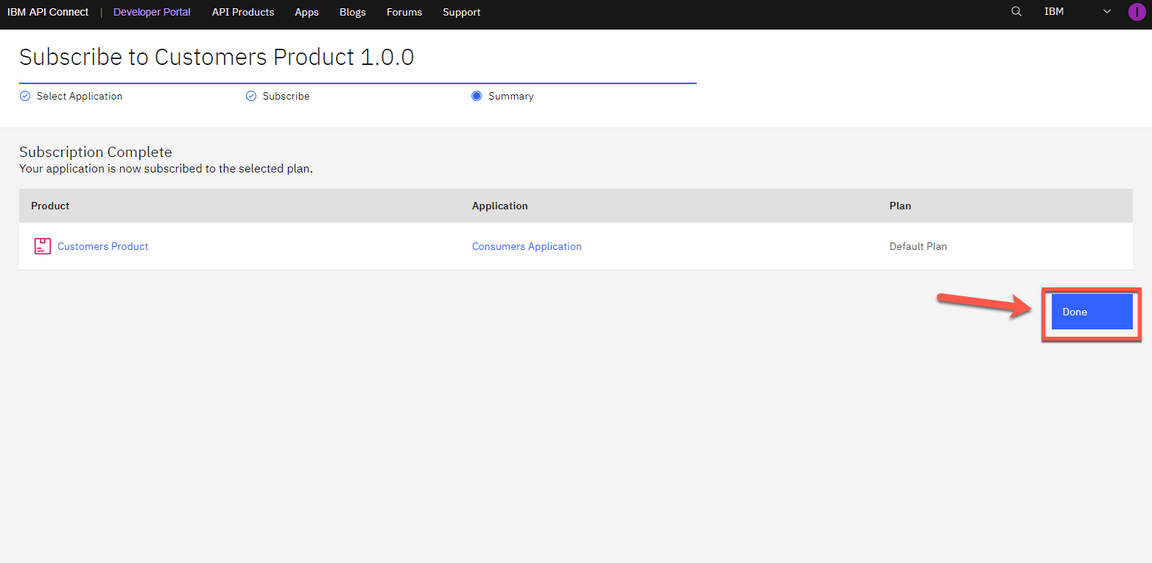
9.4 - Test the API
Narration
The app developers are now back at the product screen. They are able to explore the Focus’ API here. From the Overview page, they can download the OpenAPI Document and get the API endpoint. Note the portal has everything the consumers need to call the API, it’s even generated clients in various languages for them to copy/paste into their calling application. They can try the API on the Try it area. They can use the customers query here. It is time to test it. Great, they got a response. The Focus GraphQL Proxy API is running and available for their ecosystem. It is amazing how quickly the results are returned in the results window, coming from different sources. If this was a REST API multiple end points would be needed and aggregated to achieve the same result.
Action 9.4.1
Click the customers 1.0.0 API.
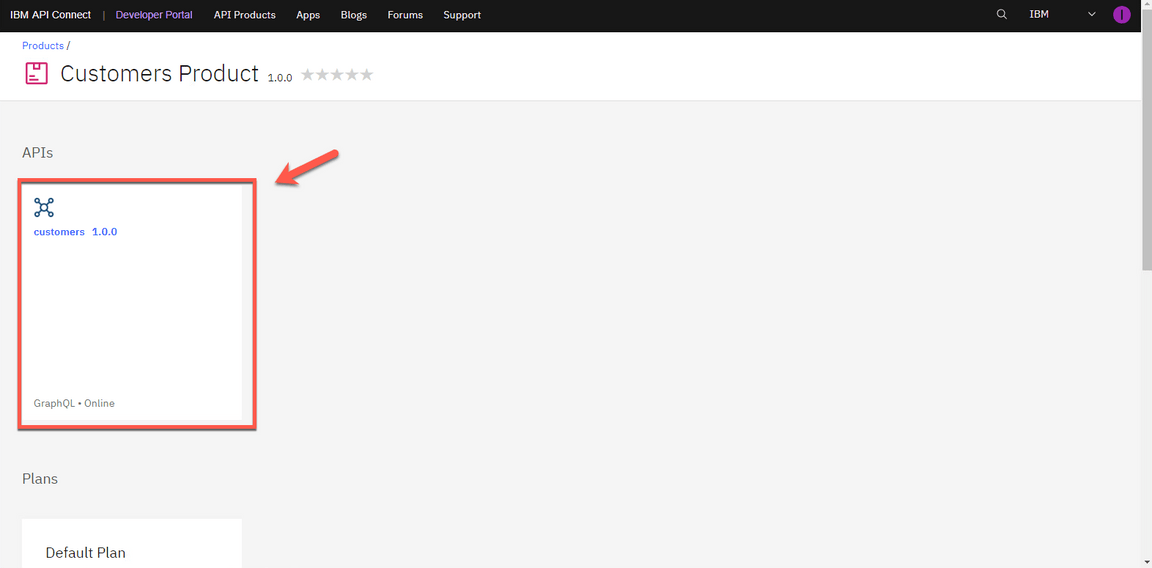
Action 9.4.2
Open the Try it tab.
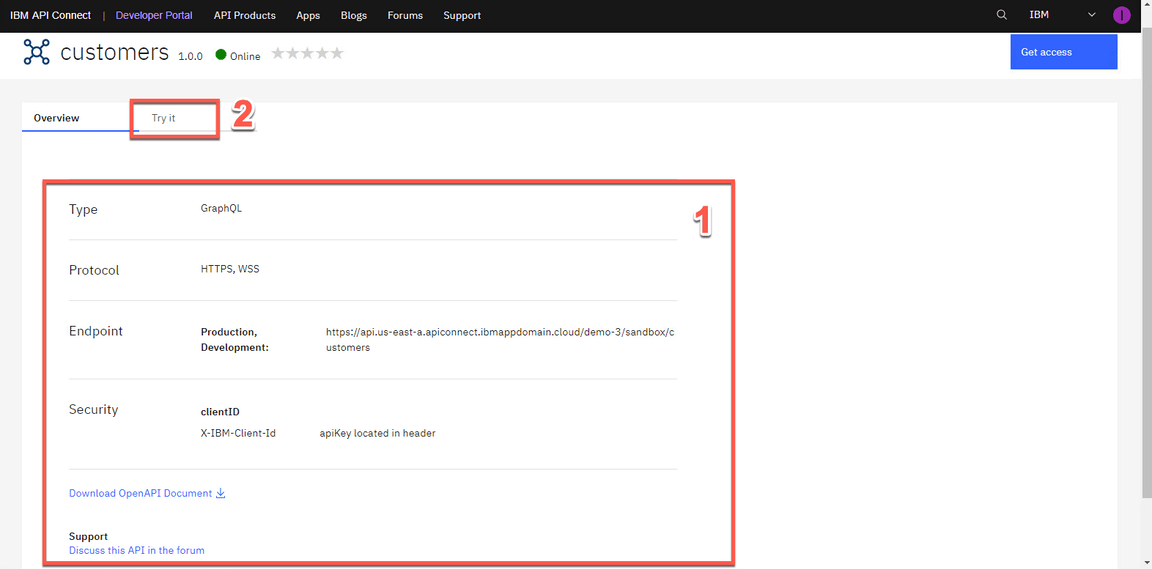
Action 9.4.3 (This step is currently not working, see the notification above)
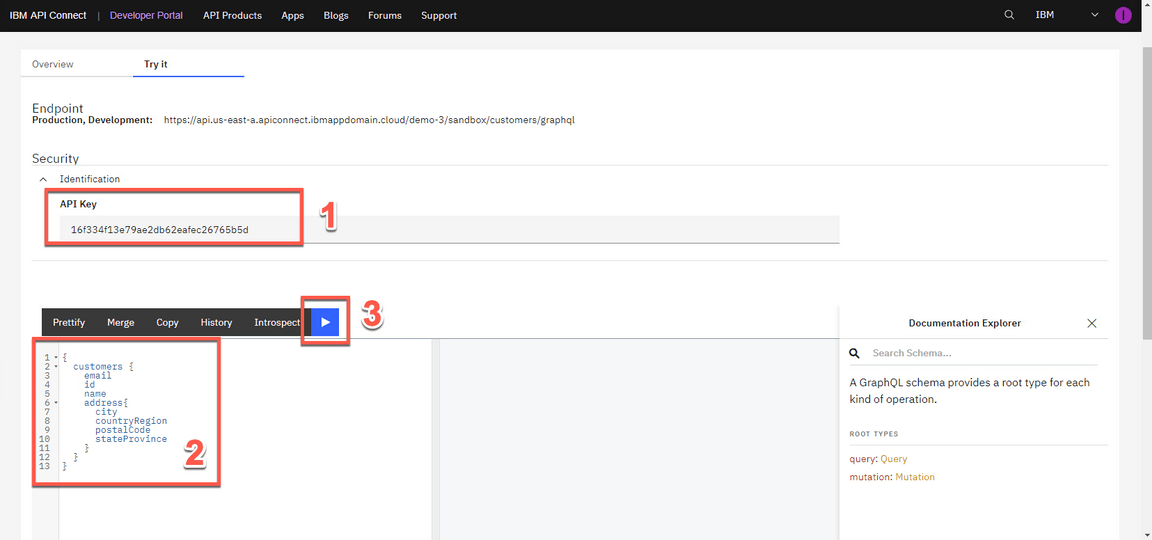
Paste the API Key that you copied in the previous step (1). Paste the GraphQL below in the GraphQL editor (2). And click on Execute Query button (3).
{customers {idnameaddress {citycountryRegionpostalCode
Action 9.4.4 (This step is currently not working, see the notification on step 9.4.3.)
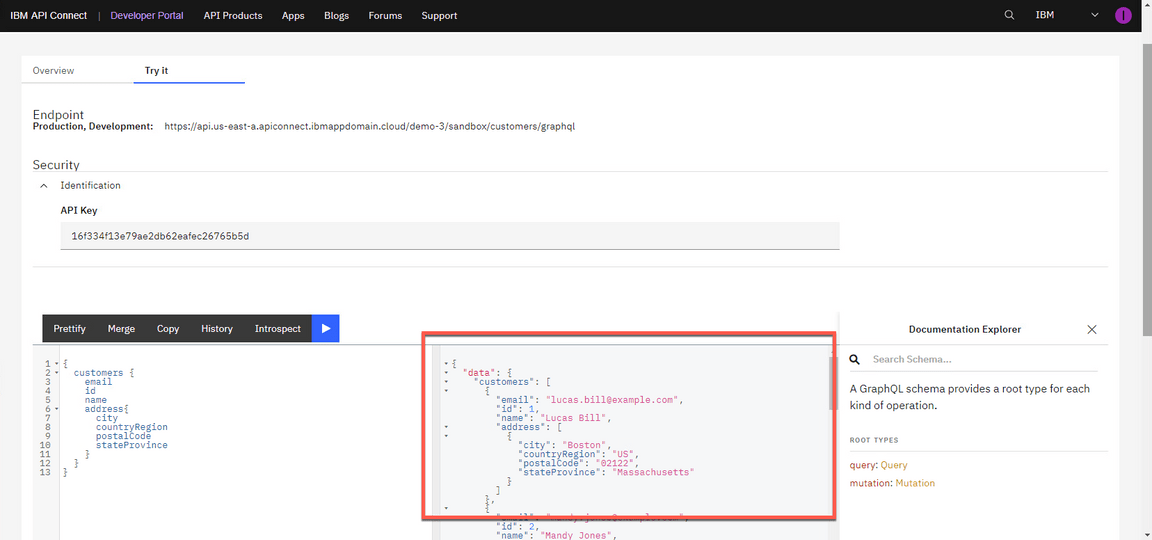
Your GraphQL Proxy API is running. You are welcome to continue to test the API, using the GraphQL Editor. Submit requests with different field names.
Action 9.4.5 (WORKAROUND)
You can keep using the external GraphQL playground to test your API(1), but now in the HTTP Header section, paste the API Key that you copied in the previous step as your X-IBM-Client-Id header parameter (4). Then click on the Play button to see the graphQL returned data (5).
{customers {idnameaddress {citycountryRegionpostalCode
9.5 - Analyze the API
Narration
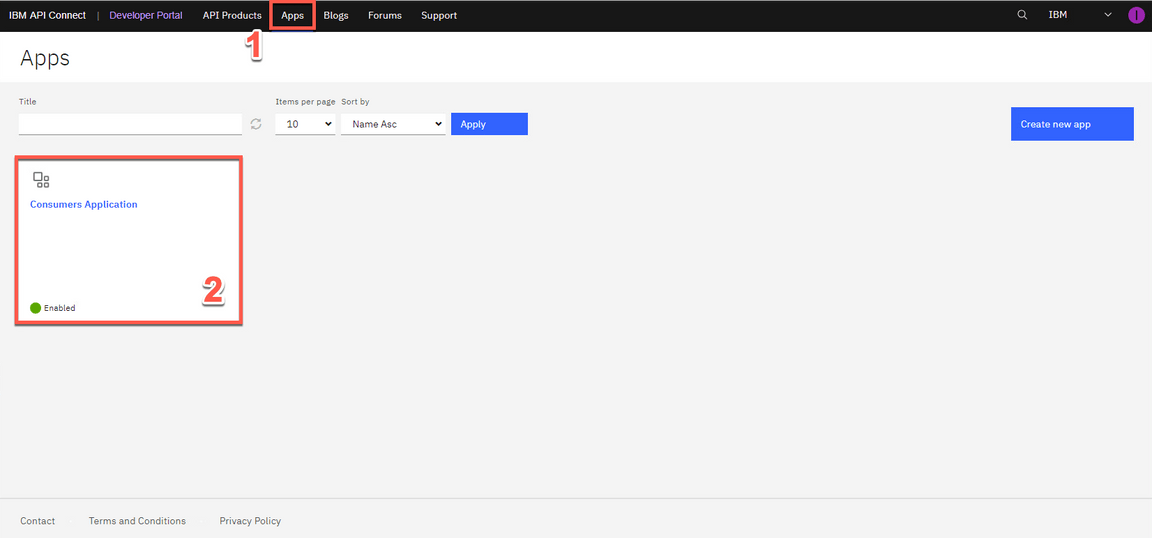
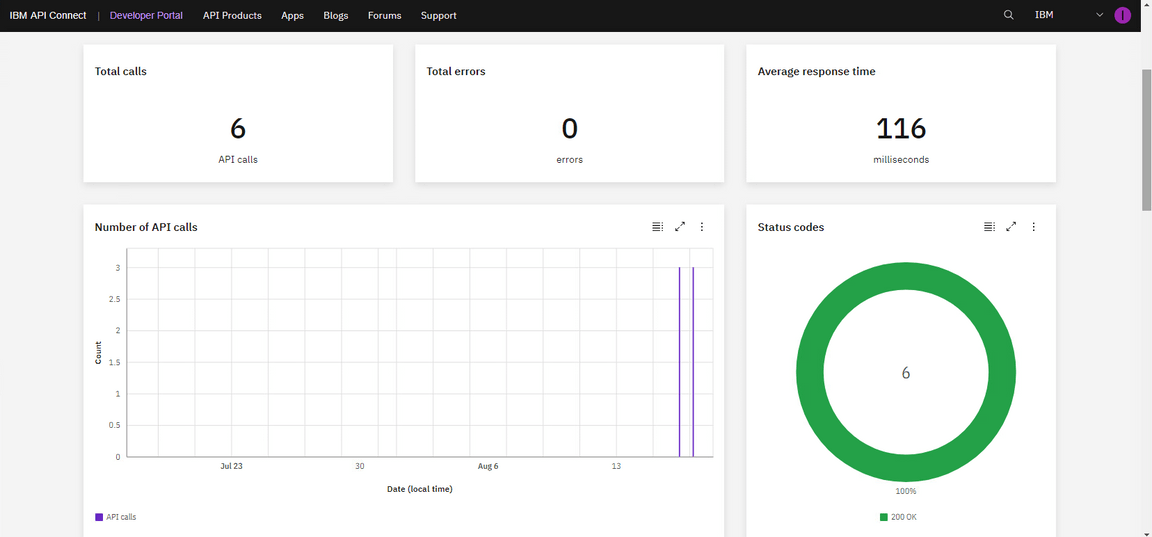
Another great capability of API Connect, the consumers can see the API statistics in the portal. They just need to select their app, and here they can see all the API calls, including any possible errors. If they make more calls, they will see larger statistic results.
In this page, the developers can view information about the APIs to help them to develop new applications.
Action 9.5.1
Open the Apps page (1) and select the Consumers Application (2).
Action 9.5.2
Show the statistics page.
Summary
Let’s summarize what Focus’ developers have done today. In this demo they:
- Created a GraphQL API using a declarative approach using API Connect Essentials (StepZen)
- Created a GraphQL API using different sources (two REST services and one MySQL database)
- Created a graph composition using @materializer
- Deployed the new GraphQL API on StepZen Cloud runtime;
- Created a GraphQL Proxy API in API Connect to call the GraphQL API on StepZen
- Managed their API and set up the security policies
- Created a Product and applied GraphQL rate limits
- Socialized their GraphQL API on the Developer Portal and demonstrated how an API consumer can use the API portal to perform self-service consumption of the API;
From a business perspective, Focus Corporate learned how to use APIs to automate a series of steps to obtain customer and order information from different sources (legacy services and databases). They verified how to use APIs as the foundation of their digital transformation journey.
For Focus’ Development team, they learned an easier way to build GraphQL APIs and consume data stored everywhere. At the same time, they saw a complete API Management solution that enables them to create, secure, socialize and manage APIs.
Thank you for attending today’s presentation.
