MQ and ACE Demo
Introduction
Every enterprise in today's markets must offer robust digital products and services, often requiring integration of complex capabilities and systems to deliver one coherent whole. IBM® Cloud Pak for Integration offers a simplified solution to this integration challenge, allowing the enterprise to modernize its processes while positioning itself for future innovation. Messaging is one of the key capabilities of IBM Cloud Pak for Integration.
IBM MQ provides a universal messaging backbone with robust connectivity for flexible and reliable messaging for applications and the integration of existing IT assets. IBM MQ simplifies, accelerates and facilitates the reliable exchange of data with a flexible and security-rich messaging solution that’s trusted by some of the world’s most successful enterprises. With IBM MQ, you ensure you receive the information you need, when you need it — and receive it only once.
Automating customer interactions effectively can mean the difference between a satisfied customer (one who will want to do more business with you in the future) or a disappointed customer (who will afterwards be looking for alternative options).
Automation in this context can also reduce the manual steps involved in customer interactions, cut down on data entry into multiple different applications, and potentially eliminate errors and delays – all of which are additional costs to your business.
The demo will showcase ways to automate customer interactions. To implement this automation, we will use both Messaging and Integrations to back-end applications.
Let's get started!
(Demo Slides here)
1 - Accessing the environment
| 1.1 | Log in to Cloud Pak for Integration |
|---|---|
| Narration | Let’s see IBM MQ and IBM App Connect in action. Here we have an IBM Cloud Pak for Integration environment with IBM MQ and IBM App Connector operators installed. In our demonstration, we’re leveraging the cloud version of the product which is available from IBM Cloud. First, I’ll log into the environment. |
| Action 1.1.1 | Open Cloud Pak for Integration page and log in with your username and password. 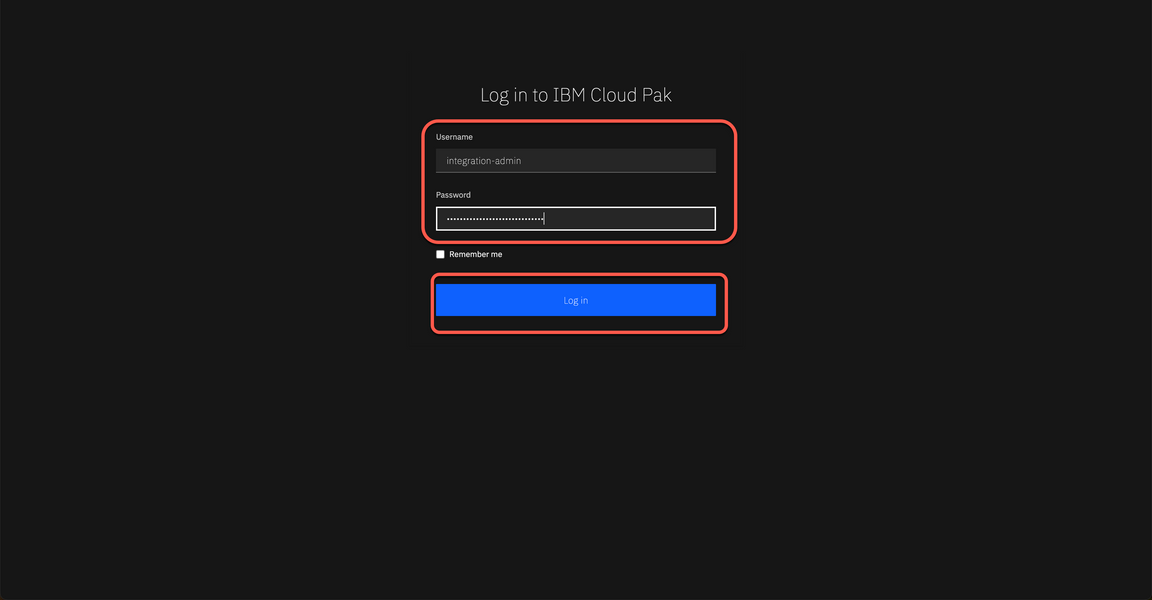
|
| 1.2 | View the Cloud Pak for Integration instances |
|---|---|
| Narration | Welcome to IBM Cloud Pak for Integration! We’re now at the home screen showing all the capabilities of the Pak, brought together in one place. Specialized integration capabilities — for API management, application integration, messaging, and more — are built on top of powerful automation services. As you can see, you are able to access all the integration capabilities your team needs through a single interface. In this demo, we will use App Connect for application integration to access our company’s backend systems. IBM MQ will serve as the universal messaging backbone, providing robust connectivity for flexible and reliable messaging between applications — as well as for integration of existing IT assets. |
| Action 1.2.1 | Show the Instances page and open the Messaging capability (qmgr-demo). ‘Note’- If you didn’t complete the Uniform Clusters demo before this demo, you don’t have the uniform clusters instance. No problem at all! Just ignore them in the picture below. You don’t need them. In this demo you only use the qmgr-demo instance. If necessary, accept the security risks. 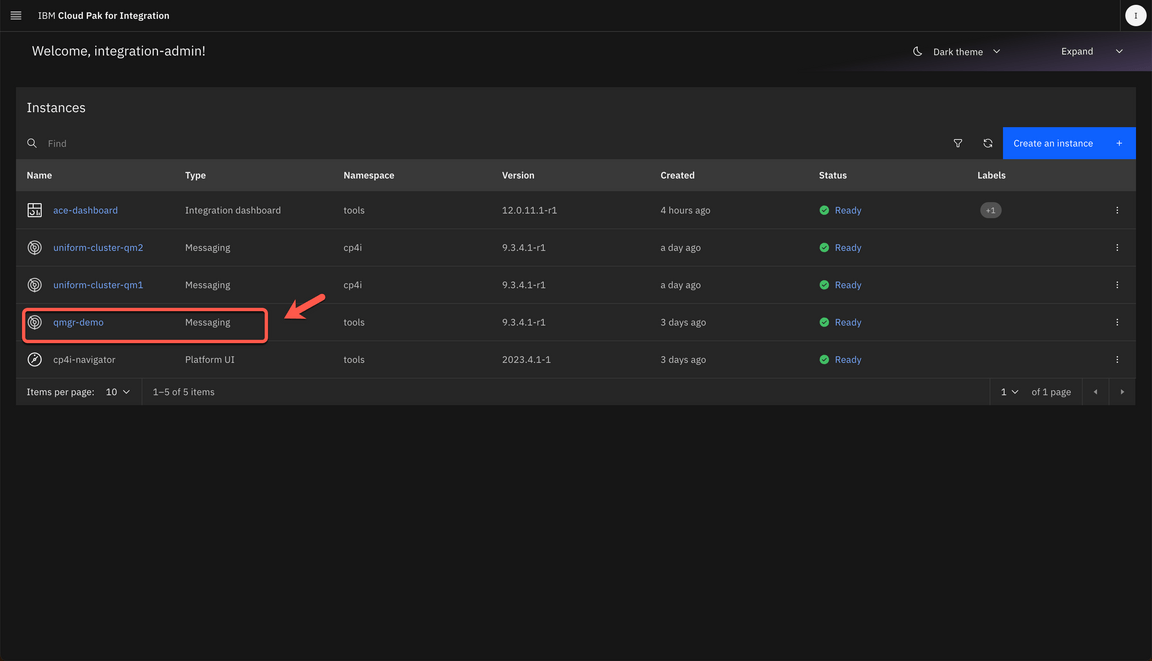
|
2 - Create a queue
| 2.1 | View the IBM MQ home screen |
|---|---|
| Narration | Let’s examine the capabilities of IBM MQ on Cloud Pak for Integration. IBM MQ offers proven, enterprise-grade messaging capabilities that skillfully and safely move information between applications. You can run IBM MQ in the pre-packaged container provided in IBM Cloud Pak for Integration. Here we are on MQ Console page of a pre-created Queue Manager. From here you can manage your local queues or create a new queue. IBM MQ can be managed using a variety of tools: from the IBM MQ Explorer GUI; as well as through scripted or interactive command line tools; or programmatically. Let’s explore how to create a new queue. For demo purposes, we will create the queue using the Graphic User Interface, however in a production scenario you will create the queue using a ConfigMap that allows you to decouple environment-specific configuration from your container images, so that your applications are easily portable. |
| Action 2.1.1 | Click Create a queue. 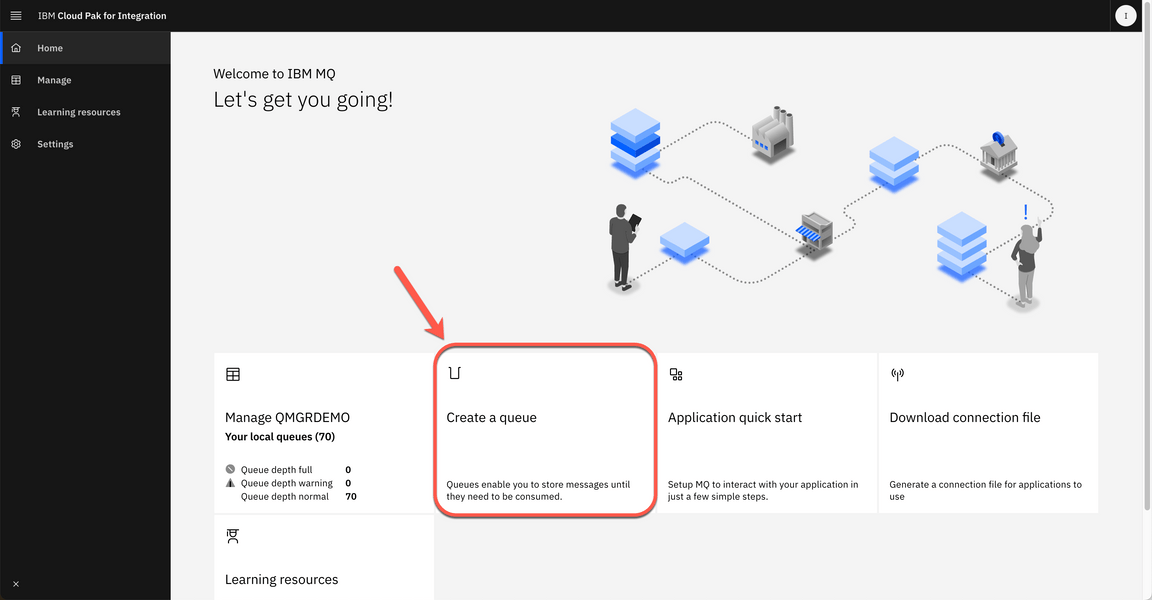
|
| 2.2 | Choose queue type |
|---|---|
| Narration | An IBM MQ messaging system is made up of one or more queue managers. Queue managers are where messaging resources, such as queues, are configured. Queue managers are also what applications connect to, either running on the same system as the queue manager itself or over the network. A network of connected queue managers supports asynchronous routing of messages between systems, where producing and consuming applications are connected to different queue managers. In this demo, we will use a Local queue that is on the queue manager we are connected to, QMGRDEMO. |
| Action 2.2.1 | In Create a queue page. Choose Local as your queue type. 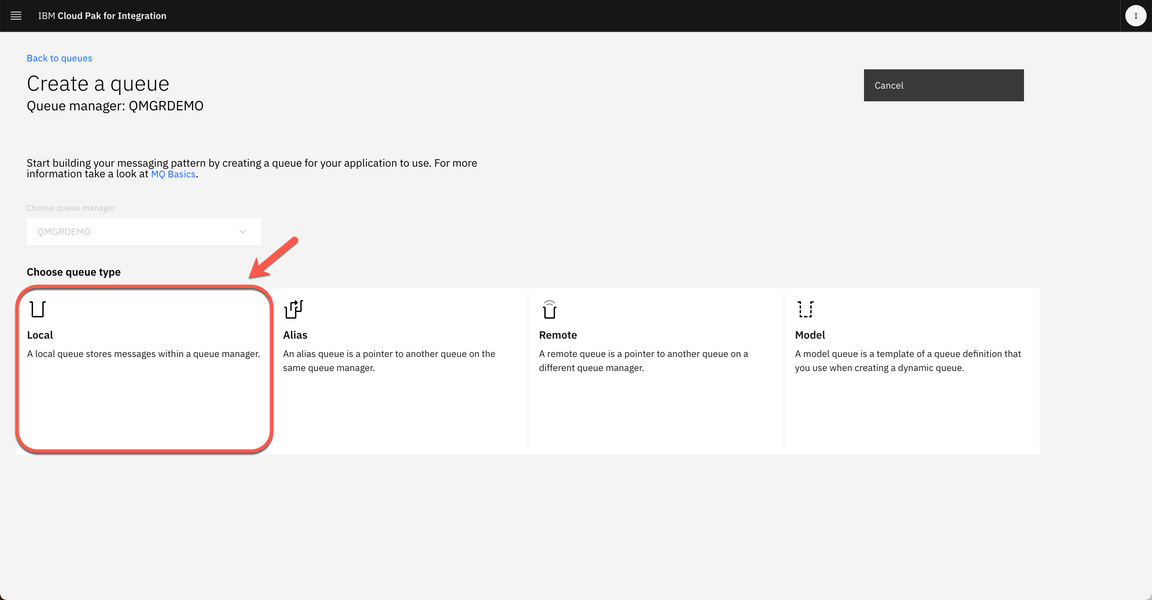
|
| 2.3 | Define queue details |
|---|---|
| Narration | Message queuing has been used in data processing for many years. It is most commonly used today in electronic mail. Without queuing, sending an electronic message over long distances requires every node on the route to be available for forwarding messages, and the addressees to be logged on and conscious of the fact that you are trying to send them a message. In a queuing system, messages are stored at intermediate nodes until the system is ready to forward them. At their final destination they are stored in an electronic mailbox until the addressee is ready to read them. You can think of message queuing as being electronic mail for programs. In a message queuing environment, each program that makes up part of an application suite performs a well-defined, self-contained function in response to a specific request. To communicate with another program, a program must put a message on a predefined queue. The other program retrieves the message from the queue, and processes the requests and information contained in the message. So, message queuing is a style of program-to-program communication. A message queue, known simply as a queue, is a named destination to which messages can be sent. Messages accumulate on queues until they are retrieved by programs that service those queues. Here, we need to define the details of our new queue. Let’s define NEWORDER as the name of the queue and keep the default values as given. |
| Action 2.3.1 | Enter NEWORDER as queue name (A), keep the default values (B) and the click Create (C). 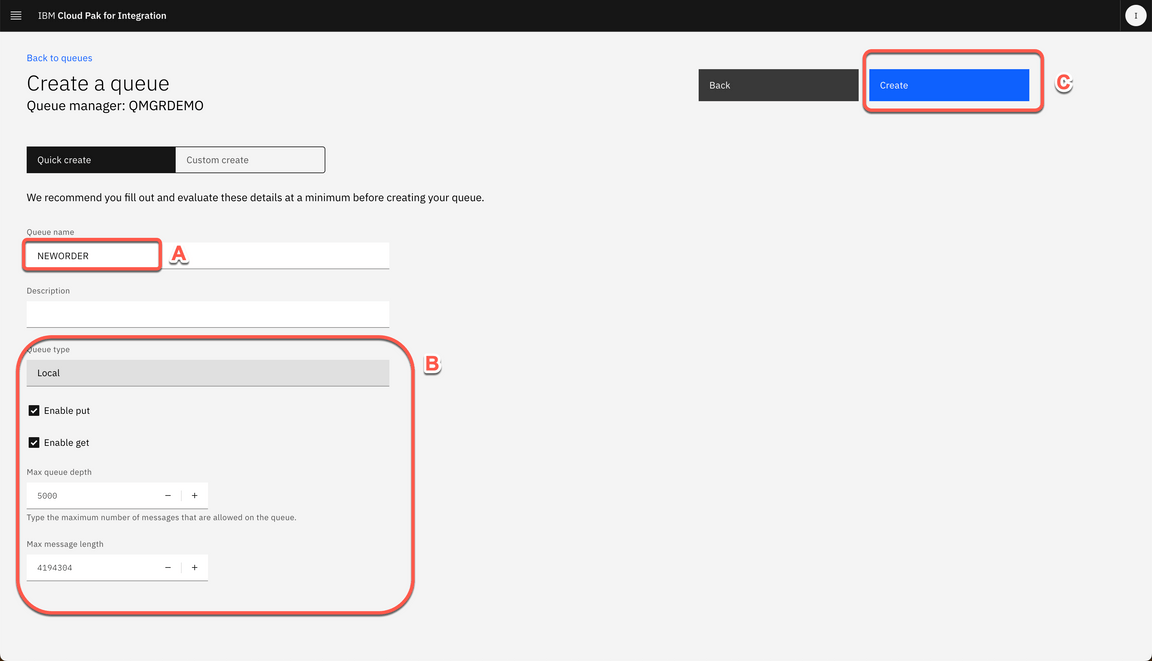
|
| 2.4 | Manage your new queue |
|---|---|
| Narration | At this stage we now have a new local queue. From the Manage page, we can see all the queues available. Let’s open the NEWORDER queue. In the Details page, let’s inspect the messages available in this queue. Right now, the NEWORDER queue is empty. Our next step will be to create an application for automatically generating messages for this queue. Once that application is ready to go, return to the queue manager page. |
| Action 2.4.1 | In the Manage page (A), open the Queues tab (B), click on Find button (lens icon) (C) 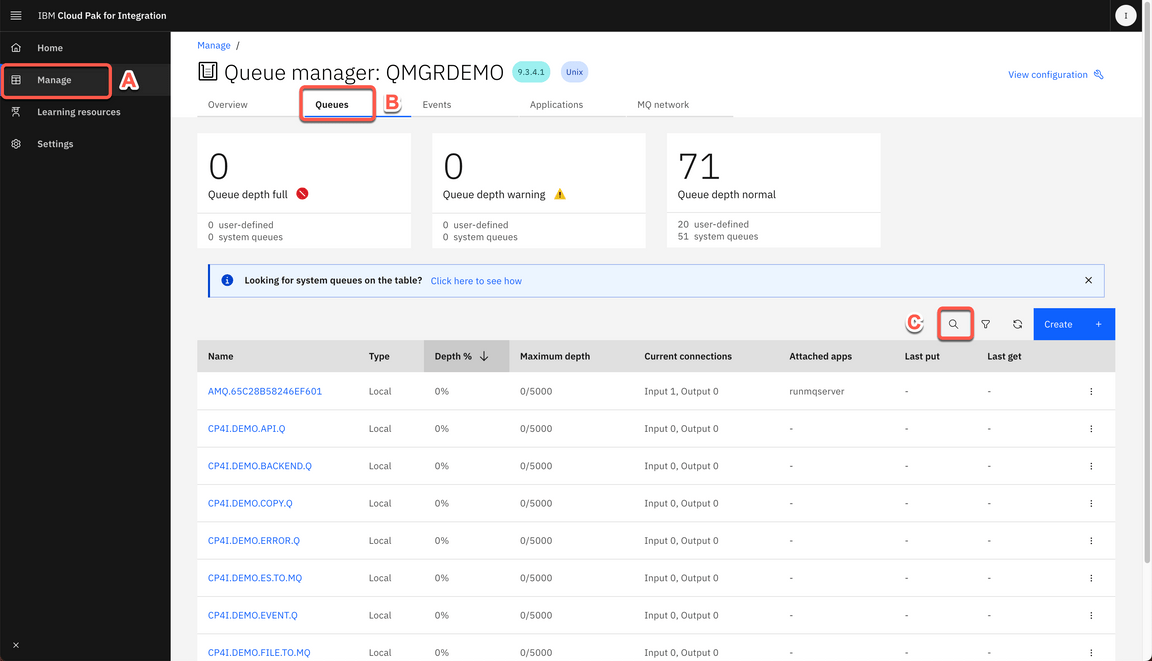
|
| Action 2.4.2 | Search for NEWORDER (A) queue and click on the NEWORDER queue link (B). 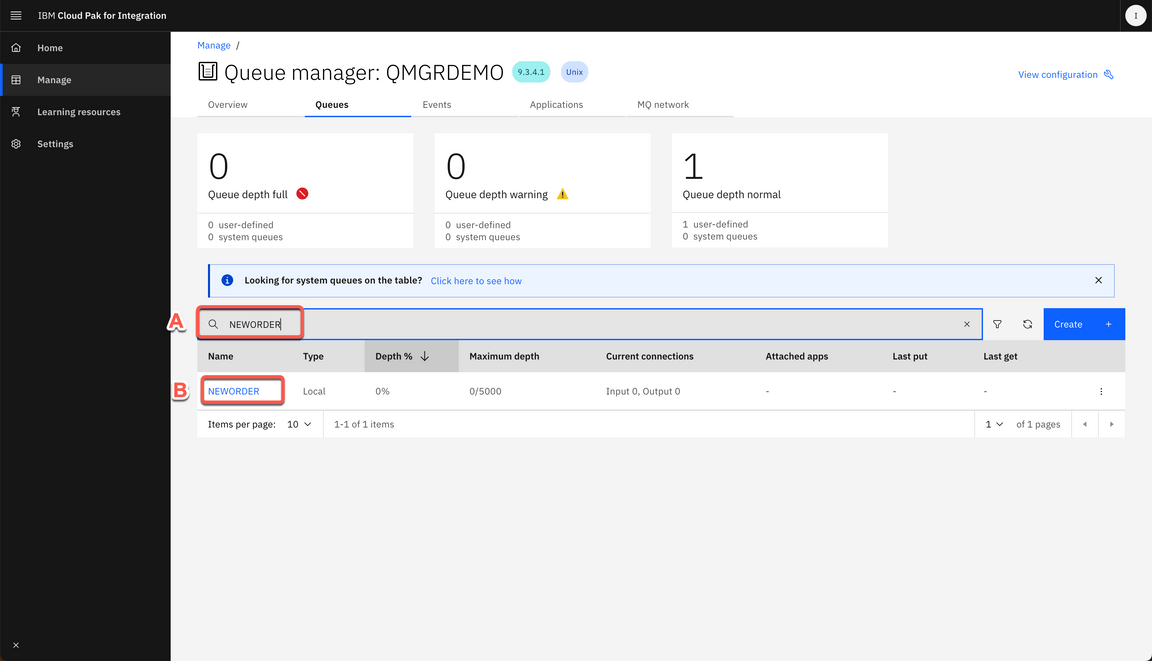
|
| Action 2.4.3 | On the breadcrumbs, click QMGRDEMO link.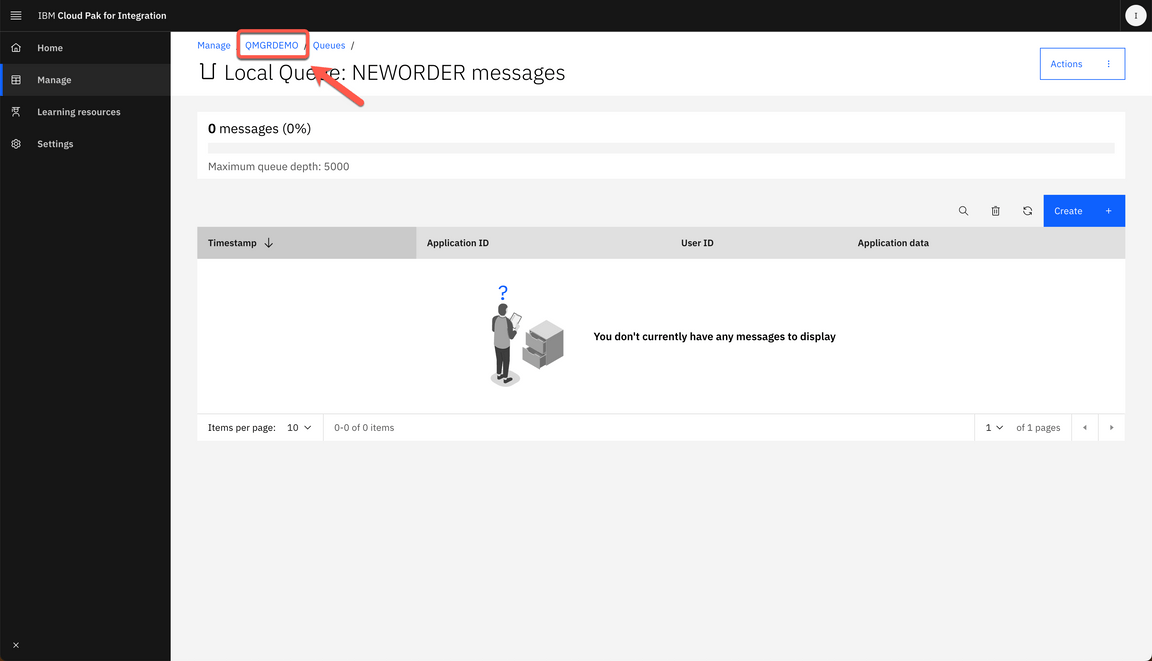
|
3 - Configuring the App Integration flow
| 3.1 | Checking the MQ Services name |
|---|---|
| Narration | The applications connecting to IBM MQ can be written in any one many programming languages — and are compatible with multiple APIs, including: C, Cobol, Java, .Net, NodeJS, and Ruby. Continuing with the demonstration, we will now create an Integration Flow using App Connect Enterprise Toolkit. Let’s first verify the services name of our IBM MQ instance, before starting App Connect Enterprise for building a message flow. |
| Action 3.1.1 | Open a Terminal window where you are already loggedin your CP4I environment. |
| Action 3.1.2 | Run the command below to get a list of mq services in the cp4i namespace. oc get svc -n tools | grep mq |
| Action 3.1.3 | Copy the MQ service name from service which the port is 1414 (e.g.:qmgr-demo-ibm-mq). 
|
| 3.2 | Open App Connect Enterprise Toolkit |
|---|---|
| Narration | With the MQ services name in hand, let’s now open the App Connect Enterprise Toolkit. You can use the IBM App Connect Enterprise Toolkit to build powerful integration applications, services, and APIs. You can then deploy your integration solutions to the software run time, IBM App Connect Enterprise as a Service, containers, or a combination of those environments. The welcome page provides access to the Tutorials Gallery. This gallery can help you get started, provides information on what’s new within the product, and can also be used to install new language packs. Let’s close this Welcome page and drill down into the Integration Development perspective. |
| Action 3.2.1 | Open your App Connect Enterprise Toolkit by clicking the icon on the Launchapad (MAC OS) or Desktop (Windows) or executing ace toolkit in terminal window. 
|
| Action 3.2.2 | In the Workspace Launcher window, you are welcome to create a new workspace or accept the default one. Click Launch. 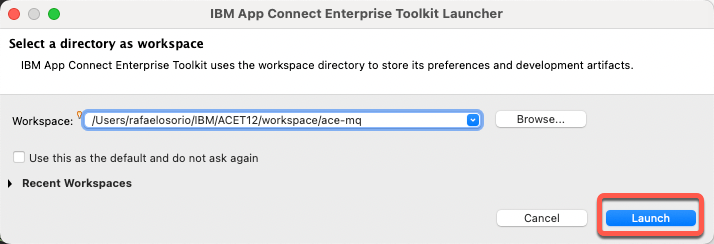
|
| Action 3.2.3 | Close the welcome page. 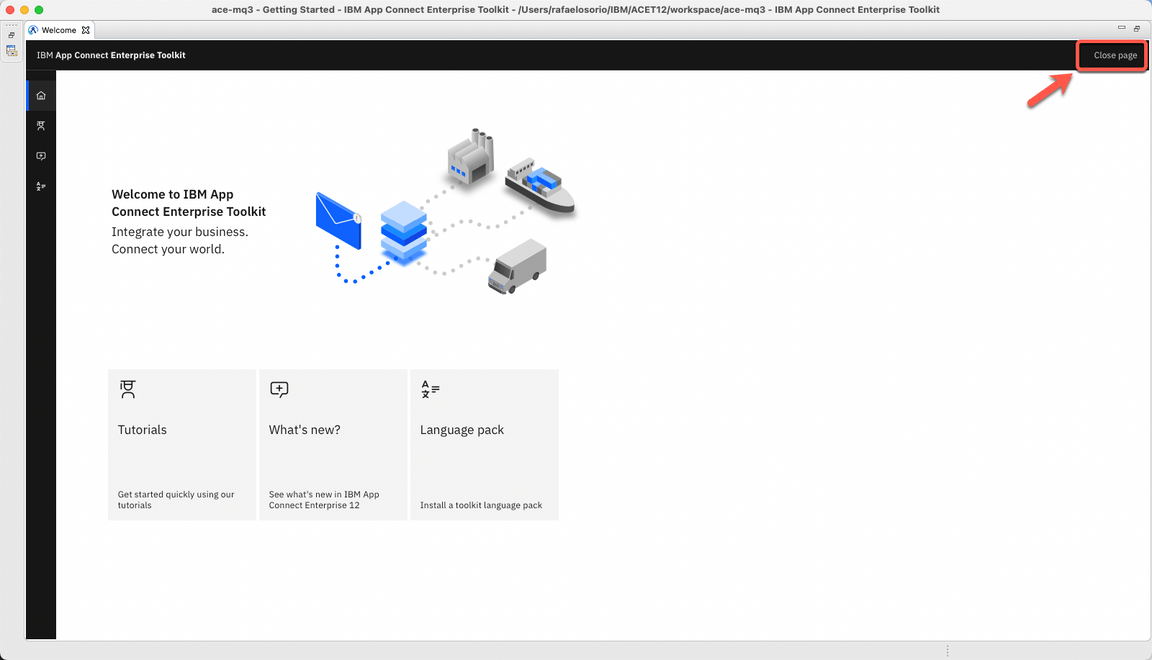
|
| 3.3 | Import a flow |
|---|---|
| Narration | From the Integration Development perspective, we can create all manner of integration flows, as well as manage connectivity between services and endpoints. For the sake of example, we have created a simple flow for demonstrating a messaging integration scenario. Let’s go ahead and import the example into our demonstration environment. |
| Action 3.3.1 | Select File->Import 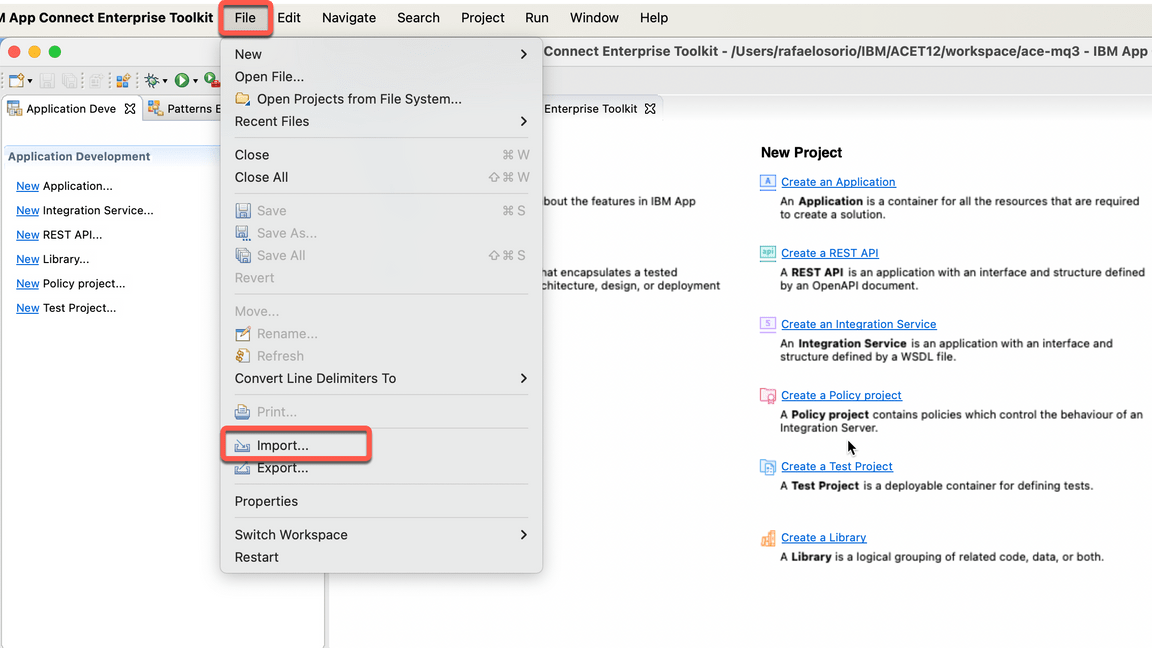
|
| Action 3.3.2 | Select Project Interchange (A) and click Next (B). 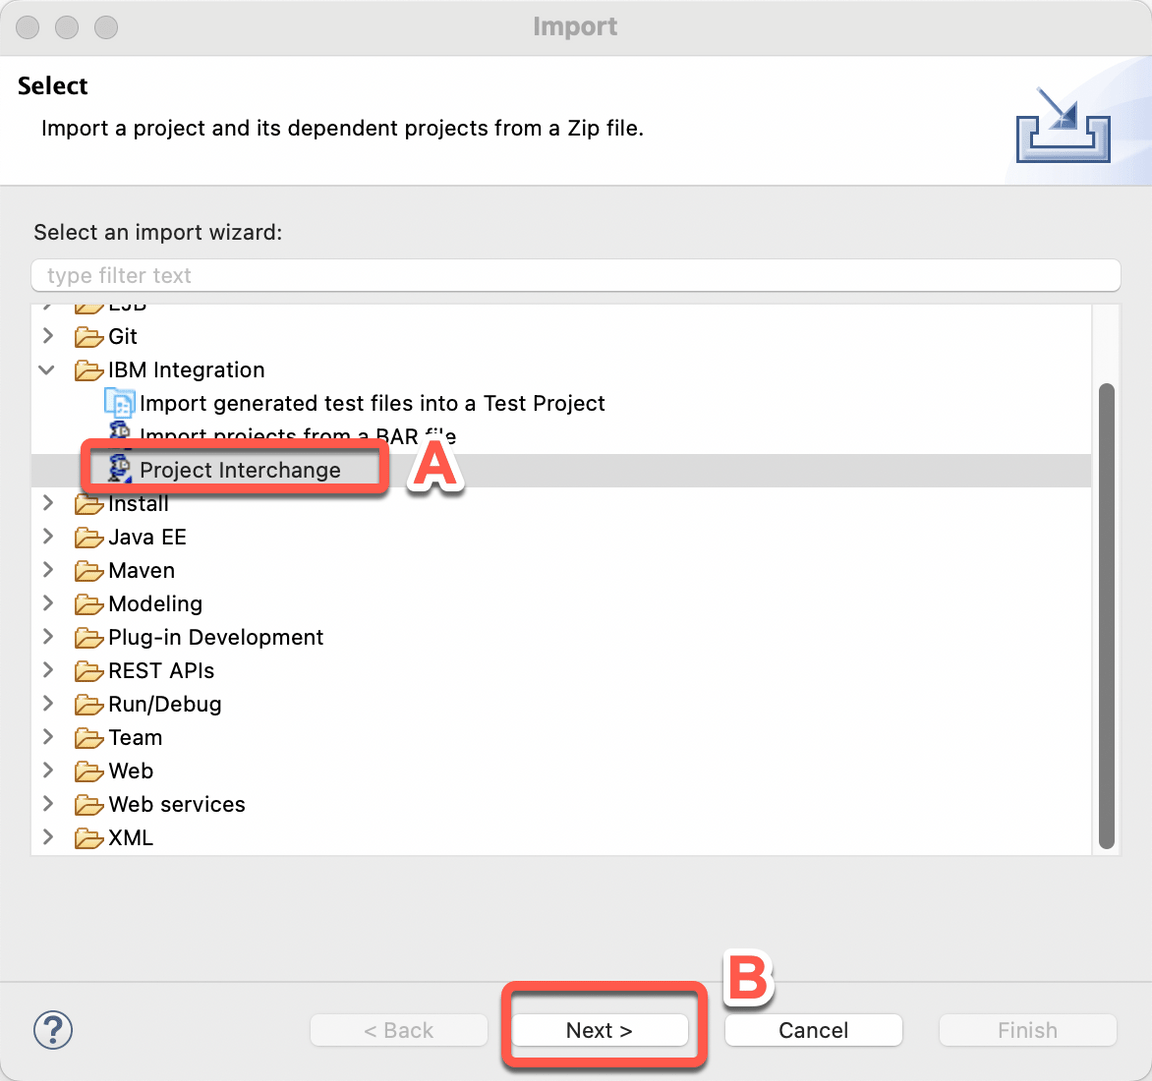
|
| Action 3.3.3 | Select ace-mq.zip (A) file that you downloaded in the Demo Preparation part. Verify neworder project is checked (B) and click Finish (C). 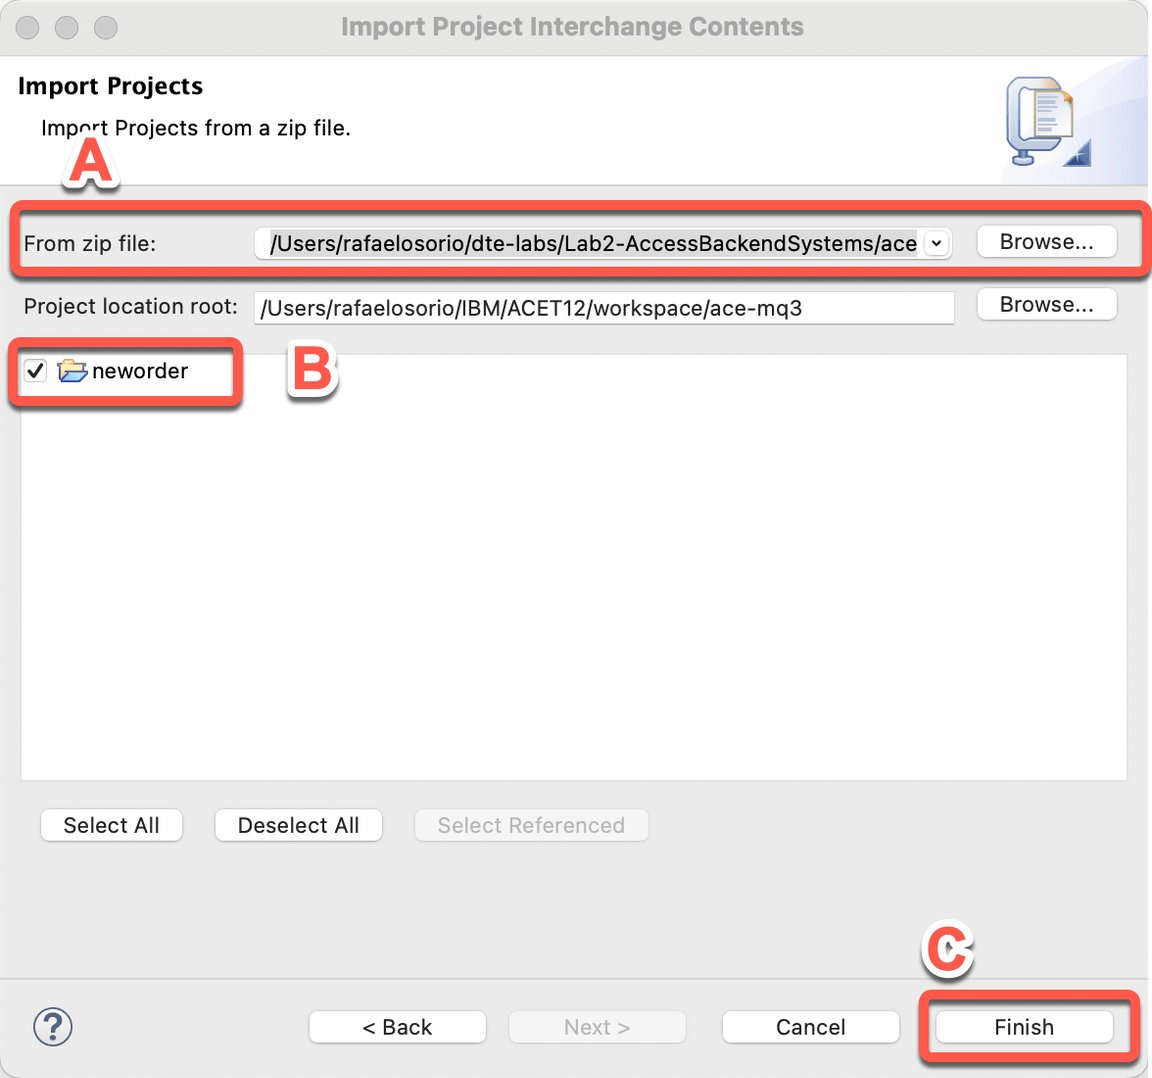
|
| 3.4 | Check the integration flow |
|---|---|
| Narration | Here we have our demo flow. In the flow editor, we can edit and change our flow. Message flows are created in the Toolkit using a drag and drop editor. The flow is quite simple, consisting of only four nodes: Input, Output, a simple mapping node, and an MQOutput node. This message flow is developed as an API, therefore, the actual API operation is developed as a subflow in the ACE Toolkit. |
| Action 3.4.1 | Open neworder -> Resources -> Subflows -> getid.subflow 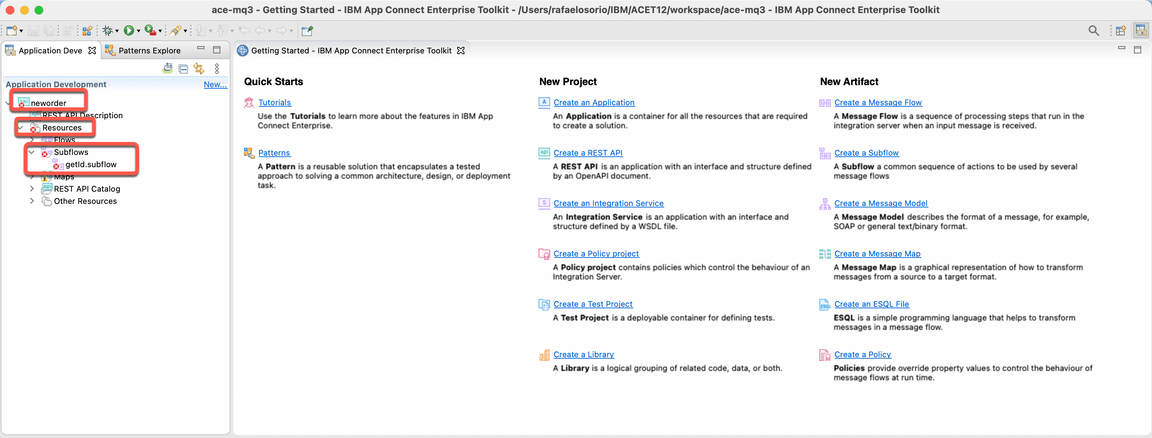
|
| 3.5 | Configure MQ Output node properties |
|---|---|
| Narration | This scenario uses an MQOutput node which is configured to interact with a local queue manager. Let’s explore this node. Let’s start by defining the Queue name in the Basic section. Now, we need to supply additional specifications for the MQ Connection, including: the queue manager, the MQ service name, port number, and channel. For demo purposes, we are hard coding the queue manager values in the flow, but in a production environment, we should use a Policy to implement it. |
| Action 3.5.1 | Click the MQ Output tile. 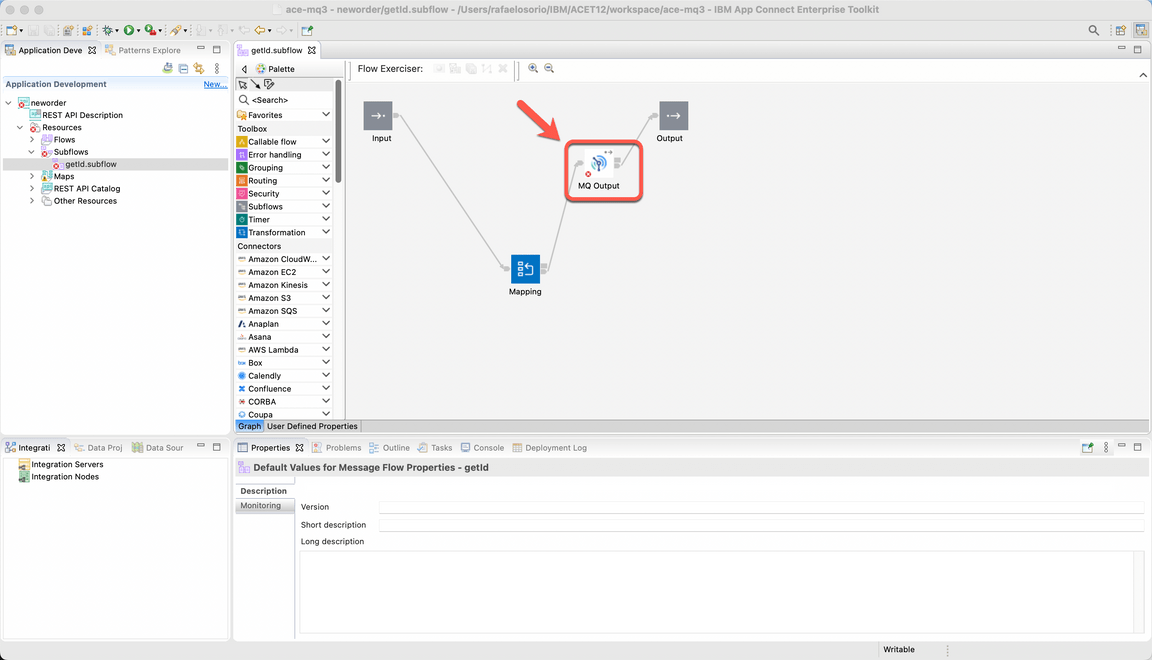
|
| Action 3.5.2 | In the lower-right of the Properties pane, you see the Properties view (A), open the Basic tab (B) and type NEWORDER as the queue name (C). 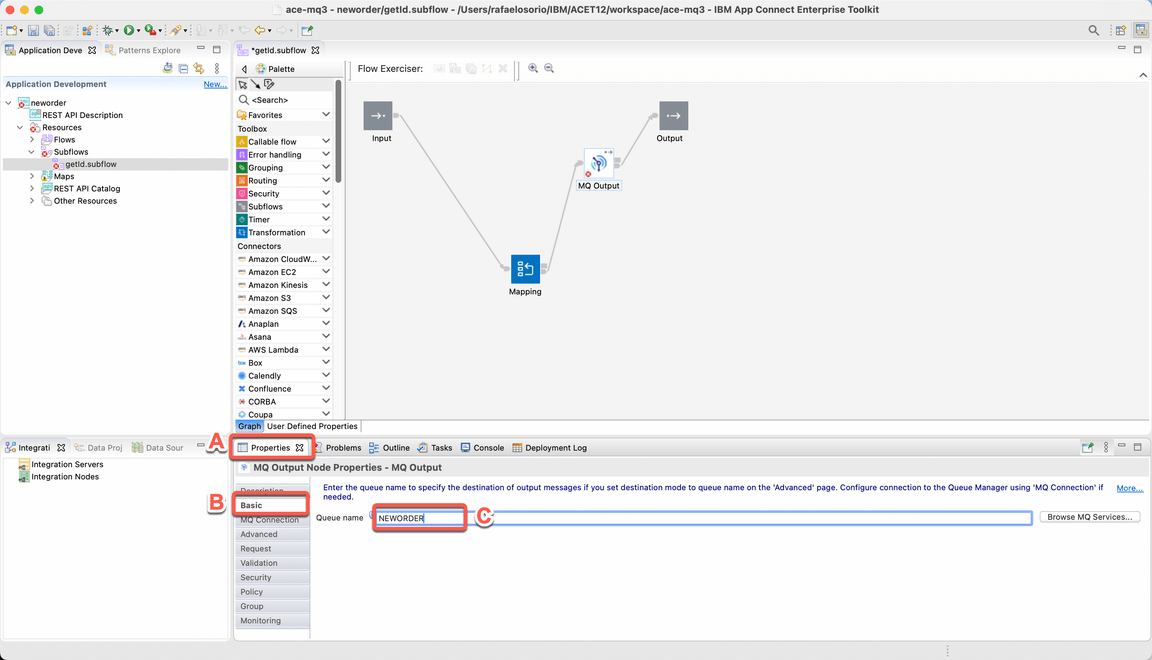
|
| Action 3.5.3 | Open the MQ Connection tab (A). On the Connection field, select MQ client connection properties (B). On Destination queue manager name, enter QMGRDEMO (case-sensitive) (C). On Queue manager host name, enter the MQ service name (e.g.: qmgr-demo-ibm-mq) identified in the previous step (D). On Listener port number, enter 1414 (E). On Channel name field, enter SYSTEM.DEF.SRVCONN (F). Save the flow (CRTL+S). 
|
| 3.6 | Export BAR file |
|---|---|
| Narration | At this stage, we are ready to deploy our Integration flow. Generate a BAR (broker archive) file. The App Connect Enterprise server uses BAR files to save compiled message flows, libraries, and other elements critical to the Integration flow. |
| Action 3.6.1 | In the Application Development window in the upper-left, on neworder application, right-click and select New then BAR file. 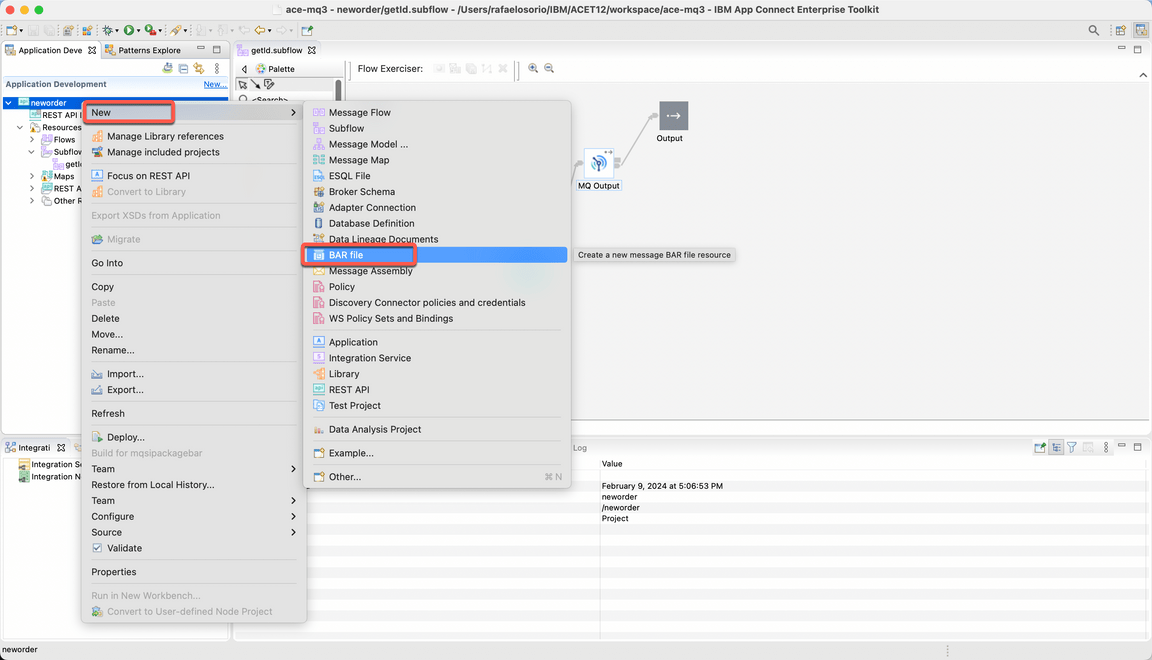
|
| Action 3.6.2 | On the Window New Bar file, type neworder as the bar file name (A) and click Finish (B). 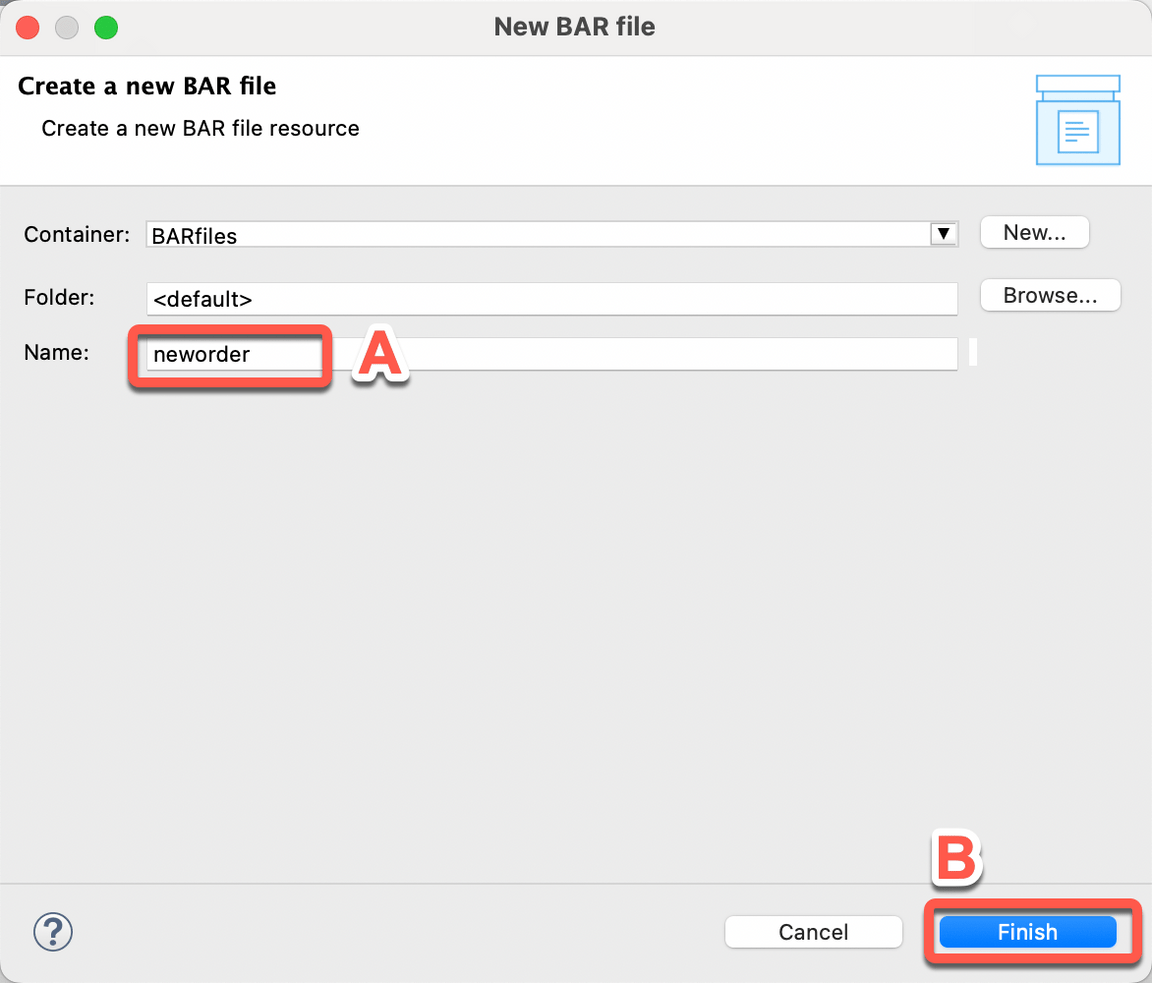
|
| Action 3.6.3 | On the Prepare screen, mark the REST APIs checkbox (A). Check Compile and in-line resources (B). Click Build and Save (C). 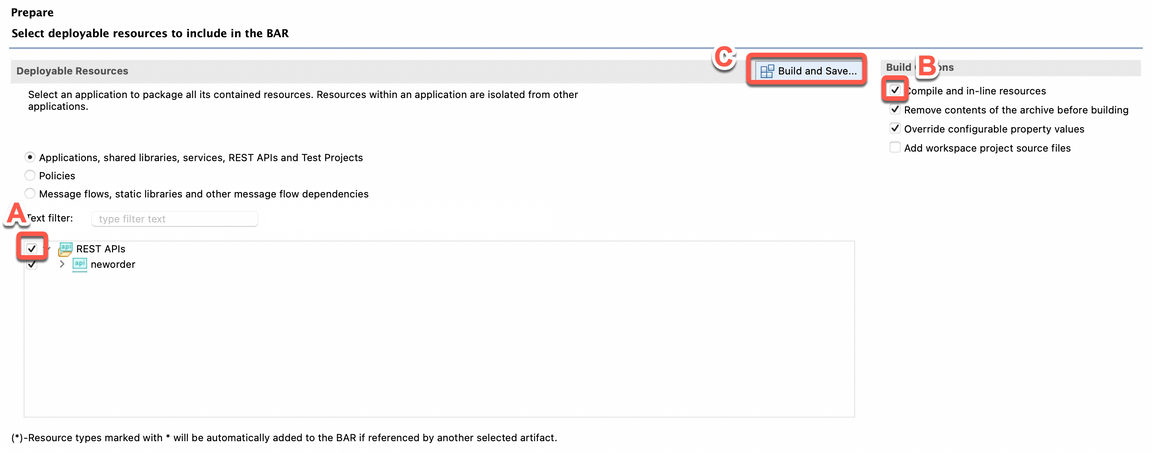
|
| Action 3.6.4 | Now, a popup window displays Operation completed successfully. Click OK. 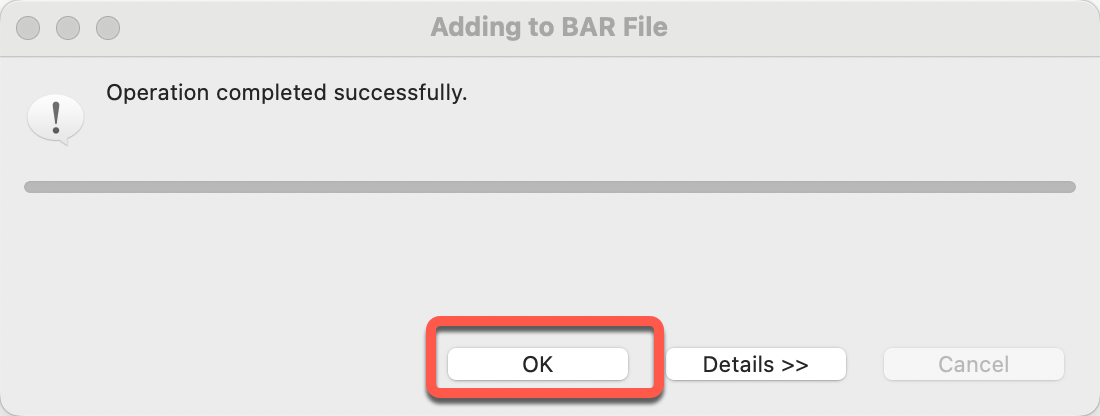
|
4 - Deploying the App Integration flow
| 4.1 | Accessing the Integration Dashboard |
|---|---|
| Narration | Let’s create an Integration Server using the App Connect Enterprise Dashboard in Cloud Pak for Integration. |
| Action 4.1.1 | Back to the Cloud Pak Integration Platform Navigator in the browser. Open the Menu (A) and on the Run section (B), open the Integrations dashboard (C). 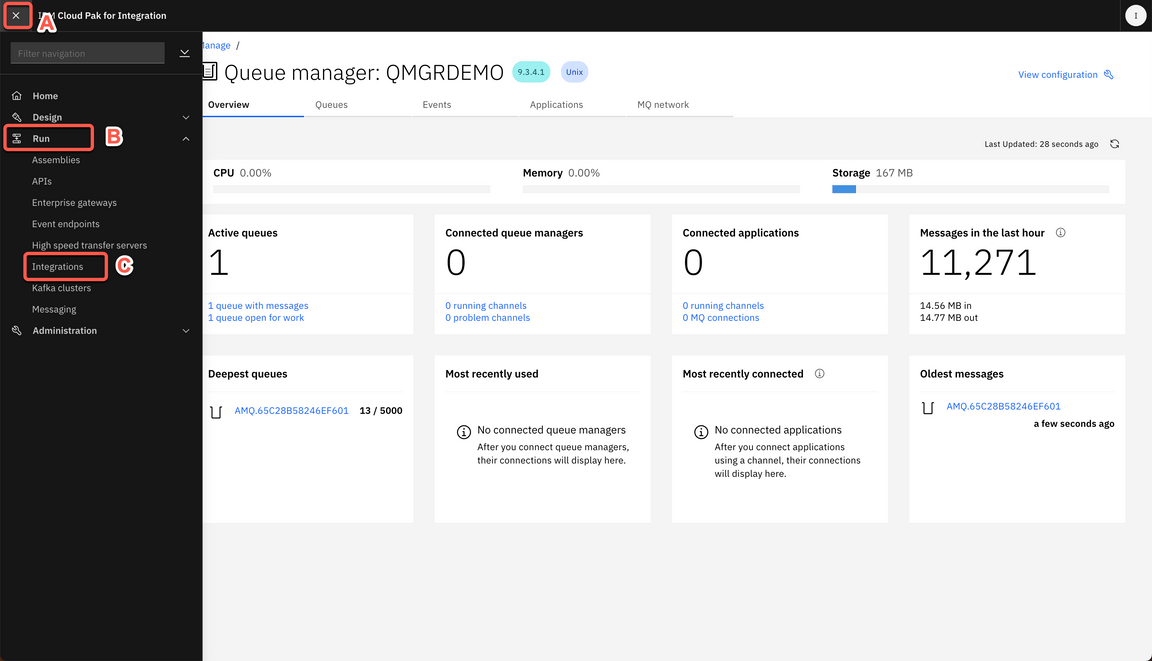
|
| Action 4.1.2 | On the Run integrations view, select the ace-dashboard. 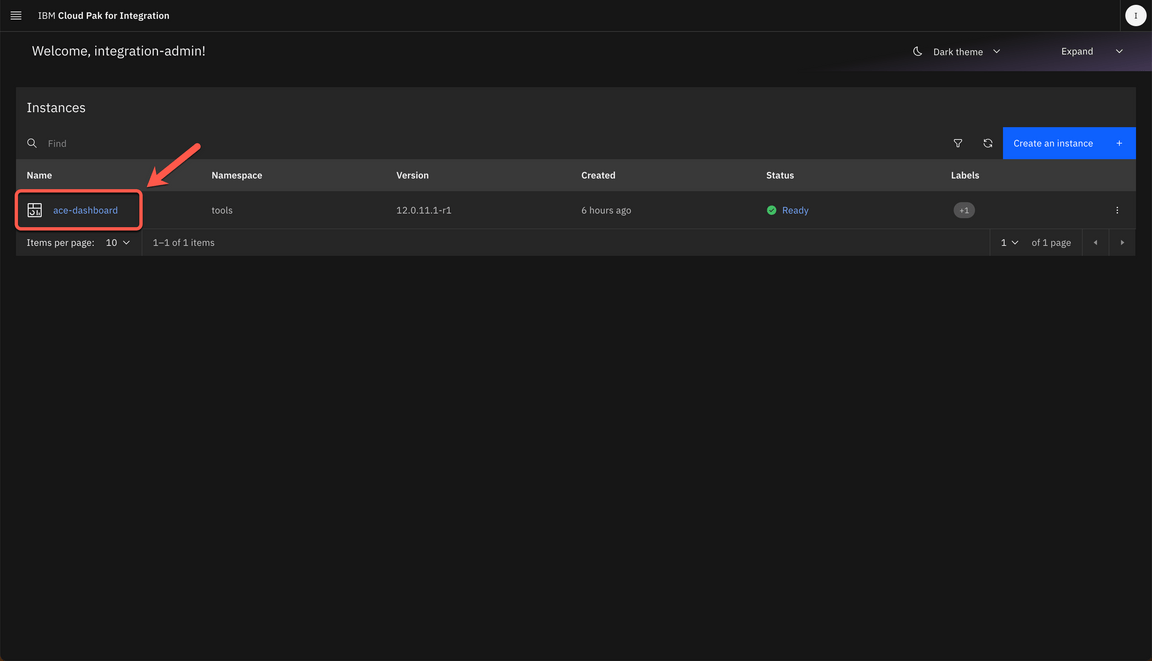
|
| 4.2 | Deploy integrations |
|---|---|
| Narration | We begin in the IBM App Connect Dashboard. Here we can administer integration servers and integration runtimes, which are deployed from the BAR files mentioned earlier. Let’s deploy the Integration flow defined in the previous steps. Because we need to deploy a simple integration, let’s select the Quick start integration type. Now we need to provide a BAR file. The BAR file contains all the resources that are needed to deploy an integration. The BAR file parameters will expose both the integration and its operations. Let’s upload our exported BAR file. We can use the Configuration component to apply any customizations to the integration server when we deploy it. For our scenario, we don’t need to use the configuration package. Now, we need to define a name for our Integration server, for example neworder. That is it! After few minutes our server should be ready with our integration flow. |
| Action 4.2.1 | Click Deploy integrations. 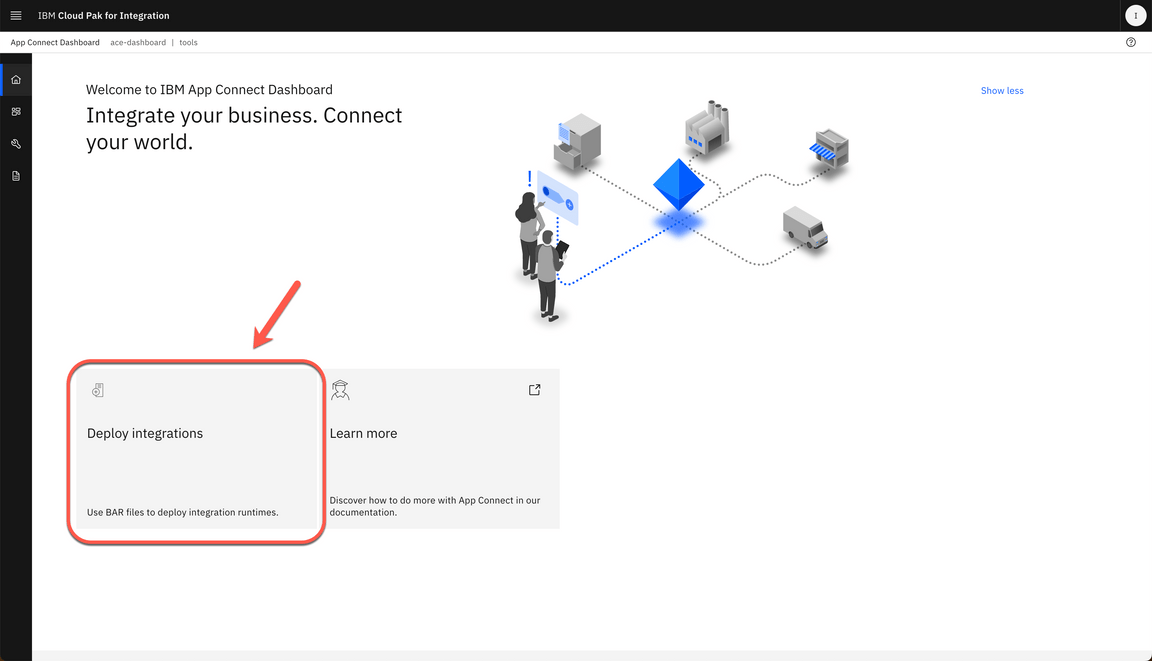
|
| Action 4.2.2 | Select Quick start integration option (A) and click NEXT (B). 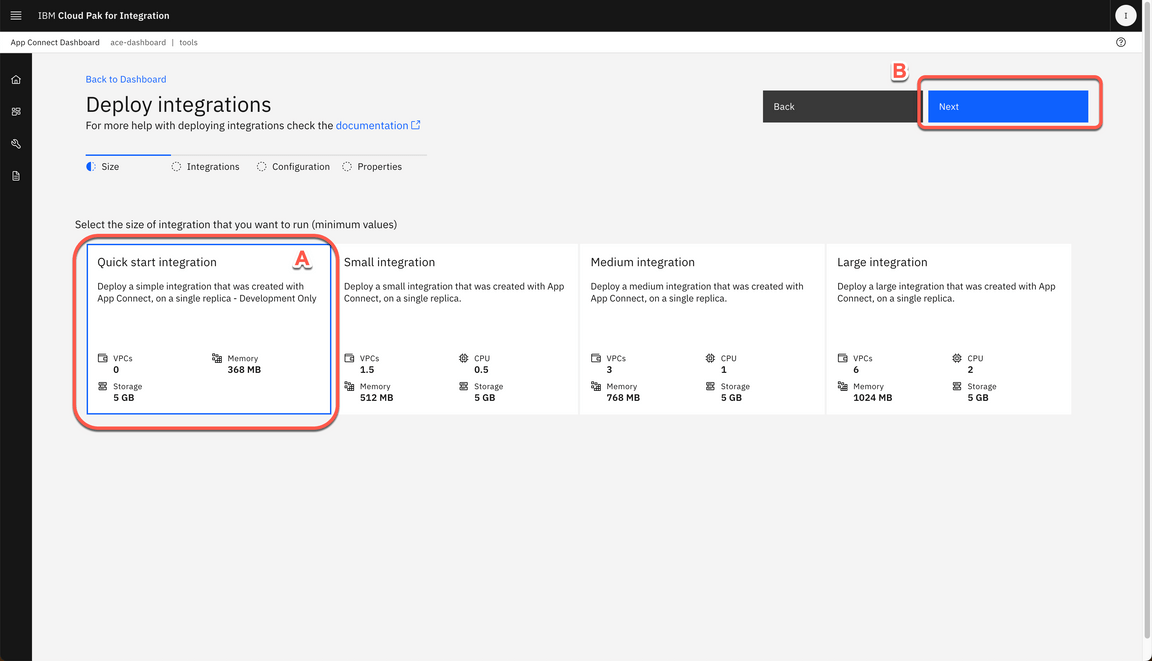
|
| Action 4.2.3 | Click to upload your BAR File. And select the neworders.bar (A) file (it is in your workspace folder in a Bar Files directory). And click Next (B). 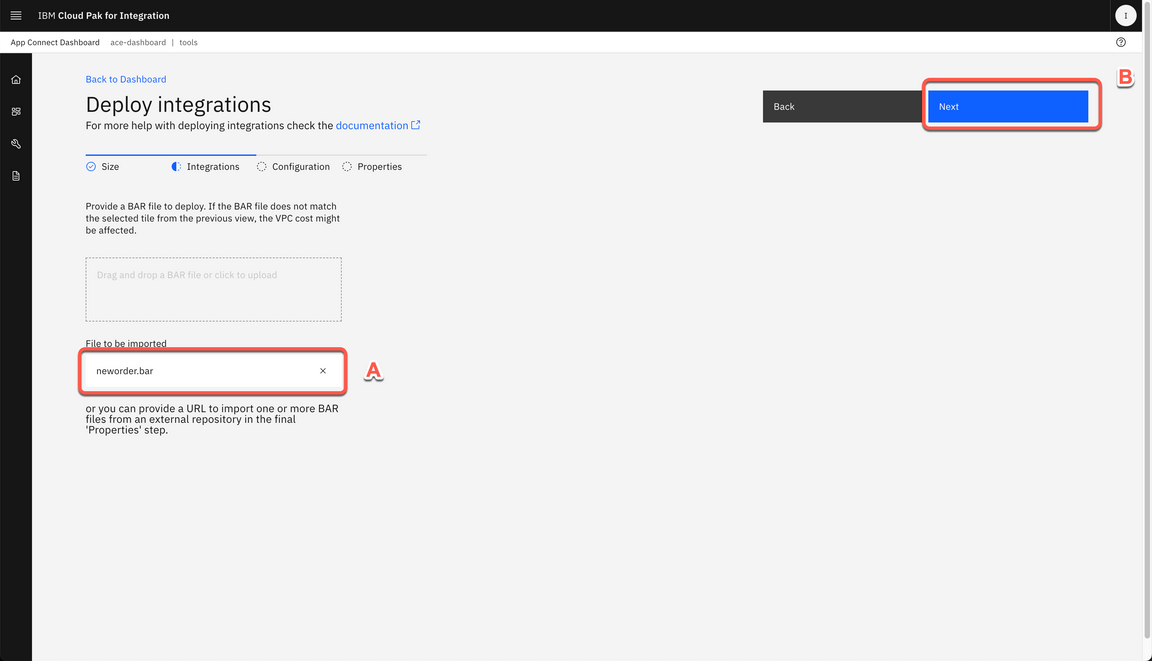
|
| Action 4.2.4 | You don’t need any Integration configuration, click Next. 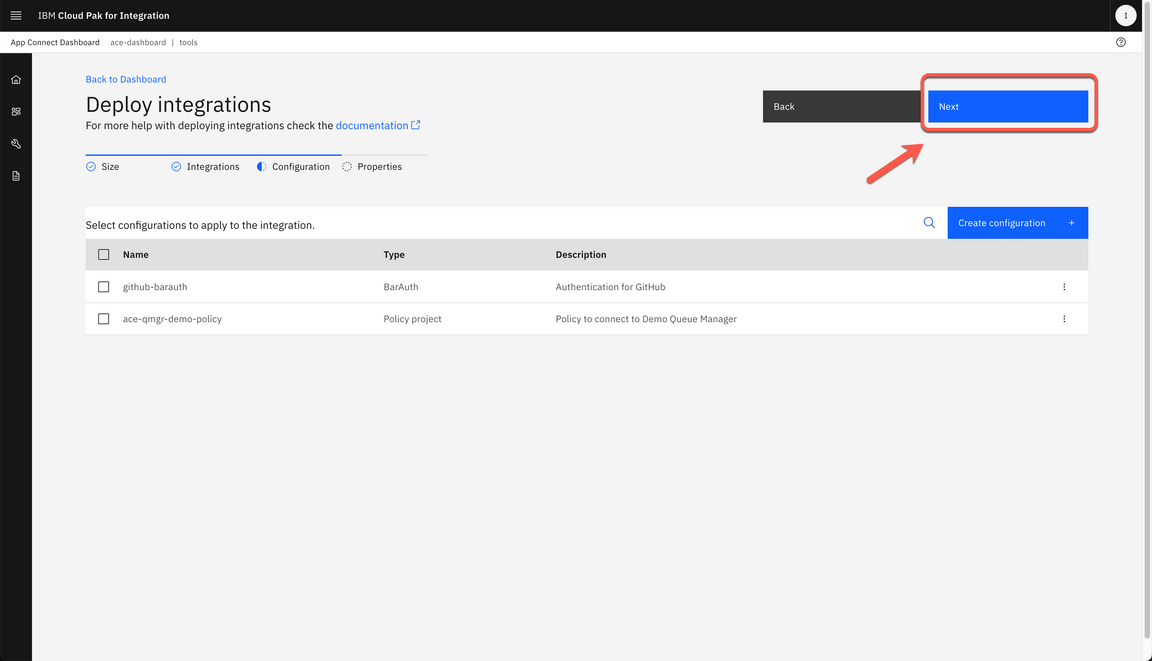
|
| Action 4.2.5 | Enter the Integration Server name as neworder (A). Then click Create (B). 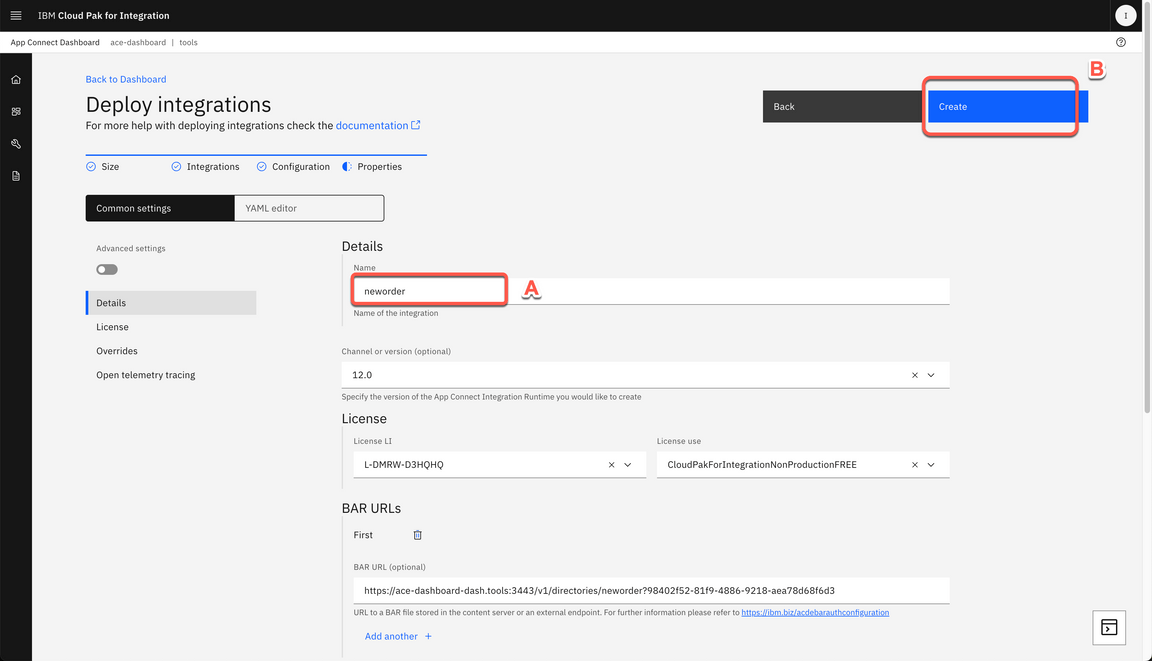
|
| Action 4.2.6 | The deployment process takes up to 5 minutes, refresh the browser to see the BAR file deployed and started. 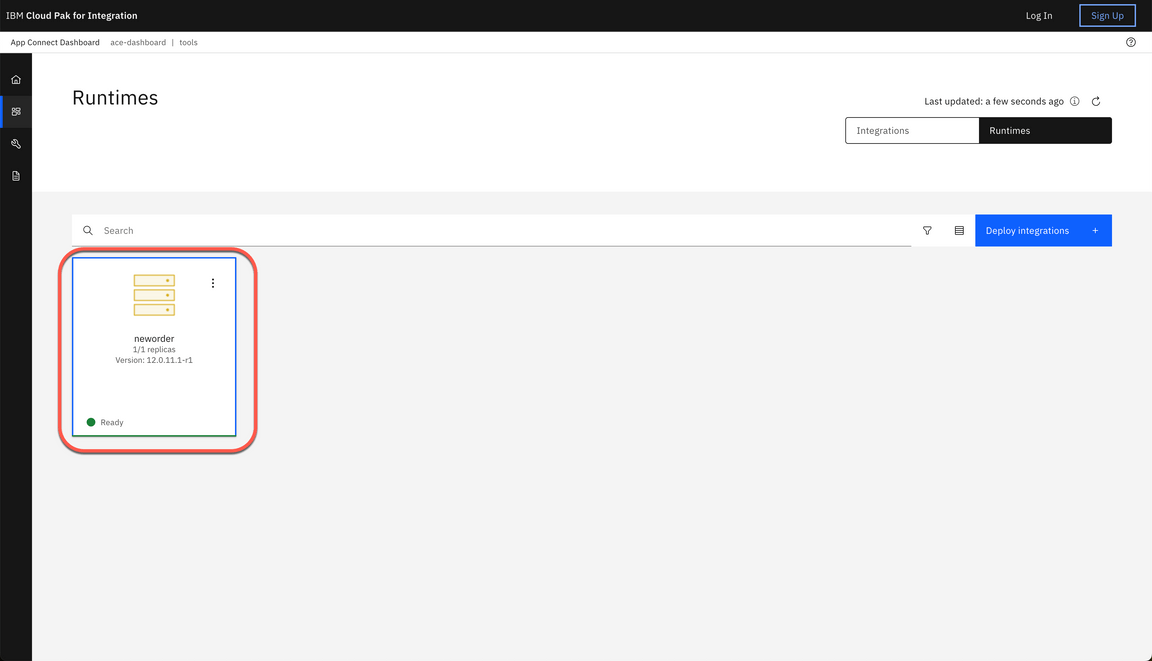
|
5 - Testing the Integration flow
| 5.1 | Copying the Integration server endpoint |
|---|---|
| Narration | To test our Integration flow, we need to have the Integration API endpoint. Let’s copy our Integration flow endpoint here in the Integration definition. |
| Action 5.1.1 | Click the neworder server icon. 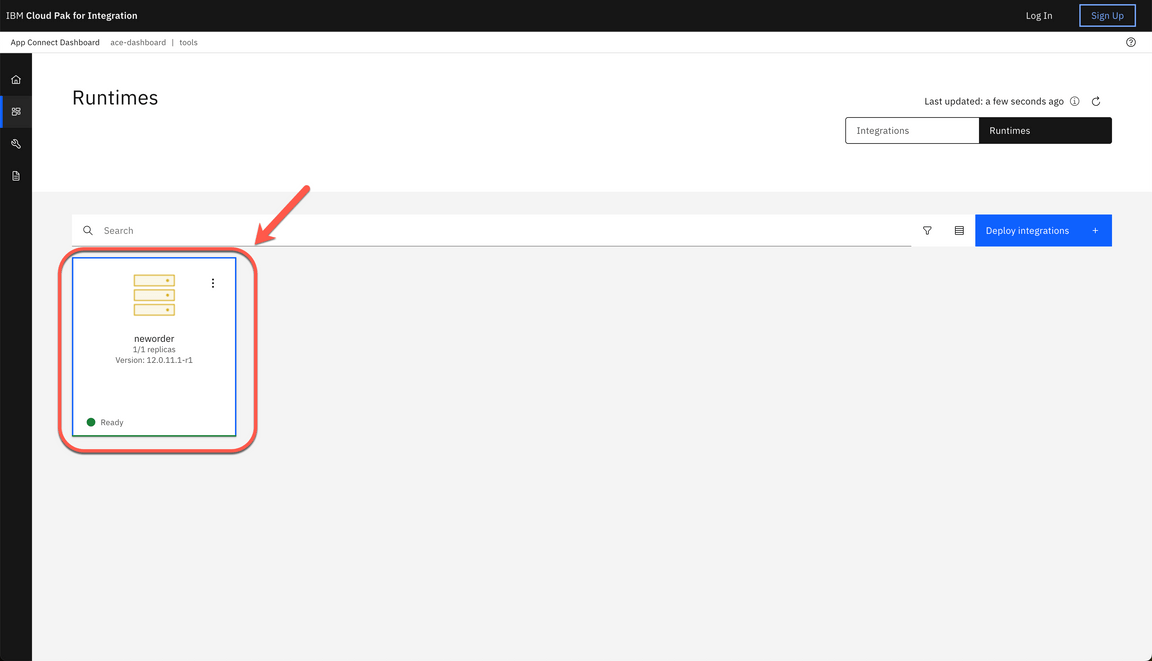
|
| Action 5.1.2 | Click the neworder API icon. 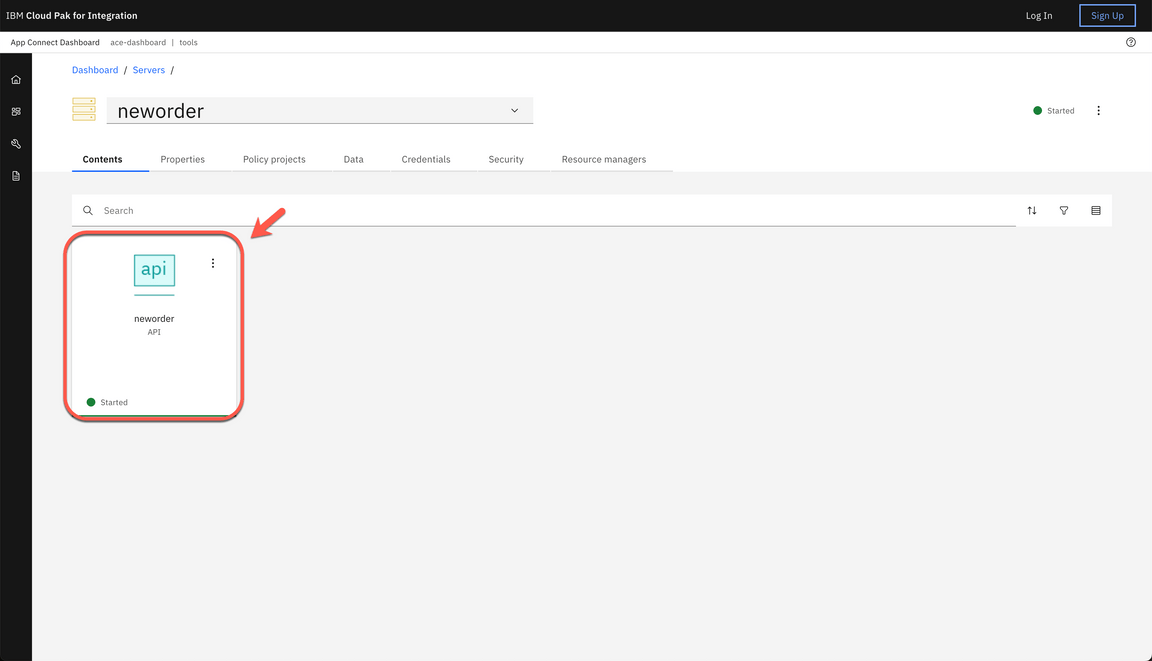
|
| Action 5.1.3 | Copy the Endpoint URL. 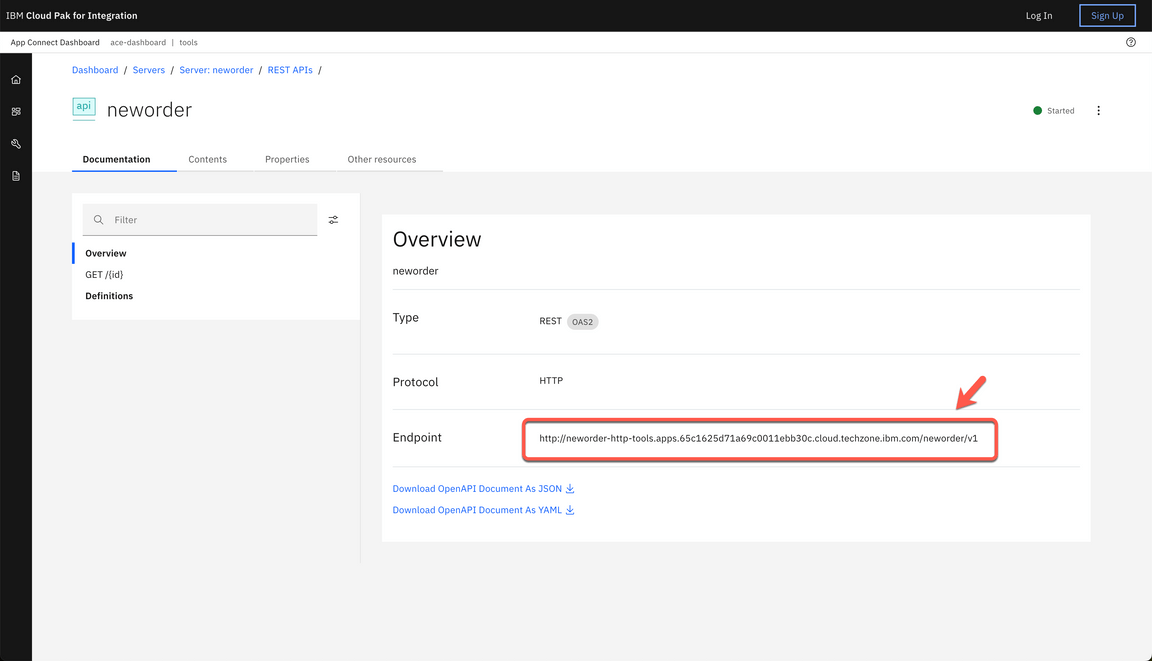
|
| 5.2 | Invoking the Integration flow |
|---|---|
| Narration | To test our flow, let’s do a simple curl HTTP request to our endpoint, passing the order number as parameter. |
| Action 5.2.1 | Open a terminal window and enter the curl command below. curl -G -k [NEWORDER_ENDPOINT]/00000 Note - Replace the API URL with your Endpoint and don’t forget to include 00000 as order number at the end of the URL. 
|
| 5.3 | Checking the message |
|---|---|
| Narration | Now, let’s check if the message arrived in the NEWORDER queue in IBM MQ. Let’s use the IBM MQ Console to do so. Here we can see that our NEWORDER queue has one new message. Great! At this point we’ve validated that the message queue is working and reached the end of the hands-on demonstration. |
| Action 5.3.1 | Open the Menu again (A), and on Run section (B), click on Messaging (C). 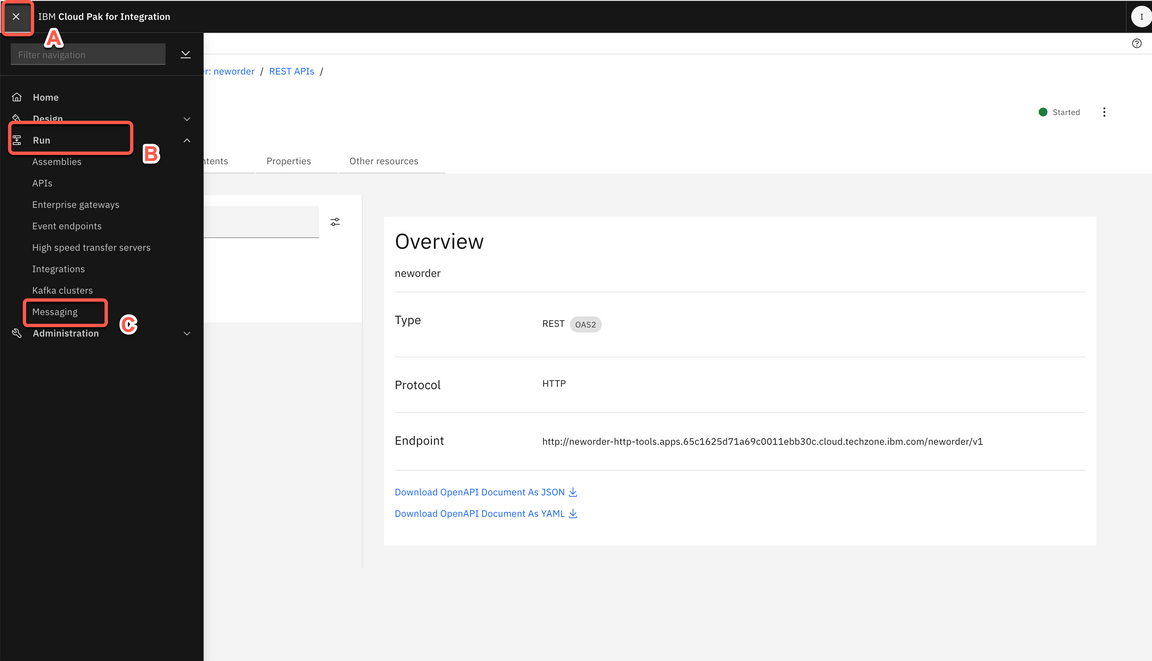
|
| Action 5.3.2 | Select qmgr-demo. 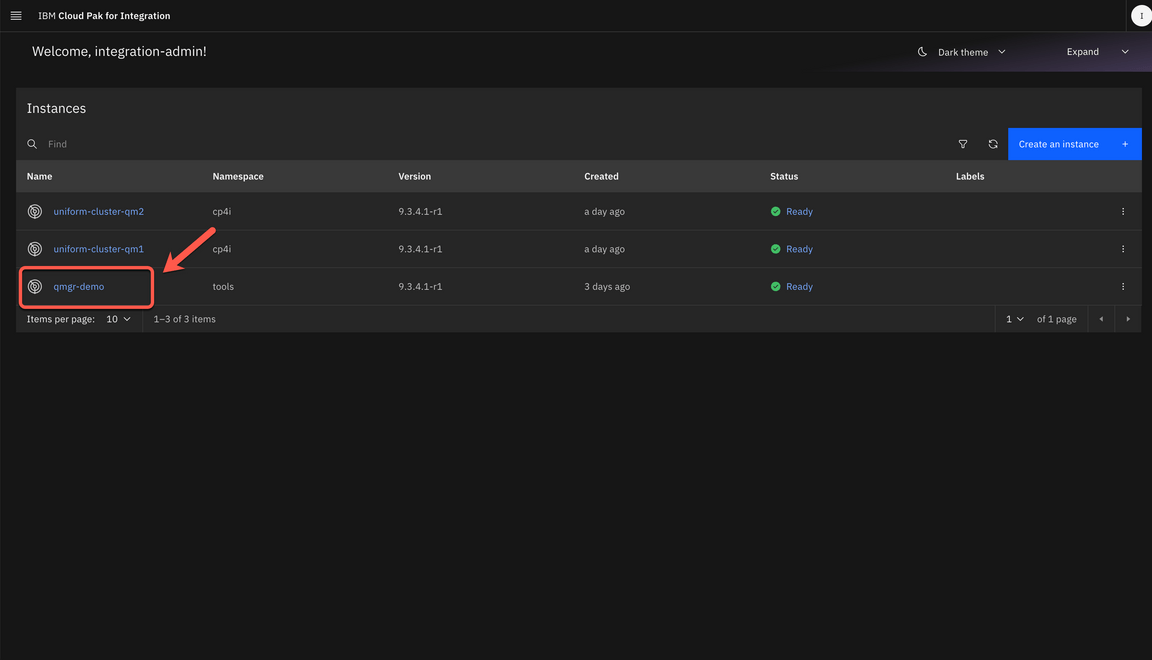
|
| Action 5.3.3 | Click Manage QMGRDEMO. 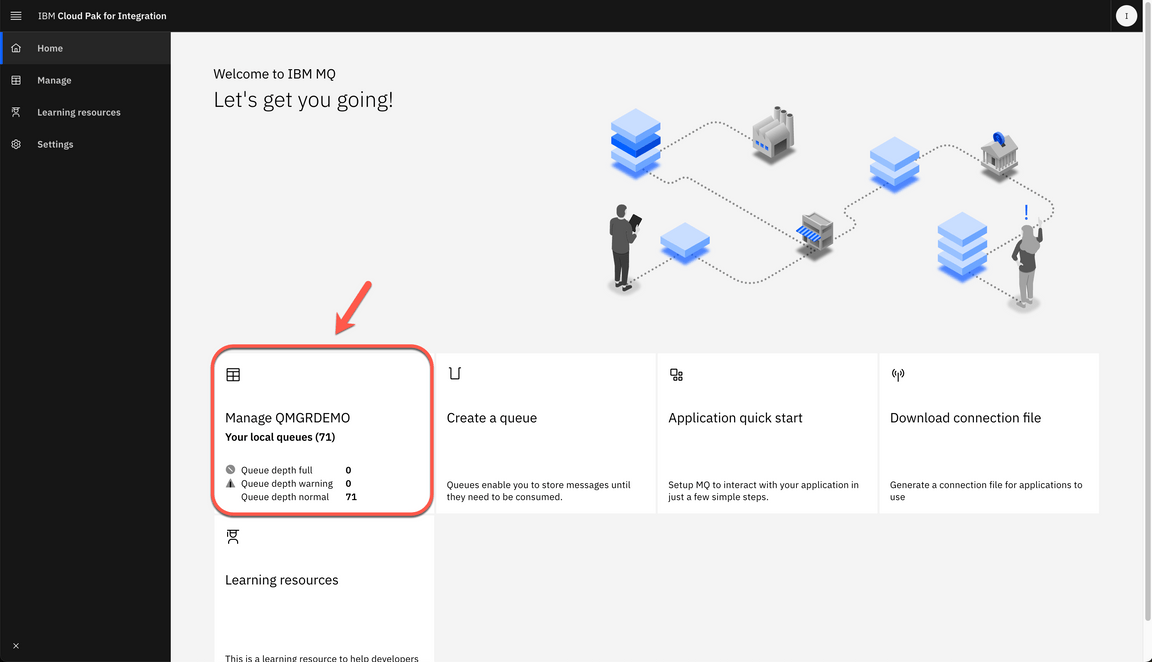
|
| Action 5.3.4 | Open the Queues tab. 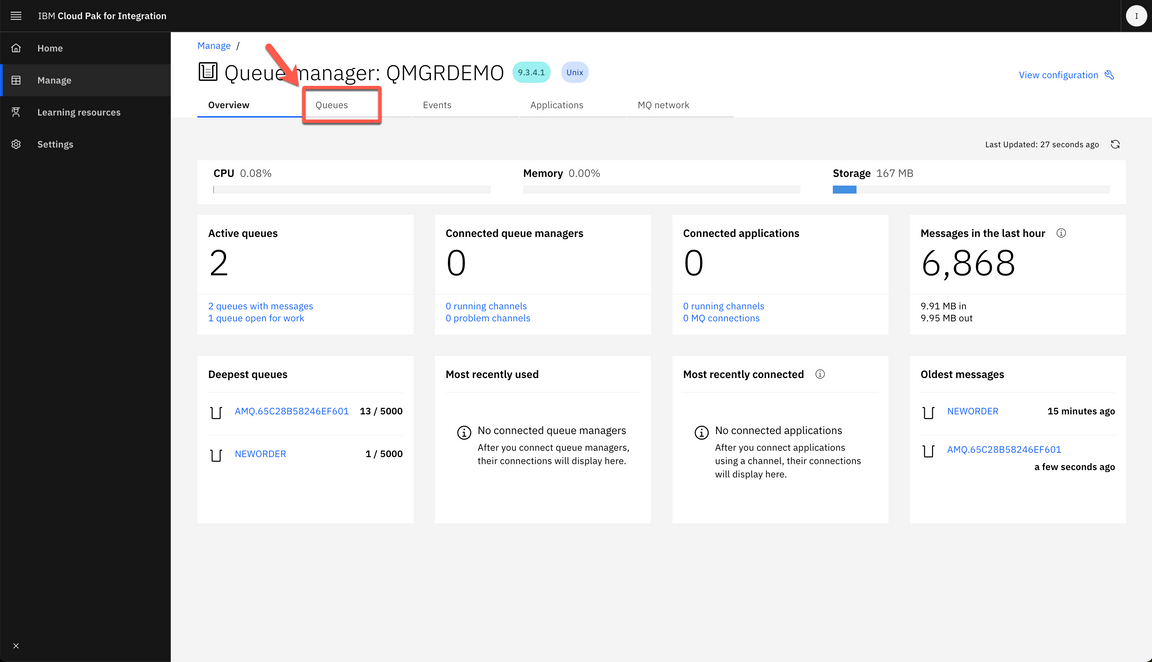
|
| Action 5.3.5 | In the Maximum depth, you can see that a new message has arrived in NEWORDER queue. 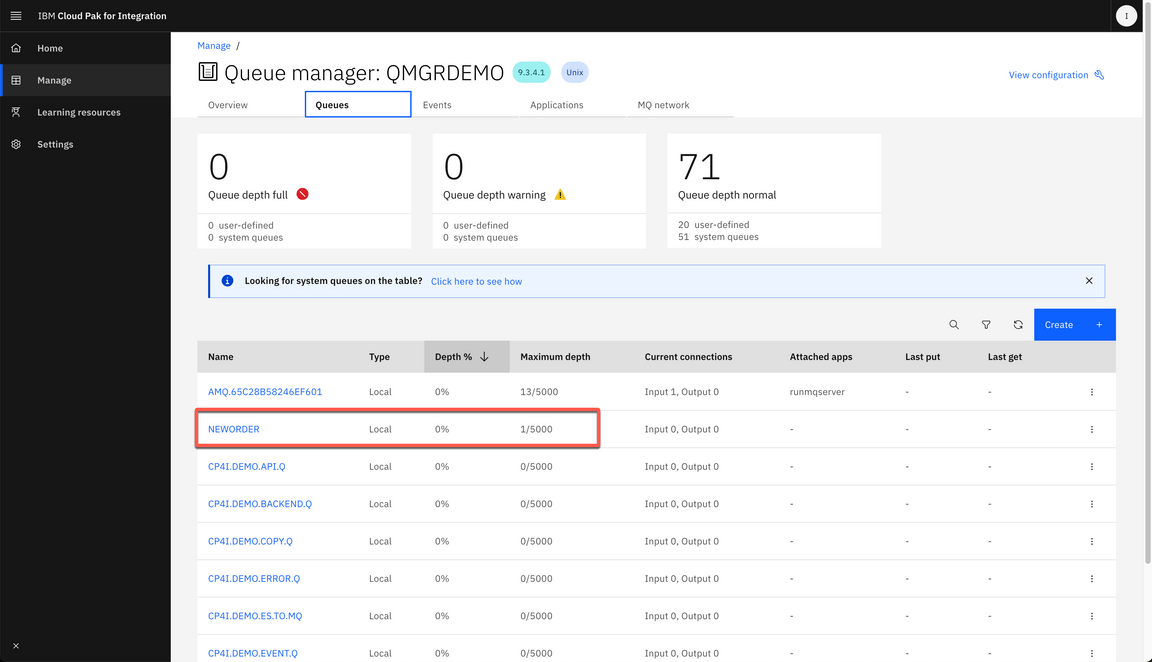
|
| Action 5.3.6 | Click on the NEWORDER queue. 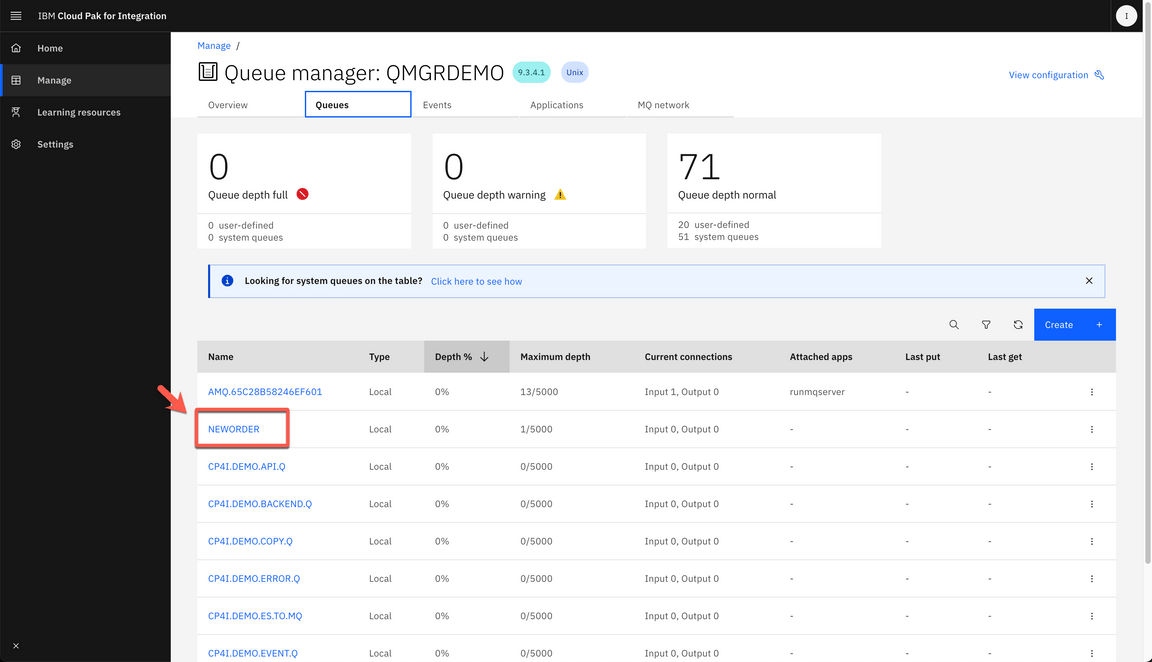
|
| Action 5.3.7 | Show the messages received. 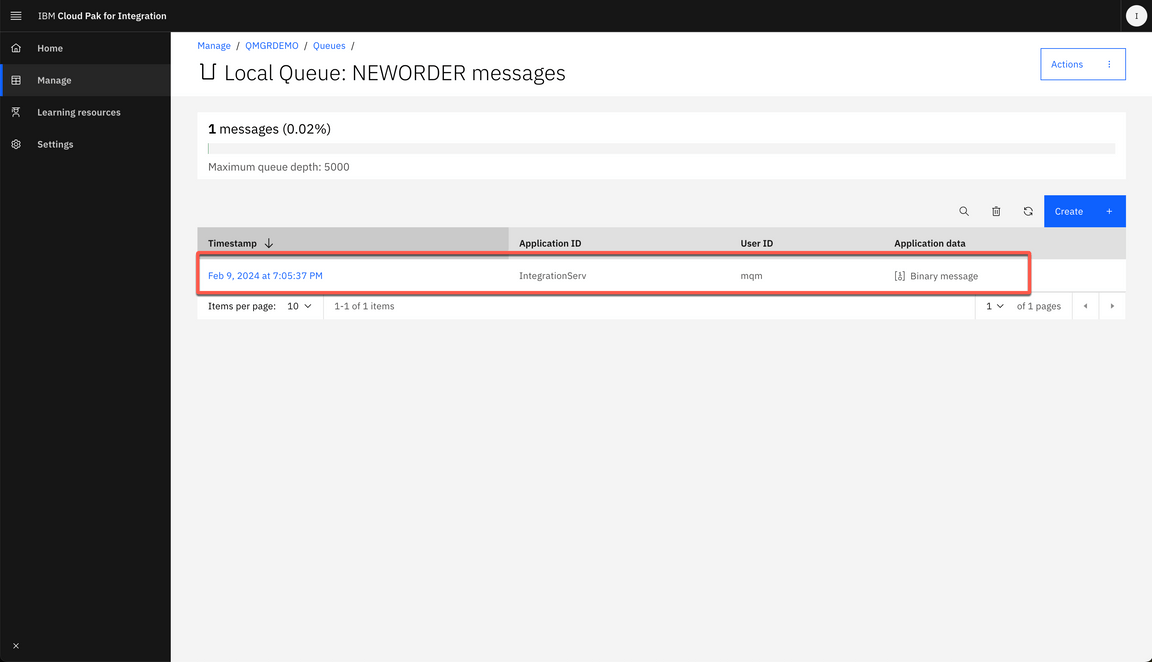
|
Summary
Let’s summarize what we’ve done today.
In the demo we: accessed the Cloud Pak for Integration environment and explored the capabilities; created a queue in IBM MQ; imported and configured an Integration flow using IBM App Connect Enterprise toolkit; deployed and tested our Application flow in IBM App Connect Dashboard.
From a business perspective, we unified messaging and application connectors to integrate backend systems using the IBM MQ messaging platform. IBM MQ provides a universal messaging backbone with robust connectivity for flexible and reliable messaging across applications and existing IT assets. IBM MQ simplifies, accelerates, and facilitates the reliable exchange of data with a flexible and security-rich messaging solution that’s trusted by some of the world’s most successful enterprises.
Thank you for attending today’s presentation.
